Live2D Cubism 4 Editor で出力したモデルを表示するアプリケーションのサンプル実装です。
Cubism Web Framework および Live2D Cubism Core と組み合わせて使用します。
- Create my own character model and run with custom param
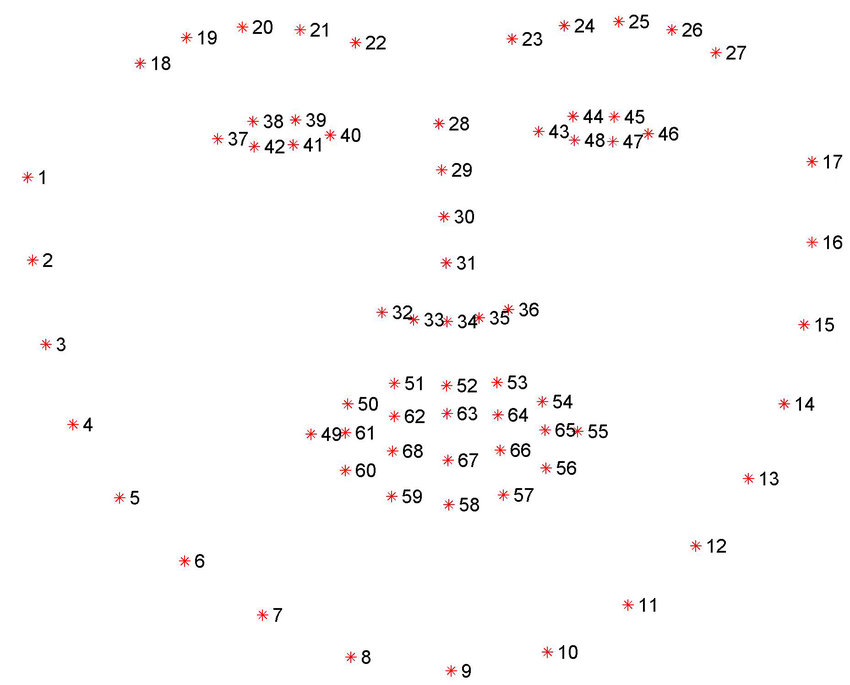
- Get face landmark using dlib with python
- Send face landmark data to socket.io server (Node.js)
- Use face x,y instead of mouse x,y
In lappmodel.ts method getBigBox
    data[0].forEach(dot => {
      if (minX > dot.x) {
        minX = dot.x;
      }
      if (minY > dot.y) {
        minY = dot.y;
      }
      if (maxX < dot.x) {
        maxX = dot.x;
      }
      if (maxY < dot.y) {
        maxY = dot.y;
      }
    });
Get max x,y and min x,y for big size of face rect.
In my case i used point 31 for center of x and 31, 34 for center of y.
    const gapVertical =
      bigBoxHeight - ((data[0][30].y + data[0][33].y) / 2 - bigBox.minY);
    const gapHorizontal = bigBoxWidth - (data[0][30].x - bigBox.minX);
It will return 0 ~ 1 but in cubism mouse's range is -1 ~ 1.
So, add some calc and threshold so that move face comfortable.
    regX = Number(((regX - 0.5) * 2 * 4 * -1).toFixed(2));
    regY = Number(((regY - 0.5) * 2 * 8).toFixed(2));
If you use raw data of face position. It will move unnaturally.
    this._custDragX =
      this._custDragX + (this._custDragAnimX - this._custDragX) / 16;
    this._custDragY =
      this._custDragY + (this._custDragAnimY - this._custDragY) / 16;
It will reach for latest face x,y slowly.
本 SDK を使用する前に、ライセンスをご確認ください。
本 SDK を使用する前に、注意事項をご確認ください。
.
├─ .vscode          # Visual Studio Code 用プロジェクト設定ディレクトリ
├─ Core             # Live2D Cubism Core が含まれるディレクトリ
├─ Framework        # レンダリングやアニメーション機能などのソースコードが含まれるディレクトリ
└─ Samples
   ├─ Resources     # モデルのファイルや画像などのリソースが含まれるディレクトリ
   └─ TypeScript    # TypeScript のサンプルプロジェクトが含まれるディレクトリ
モデルをロードするためのライブラリです。
当リポジトリではCubism Coreを管理していません。 こちらからCubism SDK for Webをダウンロードして、 Coreディレクトリのファイルをコピーしてください。
- [Node.js] と [Visual Studio Code] をインストールします
- Visual Studio Code で 本 SDK のトップディレクトリ を開き、推奨拡張機能をインストールします
- ポップアップ通知の他、拡張機能タブから
@recommendedを入力することで確認できます
- ポップアップ通知の他、拡張機能タブから
コマンドパレット(View > Command Palette...)で >Tasks: Run Task を入力することで、タスク一覧が表示されます。
- タスク一覧から
npm: install - Samples/TypeScript/Demoを選択して依存パッケージのダウンロードを行います - タスク一覧から
npm: build - Samples/TypeScript/Demoを選択してサンプルデモのビルドを行います - タスク一覧から
npm: serve - Samples/TypeScript/Demoを選択して動作確認用の簡易サーバを起動します - ブラウザの URL 欄に
http://localhost:5000/Samples/TypeScript/Demo/と入力してアクセスします - コマンドパレットから
>Tasks: Terminate Taskを入力してnpm: serveを選択すると簡易サーバが終了します
その他のタスクに関してはサンプルプロジェクトの README.md を参照ください。
NOTE: デバック用の設定は、.vscode/tasks.json に記述しています。
Visual Studio Code で 本 SDK のトップディレクトリ を開き、 F5 キーを入力すると Debugger for Chrome が起動します。
Visual Studio Code 上でブレイクポイントを貼って Chrome ブラウザと連動してデバックを行うことができます。
NOTE: デバック用の設定は、.vscode/launch.json に記述しています。
当リポジトリの変更履歴については CHANGELOG.md を参照ください。
- 13.7.0
- 12.14.1
- 10.18.1
| プラットフォーム | ブラウザ | バージョン |
|---|---|---|
| Android | Google Chrome | 79.0.3945.136 |
| Android | Microsoft Edge | 42.0.4.3989 |
| Android | Mozilla Firefox | 68.2.0 |
| iOS / iPadOS | Google Chrome | 79.0.3945.73 |
| iOS / iPadOS | Microsoft Edge | 44.11.15 |
| iOS / iPadOS | Mozilla Firefox | 21.0 |
| iOS / iPadOS | Safari | 13.0.4 |
| Linux | Google Chrome | 79.0.3945.130 |
| Linux | Mozilla Firefox | 72.0.1 |
| macOS | Google Chrome | 79.0.3945.130 |
| macOS | Microsoft Edge | 79.0.309.71 |
| macOS | Mozilla Firefox | 72.0.2 |
| macOS | Safari | 13.0.4 |
| Windows | Google Chrome | 79.0.3945.130 |
| Windows | Internet Explorer 11 | 11.592.18362.0 |
| Windows | Microsoft Edge | 79.0.309.71 |
| Windows | Mozilla Firefox | 72.0.2 |
Note: 動作確認時のサーバの起動は ./Samples/TypeScript/Demo/package.json の serve スクリプトを使用して行っています。

