Turning your Jupyter notebook into a Blogger blog post is harder than it should be.
- If you attempt to export a html version from Jupyter and paste it in Blogger, the styling from the notebook will interfere with the rest of you blog.
- If you use nbconvert to export a "basic" html version without any styling, the contents of the notebook would appear illegible in Blogger. You will also lose syntax highlighting.
This repo has instructions to add bare-minimum css and javascript to make the notebooks legible in Blogger and get syntax highlighting.
- First we add some CSS to make the code cells visually different from the text.
- We then add some javascript to use highlight.js for syntax highlighting.
- The default blogger theme "Contempo" works well enough.
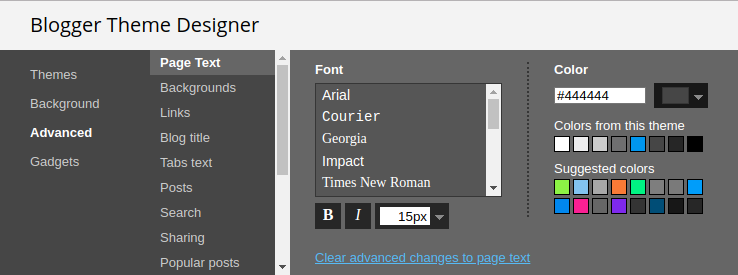
- Go to Theme > Customize and make the following changes:
- Edit Advanced > Page Text > Color to #444444.
- Go to Advanced > Add CSS, and add the following:
a.anchor-link {
  padding-left: 8;
  opacity: 0;
}
div.highlight > pre {
  border: 1px solid #cfcfcf;
  padding: 16px;
  margin-left: 16px;
}
div.output_subarea {
  margin-left: 16px;
  padding-left: 12px;
  font-size: smaller;
  border-left: 4px solid #cfcfcf;
}
- Edit Advanced > Page Text > Color to #444444.
- Go to back to your blog. Then Theme > Edit HTML. You will see a bunch of html code. Scroll down to the bottom and add the following javascript right before the closing body tag.

<script src="https://ajax.googleapis.com/ajax/libs/jquery/3.3.1/jquery.min.js"></script>
<link rel="stylesheet"
      href="https://cdnjs.cloudflare.com/ajax/libs/highlight.js/9.12.0/styles/atom-one-light.min.css" />
<script src="https://cdnjs.cloudflare.com/ajax/libs/highlight.js/9.12.0/highlight.min.js"></script>
<script>
  $(document).ready(function() {
    $('.highlight > pre').each(function(i, block) {
      hljs.highlightBlock(block);
    });
    $('.highlight.hl-ipython3 > pre').addClass('python');
    $('.highlight.hl-ipython3 > pre').each(function(i, block) {
      hljs.highlightBlock(block);
    });
  });
</script>
It should look something like this:

We will use nbconvert to export a basic html version (without any stylesheet) of our notebook.
sudo apt-get -y install pandoc
pip install nbconvertjupyter nbconvert --to html --template basic <your notebook>.ipynb Copy the html generated into a Blogger post. Make sure to choose the HTML option in the Compose/HTML selector at the top.
Finally hit Publish :)
If things go right, this is what it shoud look like: http://tensor-therapy.blogspot.com/2018/03/text-content-generation-using-lstms.html