Instructions on how to set up ESP32 toolchain using WSL2 and Windows.
If you rather work on Mac, see the very similar sister repo ESP32 on Mac.
- Minimal software installs on the host (Windows)
- Ability to flash the device from within WSL
-
Getting started with the ESP-IDF running under WSL2 (blog, Jul 2021)
Does flashing on the Windows side, which means installing tools on the host (e.g. Python). We only need device drivers and
usbipd-winon Windows side.
- Windows 10
- WSL2 installed
The instructions have been tested on following boards:
Note: The repo covers RISC V based development kits, only. If you have an Xtensa based chip and are willing to keep supporting this repo (test against such boards), let the author know. :)
The instructions likely work for Windows 11 as well, but the author is not in a position to confirm this.
When plugging the ESP32-C3-DevKitC-02 development board for the first time, BEWARE OF THE STRONG LED LIGHT!! The author used a tape on top, until he reflashed the device. 😎🩹
By bridging the USB device from your host (Windows) computer to the client (WSL), we are able to do all the development actions within the Linux side of things.
Most ESP32 development boards use a Silicon Labs USB-to-UART chip, to allow communicating with the development board. A device driver for this chip needs to be installed on the host side - otherwise you won't be able to communicate with the board.
As per Getting started with the ESP-IDF running under WSL2 (blog, Jul 2021):
- Visit Silicon Labs > Developers > CP210x USB to UART Bridge VCP Drivers
- Download the latest
CP210x Universal Windows Driver(11.3.0 at the time of writing) - unzip and follow the instructions
- Download the latest
After installation, you should be able to see device information in the Device Manager:

Let's make sure you've got the latest WSL host support.
-
Open an Admin command prompt in Windows, in it:
> wsl --update
Without this, the USB stick wouldn’t have the right access rights (group dialup), later on, and flashing wouldn’t work from within WSL.
-
Follow this advice (Ask Ubuntu, Jan 2023):
-
Within WSL, create a file called
/etc/wsl.conf$ sudo nano /etc/wsl.conf..with contents:
[boot] systemd=true -
In Windows (admin prompt):
> wsl --shutdown
-
Read the instructions at the project website (GitHub).
The author installed this using
wingetbut you may decide to download the installer directly. Version 4.0.0.
With the usbipd service installed, we can grab the development board on the Windows side.
-
In an admin command prompt:
> usbipd list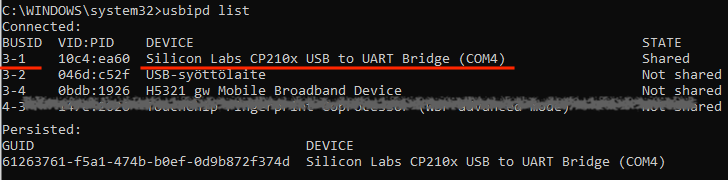
> usbipd bind -b 3-1Taking the particular device (see bus id, above) to use, for attaching to a client.
> usbipd attach —wsl —busid 3-1
Whereas
bindare persisted over restarts, you will need to repeat theusbipd attachcommand every time you restart your computer. -
The device should now be seen under WSL:
$ ls -al dev/tty*
...
crw-rw---- 1 root dialout 188, 0 Dec 29 18:09 /dev/ttyUSB0
...
Make note of the device name (it may be different for you), and ensure that group
dialouthasrwaccess to the device.This is a good place to add yourself to the
dialoutgroup, so you don't needsudoto flash the device.$ sudo usermod -a -G dialout $USERFine? The rest of the steps will take place on the WSL side. We'll install ESP-IDF development tools and flash a sample program to your device.


Follow the instructions on Standard Toolchain Setup for Linux and macOS (Espressif docs):
-
Install the pre-requisites:
$ sudo apt-get install git wget flex bison gperf python3 python3-pip python3-venv cmake ninja-build ccache libffi-dev libssl-dev dfu-util libusb-1.0-0 -
Create an installation folder
Note: Espressif advocates installing to
~/esp/esp-idfbut the author preferred~/bin/esp-idf. Pick your own way, but be consistent.Important: The
esp-idfis a shallow copy git repo, and the way to do updates is simply to re-install it fromgit clone.$ mkdir -p ~/bin # or ~/esp $ cd ~/bin $ git clone --depth 1 --recursive https://github.com/espressif/esp-idf.gitThis downloads the current ESP-IDF sources into the
esp-idffolder.Note: Adding
--depth 1is by this author. Reduces your disk use slightly, though it doesn't cover sub-repos.$ cd esp-idf $ ./install.sh esp32c3Here, you'll add the kinds of development board support that you need / have access to.
$ . ./export.shAdds environment variables to your current shell, so
idf.py(the build command) can be used.Hint: You'll need to rerun this every time a new shell is being used, so might be useful to make an alias for it.
The author has:
alias idf-init=". ~/bin/esp-idf/export.sh`` in~/.bashrc`.Done!
$ cd # get out of ~/bin
Note: Remember that you have the ESP-IDF environment variables set up (as mentioned earlier):
$ . ~/bin/esp-idf/export.sh
Pick a folder where you'd have a sample project. Let's say ~/my.
$ install -d my
$ cd my
Copy a sample project to this folder
$ cp -r $IDF_PATH/examples/get-started/hello_world hello
$ cd hello
Optional: Change something in the sources, eg. "Hello world" to - say - "Hello ESP32".
nano main/hello_world_main.c
$ idf.py set-target esp32c3
This (likely??) is a one-time command, to instruct ESP-IDF which board we are targeting.
Optional: You can try
idf.py menuconfigthat allows all kinds of project settings to be changed. We are good with the defaults.
$ idf.py build
This builds the files build/hello_world.*:
-rw-rw-r--  1 ubuntu ubuntu  184240 Dec 30 19:08 hello_world.bin
-rwxrwxr-x  1 ubuntu ubuntu 3776388 Dec 30 19:08 hello_world.elf
-rw-rw-r--  1 ubuntu ubuntu 3060919 Dec 30 19:08 hello_world.map
Note: The files look rather big, but this is a debug build.
$ idf.py flash```


This command guesses the `/dev/ttyUSB0` target correctly, and writes the program to the device.
Now, how to know anything really happened??
$ idf.py monitor


We can spot the "Hello, ESP32!" among the output. Great!!!
>NOTE: Ctrl-C does not break you away from the `idf.py monitor`. The break key is `Ctrl-]` <sub>[source](https://espressif-docs.readthedocs-hosted.com/projects/esp-idf/en/v3.3.5/get-started/idf-monitor.html)</sub> but ON A Swedish/Finnish KEYBOARD that’s `Ctrl-¨` (the key for `^¨~`).
>
>|locale|break key|
>|---|---|
>|en|`Ctrl-[`|
>|se/fi|`Ctrl-¨`|
>||*contribute your locale*|
## Outcome
We have set up the development tools fully within WSL. On the Windows side, we needed to install one device driver and the `usbipd` server.
All further work would happen solely within your WSL environment. You can install Rust, install IDE's that support WSL "remote development", or just develop with the tools we already went through.
Make great things!
## Appendix
### Uninstalling the device driver
The Release Notes of the CP210x driver have this to say:
- The device must be plugged in
- Run Device Manager
- Locate the device you want to uninstall
- Right click on the device and choose "uninstall"
- Follow the instructions
### Updating ESP-IDF

Since it's a git clone, you can `git pull`.

However, Espressif recomments to "clear `~/esp/esp-idf` and clone again”.


## References

- [WSL: how do I set the group for a tty device](https://askubuntu.com/questions/1408365/wsl-how-do-i-set-the-group-for-a-tty-device) (SO; May 2022)