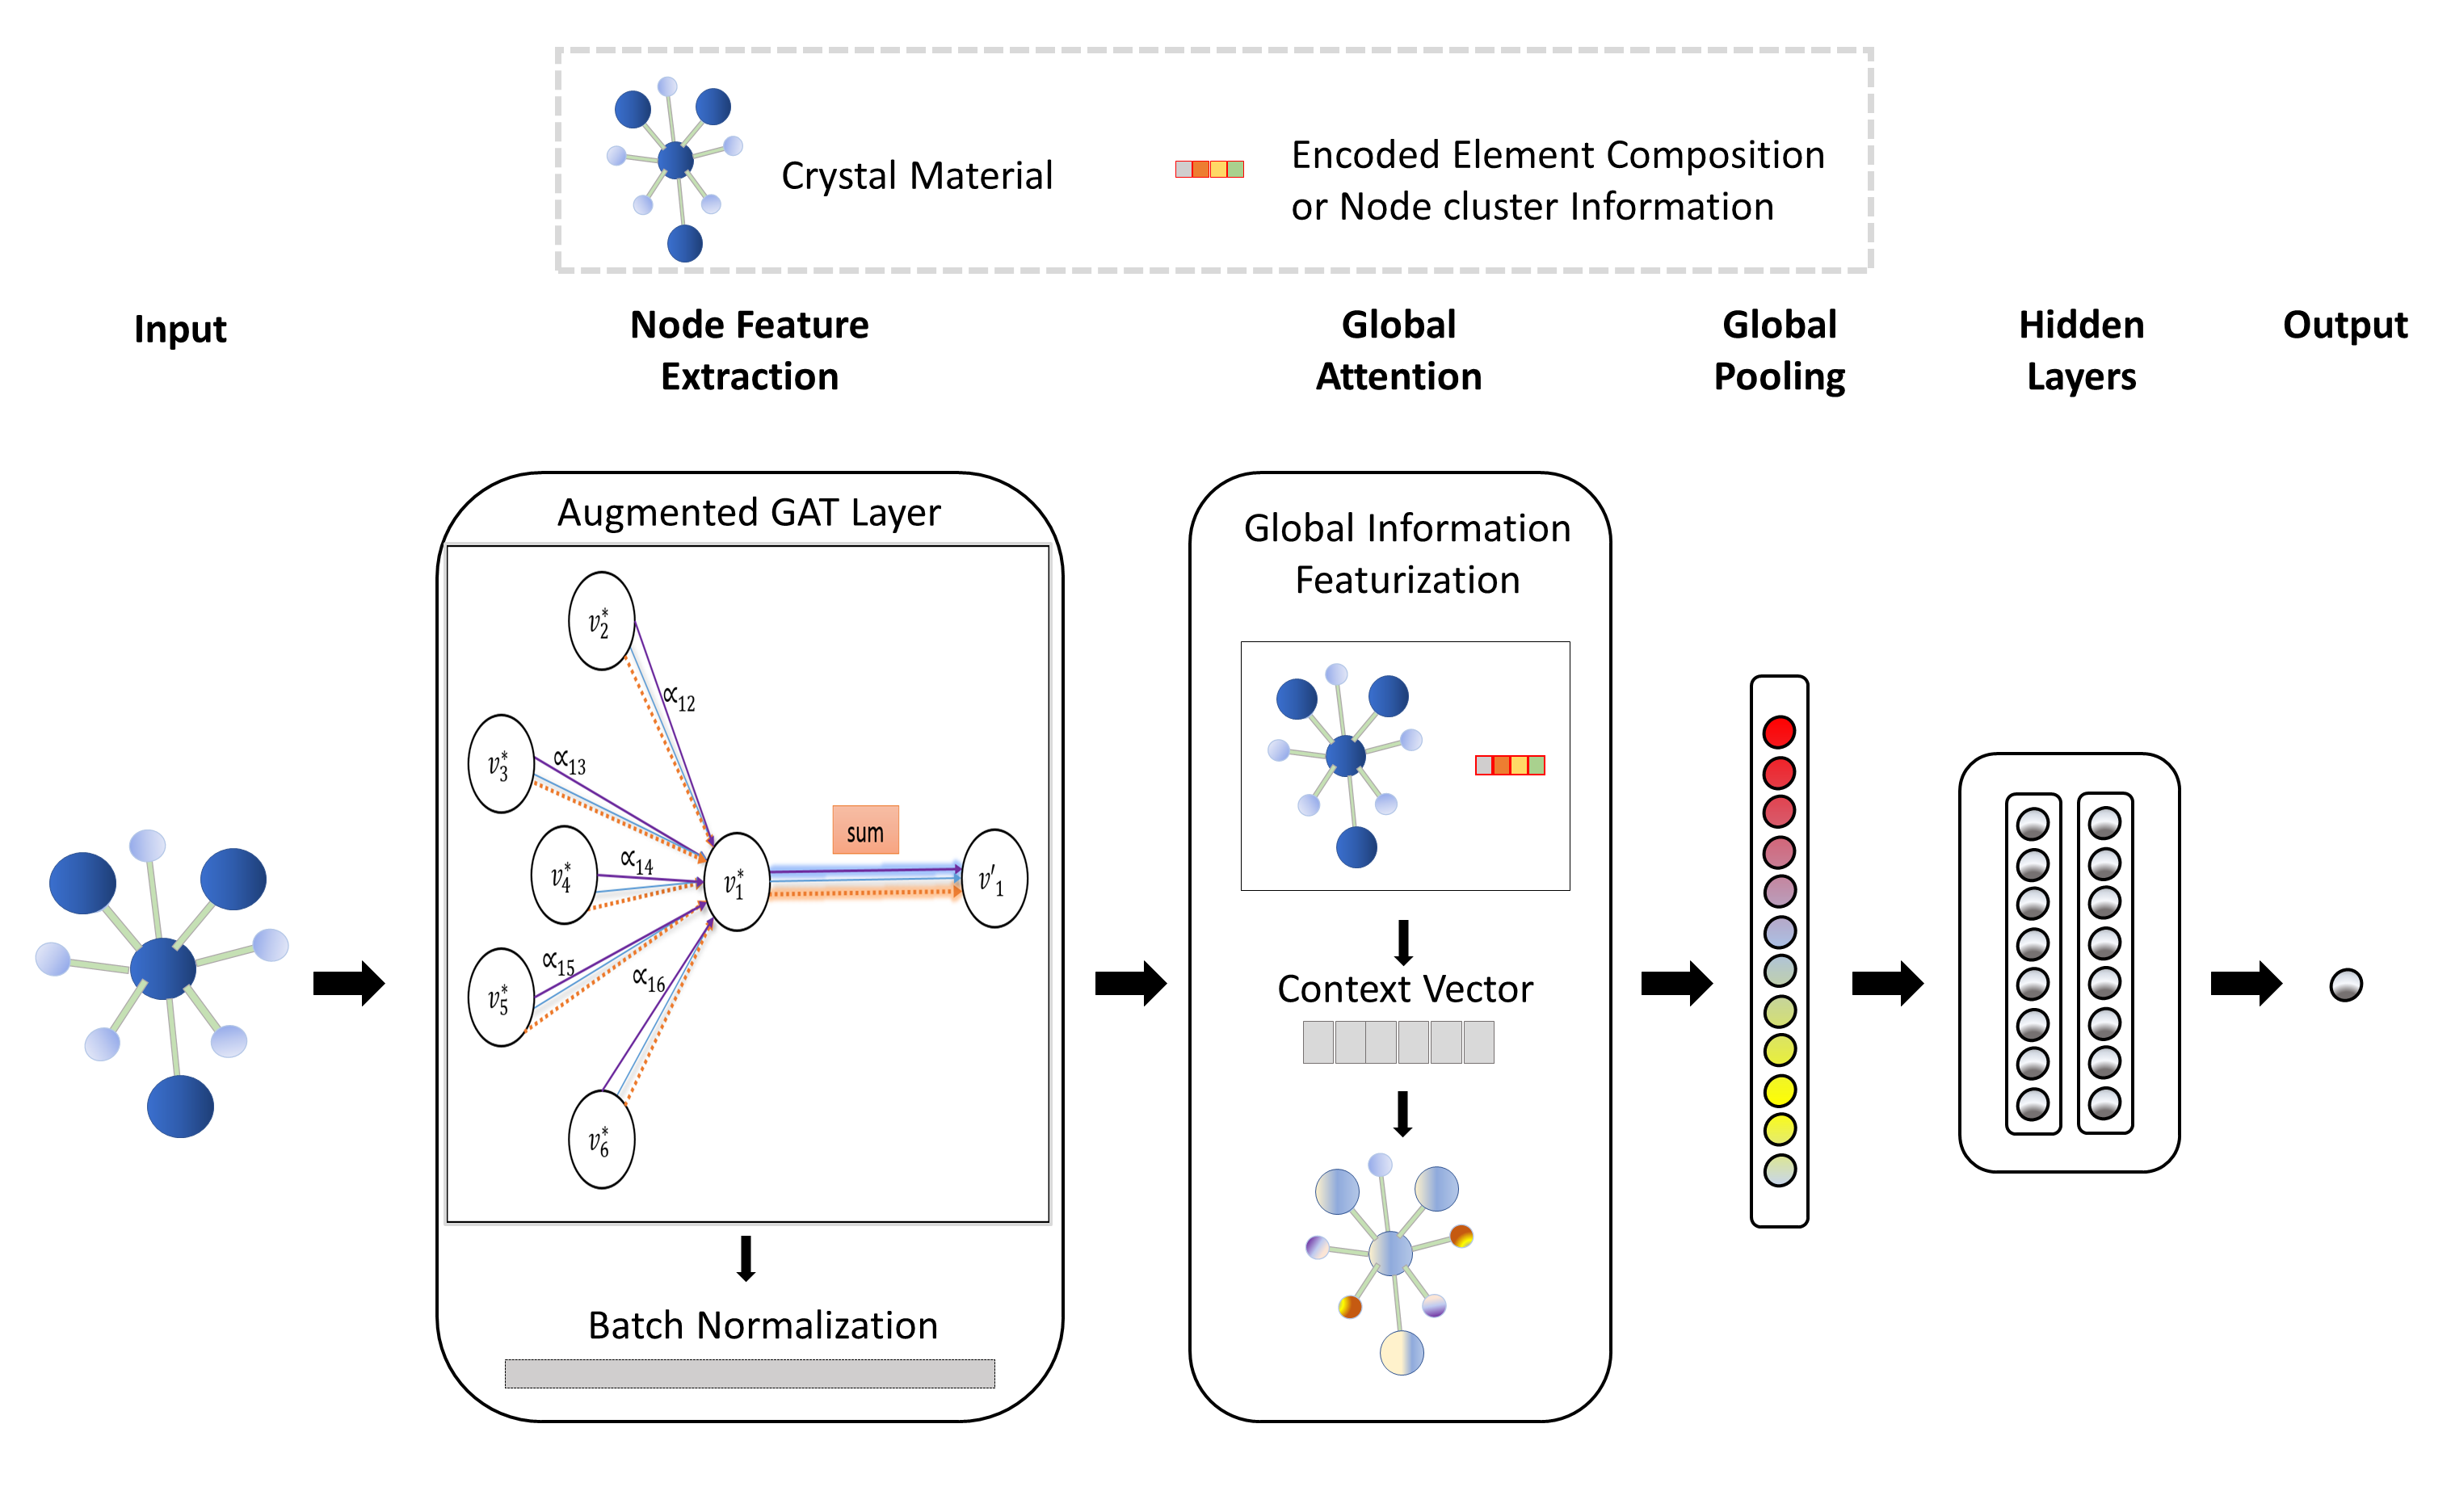
This software package implements our developed model GATGNN for improved inorganic materials' property prediction. This is the official Pytorch repository.
This model is outdated. If you want to compare with our latest model, check our DeeperGATGNN here which has achieved significantly better performance.
Machine Learning and Evolution Laboratory
Department of Computer Science and Engineering
University of South Carolina
How to cite:
Louis, Steph-Yves, Yong Zhao, Alireza Nasiri, Xiran Wang, Yuqi Song, Fei Liu, and Jianjun Hu*. "Graph convolutional neural networks with global attention for improved materials property prediction." Physical Chemistry Chemical Physics 22, no. 32 (2020): 18141-18148.
| Property | MAE Performance of our model | Units |
|---|---|---|
| Formation Energy | 0.039 | eV/atom |
| Absolute Energy | 0.048 | eV/atom |
| Fermi Energy | 0.33 | eV/atom |
| Band Gap | 0.31 | eV |
| Bulk-Moduli | 0.045 | log(GPa) |
| Shear-Moduli | 0.075 | log(GPa) |
| Poisson-ratio | 0.029 | - |
The package provides 3 major functions:
- Train a GATGNN model for either of the 7 properties referenced above.
- Evaluate the performance of a trained GATGNN model on either of the 7 properties referenced above.
- Predict the property of a given material using its cif file.
The following paper describes the details of the our framework: GLOBAL ATTENTION BASED GRAPH CONVOLUTIONAL NEURAL NETWORKS FOR IMPROVED MATERIALS PROPERTY PREDICTION
Install any of the relevant packages if not already installed:
- Pytorch (tested on 1.2.0) - preferably version 1.2.0 or later
- Numpy (tested on 1.17.3)
- Pandas (tested on 0.21.3)
- Scikit-learn (tested on 0.21.3)
- Pytmatgen (tested on 2019.10.16)
- PyTorch-Geometric (tested on 1.1.2)
- Pytorch, Numpy, Pandas, Scikit-learn, and Pymatgen
pip install torch torchvision
pip install numpy
pip install pandas
pip install scikit-learn
pip install pymatgen- PyTorch Geometric (1.6.1) documentation. our codes are compatible with version up to 1.6.*
- Download the compressed file of our dataset using this link
- Unzip its content ( a directory named 'DATA')
- Move the DATA directory in your GATGNN directory. i.e. such that the path GATGNN/DATA now exists.
Once all the aforementionned requirements are satisfied, one can easily train a new GATGNN by running train.py in the terminal along with the specification of the appropriate flags. At the bare minimum, using --property to specify the property and --data_src to identify the dataset (CGCNN or MEGNET) should be enough to train a robust GATGNN model.
- Example-1. Train a model on the bulk-modulus property using the CGCNN dataset.
python train.py --property bulk-modulus --data_src CGCNN- Example-2. Train a model on the shear-modulus property using the MEGNET dataset.
python train.py --property shear-modulus --data_src MEGNET- Example-3. Train a model with 5 layers on the bulk-modulus property using the CGCNN dataset and the global attention technique of fixed cluster unpooling (GI M-2).
python train.py --property bulk-modulus --data_src CGCNN --num_layers 5 --global_attention cluster --cluster_option fixedThe trained model will be automatically saved under the TRAINED directory. *Pay attention to the flags used for they will be needed again to evaluate the model.
Upon training a GATGNN, one can evaluate its performance using evaluate.py in the terminal exactly the same way as train.py. It is IMPORTANT that one runs evaluate.py with the exact same flags as it was done when prior training the model.
- Example-1. Evaluate the performance of a model trained on the bulk-modulus property using the CGCNN dataset.
python evaluate.py --property bulk-modulus --data_src CGCNN- Example-2. Evaluate the performance of a model trained on the shear-modulus property using the MEGNET dataset.
python evaluate.py --property shear-modulus --data_src MEGNET- Example-3. Evaluate the performance of a model trained with 5 layers on the bulk-modulus property using the CGCNN dataset and the global attention technique of fixed cluster unpooling (GI M-2).
python evaluate.py --property bulk-modulus --data_src CGCNN --num_layers 5 --global_attention cluster --cluster_option fixedAgain, using a trained model one can also predict the property of a single inorganic material using its .cif file. Just follow those 2 steps:
- Place your .cif file inside the directory DATA/prediction-directory/
- Run predict.py in a similar fashion as evaluate.py except for the addition of the flag --to_predict which specifies the name of the .cif file.
- Example-1. Predict the bulk-modulus property of a material named mp-1 using the CGCNN graph constructing specifications.
python predict.py --property bulk-modulus --data_src CGCNN --to_predict mp-1- Example-2. Predict the shear-modulus property of a material named mp-1 using the MEGNET graph constructing specifications.
python predict.py --property shear-modulus --data_src MEGNET --to_predict mp-1Once you've followed the steps to download and unzip the dataset, follow the 3 following steps:
- Place all of your .cif files in the directory DATA/CIF-DATA_NEW
- First format your .csv property dataset so it only has 2 columns (ID, value). Your file should look like anyone of our .csv files located in the the directory DATA/properties-reference/
- Once your .csv property dataset is correctly formatted, rename your file as newproperty.csv and place it in the DATA/properties_reference/ directory.
With the 3 steps above complete, you are now ready to use our GATGNN on your own dataset. To either train, evaluate, or even predict your own property, refer to the instructions listed in the Usage section. Just use new-property, NEW, and any ratio (like 0.75) as values for the --property flag, --data_src flag, and --train_size flag. 3 examples are provided below
- Example-1. To train a new GATGNN on your property
python train.py --property new-property --data_src NEW --train_size 0.8- Example-2. Evaluate the performance of a model trained on your property.
python evaluate.py --property new-property --data_src NEW --train_size 0.8- Example-3. Predict the value of your property for a material named mp-1.
python predict.py --property new-property --data_src NEW --to_predict mp-1