Web3 Starter Kit is flexible production grade Web3 boilerplate with Next.js 12, React.js, Material-UI, Typescript and web3modal.
It's a user interface for your decentralized application.
Includes wallet connection for most popular javascript EIP-1193 providers:
- MetaMask
- Coinbase Wallet
- Wallet Connect
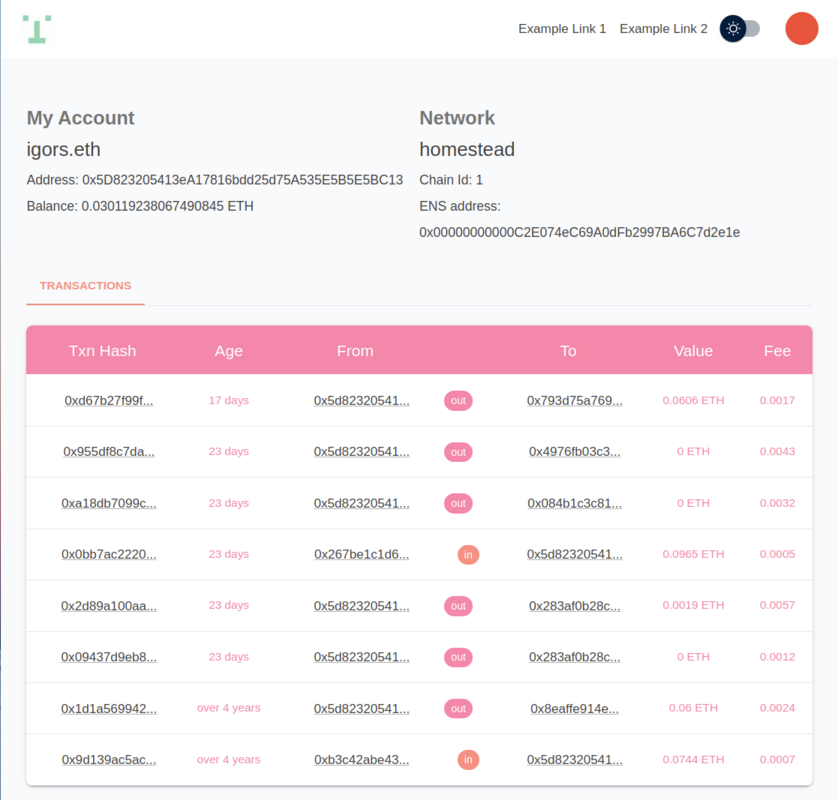
- Retrieval of users latest transactions from etherscan
Web3 Starter Kit is meant:
- to be used as boilerplate to quickly deploy new project
- to be used as educational resource
- to be flexible accomodating easy customization
Finding out which web3 libraries work together is still a difficult job. Web3 Started Kit aims to boild down the complexity to simple configuration.
git clone https://github.com/eth-salt-lake/dao-app.gitclones the Web3 Starter Kit repositorycd dao-app && git checkout mainchecks out the desired branchcp env.local.example .env.localprepares environment variables for developmentnpm installinstalls dependenciesnpm run devruns development server
That's it. The project should run on your local computer http://localhost:3000
- based om latest Next.js
- styling customization with material design
- Wallet connections and current connected wallet caching with web3-react (beta)
- state management with redux-toolkit
- dotenv, and more...
The Web3 app has 2 configurations.
- One for the API, which is used to communicate with etherscan to retrieve users latest transactions. (environment files:
.env.local,.env.production) - One for the Frontend part which is used to configure to which wallets and which blockchains you'd like your users to interact with. (file:
config.ts)
In development create in the root folder file .env.local, for production .env.production:
.env.local
.env.production
Contents:
APP_NAME=My Web3 Project Name
ETHERSCAN_API_KEY=mykey
ETHERSCAN_API_ENDPOINT=https://api-testnet.polygonscan.com/api
APP_NAME
Custom app name
ETHERSCAN_API_KEY
To request information directly from etherscan (or etherscan like service) you need an API key. For example for etherscan.io go to: https://etherscan.io/myapikey and create one.
ETHERSCAN_API_ENDPOINT
Check the documentation for an endpoint here. Or if you'd like to connect to L2 chain like Polygon then check the endpoints here.
root
|_config.ts
Contents:
export const ETHERSCAN_URL = 'https://etherscan.io/';
export const NETWORK_COIN_SYMBOL = 'ETH';
export const DEFAULT_NETWORK_ID = 1; // check folder web/chain.ts for more network IDs
export const APP_NAME = "Web3 Started Kit"
export const DEFAULT_APP_THEME = 'light'; // light, dark
ETHERSCAN_URL
Base URl from the transactions table to etherscan for more details.
NETWORK_COIN_SYMBOL
Display value for selected chains currency
APP_NAME
Custom app name.
DEFAULT_APP_THEME
light or dark.
DEFAULT_NETWORK_ID
The selected network Web3 will communicate with.
Helper chain table:
| Chain ID | Network |
|---|---|
| 1 | Mainnet |
| 3 | Ropsten |
| 4 | Rinkeby |
| 5 | Goerli |
| 10 | Optimism |
| 42 | Kovan |
| 56 | BSC |
| 137 | Polygon |
| 42161 | Arbitrum One |
| 43114 | Avalanche |
| 80001 | Polygoin Mumbai |
TO access Web3 method use our web3 hook:
const { connect, connectTo, disconnect, wallet } = useWeb3();The connect and connectTo are shortcuts to instantiate web3modal connection wizard. Most of the times this will be users first needed step to interact with your dApp.
connect allows user to connect to any blockchain.
connecTo will ask user to switch or add the blockchain network you'd like user to connect to. connectTo required 1 parameter which you can find in blockchains.ts file.
For further customization of web3modal please visit web3modal GitHub.
Disconnects users wallet.
wallet holds connected wallets information. The structure is defined in folder types:
export interface MyWallet {
    address?: string;
    ensName?: string;
    avatar?: string;
}Web3 Starter Kit is built on top of ethers.js v5. Ethers.js allows various interactions with Blockchains, such as sending transactions and interacting with your deployed contracts.
Provider is an instance of ethers.providers.Web3Provider with an established connection to desired blockchain (see Frontend configuration).
For full documentation on ethers.js please visit their documentation page.
Endpoint for getting users latest transactions.
|-- pages/api/transactions/[walletaddress].ts
TDB (Where to modify it)
If you wanted to run this site in production, you should install modules then build the site with npm run build and run it with npm run start:
npm install
npm run build
npm run start
The easiest way to deploy your Next.js app is to use the Vercel Platform from the creators of Next.js.
Check out our Next.js deployment documentation for more details.
