


- About: http://www.rbccps.org/smart-city/
- Detailed Documentation: https://cdx.readthedocs.io/en/latest/
This guide will help you to quickly get started with a single node instance of CDX and start publishing data from a device.
Install Docker
sudo apt-get install docker.io
Add permission to user
sudo usermod -a -G docker $USER
Logout and log back in.
Run
ifconfigand note down the name of the interface you're connected to.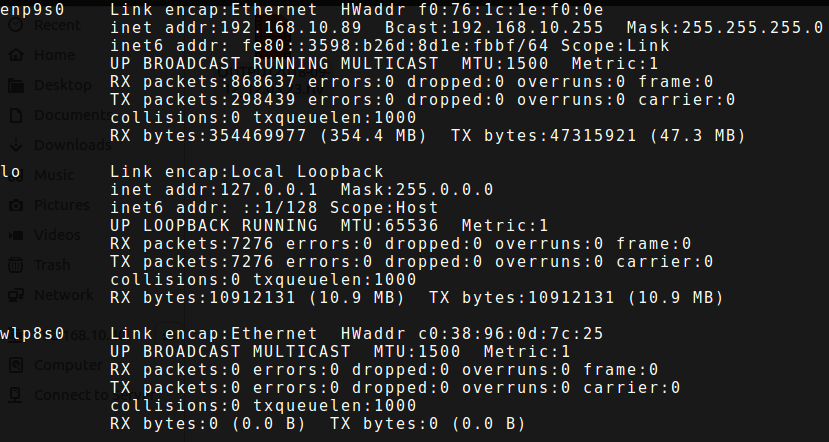
In the above example the interface name is
enp9s0Now run:
sudo nmcli device show enp9s0
Replace
enp9s0with your respective interface name. The output should be something like this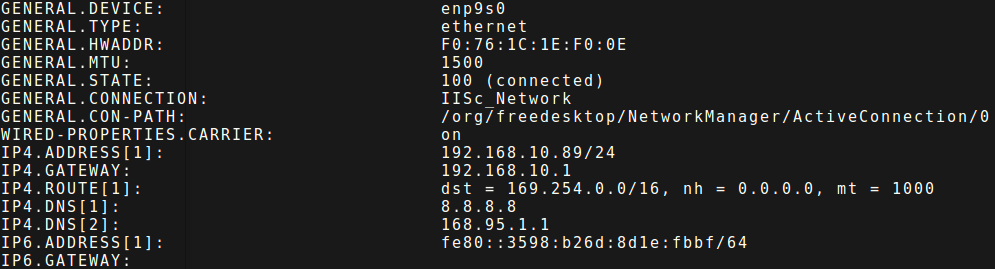
Note down the DNS from
IP4.DNSsectionAdd DNS obtained in the previous step to the file
/etc/docker/daemon.jsonIf the file does not exist, create it. The entry should look something like this{"dns": ["8.8.8.8", "8.8.4.4"]}Add the obtained DNS to the above JSON array. So the final entry should look something like this:
{"dns": ["8.8.8.8","8.8.4.4","168.95.1.1"]}Of course, the DNS would change according to your network.
Add DNS in
/etc/default/dockerfile as follows:DOCKER_OPTS="--dns 8.8.8.8 --dns 8.8.4.4 --dns 168.95.1.1"
Restart Docker
service docker restart


Clone CDX git repo
git clone https://github.com/rbccps-iisc/ideam.git
CDX repository comes with a default configuration file
ideam.conf:[APIGATEWAY] https = 8443 [BROKER] http = 12080 management = 12081 amqp = 12082 mqtt = 12083 [ELASTICSEARCH] kibana = 13081 [WEBSERVER] http = 14080 [LDAP] ldap = 15389 [CATALOGUE] http = 16080 [KONGA] http = 17080 [VIDEOSERVER] rtmp = 18935 hls = 18080 http = 18088 [PASSWORDS] ldap = ? broker = ? cdx.admin = ? database = ?
This file contains details about the ports used by different microservices. It also allows the user to configure passwords that should be used for certain services during installation. By default, the password fields in the config file is set to
?, which indicates that the system will generate random passwords during runtime.Install CDX
cd ideam/
./install
Once CDX has installed you can now start registering devices with it. Let's create a simple test device for the sake of illustration:
sh tests/create_entity.sh testStreetlight
This will give you the details of the registration
{
  "Registration": "success",
  "entityID": "teststreetlight",
  "apiKey": "EHQilai5cF_tNmWOwg-oiPdncmRPdfGCIhFHM85zDDW",
  "subscriptionEndPoint": "https://smartcity.rbccps.org/api/{version}/followid=teststreetlight",
  "accessEndPoint": "https://smartcity.rbccps.org/api/{version}/db?id=teststreetlight",
  "publicationEndPoint": "https://smartcity.rbccps.org/api/{version}/publish?id=teststreetlight",
  "resourceAPIInfo": "https://rbccps-iisc.github.io"
}
You can now publish data from this device using:
sh tests/publish.sh teststreetlight EHQilai5cF_tNmWOwg-oiPdncmRPdfGCIhFHM85zDDW
This will publish
{"body": "testdata"}to the exchangeteststreetlight.protectedThat's it! You can similarly register more devices and apps with the middleware.
For detailed guides and resources visit https://cdx.readthedocs.io/en/latest/