| page_type | description | products | languages | title | extensions | |||||||||||||||||||||
|---|---|---|---|---|---|---|---|---|---|---|---|---|---|---|---|---|---|---|---|---|---|---|---|---|---|---|
sample |
This sample ASP.NET Core web application shows how to subscribe to change notifications using webhooks. This sample also supports receiving change notifications with data, validating and decrypting the payload. |
|
|
aspnetcore-webhooks-sample |
|
Subscribe for Microsoft Graph change notifications to be notified when your user's data changes, so you don't have to poll for changes.
This sample ASP.NET Core web application shows how to subscribe for change notifications as well as how to validate and decrypt change notifications with resource data (preview) when supported by the resource.
This sample uses:
- Microsoft Authentication Library for .NET (MSAL.NET) to obtain an access token.
- The Microsoft Graph Client Library for .NET (SDK) to call Microsoft Graph.
- The Microsoft.Identity.Web library to abstract token acquisition.
This sample supports user-delegated authentication and uses:
- OpenID Connect for sign in / sign out using the Microsoft identity platform for developers.
- The auth code flow.
This sample supports app-only authentication and uses:
- The client grant flow to obtain an access token.
User-delegated authentication represents a user and the application being used when calling the Microsoft Graph. This type of authentication is best suited for scenarios when the user interacts with the application. Application only authentication represents only the application itself when calling the Microsoft Graph, without any notion of user. This type of authentication is best suited for background services, daemons or other kind of applications users are not directly interacting with.
See the list of permissions and authentication types permitted for each supported resource in Microsoft Graph.
The following are common tasks that an application performs with webhooks subscriptions:
- Get consent to subscribe to resources and then get an access token.
- Use the access token to create a subscription to a resource.
- Send back a validation token to confirm the notification URL.
- Listen for notifications from Microsoft Graph and respond with a 202 status code.
- Request more information about changed resources using data in the notification if no data is provided with the notification.
- Decrypts the resource data provided with the notification if any has been provided with the notification.
The screenshot below shows the app's start page.
After the app creates a subscription, Microsoft Graph sends a notification to the registered endpoint when events happen for the subscribed resource. The app then reacts to the event.
This sample app subscribes to any resource configured in appsettings.json in SubscriptionSettings:Resource (default is me/messages) for any change configured in SubscriptionSettings:ChangeType (default created,updated). When receiving any notification, the app then updates a page with information about the resource.
To use the Microsoft Graph Webhook Sample for ASP.NET Core, you need the following:
- Visual Studio 2019 installed on your development computer.
- .NET Core 3.1 or later (for example for Windows) installed. You can follow the instructions at .NET and C# - Get Started in 10 Minutes. In addition to developing on Windows, you can develop on Linux, Mac, or Docker.
- A work, school or personal account. A tenant administrator account is required to grant application permissions.
- The application ID and key from the application that you register on the Azure Portal.
- A public HTTPS endpoint to receive and send HTTP requests. You can host this on Microsoft Azure or another service, or you can use ngrok or a similar tool while testing.
- If you are also testing change notifications with resource data (preview), you also need a Microsoft Azure subscription to create an Azure KeyVault. If you do not have a Microsoft Azure subscription, you can start a free trial.
- Sign in to the Azure portal using either a work or school account.
- If your account is present in more than one Azure AD tenant:
- Select your profile from the menu on the top right corner of the page, and then Switch directory.
- Change your session to the Azure AD tenant where you want to create your application.
-
Navigate to the Azure portal > App registrations to register your app.
-
Select New registration.
-
When the Register an application page appears, enter your app's registration information:
-
In the Name section, enter a meaningful name that will be displayed to users of the app. For example:
MyWebApp. -
In the Supported account types section, select Accounts in any organizational directory (Any Azure AD directory) and personal Microsoft accounts (e.g. Skype, Xbox).
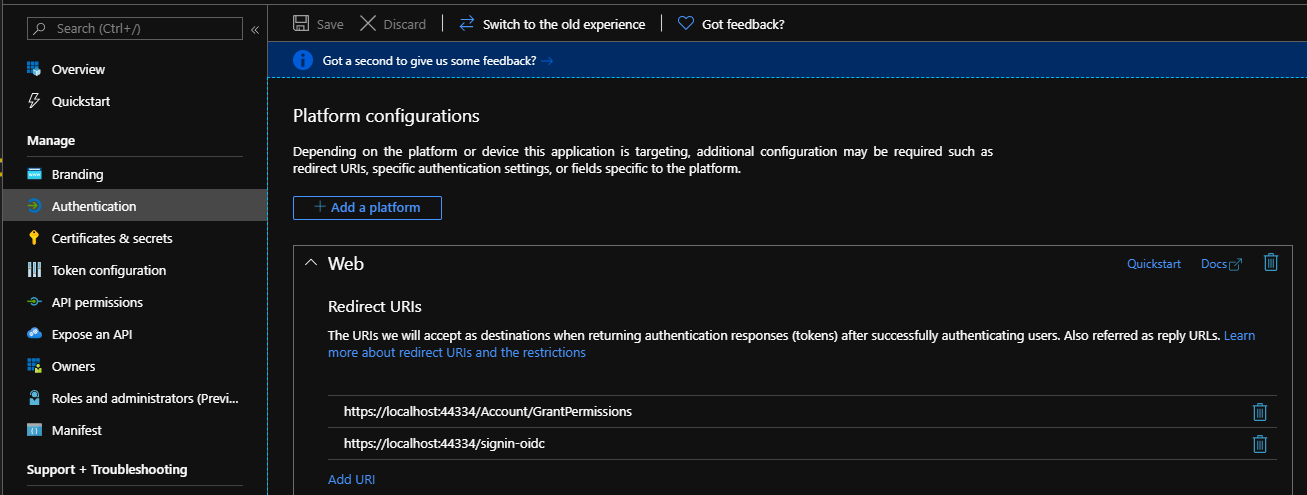
You can leave the redirect URI empty, you'll add these from the Authentication tab later after the app has been successfully created.
-
-
Select Register to create the app.
-
On the app's Overview page, find the Application (client) ID value and record it for later. You'll need this value to configure the Visual Studio configuration file for this project.
-
In the list of pages for the app, select Authentication. (this step is only required if you are using a user-delegated authentication):
-
Select Save.
-
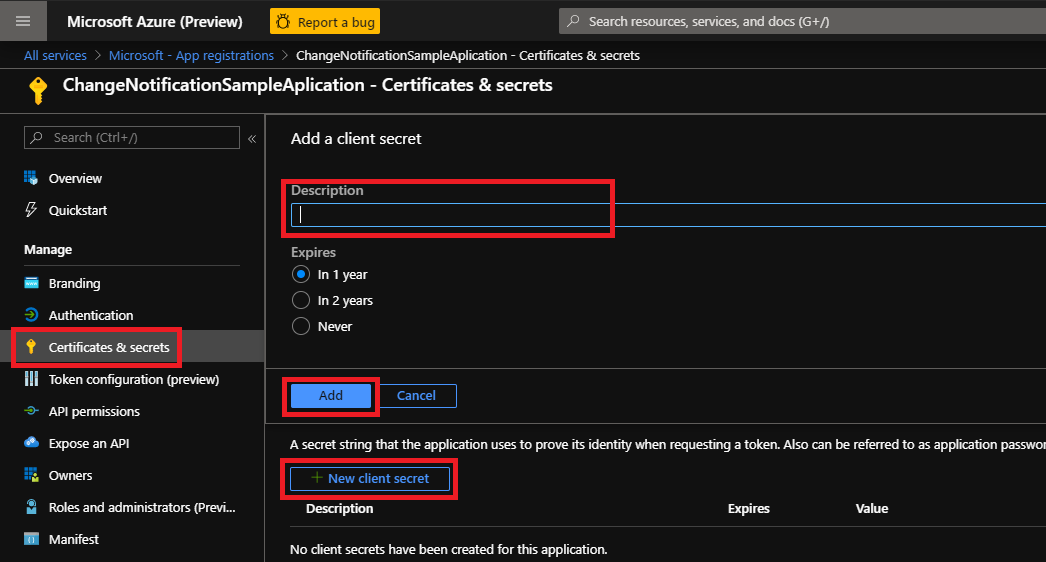
From the Certificates & secrets page, in the Client secrets section, choose New client secret.
-
Enter a key description (of instance
app secret). -
Select a key duration of either In 1 year, In 2 years, or Never Expires.
-
When you click the Add button, the key value will be displayed. Copy the key value and save it in a safe location.
You'll need this key later to configure the project in Visual Studio. This key value will not be displayed again, nor retrievable by any other means, so record it as soon as it is visible from the Azure portal.
-
-
In the list of pages for the app, select API permissions.
- Click the Add a permission button and then make sure that the Microsoft APIs tab is selected.
- In the Commonly used Microsoft APIs section, select Microsoft Graph.
- In the Application permissions section, make sure that the Mail.Read permission is checked. Use the search box if necessary.
Also, in the Delegated permissions section, check the User.Read delegated permission for Azure Active Directory, so users can sign into the app to initiate the subscription process.
Note: for other resources you need to select different permissions as documented here
Note: depending on which authentication type you chose (app-only or user delegated) you need to select the corresponding permission from the correct permission type. - Select the Add permissions button.
- Select Grant admin consent for
name of your organization>and Yes. This grants consent to the permissions of the application registration you just created to the current organization.
Note: you are only required to follow these steps if the resource you are subscribing to supports including resources data in notifications and if you set includeResourceData to true in the configuration. In any other case, you can skip these steps. Refer to the documentation for a complete list of resources that support or not including resources data.
Follow the documented steps to configure your Azure KeyVault in order to add support for change notifications with resource data (preview).
You must expose a public HTTPS endpoint to create a subscription and receive notifications from Microsoft Graph. While testing, you can use ngrok to temporarily allow messages from Microsoft Graph to tunnel to a localhost port on your computer.
You can use the ngrok web interface (http://127.0.0.1:4040) to inspect the HTTP traffic that passes through the tunnel. To learn more about using ngrok, see the ngrok website.
-
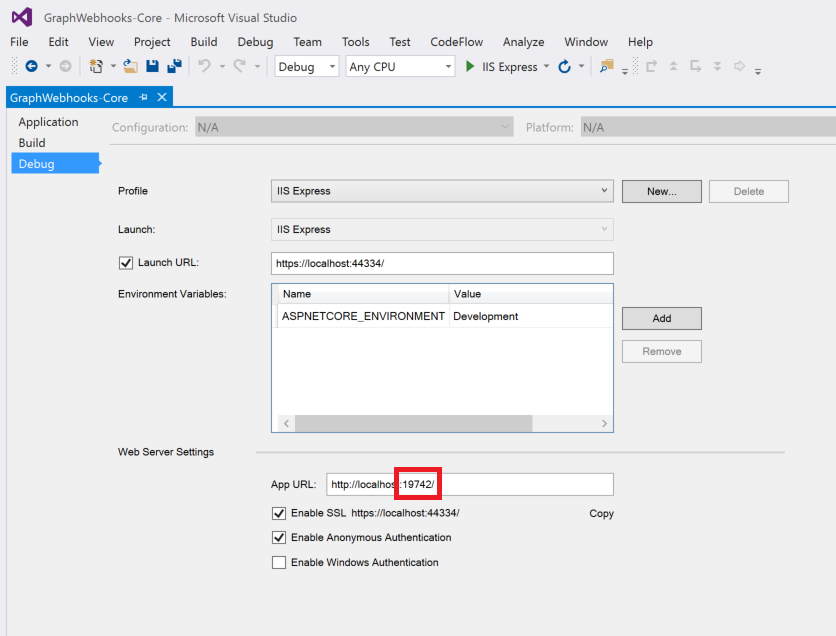
In Solution Explorer, right-click the GraphWebhooks-Core project and choose Properties.
-
On the Debug tab, copy the port number of the App URL.
-
Download ngrok for Windows.
-
Unzip the package and run ngrok.exe.
-
Replace the {port-number} placeholder value in the following command with the port number you copied, and then run the command in the ngrok console.
ngrok http {port-number} -host-header=rewrite -
Copy the HTTPS URL that's shown in the console. You'll use this to configure your notification URL in the sample.
Keep the console open while testing. If you close it, the tunnel also closes and you'll need to generate a new URL and update the sample.
See troubleshooting for more information about using tunnels.
Note: To avoid errors while installing packages from dependencies, make sure the local path where you placed the solution is not too long/deep. Moving the solution closer to the root drive resolves this issue.
-
Expose a public HTTPS notification endpoint. It can run on a service such as Microsoft Azure, or you can create a proxy web server by using ngrok or a similar tool.
-
Open the GraphWebhooks-Core.sln sample file in Visual Studio.
-
In Solution Explorer, open the appsettings.json file in the root directory of the project.
- Settings under SubscriptionSettings:
- ChangeType: CSV; possible values created, updated, deleted.
- Resource: resource to create subscription for (e.g. teams/allMessages).
- IncludeResourceData: whether the notifications should include resource data.
trueorfalse - NotificationUrl: The HTTPS Notification URL that will receive subscription validation callbacks and notification events from Graph, replace ENTER_YOUR_URL with the HTTPS URL. Keep the /notification/listen portion. If you're using ngrok, use the HTTPS URL that you copied eg
https://2885f9c5.ngrok.io/notification/listen. - Scope: The permission to use to create the subscription, eg
Mail.ReadorChannelMessage.Read.All.
For a complete list of resources, scopes required for these resources please refer to the documentation. For a list of which resources support including resource data with notifications please refer to this additional documentation
- Update KeyVaultSettings if you are using change notifications with resource data (preview) :
- CertificateUrl: the full url of the certificate on Azure KeyVault:
https://<keyvaultName>.vault.azure.net/certificates/<certificatename>. Replace<keyvaultname>by the name of your KeyVault and<certificatename>by the name of the self-signed certificate you created.
- CertificateUrl: the full url of the certificate on Azure KeyVault:
- Settings under SubscriptionSettings:
-
Still within Solution Explorer, right-click on the project name and select Manage User Secrets. This app uses Secret Manager configuration in storing sensitive app data - ClientId and ClientSecret.
-
In the secret.json window that opens, paste the below code.
"AzureAd": {
   "ClientId": "ENTER_YOUR_APP_ID",
   "ClientSecret": "ENTER_YOUR_SECRET",
   "TenantId": "ENTER_YOUR_TENANT_ID"
}
-
If you are trying change notifications with resource data (preview), you also need to add the following code in the secret.json window.
"KeyVaultSettings": {
   "ClientId": "ENTER_YOUR_APP_ID",
   "ClientSecret": "ENTER_YOUR_SECRET"
}
Note: do not forget to add a comma (,) between the AzureAd object and the KeyVaultSettings object.
-
For both code segments, replace the following keys:
- For the ClientId key, replace ENTER_YOUR_APP_ID with the application ID of your registered Azure application.
- For the ClientSecret key, replace ENTER_YOUR_SECRET with the key of your registered Azure application. Note that in production apps you should always use certificates as your application secrets, but for this sample we will use a simple shared secret password.
- For the Tenantd key, replace ENTER_YOUR_TENANT_ID with your tenant ID, this information can be found on the application registration page.
-
-
Make sure that the ngrok console is still running, then press F5 to build and run the solution in debug mode.
Note: you need to go through the following steps only if you are trying to create a subscription with user-delegated application.
-
Choose Sign in in the upper-right corner and sign in with a work or school account.
-
Consent to the View your basic profile and Sign in as you permissions.
-
On the sample home page, choose Grant admin consent. You'll be redirected to the adminconsent page.
-
Sign in as a tenant admin and consent to the Read mail in all mailboxes and Sign in and read user profile permissions. You'll be redirected back to the sample's home page.
At this point, any user in your tenant can sign in and create a subscription. If you don't grant admin permissions first, you'll receive an Unauthorized error. You'll need to open the sample in a new browser session because this sample caches the initial token.
-
Choose Create subscription. The Subscription page loads with information about the subscription.
This sample sets the subscription expiration to 15 minutes for testing purposes.
-
Choose the Watch for notifications button.
-
Generate an event for the resource you've subscribed to (eg. sending an email). The Notification page displays notification properties. It may take several seconds for the page to update.
-
Optionally choose the Delete subscription button.
The following files contain code that's related to connecting to Microsoft Graph, creating subscriptions, and handling notifications.
appsettings.jsonContains values used for authentication, authorization and endpoint URLs.- secrets.json Contains the ClientId and ClientSecret used for authentication and authorization. To check whether these have been configured for the project run the following command from the directory in which the .csproj file exists:
dotnet user-secrets list Startup.csConfigures the app and the services it uses, including authentication.
AccountController.csHandles admin consent.NotificationController.csReceives notifications.SubscriptionContoller.csCreates and deletes subscriptions.
ChangeNotification.csRepresents a change notification.NotificationCollection.csRepresents a collection of change notifications sent to the notification URL.NotificationViewModel.csDefines the NotificationViewModel that represents the data displayed in the Notification view.
GraphServiceClientFactory.csInitiates the SDK client used to interact with Microsoft Graph.SubscriptionStore.csAccess layer for stored subscription information. The sample temporarily stores the info in HttpRuntime.Cache. Production apps will typically use some method of persistent storage.
- Helper library containing a set of reusable classes that are useful in helping with the below:
- Authenticating and signing-in users with any Work, School or Microsoft Personal Accounts on the Microsoft identity platform v2.0 (AAD v2.0) using OpenId connect middleware and MSAL.NET.
- Handling sign-out and removing the account from MSAL.NET cache.
- Token acquisition.
- Bootstrapping the web resource from the
Startup.csfile in the application by just calling a few methods.
See the dedicated troubleshooting page.
If you'd like to contribute to this sample, see CONTRIBUTING.MD.
This project has adopted the Microsoft Open Source Code of Conduct. For more information see the Code of Conduct FAQ or contact opencode@microsoft.com with any additional questions or comments.
We'd love to get your feedback about the Microsoft Graph Webhooks sample for ASP.NET Core. You can send your questions and suggestions to us in the Issues section of this repository.
Questions about Microsoft Graph in general should be posted to Stack Overflow. Make sure that your questions or comments are tagged with [MicrosoftGraph].
You can suggest changes for Microsoft Graph on UserVoice.
- Microsoft Graph Webhooks sample for Node.js
- Microsoft Graph Webhooks sample for Java Spring
- Working with Webhooks in Microsoft Graph
- Subscription resource
- Microsoft Graph documentation
Copyright (c) 2019 Microsoft. All rights reserved.


