- Microprocessors / Embeded System Development
- Week 1: Your First C Program
- Week 2: Making Decisions and a look at Pointers
- Week 3: Loops and Redirecting Standard Input/Output
- Week 4: Arrays and Strings
- Week 5: Functions and Variable Scope
- Week 6: Binary Representation of Data and Bitwise Operations
- Week 7: Intro to Microcontrollers
- Week 8: Serial Communications
- Week 9: Debouncing; Timers; Interrupts
- Week 10:
- Week 11:
- Week 12:
- Week 13:
Here is a collection of important topics covered throughout the course (all this info is taken from the QUT pre-reading slides or the after lecture content). This is a good document to read in part with the lecture videos. These notes won’t go over the tutorials powerpoint slides, just the pre-lecture reading notes. The best way to learn a programming language is to use it, it is highly recommended you follow along with the lecture videos or utilise the language in your own home projects.
Please make sure to read further into topics you don’t understand, this guide is to give you a brief description on each topic so you know what you need to study more into.
There is a lot of information for each week, the best way to use this study guide is to skim everything and research deeper into things you don't understand or to have it as a reminder for things you can’t remember.
*note: Everything written here is based off the QUT course content and most of the examples are directly from the course slides.
- Microcontroller: A compact integrated circuit designed to govern a specific operation in an embedded system.
Everyone has to start somewhere when it comes to learning a new language and what better place to start than the typical hello world program.
# include <stdio.h>

int main (void) {
   printf("Hello World\n");
}
The first thing to note is that most C programs will not work without including the standard library, as shown in line 1. This standard library allows you to use many functions and methods that the base C language simply doesn't include.
# include <stdio.h>The next thing we need to do is create a new main function, this is made of a couple important parts worth noting. int at the start refers to the data type returned by the function, this isn't important currently as the main function doesn't return data however when coming to custom functions it will be used. The next thing to note is that void is used as the main function also doesn't include any parameters, at least in this current program.
int main (void) {
}
Lastly, we output the string "Hello World" into the terminal using the printf() statement. Strings are surrounded in double quotes as essentially they are a collection or list of single character data types. The \n is a special escape sequence that tells the terminal to print everything after onto a new line. It's important to remember all statements must be ended with a semicolon, it tells the compiler that we are done with this line of code and can move onto the next.
printf("Hello World\n");To compile our program we simply move to the current directory the .c file is in and type the following command.
$ gcc <applicationName.c> -o <applicationName>
This will create a new file which can be run by typing.
$ ./<applicationName>
Variables are essential in any application as they allow us to store shortcut names for pieces of data. In C a typical variable declaration is as follows: `typeQualifier typeModifier dataType variableName = initialValue;`.
const unsigned int a = 12;

// or

long int a;
a = 12;
Data types play an important role in C as they tell the compiler how much room/memory will need to be allocated for variables. Here is a list of integer data types supported in C:
- char (1 byte)
- unsigned char (1 byte) {unsigned referring to only + values}
- signed char (1 byte) {signed referring to - and + values}
- int (2 or 4 bytes)
- unsigned int (2 or 4 bytes)
- short (2 bytes)
- unsigned short (2 bytes)
- long (8 bytes)
- unsigned long (8 bytes)
It's important to remember that characters, denoted by single quotes, are representative of a numerical value, this can be seen if we print out a character with a type of int.
#include <stdio.h>

int main(void) {
   char ch = 'a';

   printf("char as char = %c \n", ch); // This is a way we can format strings in C, (%c = char; %d = int)
   printf("char as int = %d \n", ch);
}


// Output
// > "char as char = a"
// > "char as int = 97" // This is the numeric value of the character 'a'
String Formatters
- %d - Integer
- %c - Character
- %f - Float
- %lf - Double
- %5f - Floating point numbers at least 5 characters wide
- %.3f - Floating point number, 3 decimal places
- %5.3f - Floating point number, at least 5 characters and 3 decimal places
We can also check the amount of memory, or size, of a variable by using the `sizeof()` function.
#include <stdio.h>

int main(void) {
   char ch = 'a';

   printf("Size of char as int = %ld byte \n", sizeof(ch)); // %ld = long
}


// Output
// > "Size of char as int = 1 byte"C operators react exactly as we'd suspect them to work.
$ 123 + 12
> 135

$ 123 - 12
> 111

$ 123 * 12
> 1476

$ 123 % 12
> 3

$ 123 / 12
> 10 There are a few type modifiers we can apply to variables, short and long will respectively reduce or increase the amount of bytes the variable takes up while signed and unsigned will allow you to specify whether the variable will use negative or positive numbers.
int a = 1; // will return a sizeof() 4 bytes
short int a = 1; // will return a sizeof() 2 bytes
long int a = 1; // will return a sizeof() 8 bytes
Type qualifiers are a useful way to send specific insrtuctions to the compiler on how certain variables should be managed. There are many more but for now we will just show an example of the const qualifier.
const float SPEED_OF_LIGHT = 299792458; // will not allow the variable to be changed (const variables are capitalised by conventionGetting the user input is a valuable tool to have in any program and luckily C allows you to do this using the `scanf()` function.
#include <stdio.h>

int main(void) {
   int age;
   printf("What is your age: ");
   scanf("%d", &age);
   printf("Your age is: %d\n", age);
}- variable = variable + 5 || variable += 5
- variable = variable - 5 || variable -= 5
- variable = variable / 5 || variable /= 5
- variable = variable % 5 || variable %= 5
By adding ++, or --, before or after a variable we can increment or decrement 1 from that value.
$ int k = 7;
$ int n;
$
$ n = k--; // first assign k to n, then decrement k by 1
$ n = --k // first decrement k by 1, then assign k to n
$ n = k++; // first assign k to n, then increment k by 1
$ n = ++k // first increment k by 1, then assign k to n- == | check if two operands are equal or not | (A == B) is not true
- != | checks if two operands are not equal | (A != B) is true
- ^ | checks if left operand is greater than the right | (A > B) is not true
- ~ | checks if the left operand is less than the right | (A < B) is true
- >= | checks if left operand is greater or equal to than the right | (A >= B) is not true
- <= | checks if the left operand is less than or equal to the right | (A <= B) is true
- && | called Logical AND operator. If both the operands are non-zero, then the condition becomes true
- || | called Logical OR Operator. If any of the two operands is non-zero, then the condition becomes true
- ! | called Logical NOT Operator. It is used to reverse the logical state of its operand.
Conditional statements allow us to specify certain blocks of code to run when certain requirements are met. The most basic of this is an if statement, consisting of 3 types, if statement, if-else statement, and cascading if statements.
#include <stdio.h>

int main(void) {
   int a;

   scanf("%d", &a);

   if (a > 0) {
      printf("This is a positive number!\n");
   }

   return 0;
}#include <stdio.h>
int main(void) {
int raining;
printf("Is it raining outside? 0 for no, 1 for yes: ");
scanf("%d", &raining);
if (raining == 0) { // if
printf("Go outside\n");
} else {
printf("Stay inside\n");
}
return 0;
}#include <stdio.h>
int main(void) {
int raining;
printf("Is it raining outside? 0 for no, 1 for yes, 2 for I don't know: ");
scanf("%d", &raining);
if (raining == 0) { // if
printf("Go outside\n");
} else if (raining == 1) {
printf("Stay inside\n");
} else {
printf("Open the window and check");
}
return 0;
}Sometimes writing short 1 line if statements can get clunky and spacious, it's because of this that a shorthand to if statements were created. The format taken is `Expr1 ? Expr2 : Expr3` essentially saying "if Expr1 is true then run Expr2 else run Expr3".
#include <stdio.h>

int main(void) {
   int a = 10;
   int b = 20;
   int c;

   if (a > 10) {
      c = 100;
   } else {
      c = b;
   }

   // or

   c = a > 10 ? 100 : b;

   return 0
}In C there is no such data type Boolean, instead 0 = false and 1 = true. There is however a workaround to this by defining the values to their equivalent names.
#define TRUE 1
#define FALSE 0switch is a selection statement that chooses a single switch section to execute from a list of candidates based on a pattern match with the match expression. The switch statement is often used as an alternative to an if-else construct if a single expression is tested against three or more conditions.
#include <stdio.h>

int main(void) {
   float valueA, valueB;
   float result;
   char operator;

   scanf("%f %c %f", &valueA, &operator, &valueB);

   switch(operator) {
      case '+':
         result = a + b;
	 break;
      case '-':
         result = a - b;
	 break;
      case '*':
         result = a * b;
	 break;
      case '/':
         result = a / b;
	 break;
      default: // default acts like else, if nothing matches run this block
         printf("Unrecognised Operator\n");
	 break;
   }

   printf(" = %0.2f\n", result);
}When working with C you have the ability to access the direct bytes and data stored in the memory (RAM). Each of these bytes has a unique address in the memory and using the `&` you can find the hexadecimal value representing first byte of your variables address.
#include <stdio.h>

int main(void) {
   int x = 254;
   int y = 1313;

   printf("The address of x is %p\n", &x);
   printf("The address of y is %p\n", &y);

   return 0;
}

// Output
// >> "The address of x is 0x7fffd0a0dbc0"
// >> "The address of x is 0x7fffd0a0dbc4"
Here we can see that the starting position of x is 0 while y starts at position 4. This makes sense as the size of an integer is 4 bytes.
A pointer is another data type that can be used in C, it is used to point to an address. We can store this pointer in a variable converting it into a pointer variable. We declare pointer variables by prefixing the variable name with the * symbol.
#include <stdio.h>

int main(void) {
   int x = 254;
   int y = 1313;

   int *p = &x; // stored the address of x into p

   printf("*p = %d", *p); // output: "*p = 254"
   printf("&x = %p", &x); // output: "&x = 0x7ffe8f051d80" // memory address will change each time run

   return 0;
}Iteration statements are statements that allow us to run sections of code a certain number of times or until a certain condition is met. A While loop is a type of iteration that will continue to loop through a block of code as long as the specified condition is true. When working with while loops it's important to be careful not to create infinite loops, loops without any break condition.
#include <stdio.h>

int main() {
   int i = 1;

   while (i <= 10) {
      printf("%d\n", i);
      i++;
   }
}#include <stdio.h>
int main() {
int i = 1;
do {
printf("%d\t%d\n", i, i * i);
i++;
} while (i <= 10);
}#include <stdio.h>
int main() {
for (int i = 1; i <= 10; i++) {
printf("%d\t%d\n", i, i * i);
}
}break: If break is executed, control jumps immediately to the next statement in the program after the loop.
continue: If continue is executed, control jumps to the end of the loop body, then resumes from that point.
When it comes to basic unix commands the `>` operand allows us to "pipe" whatever data is outputed from our first command into a file or another program.
$ ls
> Desktop Downloads Documents Home User

$ ls > file.txt
$ cat file.txt
> Desktop
> Downloads
> Documents
> Home
> User
What we just did was push the output of our 'ls' (list directory items) into a new textfile called 'file.txt'. We then used the 'cat' command on our file to write the files contents to the terminal. If we use this in combination with our c programs we can pipe any printf statement data to a text file.
#include <stdio.h>

int main() {
   printf("hello world");
}


$ gcc main.c -o main
$ ./main > main_text.txt
$ cat main_text.txt
> "hello world"
Just like how we can direct data from a command or program to a textfile using '>', we can read data directly into c from a text file using '<'.
Say we have a textfile and on each line is 2 integers. We can create a program to read from this textfile and redirect the sum of the integers back into another file.
#include <stdio.h>

int main() {
   int num1, num2;
   int scanf_returned; // the value scanf returns when it reads from a file | 2 = success | -1 = failed

   while(1) { // while true
      scanf_returned = scanf("%d %d", &num1, &num2);

      if (scanf_returned == 2) {
         printf("%d\n", num1 + num2);
      } else if (scanf_returned == -1) {
         break; // once reaching the bottom of the file, break
      }
   }
}


$ gcc main.c -o main
$ ./main < numbers.txt >> sum.txtA pipe, |, is a form of redirection that is used in Linux and other Unix-like operating systems to send the output of one command/program/process to another command/program/process for further processing. Pipe is used to combine two or more commands, and in this, the output of one command acts as input to another command, and this command’s output may act as input to the next command and so on.
Quote source: https://www.geeksforgeeks.org/piping-in-unix-or-linux/
Arrays are a way to store multiple variables of the same datatype under one variable. Arrays follow the simple structure of `type array_name[]`
char *stringArray[number]; // with number being the amount of items the array containsJust like how we used indexing to get a certain character from a string we can use the same method to retrieve values from the list and even re-assign values.
int intArray[5];

intArray[0] = 5; // set the first item of the list to equal 5 *remember we count from 0+ in C
printf("%d", intArray[0]); // will print the first element to the console
There are a few ways we can add values to an array
// method 1
int intArray[5];
intArray[0] = 100;
intArray[1] = 200;
intArray[2] = 300;
intArray[3] = 400;
intArray[4] = 500;

// method 2 || all produce the same outcome
int intArray[5] = {100, 200, 300, 400, 500};
int intArray[] = {100, 200, 300, 400, 500};C allows us to create an array of arrays, these are called miltidimensional arrays. A two-dimensional array can be thought of like a table of data.
// 4 rows, 3 columns
int sales[4][3] = {
    {30, 25, 32},
    {41, 10, 34},
    {13, 32, 7},
    {24, 20, 25},
};

// we can now loop through this array using a forloop
for (int x = 0; x < 4; x++) {
    for (int y = 0; y < 3; y++) {
        printf("%d ", sales[x][y]);
    }
    printf("\n"); // add a space between each row
}

// output
// > 30 25 32
// > 41 10 34
// > 13 32 7
// > 24 20 25When calling random values in C it's important to remember that a seed is needed to produce a new set of random values, this is typically done by using your current time as a seed.
#include <stdio.h>
#include <stdlib.h>
#include <time.h>

int main() {
   srand(time(NULL)); // here we set a new random seed based on the current time

   double r = (double) rand() / RAND_MAX; // this value will be anything between 0 and 1
   int temp = 5 * r; // will generate a value between 0-5 but will not include 5 (so only values 0-4)
   printf("%d", temp);
}Much like all other values in our program the values of an array have bytes stored in memory and using the same method as before we can retrieve the memory address of each element in an array. Strings in C are essentially arrays of characters forced into a single double quote structure.
char name[6] = "Brook";When creating strings it's important to remember to leave space for the '\n' character that is located at the end of every string.
scanf and fgets are both functions used to pull data from certain inputs however the main difference is scanf will only read until the first whitespace character while fgets will read the whole line (until reaching a '\n' character)// char * fgets (char * dest, int size, FILE * stream);
// int scanf (const char * format, ...);
char name[6];
fgets(name, 6, stdin); // assigns the input to name, of size 6 using the standard input stream
scanf("%s", name);Functions are used in programming to shorten the amount of code needed to do multiples of the same tasks by assigning as list of commands to a single useable name. Methods follow the syntax of `return_type metthod_name (parameter_list) {statements}`. Let's start by creating a simple method to produce the sum of 2 numbers.
// we create an int value named Sum
// requiring 2 parameters, both of int value.
int Sum(int a, int b) {
    int total = a + b;

    return total;
}

Sum(1, 3);


// output
// > 4All non-void functions need a return statement at the bottom of the function. This return statement specifies the value returned by the function. The return statement terminates the function.
All variables in C are given a scope upon creation, these consist of local and global. Any variable inside of a function is considered to be part of that local scope meaning it cannot be called or referenced outside of that local scope (i.e. the function). Any variable created outside of a function (i.e. the main body of the file) is considered to have a global scope and can be referenced anywhere in the file (even inside functions).
Decimal representation is a way of representing numbers in their 10th format. Beginning from the right hand side the first number is multiplied by 10^0 with the next being 10^1 and so on. To find the 10th value we simply use the calculation 10^(n-1) with n representing the number the digit takes from the right hand side.
Note: for more information check out Decimal Representation
1234
1x10^3 2x10^2 3x10^1 4x10^0

57215
5x10^4 7x10^3 2x10^2 1x10^1 5x10^0
Here is a program that converts a number into binary representation. We can break the function decToBin down into 2 sections, the first part being the conversion to decimal and the second part is reversing the value. Let's take a test run through the program and see how it works
#include <stdio.h>

void decToBin(int n, int* d) {
    int i = 0;

    while (n > 0) {
    	d[i++] = n % 2;
	n = n / 2;
    }

    // Say we run decToBin(n, d), n = 32 and d = an empty array of 10 values
    // Now let's run through the while loop above,

    // while 32 > 0 we set the first position of our array d to 32 % 2 (0), then after we divide 32 / 2 (16)
    // our values currently: d = {0} | n = 16
    // we now repeat the process until n = 0
    // while 16 > 0, set i++ (now the second position) of our array d to 16 % 2 (0), then 16 / 2 (8)
    // our values currently: d = {0, 0} | n = 8
    // while 8 > 0, set i++ of our array d to 8 % 2 (0), then 8 / 2 (4)
    // our values currently: d = {0, 0, 0} | n = 4
    // while 4 > 0, set i++ of d to 4 % 2 (0), then 4 / 2 (2)
    // our values currently: d = {0, 0, 0, 0} | n = 2
    // while 2 > 0, set i++ of d to 2 % 2 (0), then 2 / 2 (1)
    // our values currently: d = {0, 0, 0, 0, 0} | n = 1
    // while 1 > 0, set i++ of d to 1 % 2 (1), then 1 / 2 (0.5, rounded down, 0)
    // our final values currently: d = {0, 0, 0, 0, 0, 1} | n = 0

    // here we now have a decimal representation of 32 however it is backwards
    // the code below simply reverses the list

    i--;

    for ( ; i >= 0; i--) {
    	printf("%d", d[i]);
    }

    printf("\n");
}

int main() {
    int n;
    int d[10] = {0}; // empty array to hold our decimal value

    printf("Enter a number\n");
    scanf("%d", &n);

    decToBin(n, d);

    return 0;
}


// input
// 17
// 32

// output
// 10001
// 100000
We can shift each bit by a certain value by using the `<<` or `>>` operator depending on which direction we want to shift the bits by.
void decToBin(unsigned char n, int* d) {
    int i = 0;

    while (n > 0) {
    	d[i++] = n % 2;
	n = n / 2;
    }

    for (int i = 8; i >= 0; i--) {
    	printf("%d", d[i]);
    }

    printf("\n");
}

int main() {
    unsigned char setB = 0b10011001;
    setB = setB << 1;

    int d[8] = {0};
    decToBin(setB, d);

    return 0;
}


// output
// 00110010
The operation setB = (setB << 1); shifts bits in the binary value setB by 1 position to the left.
| Bit | 7 | 6 | 5 | 4 | 3 | 2 | 1 | 0 |
|---|---|---|---|---|---|---|---|---|
| Before | 1 | 0 | 0 | 1 | 1 | 0 | 0 | 1 |
| After | 0 | 0 | 1 | 1 | 0 | 0 | 1 | 0 |
A microcontroller is an integrated chip that is often part of an embedded system designed to perform single specific task. A microcontroller consists of a CPU, RAM, ROM, I/O ports, and timers all in a single chip. Code is generally not written directly on the microcontroller, it is written on a separate device through a text editor which is then compiled and transferred onto the microcontroller.
| Microprocessor | Microcontroller | |
|---|---|---|
| Applications | General Computing | Appliances, Specialized Devices |
| Speed | Very Fast | Relatively Slow |
| External Parts | Many | Few |
| Cost | High | Low |
| Energy Use | Medium - High | Very Low - Low |
| Name | DIP (Dual Inline Package) | SOIC (Small Outline IC) | QFP (Quad Flat Package) | BGA (Ball Grid Array) |
|---|---|---|---|---|
| Installment | Through Hole | Surface Mount | Surface Mount | Surface Mount |
| Pins | 8 Pins | 18 Pins |
32 Pins | 100 Pins |
| Dimensions | 9mm x 6mm | 11mm x 7mm | 7mm x 7mm | 6mm x 6mm |
Just about every modern microcontroller contains an ADC which is used to convert the analog voltages (analog signals) into digital values. For more information on how these work check out Basics of Analog-to-Digital Converters
Much like an ADC we also have accompanying DACs which are used to convert a digital value into a pseudo-analog voltage. For more information on how these work check out How Does a Digital to Analog Converter Work?
PWN is a modulation technique which is used to encode information into a signal. It's main purpose is to regulate the power supplied to a certain load. A PWN consists of 2 main components, a duty cycle and a frequency, both each having an important role in providing power to devices. The duty cycle describes the amount of time a signal is in a high (on) stated as a percentage of the total time it takes to complete one cycle while the frequency determines how fast the PWM completes a cycle.
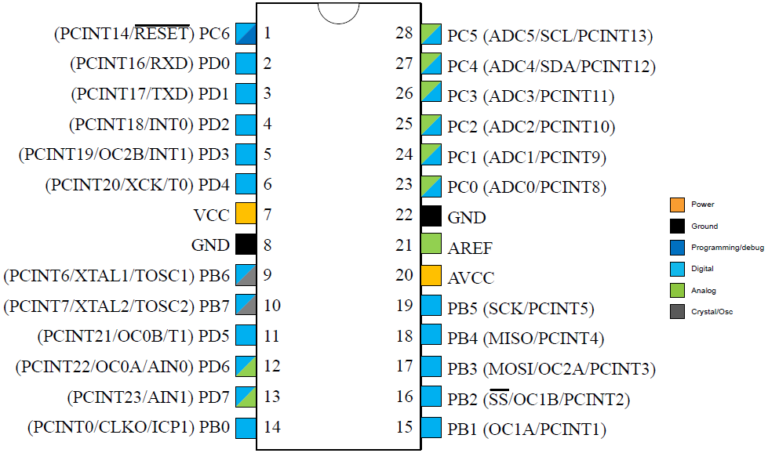
The ATmega328P is a single chip microcontroller consisting of 3 8-bit digital I/O ports with each port containing 8 data pins and being bidirectional (allowing input and or output). For more information on the ATmega328P check out this friendly ATmega328P datasheet rundown or the official ATmega328P datasheet
ATmega328P Pinout
A hostboard is a board that brings additional features to the microcontroller. Here we can see an Arduino Uno as the hostboard to the ATmega328P giving it power, a usb connection to interface with it and many more features.

Registers are special storage units with 8 bits capacity which are directly connected to the micrcontroller CPU. They can be used to store information or configure internal parameters of the microcontroller.
The data direction register is used to configure the pins in a port to be either output (1) or input (0). For example, if we want to set Port B pins 0-3 for input and 4-7 for output we would write the following code in C:
DDRB = 0b11110000;| Bit | 7 | 6 | 5 | 4 | 3 | 2 | 1 | 0 |
| DDRB | 1 | 1 | 1 | 1 | 0 | 0 | 0 | 0 |
| Input/Output Direction |
O | O | O | O | I | I | I | I |
The data register is used to write output data to a particular port. For example, if we want to write a binary 0 to output pin 6 and binary 1 to other pins of port B, we would write the following code in C:
PORTB = 0b10111111;The input pins address is used to read input data from a particular port, it's important to remember that we can't read individual values of the register, we must read the whole register. For example, if we want to read the input pins of port B, we would write the following code in C:
unsigned char temp; // temporary variable
temp = PINB; // read intput
Breadboards are reusable prototyping devices that allow the creation of circuits without the need of soldering.
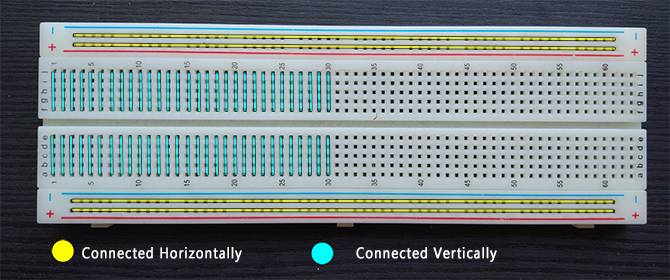
Note: For more information on breadboards check out What is a Breadboard?
Lecture notes on Electrical Connections
Now that we know what the ATmega328P is and how we can use data registry functions to manipulate our registries we can start creating our own applications. The first application we're going to create is a simple LED on and off system.
The first thing we need to do is figure out which port we want to be sending the signal out of (which port we are using to turn the light on and off). Let's say we want to use pin 6 on registry D, the first thing we need to with this information is turn the pin to output mode (because we're sending an electrical signal out). We do this using our DDRx function and by assigning pin 6 to 1 and all the rest 0:
// Import that allows us to reference our registers/pins
#include <avr/io.h>

int main() {
	DDRD |= (1 << 6);
}
The next thing we want to do is set pin 6 to 1 using our PORTx function. (1 = signal, 0 = no signal)
#include <avr/io.h>

int main() {
	// Turn portD pin 6 to write (output) mode using DDRX
	DDRD |= (1 << 6);

	// Turn portD pin6 to an on signal using PORTx
	PORTD |= (1 << 6);
}
Now that we have our code completed code it's time we setup the actual circuit that will compliment the code.

- Green wires: Input wires
- Black wires: Connection to GND (ground)
- Brown wires: Connection from circuit to ground line
The first wire in this circuit is the green wire connecting pin 6 to the breadboard (this is where the circuit starts), from there the connection goes through a resistor into our led. Lastly, our circuit finishes by routing into our ground line finishing our circuit loop.
If we now wanted to turn off the led we can simply run our pin through an NAND operator. (bitwise operators)
#include <avr/io.h>

// Import that allows us to setup a "sleep" timer
#include <util/delay.h>

int main() {
	// Turn portD pin 6 to write (output) mode using DDRX
	DDRD |= (1 << 6);

	// Turn portD pin6 to an on signal using PORTx
	PORTD |= (1 << 6);

	// Wait 1 second
	_delay_ms(1000);

	// Turn portD pin6 off using an NAND operator
	PORTD &= ~(1 << 6);
}| Serial Communication | Parallel Communication |
|---|---|
| 1. One data bit is transcevied at a time | 1. Multiple data bits are transceived at a time. |
| 2. Slower | 2. Faster |
| 3. Less number of cables required to transmit data | 3. Higher number of cables required. |
- Serial Peripheral Interface (SPI): A three-wired based communication system where a wire connects each master to slave and one wire is used for a clock pulse. An additional SS line is used mostly when we want to send/receive data between multiple ICs.
- Inter-Integrated Circuit (I2C): A 2 wire system, one for a clock and the other a bi-directional data line.
- Firewire: Developed by Apple for high-speed communications and isochronous real-time data transfer. The bus may contain a number of wires (4-pins, 6-pins, or 8-pins).
- Ethernet: Used mostly in LAN connections, the bus consists of 8 lines or 4 Tx/Rx pairs.
- USB: A four-wire physical wire system designed with two power lines and two data lines.
- RS232: The RS-232 is typically connected using a DB9 connector which has 9 pins out of which 5 are input, 3 are output, and one is Ground.
The ATmega328P provides 3 subsystems for serial communications
- Serial Peripheral Interface (SPI): Under SPI, one device is in charge, the master. The master device manages interaction with one or more slave devices. Pins associated with SPI are called:
- MOSI: Master Out Slave In
- MISO: Master In Slave Out
- SCK: Clock
- SS: Slave Select
- Two-wire Serial Interface: Network several devices such as microcontrollers and display boards, using a two-wire bus. Each device has a unique address and can exchange data with other devices in a small network.
- Universal Synchronous & Asynchronous Serial Receiver and Transmitter (USART)
- Universal Asynchronous Receiver/Transmitter (UART): The data bits are not synchronized with the clock pulses.
- Universal Synchronous Asynchronous Receiver/Transmitter (USART): The data bits are synchronized with the clock pulses.
- Essentially a piece of hardware that converts parallel data into a serial data
Serial communication, specially USART and RS232 requires that you specify the following four parameters:
- The Baud rate of the transmission (baud rate is a measure of how fast data is moving between instruments)
- The number of data bits encoding a character (frame)
- The sense of the optional parity bit
- The number of stop bits
Useful for doubling transfer rate by setting the U2X bit in UCSR0A.
| Bit | 7 | 6 | 5 | 4 | 3 | 2 | 1 | 0 |
|---|---|---|---|---|---|---|---|---|
| UCSRnA | RXCn | TXCn | UDREn | FEn | DORn | UPEn | U2Xn | MPCMn |
| Read/Write | R | R/W | R | R | R | R | R/W | R/W |
| Initial Value | 0 | 0 | 1 | 0 | 0 | 0 | 0 | 0 |
| Pin | Name | Interpretation |
| 7 | RXC0 |
USART Receive Complete flag – can generate an Receive Complete interrupt (see RXCIE0 bit). |
| 6 | TXC0 | USART Transmit Complete flag – can generate Transmit Complete interrupt. |
| 5 | UDRE0 |
USART Data Register Empty – transmit buffer is ready to receive new data. Can generate a Data Register Empty interrupt (see UDRIE0 bit). |
| 4 | FE0 |
Frame Error – always clear this bit when writing to UCSR0A (this register). |
| 3 | DOR0 |
Data Overrun – always clear this bit when writing to UCSR0A (this register). |
| 2 | UPE0 |
USART Parity Error – always clear this bit when writing to UCSR0A (this register). |
| 1 | U2X0 | Double transmission speed: 0 → Normal speed; 1 → Double speed. |
| 0 | MPCM0 | Multi-processor Communication Mode. |
UCSR0A |= (1 << U2X);Useful for enabling Tx and Rx.
- Bit 4: RXEN - Receiver Enable
- Bit 3: TXEN - Transmitter Enable
| Bit | 7 | 6 | 5 | 4 | 3 | 2 | 1 | 0 |
|---|---|---|---|---|---|---|---|---|
| UCSRnB | RXCIEn | TXCIEn | UDRIEn | RXENn |
TXENn | UCSZn2 | RXB8n | TXB8n |
| Read/Write | R/W | R/W | R/W | R/W | R/W | R/W | R | R/W |
| Initial Value | 0 | 0 | 1 | 0 | 0 | 0 | 0 | 0 |
| Pin | Name | Interpretation |
| 7 | RXCIE0 | RX Complete Interrupt Enable. |
| 6 | TXCIE0 | TX Complete Interrupt Enable. |
| 5 | UDRIE0 | USART Data Register Empty Interrupt Enable. |
| 4 | RXEN0 | Receiver enable. |
| 3 | TXEN0 | Transmitter enable. |
| 2 | UCSZ02 |
Character Size bit 2 (combined with UCSZ01 and UCSZ00). |
| 1 | RXB80 | Receive data bit 8 – the ninth bit of a 9-bit character received (when operating with 9-bit characters). |
| 0 | TXB80 | Transmit data bit 8 – the ninth bit of a 9-bit character (when operating with 9-bit characters). |
// Enable receiver and transmitter
UCSR0B |= (1 << TXEN0) | (1 << RXEN0);- Bit 6: UMSEL - USART Mode Select
- Bit 5:4: UPM1:0 - Parity Mode
- Bit 3: USBS - Stop Bit Select
- Bit 2:1: UCSZ1:0 - Character Size


| Bit | 7 | 6 | 5 | 4 | 3 | 2 | 1 | 0 |
|---|---|---|---|---|---|---|---|---|
| UCSRnC | UMSELn1 | UMSELn0 | UPMn1 | UPMn0 | USBSn | UCSZn1 | UCSZn0 | UCPOLn |
| Read/Write | R/W | R/W | R/W | R/W | R/W | R/W | R/W | R/W |
| Initial Value | 0 | 0 | 0 | 0 | 0 | 1 | 1 | 0 |
| Pin | Name | Interpretation | ||||||||||||||||||||||||
| 7 | UMSEL01 | USART mode select bit 1. | ||||||||||||||||||||||||
| 6 | UMSEL00 |
USART mode select bit 0: combine with UMSEL01.
| ||||||||||||||||||||||||
| 5 | UPM01 | Parity mode, bit 1. | ||||||||||||||||||||||||
| 4 | UPM00 |
Parity mode, bit 0: combine with UPM01.
| ||||||||||||||||||||||||
| 3 | USBS0 | Stop bits: 0 → 1 stop bit; 1 → 2 stop bits. | ||||||||||||||||||||||||
| 2 | UCSZ01 | Character size bit 1. | ||||||||||||||||||||||||
| 1 | UCSZ00 |
Character size bit 0. Combine with UCSZ01 and UCSZ02.
| ||||||||||||||||||||||||
| 0 | UCPOL0 | Clock polarity.
|
A two-byte (16 bit) register which is used to define the baud rate.
Note: Here, F_CPU is 16MHz (16000000UL) and BAUD any of the following 300, 600, 1200, 2400, 4800, 9600, 14400, 19200, 38400, 57600, or 115200
| Mode | Equation |
| Async normal | UBRR0 = (F_CPU/16/BAUD) - 1 |
| Async double speed | UBRR0 = (F_CPU/8/BAUD) - 1 |
| Sync master mode | UBRR0 = (F_CPU/2/BAUD) - 1 |