react-native-purchases
React Native Purchases is a client for the RevenueCat subscription and purchase tracking system. It is an open source framework that provides a wrapper around StoreKit, Google Play Billing and the RevenueCat backend to make implementing in-app purchases in React Native easy.
Features
| RevenueCat | |
|---|---|
| ✅ | Server-side receipt validation |
| ➡️ | Webhooks - enhanced server-to-server communication with events for purchases, renewals, cancellations, and more |
| 🎯 | Subscription status tracking - know whether a user is subscribed whether they're on iOS, Android or web |
| 📊 | Analytics - automatic calculation of metrics like conversion, mrr, and churn |
| 📝 | Online documentation up to date |
| 🔀 | Integrations - over a dozen integrations to easily send purchase data where you need it |
| 💯 | Well maintained - frequent releases |
| 📮 | Great support - Help Center |
| 🤩 | Awesome new features |
Requirements
The minimum React Native version this SDK requires is 0.58.
Installation
ExpoKit projects of version 33 or higher can successfully use react-native-purchases. If you haven't upgraded, you can follow the instructions here to upgrade.
If you're planning on ejecting from Expo, upgrade your expo version first, THEN eject. It'll save you a whole lot of hassle.
Add the library to the project
$ npm install react-native-purchases --save
or
$ yarn add react-native-purchases
Link library to the project
$ react-native link react-native-purchases
Additional iOS Setup (for manual installation)
Purchases.framework also needs to be added to your iOS project. The npm install will download the correct framework version.
Alternatively you can install the framework via CocoaPods. For instructions go here.
Create a Framework Reference in your project
- Drag
Purchases.frameworkfrom theRNPurchasessub-project under the libraries section to the outer project and create a reference.
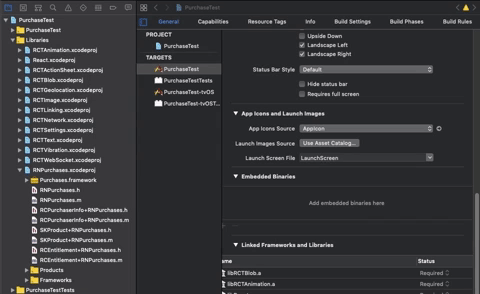
Add iOS Framework to Embedded Binaries
- In Xcode, in project manager, select your app target.
- Select the general tab
- Drag
Purchases.frameworkfrom your project to the Embedded Binaries section
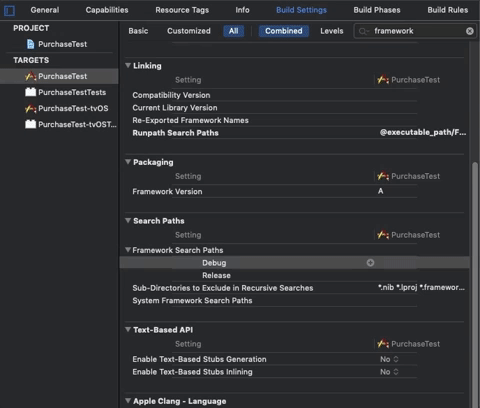
Add $(PROJECT_DIR)/../node_modules/react-native-purchases/ios to Framework Search paths in build settings
Add Strip Frameworks Phase
The App Store, in it's infinite wisdom, still rejects fat frameworks, so we need to strip our framework before it is deployed. To do this, add the following script phase to your build.
- In Xcode, in project manager, select your app target.
- Open the
Build Phasestab - Add a new
Run Script, name itStrip Frameworks - Add the following command
"${PROJECT_DIR}/../node_modules/react-native-purchases/ios/strip-frameworks.sh"(quotes included)
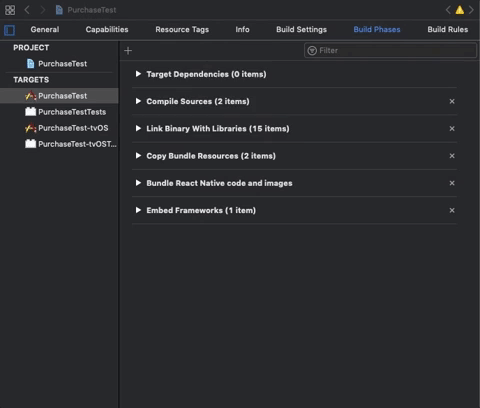
Link static library
The react-native link command should have added the libRNPurchases.a library to the Linked Frameworks and Libraries section of your app target. If it hasn't add it like this:

Installing with Cocoapods / ExpoKit
If your project already uses Cocoapods to install iOS dependencies, common in ExpoKit projects, linking the library should have added it to the podfile. If it hasn't, add the following to your project's podfile to reference the library from your node_modules folder:
  pod 'RNPurchases', :path => '../node_modules/react-native-purchases'
      :inhibit_warnings => true
In your ios folder, run pod install. If you've just upgraded ExpoKit, you might need to upgrade cocoapods to the newest version: sudo gem install cocoapods.
Getting Started
For more detailed information, you can view our complete documentation at docs.revenuecat.com.
1. Get a RevenueCat API key
Log in to the RevenueCat dashboard and obtain a free API key for your application.
2. Initialize an RCPurchases object
You should only configure Purchases once (usually on app launch) as soon as your app has a unique user id for your user. This can be when a user logs in if you have accounts or on launch if you can generate a random user identifier. The same instance is shared throughout your app by accessing the .shared instance in the SDK.
import Purchases from 'react-native-purchases';

Purchases.setDebugLogsEnabled(true);
let purchases = await Purchases.setup("revenuecat_api_key", "app_user_id");
3. Displaying Available Products
Purchases will automatically fetch the latest active entitlements and get the product information from Apple or Google. This means when users launch your purchase screen, products will already be loaded.
Below is an example of fetching entitlements.
try {
  const entitlements = await Purchases.getEntitlements();
  this.setState({entitlements});
} catch (e) {

}
4. Make a purchase
When it comes time to make a purchase, Purchases has a simple method, makePurchase. The code sample below shows the process of purchasing a product and confirming it unlocks the pro content.
try {
  const purchaseMade = await Purchases.makePurchase(entitlements.pro.monthly.identifier);
  if (purchaseMade.purchaserInfo.activeEntitlements !== "undefined" && purchaseMade.purchaserInfo.activeEntitlements.includes("my_entitlement_identifier")) {
    // Unlock that great "pro" content
  }
} catch (e) {
  if (!e.userCancelled) {
    showError(e);
  }
}
makePurchasehandles the underlying framework interaction and automatically validates purchases with Apple and Google through our secure servers. This helps reduce in-app purchase fraud and decreases the complexity of your app. Receipt tokens are stored remotely and always kept up-to-date.
5. Get Subscription Status
Purchases makes it easy to check what active subscriptions the current user has. This can be done two ways within the .purchaserInfo method:
- Checking active Entitlements - this lets you see what entitlements (from RevenueCat dashboard) are active for the user.
- Checking the active subscriptions - this lets you see what product ids (from iTunes Connect or Play Store) are active for the user.
// Get purchaser info
try {
  const purchaserInfo = await Purchases.getPurchaserInfo();
  // Option 1: Check if user has access to entitlement (from RevenueCat dashboard)
  if(purchaserInfo.activeEntitlements !== "undefined" && purchaserInfo.activeEntitlements.includes("my_entitlement_identifier")) {
    // Grant user "pro" access
  }
  // Option 2: Check if user has active subscription (from App Store Connect or Play Store)
  if (purchaserInfo.activeSubscriptions !== "undefined" && purchaserInfo.activeSubscriptions.includes("my_product_identifier")) {
    // Grant user "pro" access
  }
} catch (e) {
 // Error fetching purchaser info
}
Since the SDK updates and caches the latest PurchaserInfo when the app becomes active, the completion block in
.purchaserInfowon't need to make a network request in most cases.
Listening For Purchaser Info Updates
Since Purchases SDK works seamlessly on any platform, a user's purchase info may change from a variety of sources. You can respond to any changes in purchaser info by conforming to an optional listener. This will fire whenever we receive a change in purchaser info and you should expect it to be called at launch and throughout the life of the app.
Depending on your app, it may be sufficient to ignore the delegate and simply handle changes to purchaser information the next time your app is launched.
Purchases.addPurchaserInfoUpdateListener(info => {
  // handle any changes to purchaserInfo
});
Restoring Purchases
Restoring purchases is a mechanism by which your user can restore their in-app purchases, reactivating any content that had previously been purchased from the same store account (Apple or Google).
If two different App User IDs try to restore transactions from the same underlying store account (Apple or Google) RevenueCat will create an alias between the two App User IDs and count them as the same user going forward.
This is a common if your app does not have accounts and is relying on RevenueCat's random App User IDs.
try {
  const purchaserInfo = Purchases.restoreTransactions();
} catch (e) {
 // Error restoring
}
Restoring purchases for logged in users:
If you've provided your own App User ID, calling restoreTransactions could alias the logged in user to another generated App User ID that has made a purchase on the same device.
Allow Sharing App or Play Store Accounts
By default, RevenueCat will not let you reuse an App or Play Store account that already has an active subscription. If you set allowSharingAppStoreAccount = True the SDK will be permissive in accepting shared accounts, creating aliases as needed.
By default allowSharingAppStoreAccount is True for RevenueCat random App User IDs but must be enabled manually if you want to allow permissive sharing for your own App User IDs.
Debugging
You can enabled detailed debug logs by setting debugLogsEnabled = true. You can set this before you configure Purchases.
Purchases.setDebugLogsEnabled(true);OS_ACTIVITY_MODE
On iOS, disabling
OS_ACTIVITY_MODEin your XCode scheme will block debug logs from printing in the console. If you have debug logs enabled, but don't see any output, go toProduct -> Scheme -> Edit Scheme...in Xcode and uncheck theOS_ACTIVITY_MODEenvironment variable.
Example output:
[Purchases] - DEBUG: Debug logging enabled.
[Purchases] - DEBUG: SDK Version - 2.0.0
[Purchases] - DEBUG: Initial App User ID - (null)
[Purchases] - DEBUG: GET /v1/subscribers/<APP_USER_ID>
[Purchases] - DEBUG: GET /v1/subscribers/<APP_USER_ID>/products
[Purchases] - DEBUG: No cached entitlements, fetching
[Purchases] - DEBUG: Vending purchaserInfo from cache
[Purchases] - DEBUG: applicationDidBecomeActive
[Purchases] - DEBUG: GET /v1/subscribers/<APP_USER_ID>/products 200
Entitlements
An entitlement represents features or content that a user is "entitled" to. With Entitlements, you can set up your available in-app products remotely and control their availability without the need to update your app. For more information on configuring entitlements, look at our entitlements documentation.
Sample App
We've added an example in this project showing a simple example using Purchases with the RevenueCat backend. Note that the pre-registered in app purchases in the demo apps are for illustration purposes only and may not be valid in App Store Connect. Set up your own purchases with RevenueCat when running the example.
Next Steps
- Head over to our online documentation for complete setup guides
- If you haven't already, make sure your products are configured correctly in the RevenueCat dashboard by checking out our guide on entitlements
- If you want to use your own user identifiers, read about setting app user ids
- If you're moving to RevenueCat from another system, see our guide on migrating your existing subscriptions
- Once you're ready to test your integration, you can follow our guides on testing purchases
Reporting Issues
You can use Github Issues to report any bugs and issues with Purchases. Here is some advice for users that want to report an issue:
- Make sure that you are using the latest version of Purchases. The issue that you are about to report may be already fixed in the latest master branch version: https://github.com/revenuecat/react-native-purchases/tree/master.
- Providing reproducible steps for the issue will shorten the time it takes for it to be fixed - a Gist is always welcomed!
- Since some issues are Sandbox specific, specifying what environment you encountered the issue might help.
Technical Support or Questions
If you have questions or need help integrating Purchases please contact us or email support@revenuecat.com instead of opening an issue.
Feature Requests
If there is something you'd like to see included or feel anything is missing you can add a feature to our public roadmap. If the feature already exists, or you see something else you'd like, upvote it.
Pricing
Purchases SDK is free to use but some features require a paid plan. You can find more about that on our website on the pricing plan page.