Extending XNAT to Preclinical Imaging Centers
Explore the docs »
View Demo
·
Report Bug
·
Request Feature
Table of Contents
 XNAT for Preclinical Imaging Centers (XNAT-PIC) has been developed to expand XNAT's basic functionalities to preclinical imaging and consists of:
- MRI2DICOM, a Magnetic Resonance Imaging (MRI) converter from ParaVision® (Bruker, Inc. Billerica, MA) file format to DICOM standard
- XNAT-PIC Uploader to import multimodal DICOM image datasets to XNAT
- XNAT-PIC Pipelines for analysing single or multiple subjects within the same project in XNAT.
XNAT-PIC has been built by using the following major frameworks:
This section contains instructions on setting up XNAT-PIC on your computer, in both Linux and Windows OS.
Make sure you have the following softwares and packages in place:
- XNAT 1.7.6
- Python 3.7.6 and Python 2.7
- Numpy 1.15.4 and Numpy 1.18.5
- pyAesCrypt 0.4.3
- Pydicom 1.2.1
- xnatpy 0.3.22
- pyxnat-1.2.1.0.post3
- Requests 2.23.0
- opencv-python 4.4.0.40
- nibabel 3.1.1
- dcmrtstruct2nii 1.0.19
- MATLAB Engine API for Python
XNAT-PIC requires an XNAT instance to work with, therefore you first need to install XNAT on a local desktop or server. XNAT-PIC has been designed and tested for XNAT 1.7.6: we recommend to install this version. You can find the XNAT installation guide at the following link https://wiki.xnat.org/documentation/getting-started-with-xnat/xnat-installation-guide.
If you need help with the XNAT installation, please get in touch with us!
-
Clone the repo
git clone https://github.com/szullino/XNAT-PIC
-
Install Python 3.7.6 or, alternatively, Anaconda
Once you have Python up and running, you can install the following libraries. Again, we recommend to install the indicated versions as XNAT-PIC has not been tested to work with the latest releases. For any issue, please contact us.
-
Install Numpy 1.15.4
pip install numpy==1.15.4
-
Install pydicom 1.2.1
pip install pydicom==1.2.1
-
Install xnatpy 0.3.22
pip install xnatpy==0.3.22
-
Install pyAesCrypt 0.4.3
pip install pyAesCrypt==0.4.3
- Clone the repo
git clone https://github.com/szullino/XNAT-PIC-pipelines
Follow these instructions to set up the XNAT-PIC Pipelines:
-
Create a Python 2.7 virtual environment
-
Install Requests 2.23.0
pip install requests==2.23.0
-
Install pyxnat 1.2.1.0.post3
pip install pyxnat==1.2.1.0.post3
-
Install the MATLAB Engine API for Python
In particular, for the Mask_Average XNAT-PIC Pipeline you need to install Python 3.8.3 and the following libraries:
-
Install numpy 1.18.5
pip install numpy==1.18.5
-
Install opencv-python 4.4.0.40
pip install opencv-python==4.4.0.40
-
Install nibabel 3.1.1
pip install nibabel==3.1.1
-
Install dcmrtstruct2nii 1.0.19
pip install dcmrtstruct2nii==1.0.19
You can launch MRI2DICOM and the XNAT-PIC Uploader by running launcher.py in your Python IDE or via operating system command-line or terminal:
$ python launcher.py
Users can then click on MRI2DICOM to convert the ParaVision® (Bruker, Inc. Billerica, MA) raw data to DICOM standard or on the XNAT-PIC Uploader to import the MR image sessions to XNAT, if your images are already in DICOM. In the first case, the converter needs to know the directory of the project in ParaVision® format. Once the process is over, a new folder with the DICOM images will be created in the same directory.
The DICOM image dataset can be then uploaded to XNAT. XNAT-PIC Uploader can upload a single subject or multiple subjects. You need to provide the XNAT webpage address and the login details. Then users can create a new project or select a pre-existing one in the drop-down menu, browse to the directory and type the number of custom variables. A pop-up window notifies the user once the process is complete.
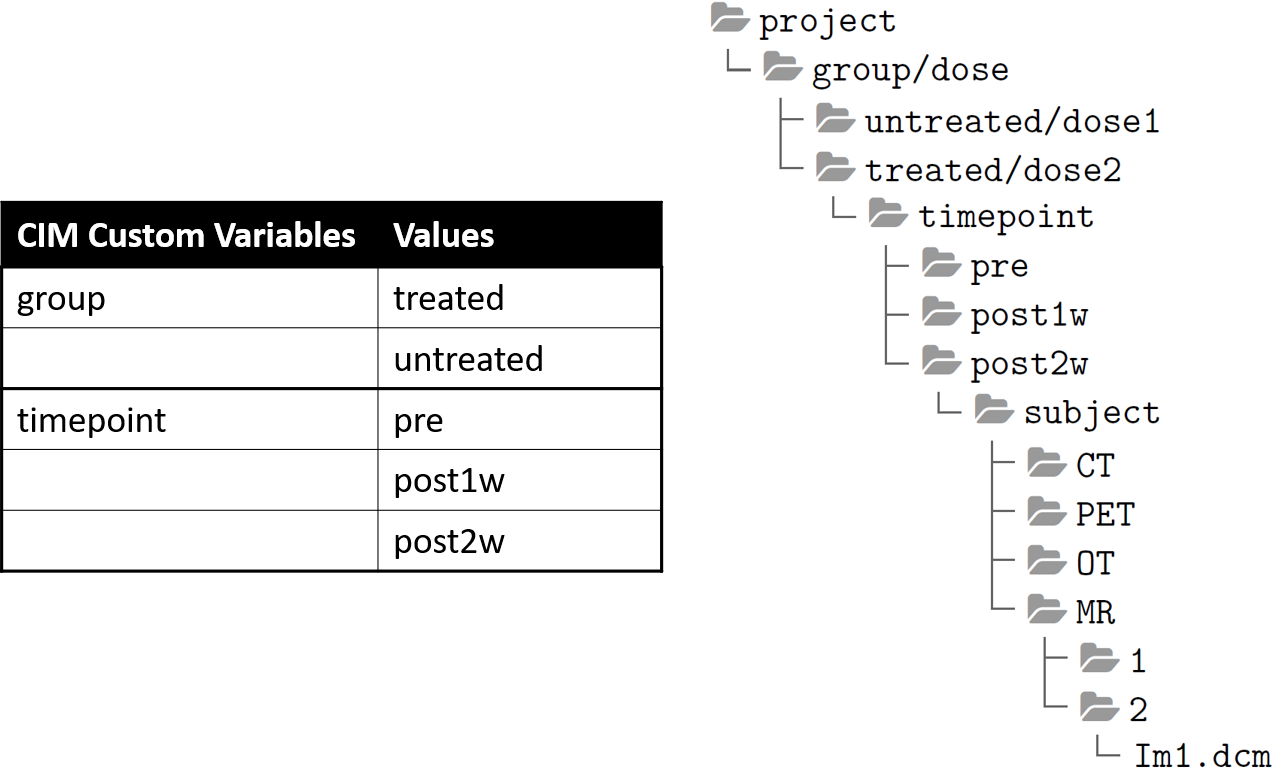
When uploading DICOM images to XNAT the user can also adopt a more complex structure that automatically sets custom variables (up to 3) and their values. For example, this data tree structure corresponds to the following custom variables and values:
For more information about custom variables in XNAT, please visit: https://wiki.xnat.org/documentation/how-to-use-xnat/creating-and-managing-projects/adding-custom-variables-to-xnat-projects
If you wish to use the pipelines developed in XNAT-PIC, you have two options accordingly to your profile:
-
generic XNAT users can sign up to our CIM-XNAT instance at http://cim-xnat.unito.it, upload the MR image datasets to be analyzed and add the pipelines to their own projects.
More information can be found here: Adding Pipelines to your Project -
XNAT admins can download the XNAT-PIC pipelines from https://github.com/szullino/XNAT-PIC-Pipelines, install and register them in their own XNAT instance.
More information can be found here: Installing Pipelines in XNAT
In this second case, you need to create the following XNAT format config file, named .central.cfg, to be placed at a default location.
{"server": "your_xnat_url", "user": "user", "password": "your_xnat_password"}
The path of your .central.cfg file must be replaced in the following scripts REST_XNAT_Getscans_bytype.py, download_project_scans_of_type.py, and upload_XNAT_files.py.
To run a pipeline in XNAT, please follow this guide: https://wiki.xnat.org/documentation/how-to-use-xnat/running-pipelines-in-xnat
This table shows a list of the XNAT-PIC Pipelines currently available:
| Name | Description |
|---|---|
| Process_DWI | Pipeline processes DWI map |
| Process_DWI project | Pipeline processes all DWI maps in a project |
| Process_T1w_SR | Pipeline processes T1 Saturation Recovery map |
| Process_T1w_SR_project | Pipeline processes all T1 Saturation Recovery maps in a project |
| Process_T2w | Pipeline processes T2 map |
| Process_T2w_project | Pipeline processes T2 maps in a project |
| Mask_Average | Pipeline computes a mean value in a Region of Interest of a parametric map |
Please visit open issues for a list of proposed features (and known issues).
Contributions are greatly appreciated.
If you wish to help us in improving the XNAT-PIC project, please follow these instructions.
- Fork the Project
- Create your Feature Branch (
git checkout -b feature/XNAT-PIC-new-feature) - Commit your Changes (
git commit -m 'Add some XNAT-PIC-new-feature') - Push to the Branch (
git push origin feature/XNAT-PIC-new-feature) - Open a Pull Request
Thank you!
XNAT-PIC is distributed under the terms of the GNU General Public License (GPL) v3 or any later version as stated by the Free Software Foundation. See LICENSE for more information.
Please, cite these repositories by using:
- S. Zullino, A. Paglialonga, W. Dastrù, D. L. Longo, S. Aime. XNAT-PIC: Extending XNAT to Preclinical Imaging Centers, 2021. DOI: https://arxiv.org/abs/2103.02044
-
"Demonstrator 5: XNAT-PIC: expanding XNAT for image archiving and processing to Preclinical Imaging Centers". EOSC-Life website, https://www.eosc-life.eu/d5/
-
"Towards sharing and reusing of preclinical image data". Euro-Bioimaging website, https://www.eurobioimaging.eu/news/towards-sharing-and-reusing-of-preclinical-image-data/
-
"Data Management: Biological and Preclinical Imaging Perspective". Euro-Bioimaging Virtual Pub, February 12th, 2021.
-
"XNAT-PIC: expanding XNAT for image archiving and processing to Preclinical Imaging Centers". Demonstrator 5 from Populating EOSC-Life: Success stories for the Demonstrators – Session 1 from January 13, 2021.
Sara Zullino, PhD


Molecular Imaging Center
Department of Molecular Biotechnology and Health Sciences

Via Nizza 52 | 10126 Torino, Italy
sara.zullino@unito.it | T +39 011 670 9539


- Alessandro Paglialonga: https://github.com/pagli17
- Stefan Klein, Hakim Achterberg and Marcel Koek - Biomedical Imaging Group Rotterdam, Erasmus Medical Center, Rotterdam
- Matteo Caffini, “Project-Beat--Pyhton”: https://github.com/mcaffini/Project-Beat---Python


