日本語版ドキュメントはこちら。
Tiny View Plus is a FPV multi-view and lap timing system. It works on PC with UVC compatible FPV receivers. Up to 4 receivers(*) can be connected.

(*)On Windows, please connect only one receiver to each USB port built in PC.
| OS | macOS (13 Venture is recommended) Windows (11 is recommended) |
| FPV Receiver | Eachine ROTG02 Eachine ROTG01 Pro Eachine ROTG01 |
Attention: We are not responsible for any problems caused by running the application.
If you want to build from source code, please refer to this document.
- Download a zip file from Release page.
- Remove extended file attribute from zip file.
- Run following command on the "Terminal" app.
xattr -c ~/Downloads/tinyviewplus_*_macos64bit.zip
- Extract zip file.
- Place app file in the "Application" folder.
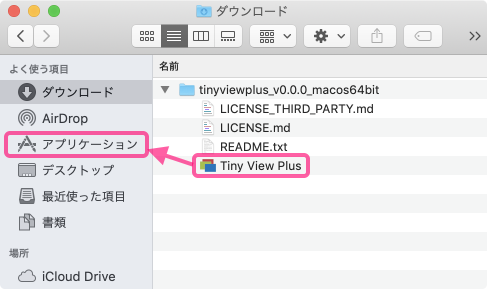
- If you place it anywhere else, file write functions will not work.

- Download a zip file from Release page.
- Extract it and place its contents in the proper place.
- Install Microsoft Visual C++ Redistributable for Visual Studio(vc_redist.x64.exe).
- Connect receivers(Up to 4) to computer.
- Launch application.
If receivers are not successfully detected, please try following operation.
- Remove all receivers.
- If using a USB hub, reconnect it or remove it.
- Connect receivers one by one at intervals of several seconds.
On macOS, if you are using a USB hub and the picture drops, please reduce the number of receivers per USB hub.
On Windows, if multiple receivers are connected to same USB hub, only one of them may operate.
| key | Function | Default value |
|---|---|---|
| N | Set speech language (Japanese/English) | Same as system locale |
| S | Set system statistics (On/Off) | Off |
| H | Display "Settings/Commands" | - |
| I | Initialize settings | - |
| key | Function | Default value |
|---|---|---|
| F,Esc | Set fullscreen mode (On/Off) | Off |
| B | Set background image (*1) | Built-in image |
| T | Set camera view trimming (On/Off) (*2) | Off |
| E | Set camera frame visibility (On/Off) | Off |
| 1~4 | Set camera 1~4 enhanced view (On/Off) | Off |
| command + 1~4 | Set camera 1~4 visibility (On/Off) [macOS] | On |
| Alt + 1~4 | Set camera 1~4 visibility (On/Off) [Windows] | On |
| L | Set lap history view mode (Off/Inside/Outside) (*3) | Off |
| Q | Start/Stop QR Code reader for camera label (*4) | - |
- (*1) The background image will be scaled according to the screen. Upper left corner will be displayed in priority.
- (*2) Camera image will be cropped and displayed as large as possible, when 1 or 3 cameras are connected.
- (*3) "Outside" will be effective, when 3 cameras are connected.
- (*4) Sets the characters scanned from the QR Code to the camera label.
| key | Function | Default value |
|---|---|---|
| A | Set AR lap timer mode (Normal/Loose/Off) (*1) | Normal |
| Left/Right,Up/Down,D | Set race duration time (0~36,000s) and laps (1~10,000) | 0s (No limit), 10 laps |
| W | Set wait for lap after time limit (On/Off) | Off |
| PgUp/PgDown | Set minimum lap time (1~100s) | 3s |
| G | Set staggered start (On/Off) (*2) | Off |
| Space | Start/Stop race | - |
| 5~8,Z,/ | Add lap at camera 1~4,1,3 (manual measurement) | - |
| command + 5~8,Z,/ | Delete previos lap at camera 1~4,1,3 [macOS] | - |
| Alt + 5~8,Z,/ | Delete previos lap at camera 1~4,1,3 [Windows] | - |
| R | Display race result (*3) | - |
| C | Clear race result | - |
- (*1) In loose mode, lap time will be measured even if the drone passes outside the gate.
- (*2) Time measurement starts after passing the first gate.
- (*3) Race results will be saved under predefined folder when race finish.
- macOS binary: Tiny View Plus.app/Contents/ Resources/data/pilots
- others: data/pilots
- When you exit the application, system/race settings will be saved.
- When you exit the application, some display settings will be saved.
- Camera audio is not supported.
Some functions can be operated with mouse.
| Operation | Function |
|---|---|
| Click camera 1~4 icon | Change icon (*1) |
| Click camera 1~4 label | Change label (*2) |
Click  button button |
Display "Settings/Commands" |
Click  button button |
Set fullscreen mode to On |
Click  button button |
Set fullscreen mode to Off |
Click  button button |
Quit application |
- (*1) Camera label will be automatically changed according to changing camera icon.
- The file name of the icon (excluding the extension) will be adopted.
- (*2) Camera icon will be automatically changed according to changing camera label.
- If {label string}.jpg/png/bmp was found under predefined folder, it will be adopted as an icon image in this priority order.
- macOS binary: Tiny View Plus.app/Contents/ Resources/data/pilots
- others: data/pilots
- If no image file is found, the default icon will be adopted.
- The aspect ratio is forced to 1:1.
- If {label string}.jpg/png/bmp was found under predefined folder, it will be adopted as an icon image in this priority order.
Some functions can also be operated with gamepad. Up to 4 gamepads can be used simultaneously.
| Button | Function |
|---|---|
| 1~4 | Add lap at camera 1~4 (manual measurement) |
| 5 + 1~4 | Delete previos lap at camera 1~4 |
You can set the camera label by the QR Code.

You can use Google Charts API to create QR Code. An example of URL is as follows.
https://chart.apis.google.com/chart?cht=qr&chs=500x500&chl=TinyViewPlus
It is convenient to embed the QR Code in the OSD. An example of an image for the Betaflight is as follows.

* "QR Code" is a registered trademark of DENSO WAVE INCORPORATED.
You can measure the lap time by using AR marker.


Please place 8 or more markers around the gate. Also make sure that the top of the marker faces the center of the gate. Following four types of markers are supported. It does not matter if only one type is placed as shown above.
The size of the marker should be 120-150mm per side. Larger marker will be suitable for higher speed range. If marker recognition is not successful, please try increasing the size of the marker or placing them in a brighter place.
Following are gate design prototypes.
- Normal gate : Whole (A0) Part (A4)
- Gate for high speed : Whore (A0) Part (A3)
- Others
Lap time will be measured only during the race. After detecting two or more correctly oriented markers simultaneously, when the marker disappears from the screen, lap time will be confirmed. However, if the direction of the last displayed marker is incorrect, the measurement will be canceled.
Depending on the environment, recognition processing of markers might be heavy. In that case, please disable the function.
When automatic and manual measurement are used together, the one with earlier timing will be adopted and recorded. The one with later timing will be rejected and not be recorded.
However, if the interval between the two is equal to or greater than the minimum lap time setting, it will be considered as individual laps, both will be adopted and will be recorded.
Tiny View Plus can be controlled by OSC protocol. Detailed information is here.
Tiny View Plus is distributed under the MIT License. This gives everyone the freedoms to use Tiny View Plus in any context: commercial or non-commercial, public or private, open or closed source. Please see LICENSE.md and LICENSE_THIRD_PARTY.md for details.