Note: This new workshop for the workshop days 2022 of ch-open is still in beta. Feedback is welcome, please create an issue.
The Internet of Things (IoT) is the convergence of internet and real world. IoT embedded devices typically have limited resources, but they are also becoming more performant with each generation. This enables more complex software on site, but also places higher demands on the platform. Zephyr RTOS, an open source operating system for embedded devices, provides the necessary abstractions, including POSIX threads, BSD sockets and debugging mechanisms. These allow professional software engineering for robust, reliable IoT applications.
- Introduction
- Toolchain Setup
- Hardware Setup
- GPIO & Sensors
- Threads & Mutex
- Message Queues
- Sockets & HTTP
- Debugging
This workshop teaches the basics of embedded programming on the latest IoT hardware, with Zephyr OS, in the C programming language.
This workshop is aimed at interested people with programming experience, ideally in C, but also in Python or Java.
Participants need a laptop with MacOS, Windows or Linux, and two USB/USB-C ports. IoT hardware including sensors is available on loan.
The workshop requires a Wi-Fi network that is accessible without a portal. Alternatively, a personal smartphone can be used as a hotspot.
Video: Introduction to Zephyr by @TheaClay
The Zephyr Project strives to deliver the best-in-class RTOS for connected resource-constrained devices, built to be secure and safe.
Secure - Developed with security in mind. Includes CNA with PSIRT response team.
Open Source - Available through the Apache 2.0 open source license. Free to use in commercial and non-commercial solutions.
Product Ready - Long term support (LTS) with security updates. Auditable code base developed with a goal of safety certifications.
Connected - Supports BLE, Wi-Fi, 802.15.4. Supports standards like 6LoWPAN, CoAP, IPv4, IPv6, Ethernet, USB, CAN and Thread.
The Zephyr OS is based on a small-footprint kernel designed for use on resource-constrained and embedded systems: from simple embedded environmental sensors and LED wearables to sophisticated embedded controllers, smart watches, and IoT wireless applications.
https://docs.zephyrproject.org/latest/introduction/index.html
Extensive suite of Kernel services • Multiple Scheduling Algorithms • Highly configurable / Modular for flexibility • Cross Architecture • Memory Protection • Compile-time resource definition • Optimized Device Driver Model • Devicetree Support • Native Networking Stack supporting multiple protocols • Bluetooth Low Energy 5.0 support • Native Linux • macOS • and Windows Development • Virtual File System Interface with LittleFS and FATFS Support • Powerful multi-backend logging Framework • User friendly and full-featured Shell interface • Settings on non-volatile storage • Non-volatile storage (NVS) • Native POSIX port.
https://docs.zephyrproject.org/latest/introduction/index.html#distinguishing-features
The Zephyr kernel lies at the heart of every Zephyr application. It provides a low footprint, high performance, multi-threaded execution environment with a rich set of available features. The rest of the Zephyr ecosystem, including device drivers, networking stack, and application-specific code, uses the kernel’s features to create a complete application.
Scheduling, Interrupts, and Synchronization • Data Passing • Memory Management • Timing • Other
https://docs.zephyrproject.org/latest/kernel/services/index.html
Cryptography • Debugging • Device Management • File Systems • Formatted Output • Logging • Tracing • Resource Management • Modbus • Asynchronous Notifications • Power Management • OS Abstraction • Shell • Settings • State Machine Framework • Storage • Task Watchdog • Trusted Firmware-M • USB device support • Virtualization • Miscellaneous.
https://docs.zephyrproject.org/latest/services/index.html
CMake is used to build your application together with the Zephyr kernel. A CMake build is done in two stages. The first stage is called configuration. During configuration, the CMakeLists.txt build scripts are executed. After configuration is finished, CMake has an internal model of the Zephyr build, and can generate build scripts that are native to the host platform.
https://docs.zephyrproject.org/latest/build/cmake/index.html

https://docs.zephyrproject.org/latest/build/cmake/index.html#configuration-phase


https://docs.zephyrproject.org/latest/build/cmake/index.html#pre-build, #intermediate-binaries, #intermediate-binaries-post-processing, #final-binary, #post-processing
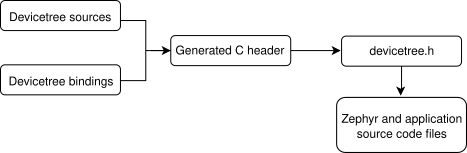
A devicetree is a hierarchical data structure that describes hardware.
There are two types of devicetree input files: devicetree sources and devicetree bindings. The sources contain the devicetree itself. The bindings describe its contents, including data types.
https://docs.zephyrproject.org/latest/build/dts/intro.html
a devicetree is a tree. The human-readable text format for this tree is called DTS (for devicetree source)
Devicetree nodes have paths identifying their locations in the tree [and] properties [which] are name/value pairs.
In practice, devicetree nodes usually correspond to some hardware, and the node hierarchy reflects the hardware’s physical layout.
https://docs.zephyrproject.org/latest/build/dts/intro.html#syntax-and-structure
A devicetree binding declares requirements on the contents of nodes, and provides semantic information about the contents of valid nodes. Zephyr devicetree bindings are YAML files
https://docs.zephyrproject.org/latest/build/dts/bindings.html
Step-by-step advice for getting things done with devicetree.
Show final devicetree after a build
$ cat build/zephyr/zephyr.dts
Show final devicetree includes
$ cat build/zephyr/include/generated/devicetree_unfixed.h
https://docs.zephyrproject.org/latest/build/dts/howtos.html
Devicetree input (green) and output (yellow) files

There are four types of devicetree input files:
- sources (.dts)
- includes (.dtsi)
- overlays (.overlay)
- bindings (.yaml)
Every supported board has a BOARD.dts file describing its hardware
BOARD.dts includes one or more .dtsi files [which] describe the CPU or system-on-chip Zephyr runs on [and] common hardware features shared by multiple boards.
BOARD.dts can be extended or modified using [...] .overlay [...] DTS files [to] adapt the base devicetree for different purposes
Zephyr applications can use overlays to enable a peripheral that is disabled by default, select a sensor on the board for an application specific purpose, etc. [or] defining shields.
https://docs.zephyrproject.org/latest/build/dts/intro.html#input-and-output-files
Here are some tips for fixing devicetree related code.
- Try again with a pristine build directory
- Make sure <devicetree.h> is included
- Make sure you’re using the right names
- Look at the preprocessor output
- Validate properties
- Check for missing bindings
- Errors with DT_INST_() APIs
https://docs.zephyrproject.org/latest/build/dts/troubleshooting.html#dt-trouble
https://docs.zephyrproject.org/latest/develop/getting_started/index.html
Maybe also https://github.com/zephyrproject-rtos/sdk-ng/releases (Installer, optional)
Install the Zephyr command line tool west
$ brew install cmake ninja gperf python3 ccache qemu dtc wget
$ pip3 install -U west
Create a Zephyr workspace zephyrproject
$ cd ~/Documents
$ west init zephyrproject
$ cd zephyrproject
$ west update
$ west zephyr-export
$ pip3 install -r zephyr/scripts/requirements.txt
Install the Zephyr SDK
$ cd ~
$ wget https://github.com/zephyrproject-rtos/sdk-ng/releases/download/v0.14.2/zephyr-sdk-0.14.2_macos-x86_64.tar.gz
$ wget -O - https://github.com/zephyrproject-rtos/sdk-ng/releases/download/v0.14.2/sha256.sum | shasum --check --ignore-missing
$ tar xvf zephyr-sdk-0.14.2_macos-x86_64.tar.gz
$ cd zephyr-sdk-0.14.2
$ ./setup.sh
Clone the workshop directory into the workspace
$ cd ~/Documents/zephyrproject
$ git clone https://github.com/tamberg/zephyr-workshop
(Tipps on Brew, XCode, etc. see https://learn.adafruit.com/blinking-led-with-zephyr-rtos/installing-zephyr-osx)
TODO
TODO
#include <zephyr/zephyr.h>

void main(void) {
    printk("Hello World! %s\n", CONFIG_BOARD);
}
This example runs without embedded hardware, on MacOS, Linux or Windows.
$ west build -p auto -b qemu_x86 samples/hello_world
$ west build -t run

SeaBIOS (version rel-1.15.0-0-g2dd4b9b3f840-prebuilt.qemu.org)
Booting from ROM..
*** Booting Zephyr OS build zephyr-v3.0.0-3797-gc28874657b70  ***
Hello World! qemu_x86
- https://docs.zephyrproject.org/latest/develop/west/basics.html
- https://docs.zephyrproject.org/latest/develop/west/manifest.html
- https://docs.zephyrproject.org/latest/develop/west/extensions.html
- https://docs.zephyrproject.org/latest/develop/west/troubleshooting.html
- https://docs.platformio.org/en/latest/frameworks/zephyr.html
- https://marketplace.eclipse.org/content/eclipse-plug-zephyr-project
- https://marketplace.visualstudio.com/items?itemName=zephir-lang.zephir
- https://marketplace.visualstudio.com/items?itemName=trond-snekvik.devicetree
- https://marketplace.visualstudio.com/items?itemName=trond-snekvik.kconfig-lang
- Video: Diskussion über Zephyr Developer Environments mit @laurenmurphyx64 und @anasnashif
- https://docs.zephyrproject.org/latest/develop/application/index.html
- https://github.com/zephyrproject-rtos/example-application
Zephyr project developers are continually adding board-specific support
https://docs.zephyrproject.org/latest/boards/index.html
ESP32 or ESP32-S2, which are currently the best choices [by Espressif] for running Zephyr
https://www.espressif.com/en/news/Zephyr_updates
https://www.adafruit.com/product/4331 (3.3V)
https://www.adafruit.com/product/5325 (Adafruit QT Py ESP32-S2 WiFi Dev Board)
https://docs.zephyrproject.org/latest/boards/xtensa/esp32s2_saola/doc/index.html

- https://learn.adafruit.com/assets/107493 (Pinout)
- https://learn.adafruit.com/adafruit-qt-py-esp32-s2/pinouts
- https://docs.espressif.com/projects/esp-idf/en/latest/esp32s2/_images/esp32-s2_saola1-pinout.jpg (esp32s2_saola)

- https://learn.adafruit.com/assets/110384 (Schematic)
- https://learn.adafruit.com/adafruit-qt-py-esp32-s2/downloads
- https://github.com/adafruit/Adafruit-QT-Py-ESP32-S2-PCB
- ESP32-S2 Series Datasheet
- ESP32-S2 Technical Reference Manual
- ESP32-S2 WROVER Technical Reference Manual
- https://docs.espressif.com/projects/esp-idf/en/latest/esp32s2/hw-reference/esp32s2/user-guide-saola-1-v1.2.html (esp32s2_saola)
- boards/xtensa/esp32s2_saola/esp32s2_saola.dts
- dts/xtensa/espressif/esp32s2.dtsi
- boards/xtensa/esp32s2_saola/esp32s2_saola-pinctrl.dtsi
- boards/xtensa/esp32s2_saola/esp32s2_saola.yaml
- boards/xtensa/esp32s2_saola/esp32s2_saola_defconfig
| Color | FTDI | Board |
|---|---|---|
| Black | GND | GND |
| Brown | CTS | - |
| Red | VCC | - |
| Orange | TXD | RX |
| Yellow | RXD | TX |
| Green | RTS | - |

To get the ESP32-S2 into ROM bootloader mode
- Press and hold the BOOT button
- Then, press the RESET button
- Release the BOOT button
Now it should show up as a USB device.
To install the ESP32-S2 specific toolchain
$ pip3 install --upgrade esptool
$ cd ~/Documents/zephyrproject
$ west espressif update
To check the source code
$ cd ~/Documents/zephyrproject/zephyr
$ cat samples/basic/blinky/src/main.c
To build and flash
$ west build -p auto -b esp32s2_saola samples/basic/blinky
$ west flash
$ # or: west flash --esp-device=/dev/cu.usbmodem01
TODO
TODO
Not recommended yet.
https://www.adafruit.com/product/5405 (Adafruit QT Py ESP32-C3 WiFi Dev Board)
https://docs.zephyrproject.org/latest/boards/riscv/esp32c3_devkitm/doc/index.html

- https://learn.adafruit.com/assets/109663 (Pinout)
- https://learn.adafruit.com/adafruit-qt-py-esp32-c3-wifi-dev-board/pinouts

- https://learn.adafruit.com/assets/109793 (Schematic)
- https://learn.adafruit.com/adafruit-qt-py-esp32-c3-wifi-dev-board/downloads
- https://github.com/adafruit/Adafruit-QT-Py-ESP32-C3-PCB
- /boards/riscv/esp32c3_devkitm/esp32c3_devkitm.dts
- /dts/riscv/espressif/esp32c3.dtsi
- /boards/riscv/esp32c3_devkitm/esp32c3_devkitm-pinctrl.dtsi
- /boards/riscv/esp32c3_devkitm/esp32c3_devkitm.yaml
- /boards/riscv/esp32c3_devkitm/esp32c3_devkitm_defconfig
$ west espressif update
$ cat samples/hello_world/src/main.c
$ west build -p auto -b esp32c3_devkitm samples/hello_world
<press & hold reset, press user button, release user button, release reset>
$ west flash
$ west espressif monitor
TODO: https://forums.adafruit.com/viewtopic.php?f=8&t=191501&p=926488#p926488
TODO
TODO
No built-in connectivity.
$ brew install dfu-util
$ brew install gcc-arm-embedded --cask
$ which arm-none-eabi-gdb
$ nano ~/.zshenv
export ZEPHYR_TOOLCHAIN_VARIANT=gnuarmemb
export GNUARMEMB_TOOLCHAIN_PATH=/usr/local/
$ source ~/.zshenv
$ echo $ZEPHYR_TOOLCHAIN_VARIANT
$ echo $GNUARMEMB_TOOLCHAIN_PATH
$ cat samples/basic/blinky/src/main.c
$ west build -p auto -b adafruit_feather_stm32f405 samples/basic/blinky
$ west flash
TODO
TODO
Based on samples/basic/blinky try blink

Based on samples/basic/button try button

Based on samples/sensor/dht try dht

See samples/sensor
TODO
TODO
-
https://docs.zephyrproject.org/latest/connectivity/networking/net-stack-architecture.html
-
https://docs.zephyrproject.org/latest/connectivity/networking/api/sockets.html
-
https://github.com/zephyrproject-rtos/zephyr/tree/main/samples/net/sockets
-
https://github.com/zephyrproject-rtos/zephyr/tree/main/samples/net/wifi
-
https://github.com/zephyrproject-rtos/zephyr/blob/main/samples/net/sockets/http_get
-
https://github.com/zephyrproject-rtos/zephyr/tree/main/samples/net/sockets/http_client
-
https://github.com/zephyrproject-rtos/zephyr/tree/main/samples/net/sockets/dumb_http_server
-
https://github.com/zephyrproject-rtos/zephyr/tree/main/samples/net/mqtt_publisher
-
https://github.com/zephyrproject-rtos/zephyr/tree/main/samples/net/sockets/coap_client
-
https://github.com/zephyrproject-rtos/zephyr/tree/main/samples/net/sockets/coap_server
-
https://blog.golioth.io/esp32-esp-at-enables-connectivity-on-any-zephyr-project/ (TODO)
-
https://github.com/golioth/golioth-zephyr-sdk/tree/main/samples/hello#nrf52840-dk--esp32-wroom-32
TODO
- https://docs.zephyrproject.org/latest/kernel/services/other/fatal.html (Runtime Assertions)
$ west debug
https://www.zephyrproject.org/zephyr-rtos-boards-configurations-hardware-interaction/ (Debugging)
On the development machine, at build time.
https://docs.zephyrproject.org/2.7.0/guides/build/kconfig/menuconfig.html
$ west build -t menuconfig
$ cat build/zephyr/.config
e.g. https://docs.zephyrproject.org/latest/kconfig.html#CONFIG_MBEDTLS_KEY_EXCHANGE_ECDHE_ECDSA_ENABLED
Menu path (Top) > Modules > mbed TLS Support > TLS configuration > Ciphersuite configuration
- https://blog.golioth.io/troubleshoot-zephyr-like-a-pro-with-menuconfig/
- https://blog.golioth.io/zephyr-quick-tip-show-what-menuconfig-changed-and-make-changes-persistent/
On the device, via UART.
a shell with a user-defined command set
https://docs.zephyrproject.org/latest/services/shell/index.html
If the shell or rather specific shell commands are enabled in the config, type e.g.
$ help
$ net iface
On the deployed device, via Internet.
- https://blog.golioth.io/adding-an-out-of-tree-sensor-driver-to-zephyr/
- https://blog.golioth.io/how-to-build-your-zephyr-app-in-a-standalone-folder/
- https://blog.golioth.io/improving-zephyr-project-structure-with-manifest-files/
- https://blog.golioth.io/firmware-update-for-esp32-devices/
- https://blog.golioth.io/category/zephyr/ (More)
- https://github.com/nrfconnect/sdk-zephyr
- https://developer.nordicsemi.com/nRF_Connect_SDK/doc/latest/zephyr/index.html
- https://devzone.nordicsemi.com/f/nordic-q-a/77257/relationship-sdk-zephyr-and-zephyhrproject-zephyr
- https://www.youtube.com/watch?v=4m0DPV6-GCs&list=PLzRQULb6-ipG39tVb-DEkIoSS5wQlbK6i&index=30 (Introduction to Zephyr)
- https://www.youtube.com/watch?v=HqDxohtaFUU&list=PLzRQULb6-ipG39tVb-DEkIoSS5wQlbK6i&index=16 (Using OPC-UA with Zephyr)