参考 https://github.com/kubean-io/kubean 源码进行编写,进行了裁剪。感谢 DaoCloud 开源! 👍👍
随着容器化覆盖率的逐步增加,越来越多的业务迁移到 K8s 集群中, 考虑到同城双活、不同业务的复杂性以及耦合度,需要部署维护多套 K8s 集群,如何高效、可靠的在数据中心管理多个 k8s 集群是我们面临的关键挑战。
以前集群的部署和扩缩容主要通过ansible编排任务,黑屏化操作、配置集群的inventory和vars执行ansible playbook。
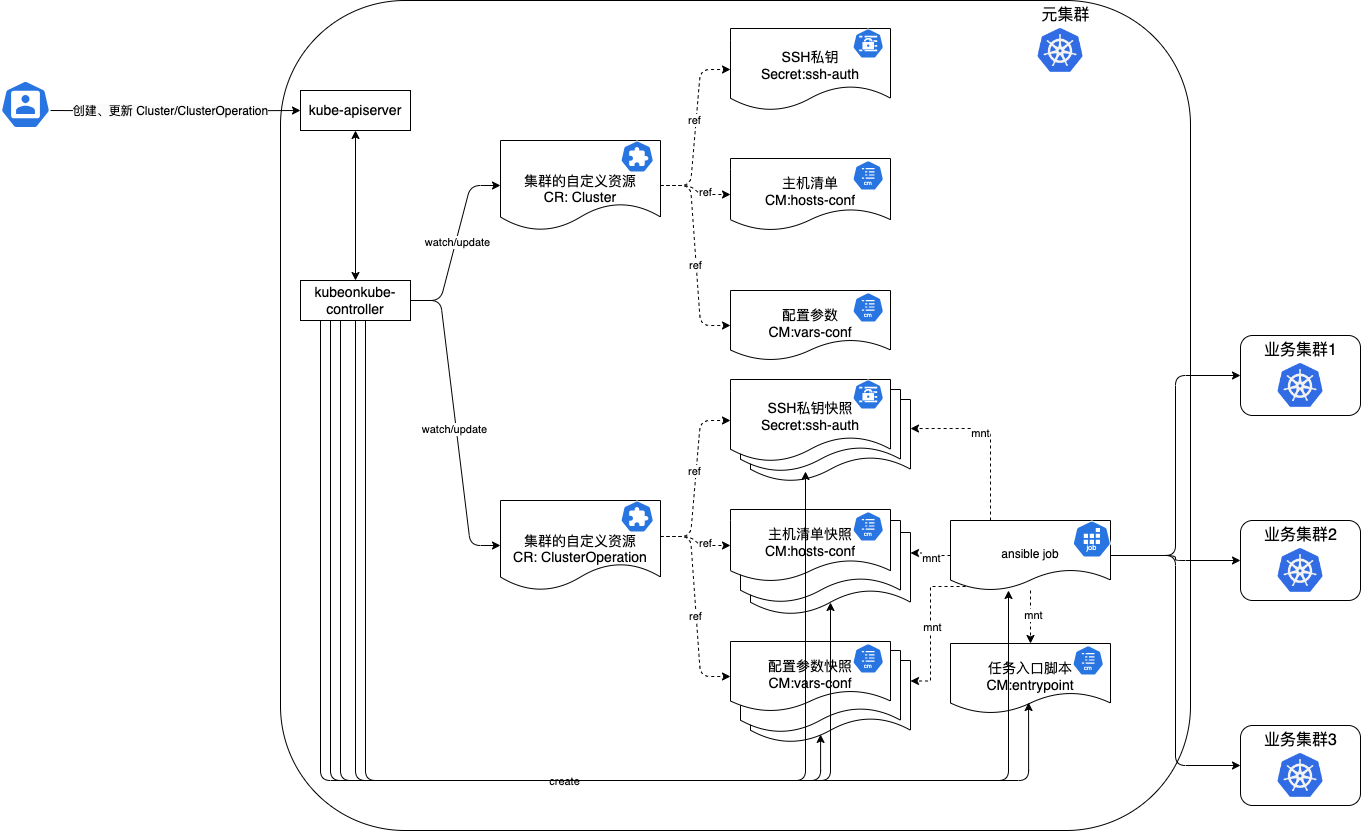
kubeonkube-controller 需要运行在一个已存在的 Kubernetes 集群,通过应用 kubeonkube-controller 提供的标准 CRD 资源和 Kubernetes 内建资源来控制和管理集群的生命周期(安装、卸载、升级、扩容、缩容等)。 kubeonkube-controller 采用 ansible-playbook 作为底层技术依赖,一方面简化了集群部署的操作流程,降低了用户的使用门槛。另一方面在 ansibel-playbook 能力基础上增加了集群操作记录等。
控制器介绍:
- Cluster Controller: 监视
Cluster Objects。唯一标识一个集群,拥有集群节点的访问信息、类型信息、部署参数信息,并且关联所有对此集群的操作(ClusterOperation Objects); - ClusterOperation Controller: 监视
ClusterOperation Objects。当ClusterOperation Object被创建时,控制器会组装一个 Job 去执行 CRD 对象里定义的操作;
前置步骤说明:
需要提前创建好hosts-conf config(主机清单)、 vars-conf configmap(配置参数)、ssh-auth secret(SSH 私钥) 三个资源对象。
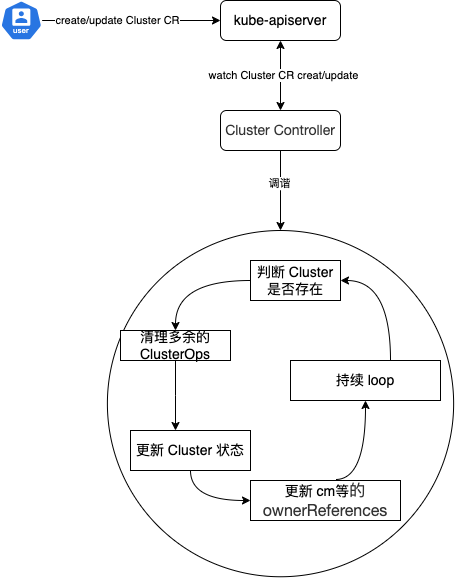
Cluster Controller 执行流程分析:
- 集群管理员或者容器平台触发创建Cluster 的CR,去定义当前集群的Spec。
- Cluster Contorller 感知到变化进行调谐。
- 判断 Cluster 是否存在
- 判断是否有多余的 Cluster Operation 对象需要清理
- 更行 Cluster 状态,记录 Cluster Operator 的执行情况
- 更新 hosts-conf / vars-conf / ssh-auth 的 ownerReferences 变为当前 Cluster 信息
- 循环监听,当有新的 ClusterOps 任务进来后,继续记录 Cluster Operator 的执行情况等
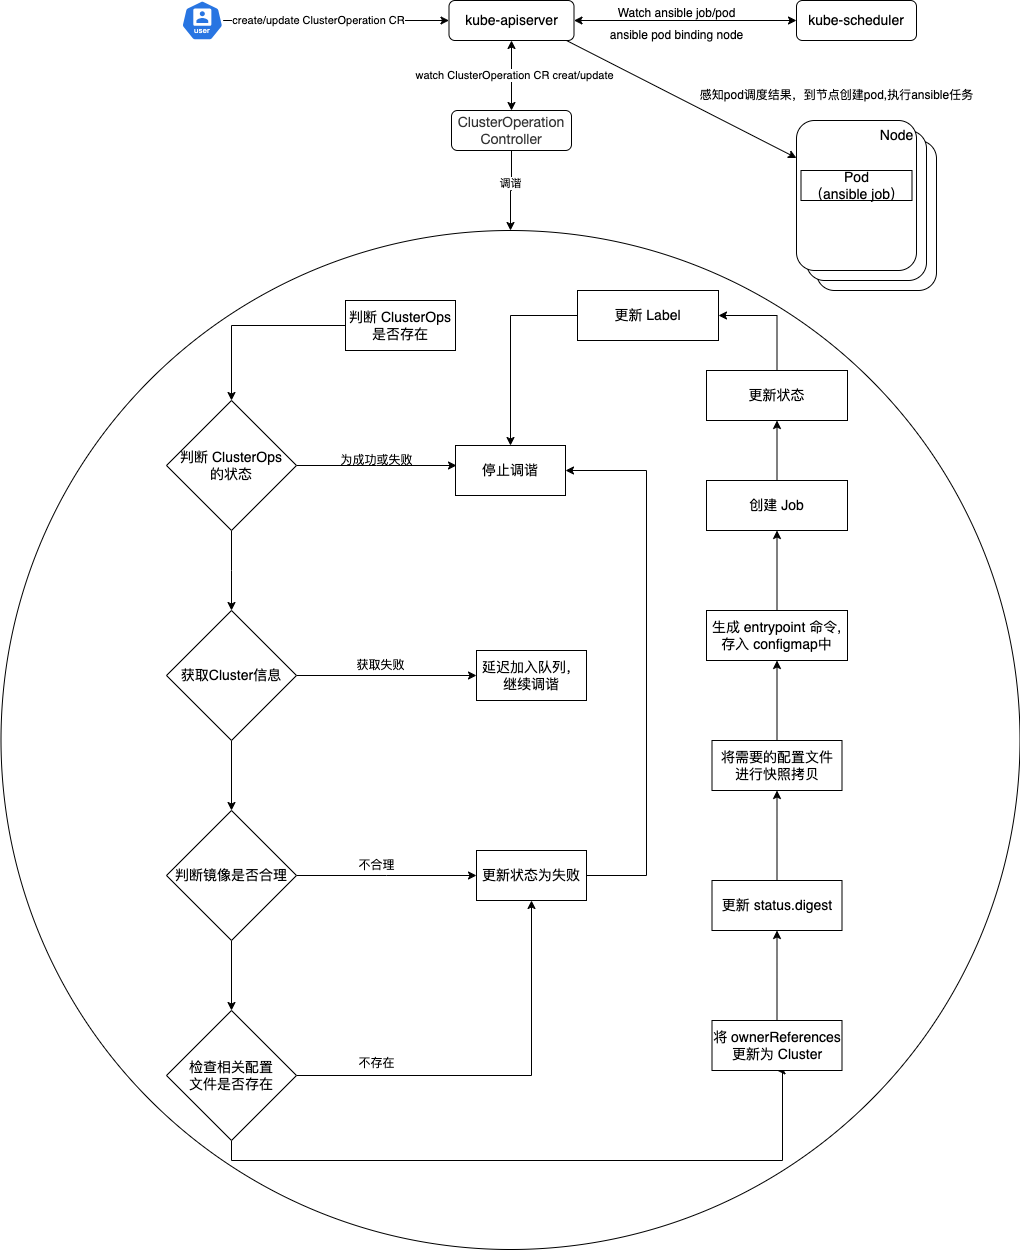
ClusterOperation Controller 执行流程分析:
ClusterOperation 对象由 ClusterOps 别名。
- 集群管理员或者容器平台触发创建ClusterOperation 的CR,去定义当前 ClusterOperation 的Spec。
- ClusterOperation Contorller 感知到变化进行调谐(看图吧,太多了,看后面源码也行)。 https://github.com/clay-wangzhi/kube-on-kube/blob/master/internal/controller/kubeonkube/clusteroperation_controller.go#L75
- Job Pod 创建,执行具体的 创建集群、增加节点等任务。
- 执行完成,返回状态,确定成功或失败,Cluster 和 ClusterOperation 都会记录状态及开始结束时间。
环境说明
kubebuilder 3.10.0
go 1.20.3
- 初始化
kubebuilder init --domain clay.io --owner Clay --repo kube-on-kube
kubebuilder edit --multigroup=true
kubebuilder create api --group kubeonkube --version v1alpha1 --kind Cluster
Create Resource [y/n]
y
Create Controller [y/n]
y
kubebuilder create api --group kubeonkube --version v1alpha1 --kind ClusterOperation
Create Resource [y/n]
y
Create Controller [y/n]
y- 改配置 Makefile 中 k8s 版本改为
ENVTEST_K8S_VERSION = 1.18.10
make manifests
go mod vendor- 定义 CRD 结构体,改完 make
- 新增 clientset,informer,lister
# 1. 新增 hack/tools.go 文件,安装依赖包,参考 https://github.com/kubernetes/sample-controller/blob/master/hack/tools.go
go get k8s.io/code-generator@v0.26.1
go mod vendor
chmod +x vendor/k8s.io/code-generator/generate-groups.sh
# 2. 新增hack/update-codegen.sh,参考 https://github.com/kubernetes/sample-controller/blob/master/hack/update-codegen.sh
注意修改几个变量:

MODULE和go.mod保持一致
API_PKG=api #和api目录保持一致
OUTPUT_PKG=generated #和生成Resource时指定的group一样
GROUP_VERSION=kubeonkube:v1alpha1 #和生成Resource时指定的group version对应

# 3. 新增 hack/verify-codegen.sh , 参考 https://github.com/kubernetes/sample-controller/blob/master/hack/verify-codegen.sh

# 4. 改type
添加上tag // +genclient
新增 doc.go
新增 register.go

 chmod +x  ./hack/update-codegen.sh
./hack/update-codegen.sh- 编写调谐代码,改完,make install, 安装 crd
# 需要再本地配置 kubeconfig
make install
# 实际执行的是, 可以导出 crd 文件,在其他集群上 apply
kustomize build config/crd | kubectl apply -f -- make run 临时测试,安装 controller
make run- 将 controller 封装成镜像,并进行镜像上传 Dockerfile 如下
# Build the manager binary
FROM golang:1.20 as builder
ARG TARGETOS
ARG TARGETARCH
ENV GOPROXY="https://goproxy.cn"

WORKDIR /workspace
# Copy the Go Modules manifests
COPY go.mod go.mod
COPY go.sum go.sum
# cache deps before building and copying source so that we don't need to re-download as much
# and so that source changes don't invalidate our downloaded layer
RUN go mod download

# Copy the go source
COPY cmd/main.go cmd/main.go
COPY api/ api/
COPY pkg/ pkg/
COPY generated/ generated/
COPY internal/ internal/
COPY vendor/ vendor/

# Build
# the GOARCH has not a default value to allow the binary be built according to the host where the command
# was called. For example, if we call make docker-build in a local env which has the Apple Silicon M1 SO
# the docker BUILDPLATFORM arg will be linux/arm64 when for Apple x86 it will be linux/amd64. Therefore,
# by leaving it empty we can ensure that the container and binary shipped on it will have the same platform.
RUN CGO_ENABLED=0 GOOS=${TARGETOS:-linux} GOARCH=${TARGETARCH} go build -a -o manager cmd/main.go

# Use distroless as minimal base image to package the manager binary
# Refer to https://github.com/GoogleContainerTools/distroless for more details
FROM gcr.io/distroless/static:nonroot
WORKDIR /
COPY --from=builder /workspace/manager .
USER 65532:65532

ENTRYPOINT ["/manager"]
# 镜像打包上传
docker build -t wangzhichidocker/kubeonkube-controller:v0.1 .
docker push wangzhichidocker/kubeonkube-controller:v0.1- 将 ansible-playbook 的运行环境封装成镜像,Dockerfile 如下
# syntax=docker/dockerfile:1

# Use imutable image tags rather than mutable tags (like ubuntu:22.04)
FROM ubuntu:22.04@sha256:149d67e29f765f4db62aa52161009e99e389544e25a8f43c8c89d4a445a7ca37

# Some tools like yamllint need this
# Pip needs this as well at the moment to install ansible
# (and potentially other packages)
# See: https://github.com/pypa/pip/issues/10219
ENV LANG=C.UTF-8 \
    DEBIAN_FRONTEND=noninteractive \
    PYTHONDONTWRITEBYTECODE=1

WORKDIR /kubespray

# hadolint ignore=DL3008
RUN --mount=type=cache,target=/var/cache/apt,sharing=locked \
    apt-get update -q \
    && apt-get install -yq --no-install-recommends \
    curl \
    python3 \
    python3-pip \
    python3-dev \
    gcc \
    sshpass \
    vim \
    rsync \
    openssh-client \
    && apt-get clean \
    && rm -rf /var/lib/apt/lists/* /var/log/*

RUN --mount=type=bind,source=requirements.txt,target=requirements.txt \
    --mount=type=cache,sharing=locked,id=pipcache,mode=0777,target=/root/.cache/pip \
    pip install --no-compile --no-cache-dir -r requirements.txt -i https://mirrors.aliyun.com/pypi/simple/ \
    && find /usr -type d -name '*__pycache__' -prune -exec rm -rf {} \;

COPY *.yml ./
COPY *.cfg ./
COPY roles ./roles
# 镜像打包上传
docker build -t wangzhichidocker/kubeonkube:v0.1 .
docker push wangzhichidocker/kubeonkube:v0.1- 在其他集群安装
# 生成 crd
bin/kustomize build config/crd  > deploy/crd.yaml
# 生成 rbac, rbac 中roles 和 rolebing 没有指定 ns,需要修改, secrect、cm、job 权限需要添加
bin/kustomize build config/rbac > deploy/rbac.yaml
# 生成 deployment,需要改镜像
bin/kustomize build config/manager > deploy/deployment.yaml
# 部署
kubectl apply -f crd.yaml
kubectl apply -f deployment.yaml
kubectl apply -f rbac.yaml- 测试,安装 cluster yaml 和 clusterops yaml
准备配置文件 SSHAuthSec.yml、HostsConfCM.yml、VarsConfCM.yml
SSHAuthSec.yml
kubectl -n kubeonkube create secret generic sample-ssh-auth --type='kubernetes.io/ssh-auth' --from-file=ssh-privatekey=/home/clay/.ssh/id_rsa --dry-run=client -o yaml > SSHAuthSec.yml
HostsConfCM.yml
apiVersion: v1
kind: ConfigMap
metadata:
  name: sample-hosts-conf
  namespace: kubeonkube
data:
  hosts.yml: |
    all:
      hosts:
        master01:
          ip: 10.100.xx.xx
          access_ip: 10.100.xx.xx
          ansible_host: 10.100.xx.xx
          ansible_user: root
        worker01:
          ip: 10.100.xx.xx
          access_ip: 10.100.xx.xx
          ansible_host: 10.100.xx.xx
          ansible_user: root
      children:
        kube_control_plane:
          hosts:
            master01:
        kube_node:
          hosts:
            worker01:
准备 VarsConfCM.yml,根据实际情况,填写变量文件
准备 Cluster.yml
apiVersion: kubeonkube.clay.io/v1alpha1
kind: Cluster
metadata:
  name: sample
  namespace: kubeonkube
spec:
  hostsConfRef:
    namespace: kubeonkube
    name: sample-hosts-conf
  varsConfRef:
    namespace: kubeonkube
    name: sample-vars-conf
  sshAuthRef:
    namespace: kubeonkube
    name: sample-ssh-auth
准备 ClusterOperation.yml
apiVersion: kubeonkube.clay.io/v1alpha1
kind: ClusterOperation
metadata:
  name: sample-node-add
  namespace: kubeonkube
spec:
  cluster: sample
  image: wangzhichidocker/kubeonkube:v0.1
  actionType: playbook
  action: scale.yml
- 将以上 Yaml 文件,apply 执行即可。


