Description :
Dexter is an Android library that simplifies the process of requesting permissions at runtime.
Android Marshmallow includes a new functionality to let users grant or deny permissions when running an app instead of granting them all when installing it. This approach gives the user more control over applications but requires developers to add lots of code to support it.
The official API is heavily coupled with the Activity class. Dexter frees your permission code from your activities and lets you write that logic anywhere you want.
Include the library in your build.gradle
compile 'com.karumi:dexter:2.3.1'To start using the library you just need to call Dexter with a valid Activity:
Dexter.withActivity(this)
	.withPermission(Manifest.permission.CAMERA)
	.withListener(new PermissionListener() {
		@Override public void onPermissionGranted(PermissionGrantedResponse response) {/* ... */}
		@Override public void onPermissionDenied(PermissionDeniedResponse response) {/* ... */}
		@Override public void onPermissionRationaleShouldBeShown(PermissionRequest permission, PermissionToken token) {/* ... */}
	}).check();
This library was used to request STORAGE and CAMERA permissions.
description :
Android library projects that provides easy to use and extensible Barcode Scanner views based on ZXing and ZBar.
(1) Add the following dependency to your build.gradle file.
compile 'me.dm7.barcodescanner:zxing:1.9'(2) Add camera permission to your AndroidManifest.xml file:
<uses-permission android:name="android.permission.CAMERA" />(3) Use it in your activity as the example provided
public class SimpleScannerActivity extends Activity implements ZXingScannerView.ResultHandler {
    private ZXingScannerView mScannerView;

    @Override
    public void onCreate(Bundle state) {
        super.onCreate(state);
        mScannerView = new ZXingScannerView(this);   // Programmatically initialize the scanner view
        setContentView(mScannerView);                // Set the scanner view as the content view
    }

    @Override
    public void onResume() {
        super.onResume();
        mScannerView.setResultHandler(this); // Register ourselves as a handler for scan results.
        mScannerView.startCamera();          // Start camera on resume
    }

    @Override
    public void onPause() {
        super.onPause();
        mScannerView.stopCamera();           // Stop camera on pause
    }

    @Override
    public void handleResult(Result rawResult) {
        // Do something with the result here
        Log.v(TAG, rawResult.getText()); // Prints scan results
        Log.v(TAG, rawResult.getBarcodeFormat().toString()); // Prints the scan format (qrcode, pdf417 etc.)

        // If you would like to resume scanning, call this method below:
        mScannerView.resumeCameraPreview(this);
    }
}
The library was used to scan the credit card.
Description :
Volley is an HTTP library that makes networking for Android apps easier and, most importantly, faster.
Add the following dependency to your build.gradle file.
compile 'com.android.volley:volley:1.0.0'Inside Your activity
JsonObjectRequest tabbRequest = new JsonObjectRequest(Request.Method.POST, url, parameters, new Response.Listener<JSONObject>() {
                @Override
                public void onResponse(JSONObject response) {
                    Log.d("response: ", response.toString());
                    UserService.saveLoginDetails(context, response);
                    callback.onSuccess(response);
                }
            }, new Response.ErrorListener() {
                @Override
                public void onErrorResponse(VolleyError error) {
                    Log.d("response: ", error.toString());
                    callback.onFailure(error);
                }
            }) {
                @Override
                public Map<String, String> getHeaders() throws AuthFailureError {
                    MiscHelper miscHelper = new MiscHelper();
                    Map<String, String> MyData = new HashMap<>();
                    return MyData;
                }
            };

            VolleySingleton.getInstance(context).addToRequestQueue(tabbRequest);
        }
JSONRequest is used to send a request with a raw (JSON) body. It takes 4 parameters.
1- HTTP method (GET, POST, PUT, etc)
2- The JSON Object of the body
3- Interface of reponse listener.
4- Interface of error listener
The reponse is handled on the onResponse callback method while the error is handled on the onError callback method.
Description :
A fast circular ImageView perfect for profile images.
Add the following dependency to your build.gradle file.
compile 'de.hdodenhof:circleimageview:2.1.0' Inside your layout add this XML tag
<de.hdodenhof.circleimageview.CircleImageView
    xmlns:app="http://schemas.android.com/apk/res-auto"
    android:id="@+id/profile_image"
    android:layout_width="96dp"
    android:layout_height="96dp"
    android:src="@drawable/profile"
    app:civ_border_width="2dp"
app:civ_border_color="#FF000000"/>Images add much-needed context and visual flair to Android applications. Picasso allows for hassle-free image loading in your application—often in one line of code!
Many common pitfalls of image loading on Android are handled automatically by Picasso:
- Handling ImageView recycling and download cancelation in an adapter.
- Complex image transformations with minimal memory use.
- Automatic memory and disk caching.
Add the following dependency to your build.gradle file.
compile 'com.squareup.picasso:picasso:2.5.2'Add one of the following lines into your Activity
Picasso.with(context).load(R.drawable.landing_screen).into(imageView1); // Loading from drawable folder
Picasso.with(context).load("file:///android_asset/DvpvklR.png").into(imageView2); // Loading from a file
Picasso.with(context).load(url).into(imageView3); // Loading from an online URL.Description :
card.io provides fast, easy credit card scanning in mobile apps.
- Rear-facing camera.
- Android SDK version 16 (Android 4.1) or later.
- armeabi-v7a, arm64-v8, x86, or x86_64 processor.
Add the following dependency to your build.gradle file.
compile 'io.card:android-sdk:5.4.2'In your activit, call this method whenever you need to scan your card.
public void onScanPress(View v) {
    Intent scanIntent = new Intent(this, CardIOActivity.class);

    // customize these values to suit your needs.
    scanIntent.putExtra(CardIOActivity.EXTRA_REQUIRE_EXPIRY, true); // default: false
    scanIntent.putExtra(CardIOActivity.EXTRA_REQUIRE_CVV, false); // default: false
    scanIntent.putExtra(CardIOActivity.EXTRA_REQUIRE_POSTAL_CODE, false); // default: false

    // MY_SCAN_REQUEST_CODE is arbitrary and is only used within this activity.
    startActivityForResult(scanIntent, MY_SCAN_REQUEST_CODE);
}
Next, we'll override onActivityResult() to get the scan result.
@Override
protected void onActivityResult(int requestCode, int resultCode, Intent data) {
    super.onActivityResult(requestCode, resultCode, data);

    if (requestCode == MY_SCAN_REQUEST_CODE) {
        String resultDisplayStr;
        if (data != null && data.hasExtra(CardIOActivity.EXTRA_SCAN_RESULT)) {
            CreditCard scanResult = data.getParcelableExtra(CardIOActivity.EXTRA_SCAN_RESULT);

            // Never log a raw card number. Avoid displaying it, but if necessary use getFormattedCardNumber()
            resultDisplayStr = "Card Number: " + scanResult.getRedactedCardNumber() + "\n";

            // Do something with the raw number, e.g.:
            // myService.setCardNumber( scanResult.cardNumber );

            if (scanResult.isExpiryValid()) {
                resultDisplayStr += "Expiration Date: " + scanResult.expiryMonth + "/" + scanResult.expiryYear + "\n";
            }

            if (scanResult.cvv != null) {
                // Never log or display a CVV
                resultDisplayStr += "CVV has " + scanResult.cvv.length() + " digits.\n";
            }

            if (scanResult.postalCode != null) {
                resultDisplayStr += "Postal Code: " + scanResult.postalCode + "\n";
            }
        }
        else {
            resultDisplayStr = "Scan was canceled.";
        }
        // do something with resultDisplayStr, maybe display it in a textView
        // resultTextView.setText(resultDisplayStr);
    }
    // else handle other activity results
}
In this section, the project architecture will be discussed and we will be giving a breif about every package classs.

This is were the activities live. We will give a breif about every activity.
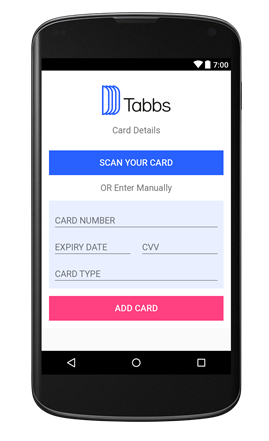
This is the activity were the user can add his card. The user can enter the card manually or scan it.
This is were the user can change his password. It requires the old password, the new password and confirming the new password.
This activity contains the list of credit cards the user entered. The user might take some actions on any card.
The user is redirected to this activity whenever he clicks on the forgot password button. The activity asks the user for his email and then sends him an email with the new password.
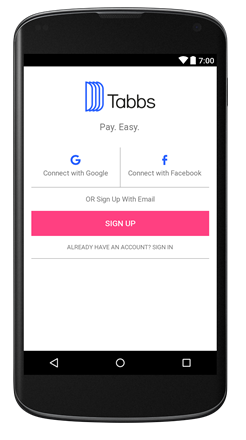
This activity is the launcher activity. The user can navigate through different activities using the sign up, connect with google or facebook or sign in buttons. The login of facebook and google login is also handled from this activity.
This is the activity where the user is navigated to when he signs in successfully. The activity holder a navigation drawer to navigate to different activities and holds a frame layout as a parent view for different fragments to be viewed inside it.
The user is navigated to this activity whenever a payment is done. The activity holds a frame layout as a parent for fragments to live in. The fragments may be successfull transaction or failed transaction.
This activity is responsible for scanning the bar code or QR code. The activity is implemented with the "ZXing" library discussed before.
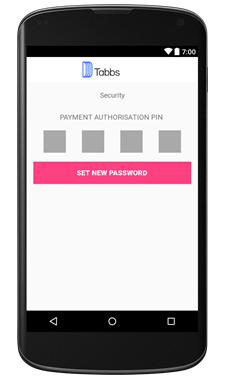
This is the activity where the user is asked to enter his authorization pin.
This is the activity where the user may view and edit his info.
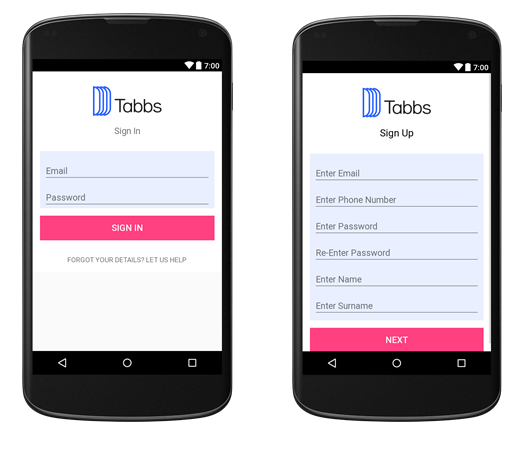
These activities are responsible for letting the user enter thier credentials to be able to sign in and sign up.
This activity is empty and redundant.
This activity view to the users the terms that he must accept after he registers and before he proceed with the main activity. The activity consists of a fragment that contains a webview that appears to the user.
These activities are used to view the transactions and the details of every transaction.

The adapters are a bridge between an AdapterView and the underlying data for that view. This is were we assign to ListView, RecyclerView and GridView (any dynamic holders that varies in size and data) their corresponding data. Therefore for every View that holds a list of items we must implement its own adapter.

This package contains interfaces to the "Volley" library which are implemented in the classes that handles the API calls. By implementing these interfaces in the activity, we will be able to handle the logic of the implemented methods whenever called.

As an example, we will be viewing the VolleyObjectCallback with implements the methods onSuccess() & onFailure. The onSuccess is called whenever an API call is successfull unlike the onFailure which is called whenever the API call is having some errors.

This package implements an SQLite database for storing data related to user, vendors, merchants, etc. The picture below will illustrate more.

We have here 7 tables
- User table
- Merchant table
- Vendor table
- Category table
- MenuItem table
- Bank table
- Role table
This package is redundant and not used.

Most of these fragments are inflated to the MainActivity based on the users navigation. For example, the Main fragment is the fragment that appears first when the user logins successfully.
When the users click on the scan to pay button, the user is navigated to the ScanActivity which we discussed in the Activities Package. Based on the user's clicks, the fragments replace each other making the whole applicaiton nearly run on a single activity (Except for some activities like signup, change password, etc).

The misc package contains some implemented mehtods but never used.

This is a package contains data models as java classes. As shown above, this is the list of models used in the code. For example a user consists of the following parameters.

The model also contains getters and setters to easily access the object's parameters.

The model contains converting a user to JSON and vice versa to be able to parse and send data corretly to the API.


This package is one of the most important packages in the project. The package contains all the logic behind the API calls, Parsing responses and sending requests to the server. Every service will be discussed into details.
This class is responsible for any user related API call (login, register, change password, etc.)
 public static void currentUser(final Context context, final VolleyObjectCallback callback) {
        final Resources resources = context.getResources();
        String preferences = resources.getString(R.string.PREFS_NAME);
        SharedPreferences settings = context.getSharedPreferences(preferences, 0);
        String userId = settings.getString("userId", "");
        final String token = settings.getString("token", "");
        String tabbsBaseUrl = resources.getString(R.string.url_tabbsNew);
        String url = String.format("%s/api/users/%s", tabbsBaseUrl, userId);

        JsonObjectRequest currentUserRequest = new JsonObjectRequest(Request.Method.GET, url, null,
                new Response.Listener<JSONObject>() {
            @Override
            public void onResponse(JSONObject response) {
                Log.d("response 2: ", response.toString());
                callback.onSuccess(response);
            }
        }, new Response.ErrorListener() {
            @Override
            public void onErrorResponse(VolleyError error) {
                Log.d("response 1: ", error.toString() + token);
                callback.onFailure(error);
            }
        }) {
            @Override
            public Map<String, String> getHeaders() throws AuthFailureError {
                Map<String, String> MyData = new HashMap<>();
                MyData.put("Authorization", "Bearer "+token); //miscHelper.readToken(context));
                return MyData;
            }
        };
        VolleySingleton.getInstance(context).addToRequestQueue(currentUserRequest);
    }
The above code is responsible for getting the user information using userID by requesting the API a GET request written by the following code
 JsonObjectRequest currentUserRequest = new JsonObjectRequest(Request.Method.GET, url, null,
                new Response.Listener<JSONObject>() {
		}
NOTE: SharedPrefrence is a key-value local storage for small data (token, id, etc.)
UserService consists of several methods :
- currentUser : Which makes a GET API call to /api/users/{{id}} to retrive the user information.
- updateUserPersonalDetails : Which makes a POST API call to /api/users/{{id}} to update user information.
- registerWithEmail : Which makes a POST request to register the user with a regular email.
- registerWithGmail : Which makes a POST request to register the user using his google account.
- registerWithFacebook : Which makes a POST request to register the user using his facebook account.
- loginWithEmail : Which makes a POST request to login the user using his regular email account.
- changePassword : Which makes a POST request to change a user password.
- saveLoginDetails : Saves the user's id, token and expiration date locally so the app does not make an API call everytime the user opens the app.
- isUserValid : Checks wherther there is any saved information locally about the current user.
All API calls are made simillar to the code snippet above with the change of the API call (POST,GET, etc.) and parameters.
This class is responsible for making the API calls related to the Tabbs.
- createTabb : Implemented but not used.
- getTabbWithId : This methods makes an API call to Get a new Tabb for a 3rd Party Code.
- findTabbWithId : Get an existing Tabb for a 3rd Party Code.
This call contains the method "updateMerchantDetails" which makes a request to update the merchant details. This method is implemented but not used.
This class impelements all the API call related to the user's transaction.
- transactionsForMerchant : This is a merchant related call. It is impelemented but not used.
- transactionWithId : This method is for getting a transaction using the transaction ID.
- createPayment : This methods makes an API call for applying the user's payment.
- transactionsForUser : This method gets the list of transactions associated with the user's ID.
This class implements the method updateBankDetails but it is not used.
These classes implements some methods but not used.
This class is redundant and implements previously implemented API calls (in UserSerivce) and could be deleted.
This class implements credit card related calls.
- creditCardsForUser : Gets the list of credit cards for a specific user. Called when the user checks his cards on his profile.
- registerCreditCard : Registers a credit card for the user. Called whenever the user register a new credit card.
- removeUserCreditCards : Removes the user's Credit card.