Contents:
To add a new wiki page, just add a [name].svx file in /src/content where [name] is the short name of the page:
|__ src
    |__ content
        |__ article-name.svx
The name should not contain any special characters except for - and _, should be lower case & should not contain any spaces as the name is used to generate the URL.
The top of the file should contain the following metadata:
---
title:        [Full Page Title]
title_short:  [(optional) Shortened Page Title]
date:         [Date of last edit in 'YYYY-MM-DD' format]
nav_index:    [Order of the page in the navigation]
---
The title_short may be set if you notice that the full title is too long for e.g. the navigation UI.
Pages are written in Markdown and are saved as .svx files. The pages are then compiled into HTML using mdsvex.
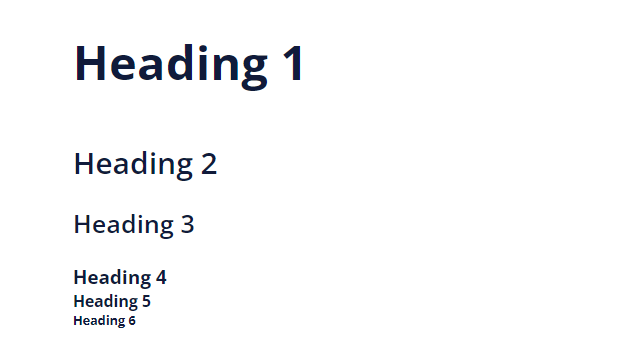
Headings are created by using # at the beginning of a line. The more # are used, the smaller the heading will be.
## Heading 2

### Heading 3

#### Heading 4

##### Heading 5
They will look like this when rendered:
The title does not need to be added to the page as it is automatically generated from the page name set at the top of the file (see Adding new pages).
To link to another wiki page, use the following syntax:
[Sanitäter](/sanitaetsdienst/sanitaeter)The square brackets contain the text that is displayed and the round brackets contain the path to the page.
To link to a section on the same page, append # and the section name to the path.
[Sanitäter](/sanitaetsdienst/sanitaeter#ausrüstung)To link to an external page, use the following syntax:
[Wikipedia](https://wikipedia.org)Lists can be created by using - at the beginning of a line.
- List Item 1
- List Item 2
- List Item 3
They will look like this when rendered:
Images can be added by using the following syntax:
Images are saved in /src/lib/images/[group] where [group] is the name of the group the image belongs to, like 'ausbildung' or 'streitkraefte'.
<script>
  import alphabet from '$lib/images/funketikette/alphabet.png';
</script>
They can then be referenced using the variable name:
The part inside the square brackets is the alt text that is displayed if the image cannot be loaded or if the user is using a screen reader. It should be a short description of the image.
To use an external image, just use the URL instead of the variable name:
Tables can be created by using the following syntax:
| Header 1 | Header 2 | Header 3 |
| -------- | -------- | -------- |
| Row 1    | Row 1    | Row 1    |
| Row 2    | Row 2    | Row 2    |
They will look like this when rendered:
HTML tags are rendered as usual, for example <u>text</u> underlines text.
For slideshows you can use the slideshow component:
<script>
  import Slideshow from '$lib/slideshow/Slideshow.svelte';
</script>
It takes two arrays as properties, images containing the paths to the images to be displayed, captions their respective captions. You can use external images as well.
A complete example might look like this:
<script lang="ts">
  import Slideshow from '$lib/slideshow/Slideshow.svelte';

  import leopard from '$lib/path/to/leopard.jpg';
</script>

<Slideshow
  images={[leopard, 'https://www.hoster.com/challenger.jpg']}
  captions={['Das ist der Leopard', 'Das ist der Challenger']}
/>Tooltips can be added by using <Tooltip> tags:
<Tooltip text="Main Battle Tank">MBT</Tooltip>They will look like this when hovered over:
Example boxes contain example text that can be used to further explain a concept and can be clicked to expand and collapse.
They can be added by using <ExampleBox> tags:
<ExampleBox>I'm an example box!</ExampleBox>They will look like this when rendered:
Keyboard keys can be displayed by using the custom <Keys> tag:
Sprinten: <Keys keys="SHIFT,W" />They will look like this when rendered:
Important: Use american english key identifiers and the keyboard layout under windows. They will get translated accordingly.
For a list of the mappings used see src/lib/wikitools/Keys.svelte, mapDeUs and mapWinMac respectively.
Be sure to use the Keys component instead of the <kbd> tag if your key needs to be mapped!
YouTube videos can be embedded by using the following syntax:
<iframe
  width="560"
  height="315"
  src="https://www.youtube.com/embed/7Tuhg0tyzT4"
  title="YouTube video player"
  frameborder="0"
  allow="accelerometer; autoplay; clipboard-write; encrypted-media; gyroscope; picture-in-picture; web-share"
  allowfullscreen
></iframe>
This embed code can be generated by clicking the share button on a YouTube video and selecting the embed option.
To mass-format all files in the repository, run the following command:
npm run formatThis will format all files using Prettier.
It is strongly recommended to activate format on save in your editor.


