介绍:
通过Cloudformation在aws一键启动AWS G4 EC2实例(英伟达T4),并使用Python Flask实现Stable Diffusion的Text2Image,Image2Image功能;
项目包含:
-
app.py: 基于Flask的Python应用程序,提供了一个简单的Web界面来使用Stable Diffusion模型,将文本转换为图像并进行图像风格迁移。
-
lora.py 基于difffuser lib实现了加载safetensors格式模式,灵活使用不同风格的模型
-
frontend: 简单的样例界面来展示调用API.
-
instance.yaml :AWS Cloudformation YAML 文件自动提供AWS G4实例并安装Nvida驱动和diffuser相关lib来运行
app.py.
Cloudformation模版(instance.yaml)功能介绍:
-
MyVPC:创建一个 VPC,CIDR块设置为
10.0.0.0/16。为VPC添加一个名为Name的标签,值为My VPC。 -
MyInternetGateway:创建一个Internet网关。为Internet网关添加一个名为
Name的标签,值为My IGW。 -
MyVPCGatewayAttachment:将Internet网关附加到VPC。通过
!Ref引用MyVPC和MyInternetGateway资源。 -
MyPublicSubnet:在VPC中创建一个公共子网,CIDR块设置为
10.0.1.0/24。为子网添加一个名为Name的标签,值为My Public Subnet。 -
MyRouteTable:为VPC创建一个路由表。为路由表添加一个名为
Name的标签,值为My Route Table。 -
MyDefaultRoute:在路由表中创建一个路由,将所有其他未指定的流量(
0.0.0.0/0)定向到Internet网关。 -
MySubnetRouteTableAssociation:将子网与路由表关联。
-
MySecurityGroup:创建一个安全组,包含以下入站规则:
-
允许来自任何来源(
0.0.0.0/0)的TCP流量通过端口22(SSH)。 -
允许来自任何来源(
0.0.0.0/0)的TCP流量通过端口5000。 -
MyInstance:创建一个EC2实例,具有以下属性:
-
实例类型:默认
g4dn.xlarge,可以按需选择g4dn.2xlarge,g4dn.4xlarge,g4dn.8xlarge,g4dn.12xlarge,g4dn.16xlarge -
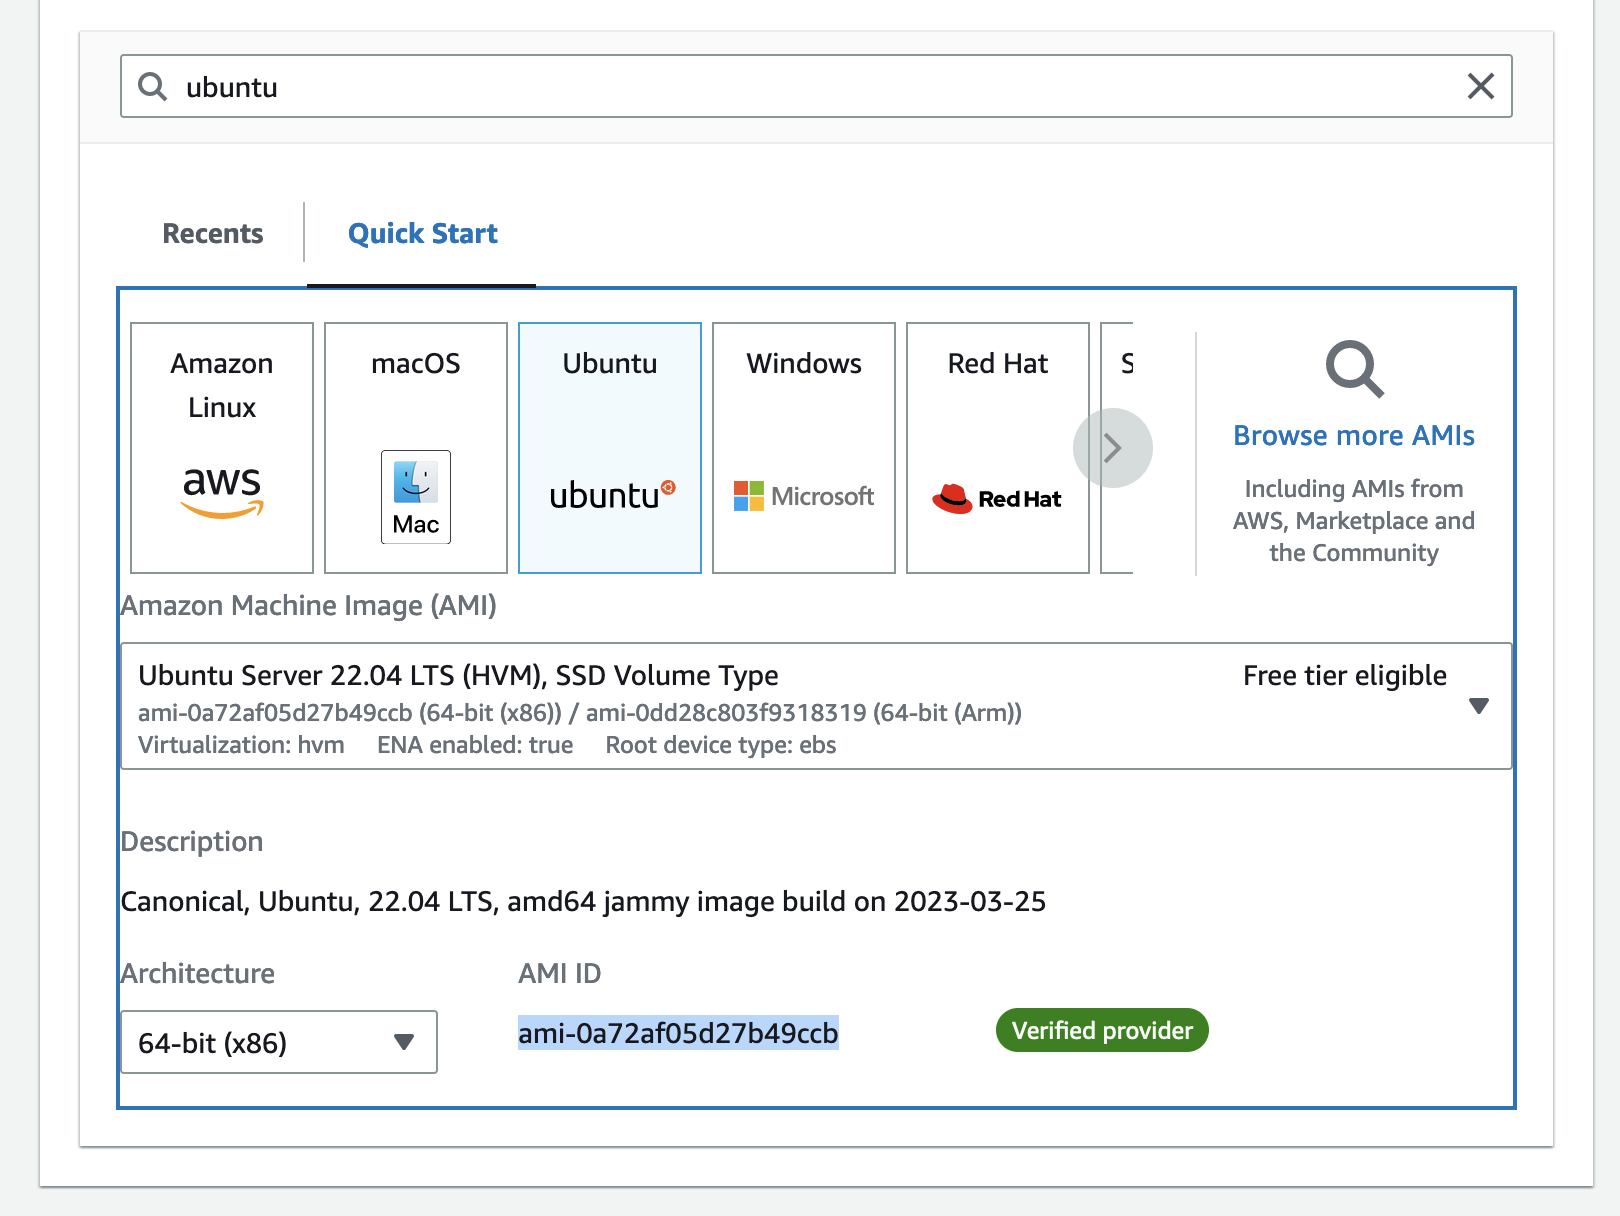
镜像ID:选择 Ubuntu Server 22.04的镜像ID
-
块设备映射:设置
/dev/sda1设备的EBS卷大小为100GB,类型为gp3 -
标签:设置一个名为
Name的标签,值为stablediffusion-onclick -
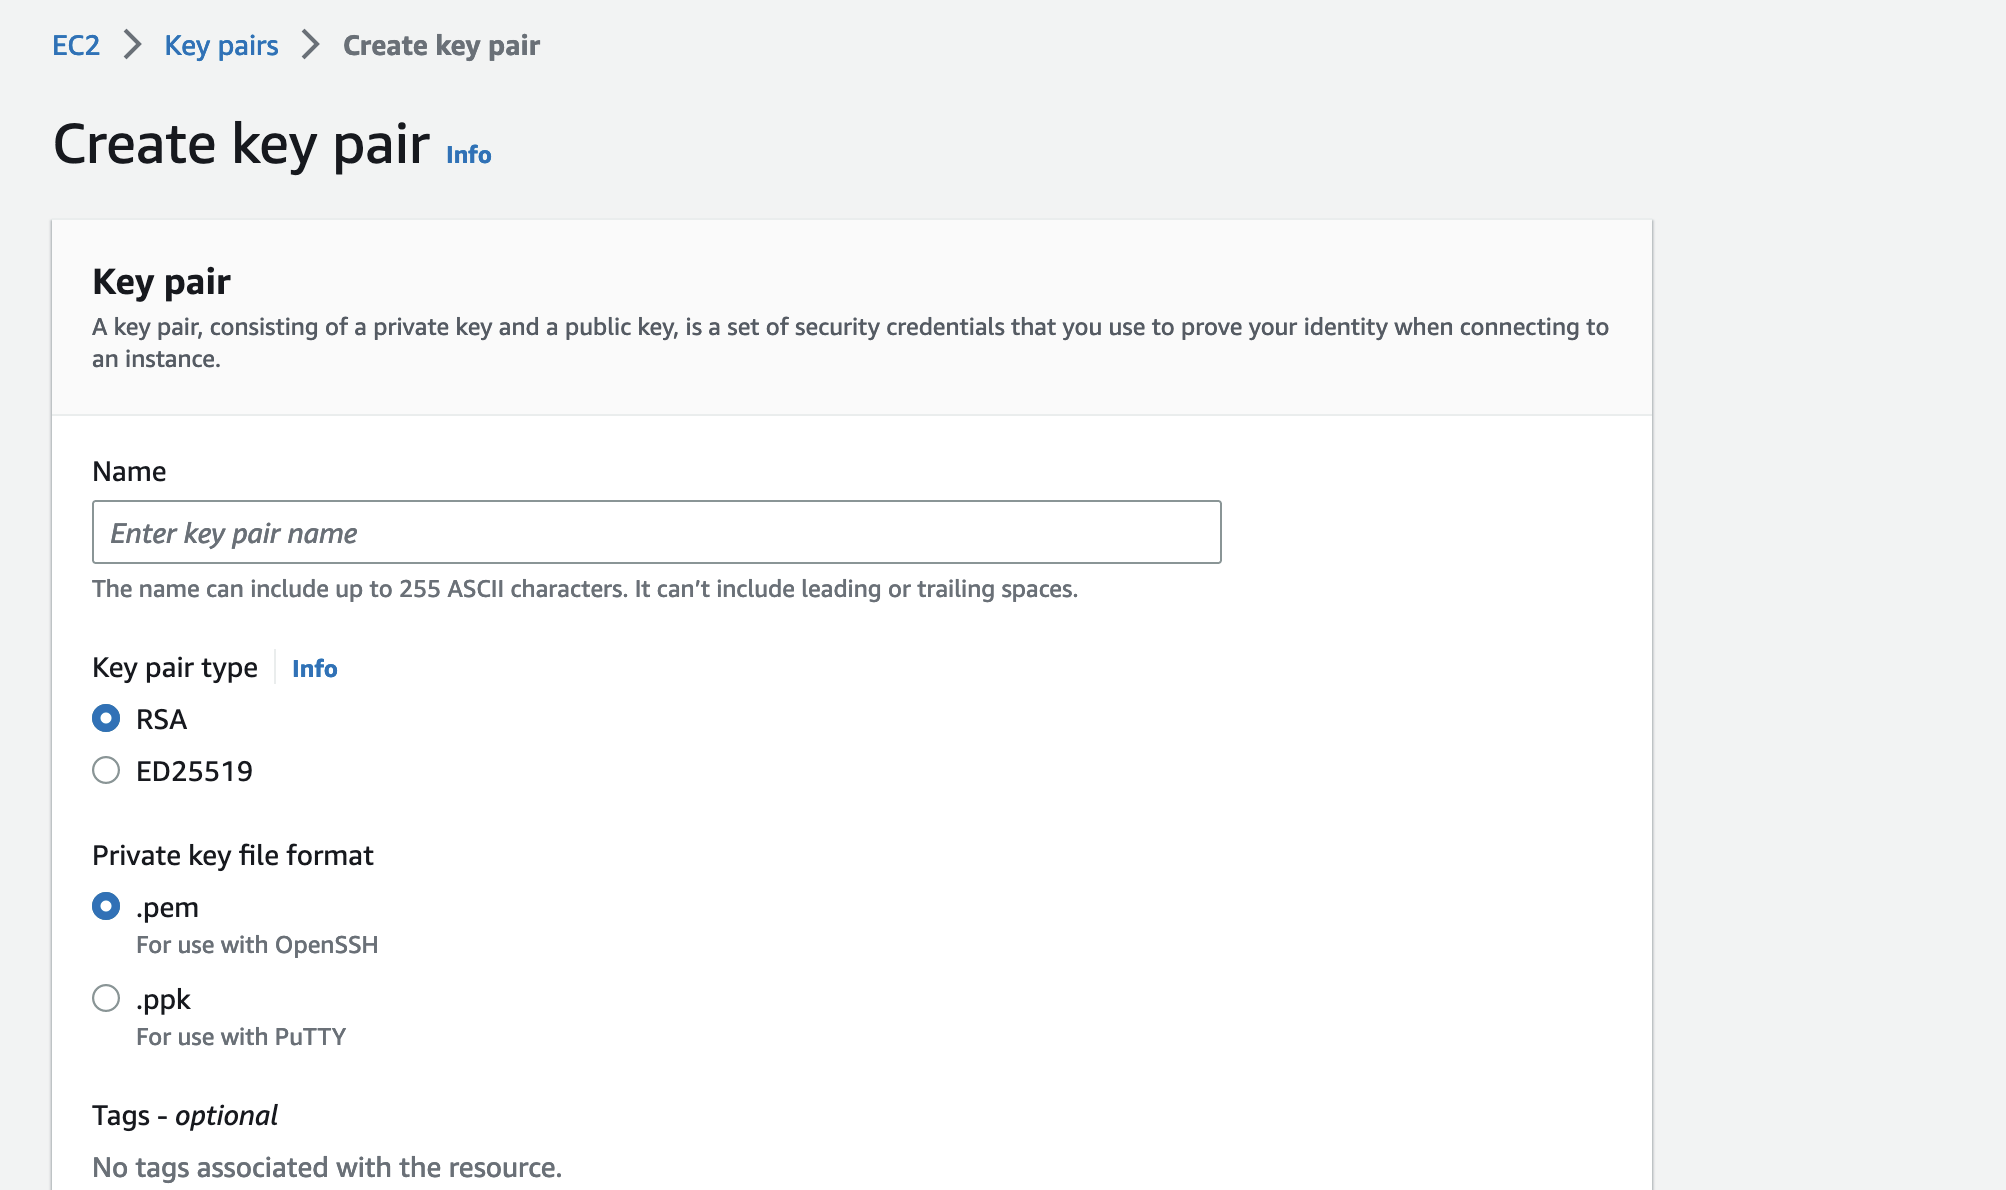
密钥名称:自定义key-pair
-
网络接口:配置网络接口以将安全组和公共子网关联到实例,并分配公共IP地址
-
UserData:包含安装运行stable diffusion环境的命令行
-
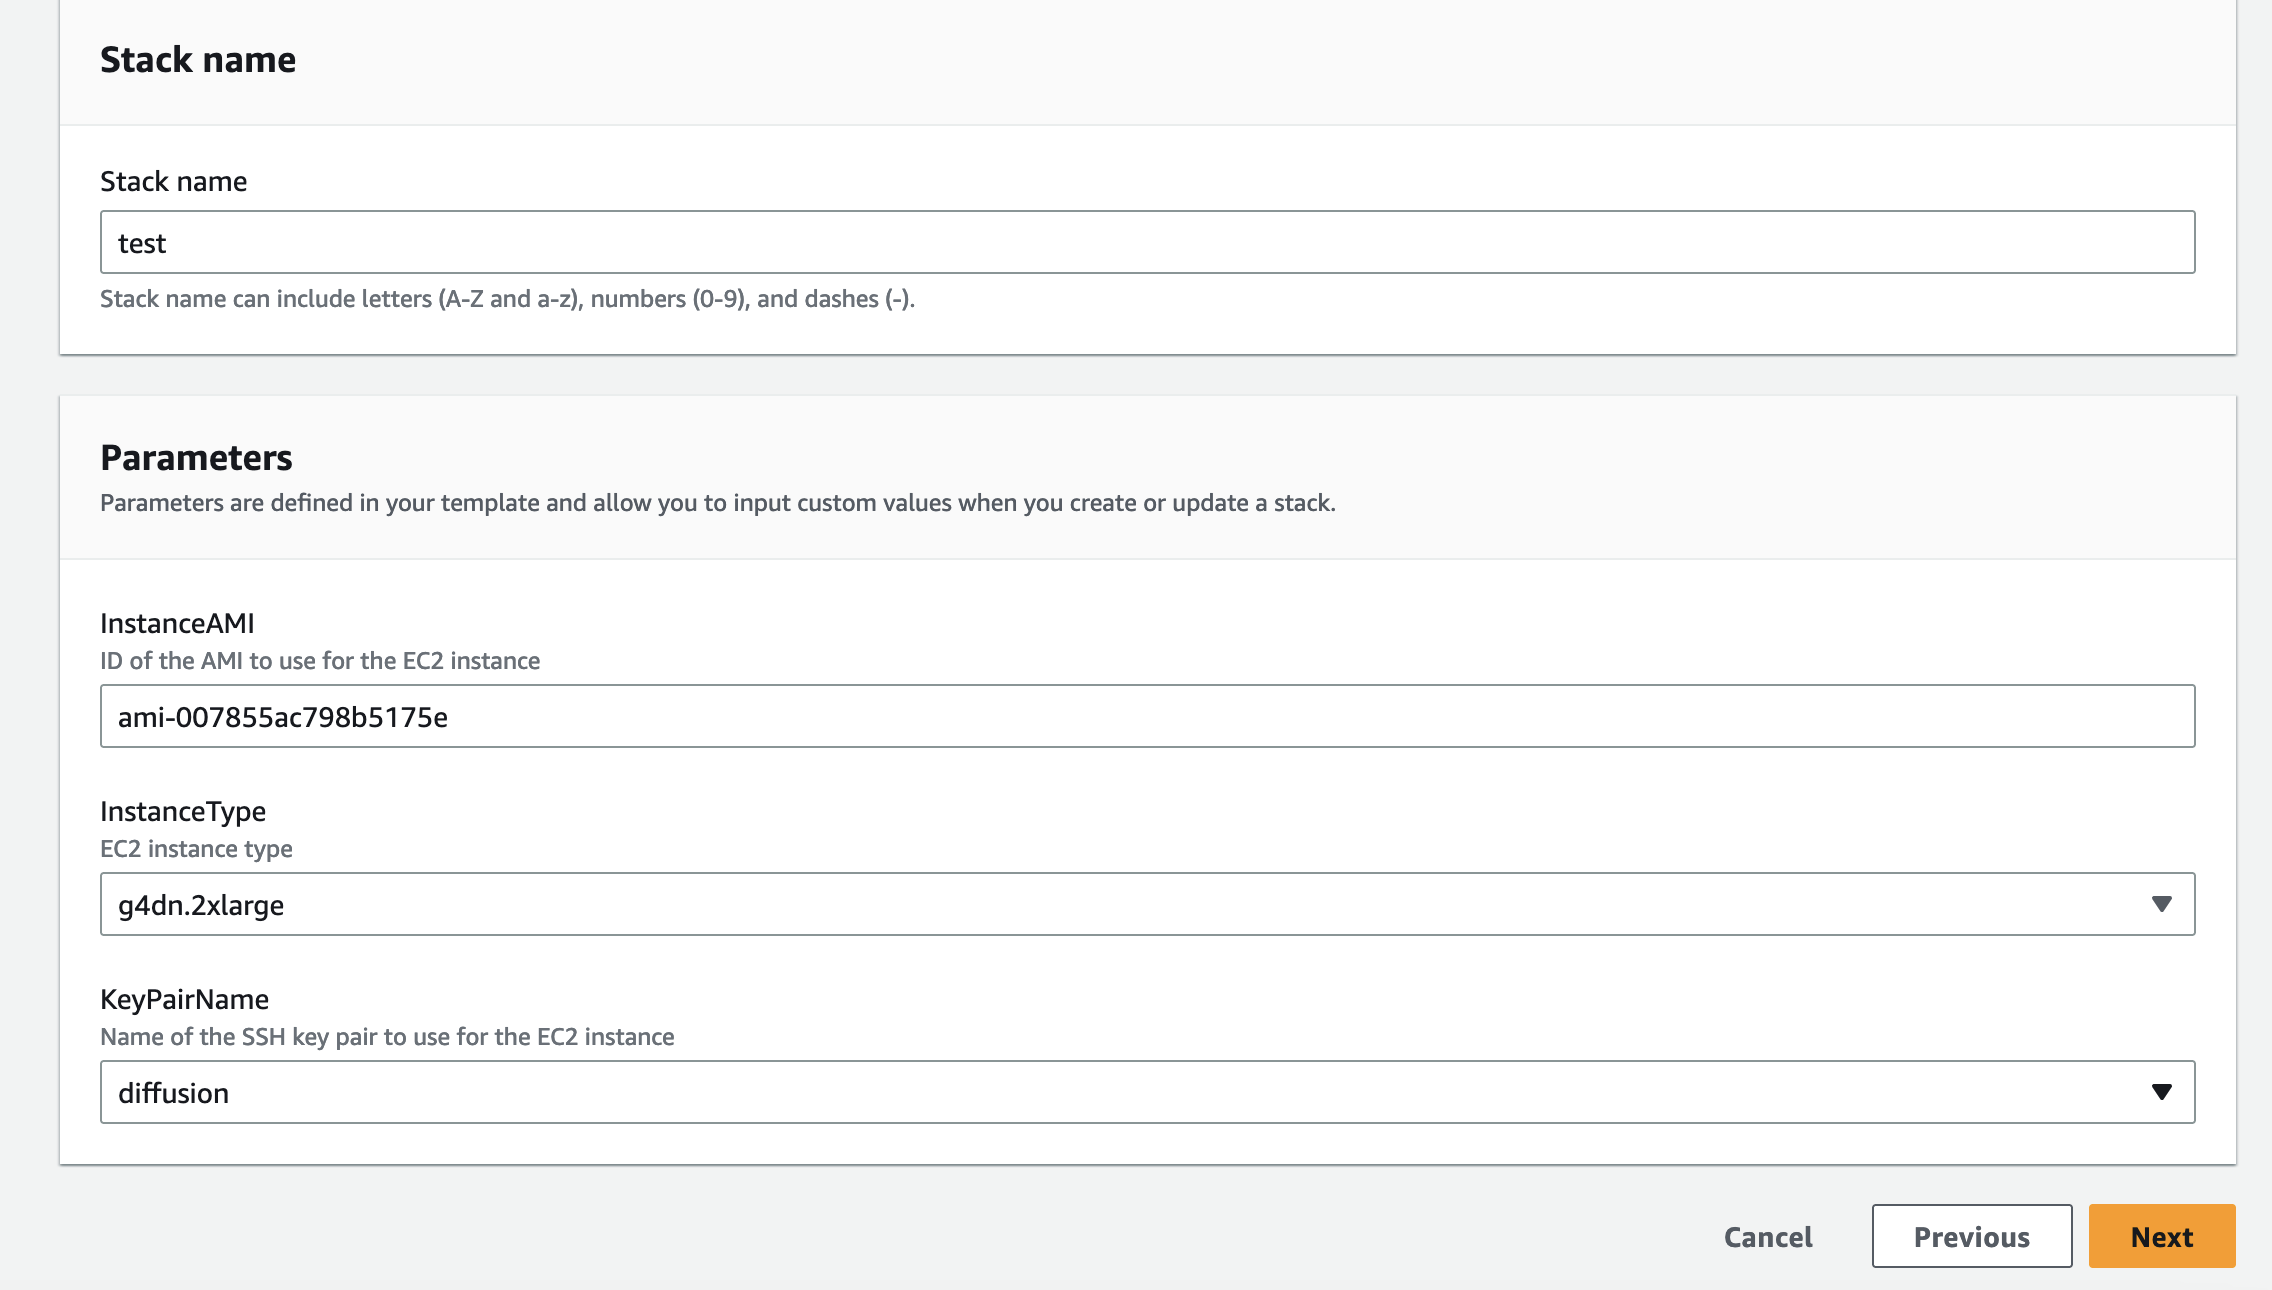
Parameter:设置key pair 和ami id(选择 Ubuntu Server 22.04的镜像)
安装和运行:
-
通过AWS Console创建命EC2 keypair
-
通过console界面找到ami id:
-
通过AWS Console界面安装和运行项目:
-
安装完毕后界面输出访问的IP地址:

-
也可以使用以下命令创建一个名为MyStack的新堆栈,通过命令行运行AWS CloudFormation模板,安装和配置AWS CLI,请按照AWS CLI官方文档进行安装和配置。:


bash
aws cloudformation create-stack \
  --stack-name my-stack \
  --template-body file://instance.yaml \
  --parameters \
      ParameterKey=InstanceAMI,ParameterValue=your-ami-id \
      ParameterKey=KeyPairName,ParameterValue=my-keypair \
  --capabilities CAPABILITY_IAM
注意:使用Ubuntu Server 22.04的镜像的ami id和自定义的key pair。
要删除堆栈,请使用delete-stack命令:
bash
aws cloudformation delete-stack --stack-name MyStack
-
等待15分钟左右,EC2会初始化环境和安装nvida驱动和diffusion lib
-
通过ssh连接EC2,tail -f /var/log/cloud-init-output.log查看安装进度
-
通过ssh连接EC2,运行nvidia-smi,出现nvidia 的系统管理界面

-
进入Stable-Diffusion-OneClick-AWS,默认已经启动了python3 app.py服务,可以通过sudo systemctl stop myapp.service 停止服务。
-
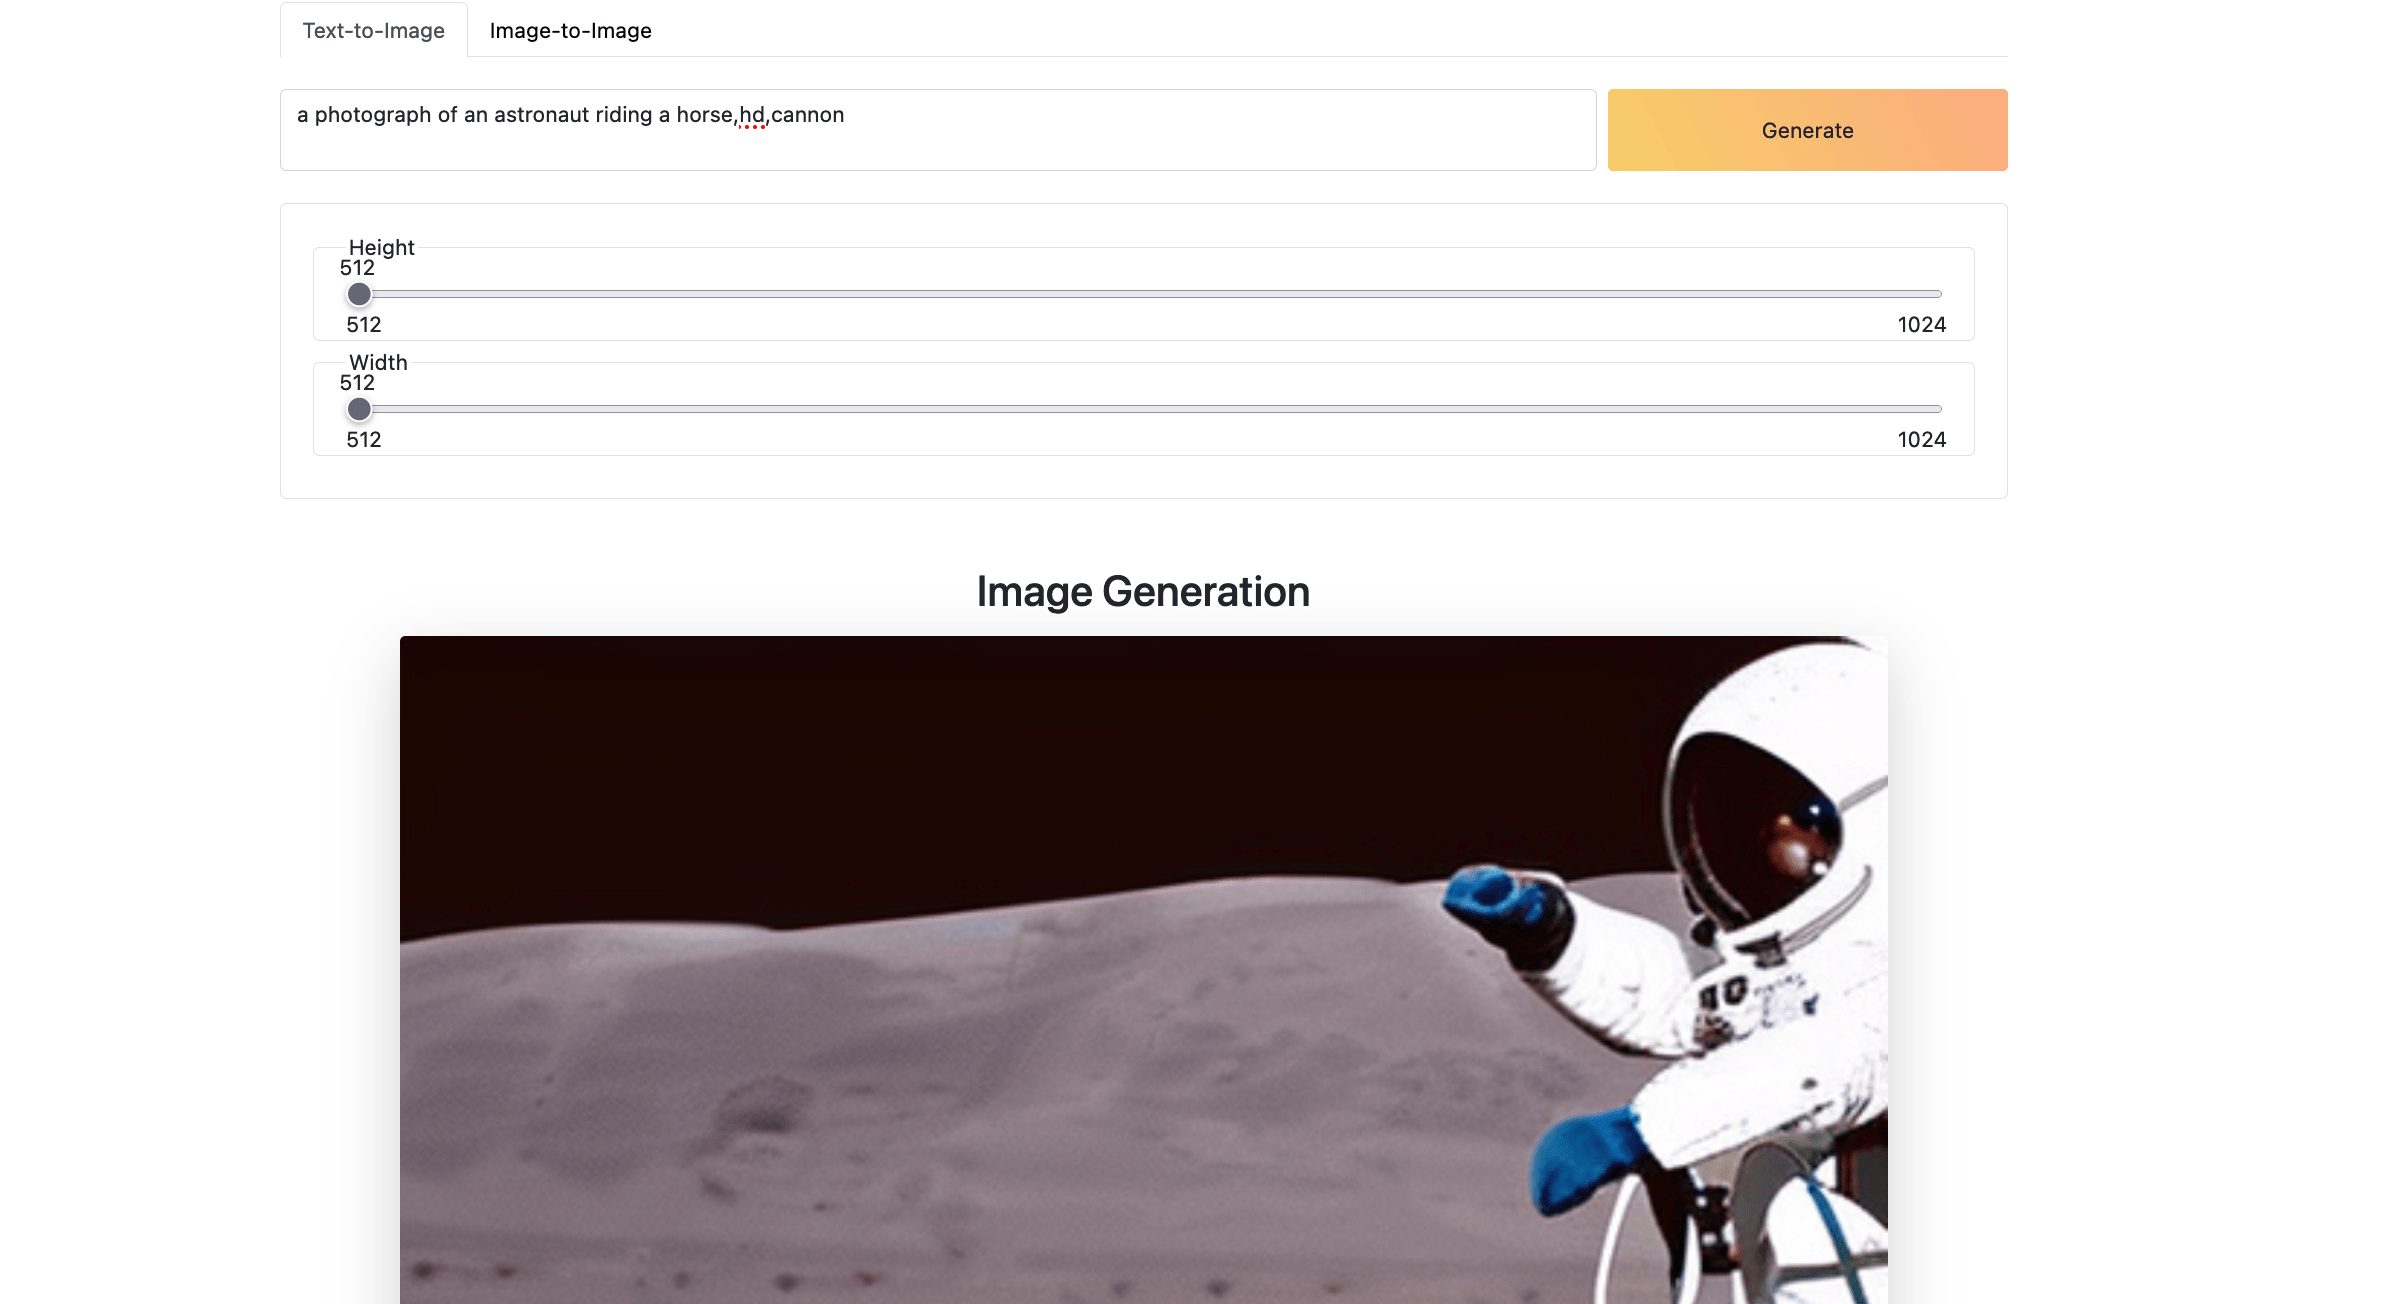
访问输出的地址http://public_ip/5000,可以看见UI界面
-
进入Stable-Diffusion-OneClick-AWS,先停止后台服务sudo systemctl start myapp.service;再运行python3 lora.py,会加载lora使用moxin模型生成水墨画风图片


样例程序说明:
app.py:
为用户提供了两个功能:将文本转换成图像(Text-to-Image)和图像到图像风格迁移(Image-to-Image)
- 定义健康检查路由(
/health):返回一个字符串Healthy和HTTP状态码200,表明应用程序正常运行。
@app.post("/txt2img")

def text_to_img():

data = request.json

model_id = "stabilityai/stable-diffusion-2"

output = "output_txt2img.png"


scheduler = EulerDiscreteScheduler.from_pretrained(model_id, subfolder="scheduler")

pipe = StableDiffusionPipeline.from_pretrained(

model_id, scheduler=scheduler, revision="fp16", torch_dtype=torch.float16

)

pipe = pipe.to("cuda")

image = pipe(data["prompt"], height=data["height"], width=data["width"]).images[0]


image.save(output)

return send_file(output), 200
当调用/txt2img API时,您需要提供一个JSON对象,其中包含以下参数:
-
prompt(string):用于生成图像的文本提示。这通常是一个描述性的文本,表示您希望在生成的图像中看到的场景或对象。 -
height(int):生成图像的期望高度(以像素为单位) -
width(int):生成图像的期望宽度(以像素为单位)
一个典型的JSON输入示例:
{

"prompt": "A beautiful sunset over the ocean",

"height": 512,

"width": 768

}
在这个例子中,文本提示是A beautiful sunset over the ocean,期望的图像尺寸为宽度768像素和高度512像素。
您可以使用POST请求调用/txt2img API,将JSON对象作为请求正文发送。例如,使用Python requests库,您可以这样调用API:
python
import requestsimport json


url = "http://instance ip:5000/txt2img"

data = {

"prompt": "A beautiful sunset over the ocean",

"height": 512,

"width": 768

}

headers = {"Content-Type": "application/json"}


response = requests.post(url, data=json.dumps(data), headers=headers)
请注意,您需要根据实际部署的应用程序URL更新url变量。
- 定义Image-to-Image路由(
/img2img):接收JSON数据,其中包含用于风格迁移的文本提示和原始图像的URL。
@app.post("/img2img")

def img_to_img():

data = request.json

model_id = "runwayml/stable-diffusion-v1-5"

output = "output_img2img.png"


pipe = StableDiffusionImg2ImgPipeline.from_pretrained(

model_id, torch_dtype=torch.float16

)

pipe = pipe.to("cuda")

response = requests.get(data["url"])

init_image = Image.open(BytesIO(response.content)).convert("RGB")

init_image = init_image.resize((768, 512))

images = pipe(

prompt=data["prompt"], image=init_image, strength=0.75, guidance_scale=7.5

).images


images[0].save(output)

return send_file(output), 200
当调用/img2img API时,您需要提供一个JSON对象,其中包含以下参数:
-
prompt(string):用于进行图像风格迁移的文本提示。这通常是一个描述性的文本,表示您希望在生成的图像中看到的风格或元素。 -
url(string):原始图像的URL。应用程序将从此URL下载图像,并在其基础上应用图像到图像风格迁移。确保提供的URL是一个可访问的图像文件地址。 -
一个典型的JSON输入示例:
json
Copy code
{

"prompt": "Starry night",

"url": "https://example.com/path/to/image.jpg"

}
在这个例子中,文本提示是Starry night,表示我们希望将原始图像转换为具有星空般的风格。原始图像的URL是https://example.com/path/to/image.jpg。
您可以使用POST请求调用/img2img API,将JSON对象作为请求正文发送。例如,使用Python requests库,您可以这样调用API:
python
Copy code
import requestsimport json


url = "http://localhost:5000/img2img"

data = {

"prompt": "Starry night",

"url": "https://example.com/path/to/image.jpg"

}

headers = {"Content-Type": "application/json"}


response = requests.post(url, data=json.dumps(data), headers=headers)
请注意,您需要根据实际部署的应用程序URL更新url变量。
Limit和解决方法:
使用Diffusers包有几个限制,包括:
-
无法直接使用safetensors格式模型
-
77提示令牌限制;
-
缺乏LoRA的支持;
-
以及缺少图像放大功能
-
启用FP16,只需添加两行代码就可以将性能提升500%,而几乎不会影响图像质量
`from diffusers import DiffusionPipeline`

`import torch # <----- Line 1 added`

`pipeline = DiffusionPipeline.from_pretrained(`

` r"D:\sd_models\deliberate_v2"`

` ,torch_dtype = torch.float16 # <----- Line 2 Added`

`)`

`pipeline.to("cuda")`

`image = pipeline("A cute cat playing piano").images[0]`

`image.save("image_of_cat_playing_piano.png")`
- Xformers
Xformers是一个开源库,为各种自然语言处理(NLP)任务提供了一组高性能转换器。它建立在PyTorch之上,旨在提供高效且可扩展的转换器模型,可以轻松集成到现有的NLP管道中
`...`

`pipeline.to("cuda")`

`pipeline.enable_xformers_memory_efficient_attention() <--- one line added`

`...`
- 移除77个token的限制:
通过使用社区提供的“lpw_stable_diffusion”管道,可以解锁77个token限制,生成更长提示词的高质量图片
`pipeline = DiffusionPipeline.from_pretrained(`

` model_path,`

` custom_pipeline="lpw_stable_diffusion", #<--- code added`

` torch_dtype=torch.float16`

`)`
- 用diffuser使用lora:可以参考lora.py文件,通过lora.py允许用户实时加载LoRA文件。此功能可用于将LoRA文件及其相应的权重加载到diffusion模型,从而使用LoRA数据生成高质量的图像
from safetensors.torch import load_file

def __load_lora(

pipeline

,lora_path

,lora_weight=0.5

):

state_dict = load_file(lora_path)

LORA_PREFIX_UNET = 'lora_unet'

LORA_PREFIX_TEXT_ENCODER = 'lora_te'


alpha = lora_weight

visited = []


# directly update weight in diffusers model

for key in state_dict:

# as we have set the alpha beforehand, so just skip

if '.alpha' in key or key in visited:

continue

if 'text' in key:

layer_infos = key.split('.')[0].split(LORA_PREFIX_TEXT_ENCODER+'_')[-1].split('_')

curr_layer = pipeline.text_encoder

else:

layer_infos = key.split('.')[0].split(LORA_PREFIX_UNET+'_')[-1].split('_')

curr_layer = pipeline.unet


# find the target layer

temp_name = layer_infos.pop(0)

while len(layer_infos) > -1:

try:

curr_layer = curr_layer.__getattr__(temp_name)

if len(layer_infos) > 0:

temp_name = layer_infos.pop(0)

elif len(layer_infos) == 0:

break

except Exception:

if len(temp_name) > 0:

temp_name += '_'+layer_infos.pop(0)

else:

temp_name = layer_infos.pop(0)

# org_forward(x) + lora_up(lora_down(x)) * multiplier

pair_keys = []

if 'lora_down' in key:

pair_keys.append(key.replace('lora_down', 'lora_up'))

pair_keys.append(key)

else:

pair_keys.append(key)

pair_keys.append(key.replace('lora_up', 'lora_down'))

# update weight

if len(state_dict[pair_keys[0]].shape) == 4:

weight_up = state_dict[pair_keys[0]].squeeze(3).squeeze(2).to(torch.float32)

weight_down = state_dict[pair_keys[1]].squeeze(3).squeeze(2).to(torch.float32)

curr_layer.weight.data += alpha * torch.mm(weight_up, weight_down).unsqueeze(2).unsqueeze(3)

else:

weight_up = state_dict[pair_keys[0]].to(torch.float32)

weight_down = state_dict[pair_keys[1]].to(torch.float32)

curr_layer.weight.data += alpha * torch.mm(weight_up, weight_down)

# update visited list

for item in pair_keys:

visited.append(item)

return pipeline
@app.post("/txt2img")

def text_to_img():

data = request.json

model_id = "XpucT/Deliberate"

output = "output_txt2img.png"


scheduler = EulerDiscreteScheduler.from_pretrained(model_id, subfolder="scheduler")


pipe = StableDiffusionPipeline.from_pretrained(

model_id,

subfolder="scheduler",

custom_pipeline = "lpw_stable_diffusion" ,

torch_dtype = torch.float16,

)

lora = (r"./moxin.safetensors",0.8)

pipe = __load_lora(pipeline=pipe,lora_path=lora[0],lora_weight=lora[1])


pipe = pipe.to("cuda")

#pipe.enable_xformers_memory_efficient_attention()

image = pipe(data["prompt"], height=data["height"], width=data["width"]).images[0]


image.save(output)

return send_file(output), 200
可以通过调用多次 __load_lora() 来装载不同的 LoRA模型实现混合模型的模式