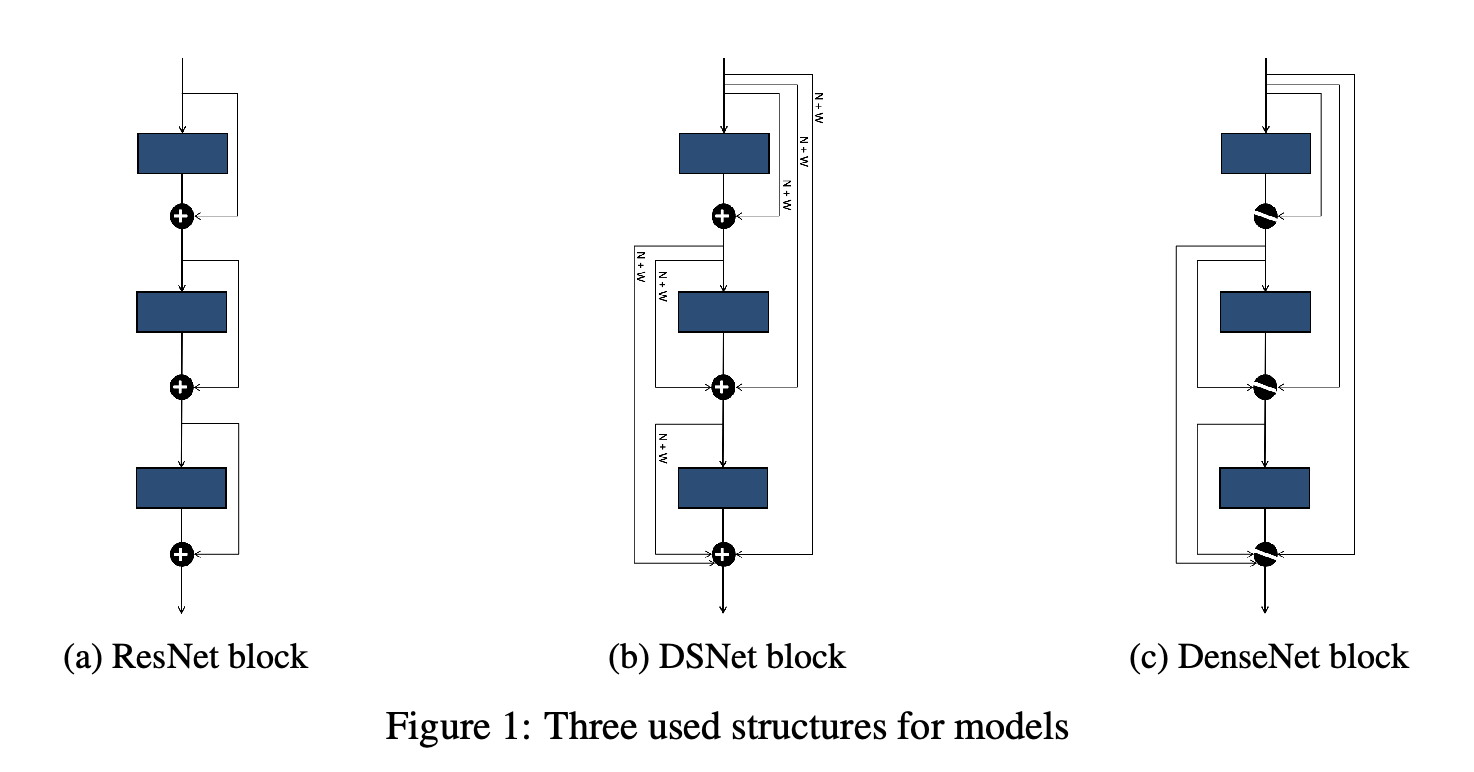
DenseNets have demonstrated superior performance on vision tasks, but have a much higher memory footprint than ResNets. DSNets claim to have solved this trade-off. In this paper, we will take a deeper look at this architecture and compare it side-by-side to the other two in multiple experiments. We find that DSNets are indeed signficantly better than ResNets, but only if the model size is large enough. We also test the effect of different hyperparameters and provide a guideline on when to use each model based on memory and time requirements.
You can read our full report here
- Make sure you have conda in your local machine, then follow the steps below.
- Make sure you are in the project root directory.
# create conda envirnoment from environment.yml
conda env create --name image_nn --file environment.yml
# Activate the created environment
conda activate image_nn
Now, install pytorch version 1.11. If you are on a linux-based machine with CUDA 11.3, you can use:
conda install pytorch torchvision torchaudio cudatoolkit=11.3 -c pytorchAnd finally run the following to test your installation:
# Set current project path as executable so that conda environment uses the project code.
pip install -e .
# All tests should passed if the environment installation is complete.
pytest After successfully setting up python environment, use this command to start the training.
python scripts/main.pyUse this command to see the summary of losses and accuracies of all the models. The training process logs the training once each model finishes the training, so all the finished training models will be shown here.
python scripts/report.pyTo reproduce the experiments, you can run the files inside the experiments folder. Each experiment has its own corresponding file.
The only exception is experiment 4.5 which was hard to put inside a single python file as the process to produce the results required multiple runs and reading things from the logs. You can find the notebook used for experiment 4.5 here.
This project is trained on GCP. Here are links that might help you along the environment setup process.
- Installation Script: [Link]
- Installing Nvidia drivers on GCP: [Link]
- Jupyter on GCP: [Link]
- Adding conda env to Jupyter: [Link]
-
Maryam Ebrahimi - MaryamEbr
- Initial implementation of ResNet
- being a part of implementing DSNet and DenseNet (we did this together, though)
- being a part of experiments (model_n experiment with CIFAR100)
- being a part of writing the report and editing
-
Teerapat Chaiwachirasak - teerapat-ch
- Initial implementation of DenseNet and DSNet.
- Train and collect experiment results on part of comparison among the three models (ResNet vs. DSNet vs. DenseNet).
- Hyper-parameters grid search on DSNet, and DSNet performance on CIFAR-10 vs. CIFAR100
- Visualize the mentioned experiments’ results as graphs, tables, and training curves for the report.
-
Ahmad Pourihosseini - ahmad-PH
- Conducted literature review of the models under comparison.
- Wrote the introduction, related work sections, significance test, and memory and time analysis sections of the report.
- Helped with editing the rest of the report to ensure cohesion.
- Helped with the implementation of the DSNet and DenseNet models.
- Designed and implemented the statistical significance experiments.


