-
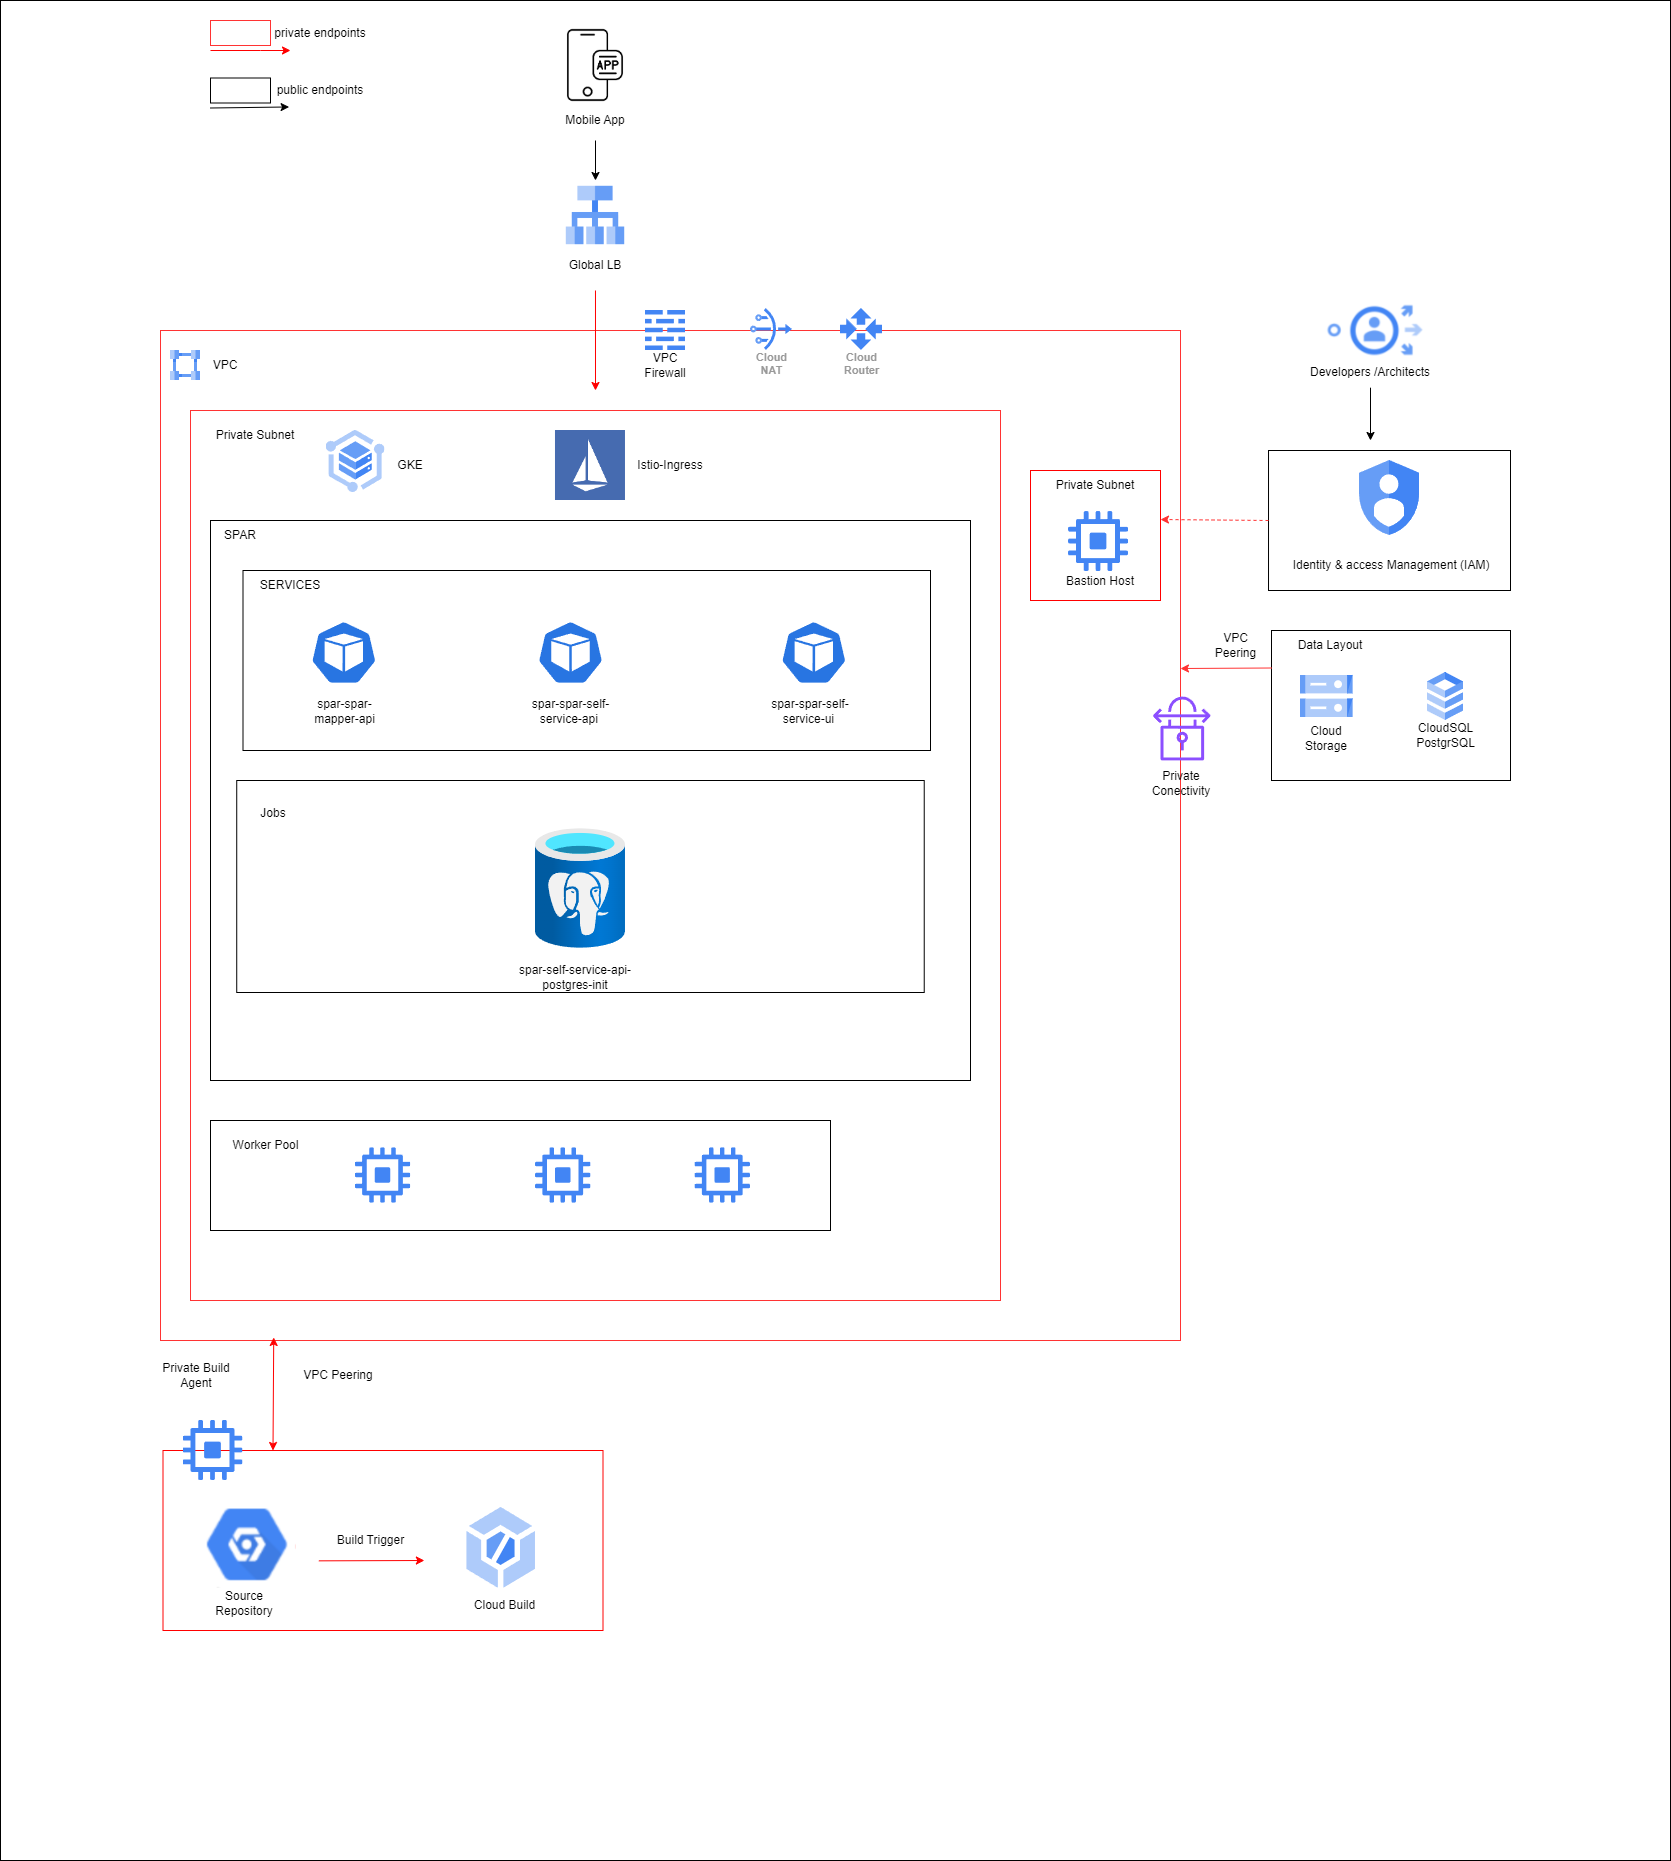
Kubernetes (GKE) - Google Kubernetes Engine (GKE) is used as the core platform for container orchestration.
-
spar-spar-mapper-api - Manages the routing and mapping of service requests to appropriate internal services.
-
spar-spar-self-service-api - Enables self-service functionalities by handling user requests and interactions with internal services.
-
spar-spar-self-service-ui – Provides the user interface for the self-service API, allowing users to interact with the system
-
Istio Ingress: The traffic to the Spar services is managed by Istio, which acts as the ingress controller.
-
Gateway: The gateway in Istio acts as the entry point for external traffic.
-
Virtualservice: A virtual service defines specific routing rules and directs the traffic to the desired Kubernetes services
Deployment uses the following tools:
- Terraform for GCP - Infrastructure deployment
- Helm chart - Application/Microservices deployment
- Cloud Build - YAML scripts which acts as a wrapper around Terraform Deployment scripts
The entire Terraform deployment is divided into 2 stages -
-
Pre-Config stage
- Create the required infra for RC deployment
-
Setup Stage
- Deploy the Core RC services
-
Helm Chart Details
| Chart | Chart Version |
|---|---|
| spar | spar-1.0.0 |
| istiod | istiod-1.23.2 |
| istio-ingressgateway | gateway-1.23.2 |
| istio-base | base-1.23.2 |
| cert-manager | cert-manager-v1.16.1 |
| prometheus | kube-prometheus-stack-65.2.0 |
-
-
Install kubectl
https://cloud.google.com/kubernetes-engine/docs/how-to/cluster-access-for-kubectl#apt
-
Install Helm
-
Esignet Cluster Setup
Esignet cluster must be set up and running before proceeding.
- (Root Folder)
- assets
- images
- architecture diagrams
- ...(more)
- builds
- apps - Deploy/Remove all Application services
- infra - Deploy/Remove all Infrastructure components end to end
- deployments - Store config files required for deployment
- configs
- Store config files required for deployment
- scripts
- Shell scripts required to deploy services
- configs
- terraform-scripts
- Deployment files for end to end Infrastructure deployment
- terraform-variables
- dev
- pre-config
- pre-config.tfvars
- Actual values for the variable template defined in variables.tf to be passed to pre-config.tf
- pre-config.tfvars
- pre-config
- dev
- assets
PROJECT_ID=
OWNER=
GSA=$PROJECT_ID-sa@$PROJECT_ID.iam.gserviceaccount.com
GSA_DISPLAY_NAME=$PROJECT_ID-sa
REGION=asia-south1
ZONE=asia-south1-a
CLUSTER=
DOMAIN_NAME=
EMAIL_ID=
alias k=kubectl
Script to setup authentication, configuring the project, enabling services, and creating a service account in GCP:
script file located at `deployment/scripts/setup_gcp.sh`

**To execute the script**

bash setup_gcp.sh
# Maintains the Terraform state for deployment

gcloud storage buckets create gs://$PROJECT_ID-tfs-stg --project=$PROJECT_ID --default-storage-class=STANDARD --location=$REGION --uniform-bucket-level-access

#### The PROJECT_ID needs to be updated in the command below.

# List all Storage buckets in the project to check the creation of the new one
gcloud storage buckets list --project=$PROJECT_IDcd $BASEFOLDERPATH
#### The PROJECT_ID,GSA needs to be updated in the command below.
# One click of deployment of infrastructure
gcloud builds submit --config="./builds/infra/deploy-script.yaml" \
--project=$PROJECT_ID --substitutions=_PROJECT_ID_=$PROJECT_ID,\
_SERVICE_ACCOUNT_=$GSA,_LOG_BUCKET_=$PROJECT_ID-tfs-stg
# Remove/Destroy infrastructure
#### The PROJECT_ID,GSA needs to be updated in the command below.
/*
gcloud builds submit --config="./builds/infra/destroy-script.yaml" \
--project=$PROJECT_ID --substitutions=_PROJECT_ID_=$PROJECT_ID,\
_SERVICE_ACCOUNT_=$GSA,_LOG_BUCKET_=$PROJECT_ID-tfs-stg
*/... Apply complete! Resources: 36 added, 0 changed, 0 destroyed.
Before moving to the next step, you need to create domain/subdomain and create a DNS A type record pointing to lb_public_ip
cd $BASEFOLDERPATH

# One click of deployment of services
#### The REGION,PROJECT_ID,GSA,EMAIL_ID,DOMAIN needs to be updated in the command below.

gcloud builds submit --config="./builds/apps/deploy-script.yaml" \
--region=$REGION --project=$PROJECT_ID --substitutions=_PROJECT_ID_=$PROJECT_ID,\
_REGION_="$REGION",_LOG_BUCKET_=$PROJECT_ID-tfs-stg,_EMAIL_ID_=$EMAIL_ID,_DOMAIN_=$DOMAIN,_SERVICE_ACCOUNT_=$GSA

# Remove/Destroy
#### The REGION,PROJECT_ID,GSA,EMAIL_ID,DOMAIN needs to be updated in the command below.

/*
gcloud builds submit --config="./builds/apps/destroy-script.yaml" \
--region=$REGION --project=$PROJECT_ID --substitutions=_PROJECT_ID_=$PROJECT_ID,\
_REGION_="$REGION",_LOG_BUCKET_=$PROJECT_ID-tfs-stg,_SERVICE_ACCOUNT_=$GSA
*/gcloud compute instances list
gcloud compute ssh spar-dev-ops-vm --zone=$ZONE
gcloud container clusters get-credentials spar-dev-cluster --project=$PROJECT_ID --region=$REGION
kubectl get nodes
kubectl get pods -n spar
kubectl get svc -n istio-system- Run the below command in bastion host
- Install psql client
sudo apt-get update
sudo apt-get install postgresql-client -y- Run below command to access psql password
gcloud secrets versions access latest --secret spar-dev- Run below command to get private ip of sql
gcloud sql instances describe spar-dev-pgsql --format=json | jq -r ".ipAddresses[0].ipAddress"- Connect to psql
psql "sslmode=require hostaddr=PRIVATE_IP user=USERNAME dbname=postgres"- Once the esignet is up and running get the client_secret value by running the below command
kubectl get secrets keycloak-client-secrets -n esignet -o jsonpath="{.data.mosip_pms_client_secret}" | base64 --decode-
Modify
client_secretenvironment variable with the above secret and save the changes in theesignet-OIDC-flow-with-mockenvironment. -
To create an OIDC Client, navigate to the
OIDC Client Mgmtsection and trigger the necessary APIs to create the OIDC client. This gives the clientId and new privateKey_jwk. -
Next, create a mock identity for testing the OIDC flow. Go to the Mock Identity System section and trigger the
Create Mock IdentityAPI. Get theindividual_idwhich gets generated. -
get the
clientIdandprivateKey_jwkfrom the environment variables. -
TO INTEGRATE ESIGNET AND SPAR
- Install psql client
sudo apt-get install postgresql-client -y
-
Before running the script get the ClientID, privatejwk key, Redirect URI, esignet Domain. Trigger the DBScript to integrate esignet and spar
   https://github.com/tejash-jl/spar-stack/blob/main/deployments/scripts/dbscript.sh
   bash dbscript.sh
-
If you encounter any
permission deniederror when running the script, runchmod +x dbscript.sh
