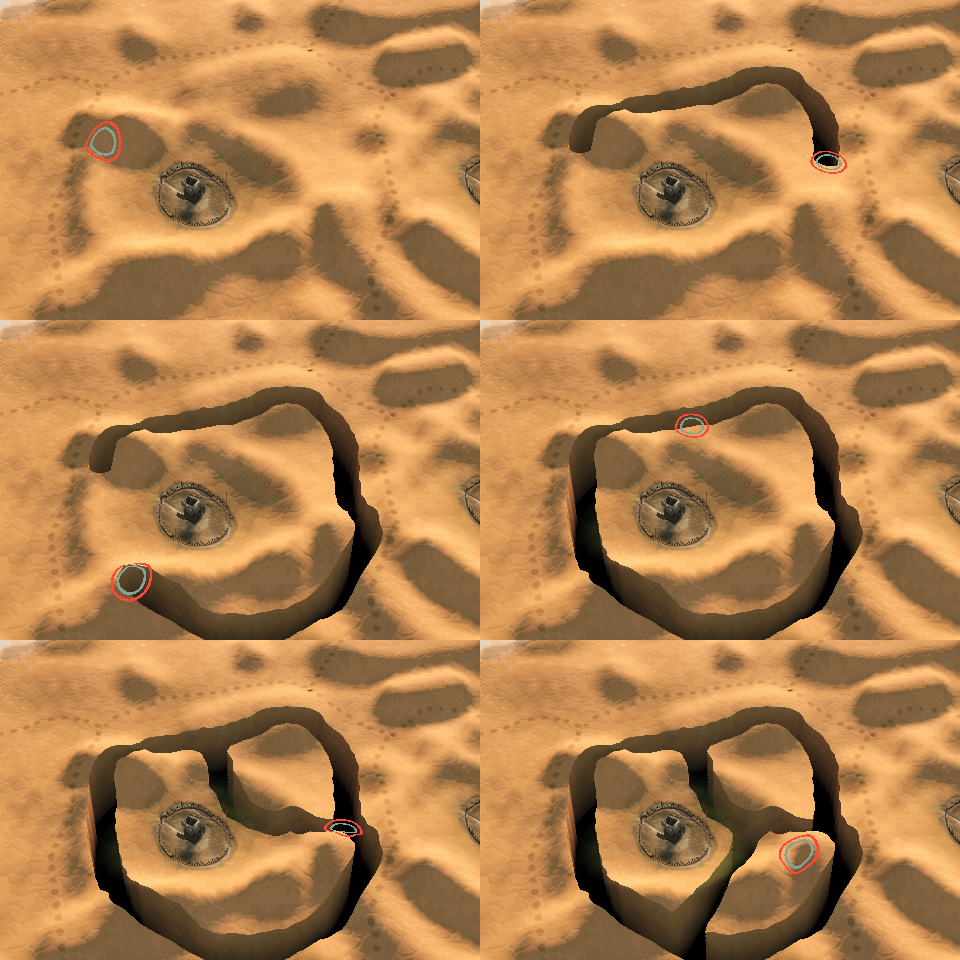
(a Crusader Kings III modding utility)
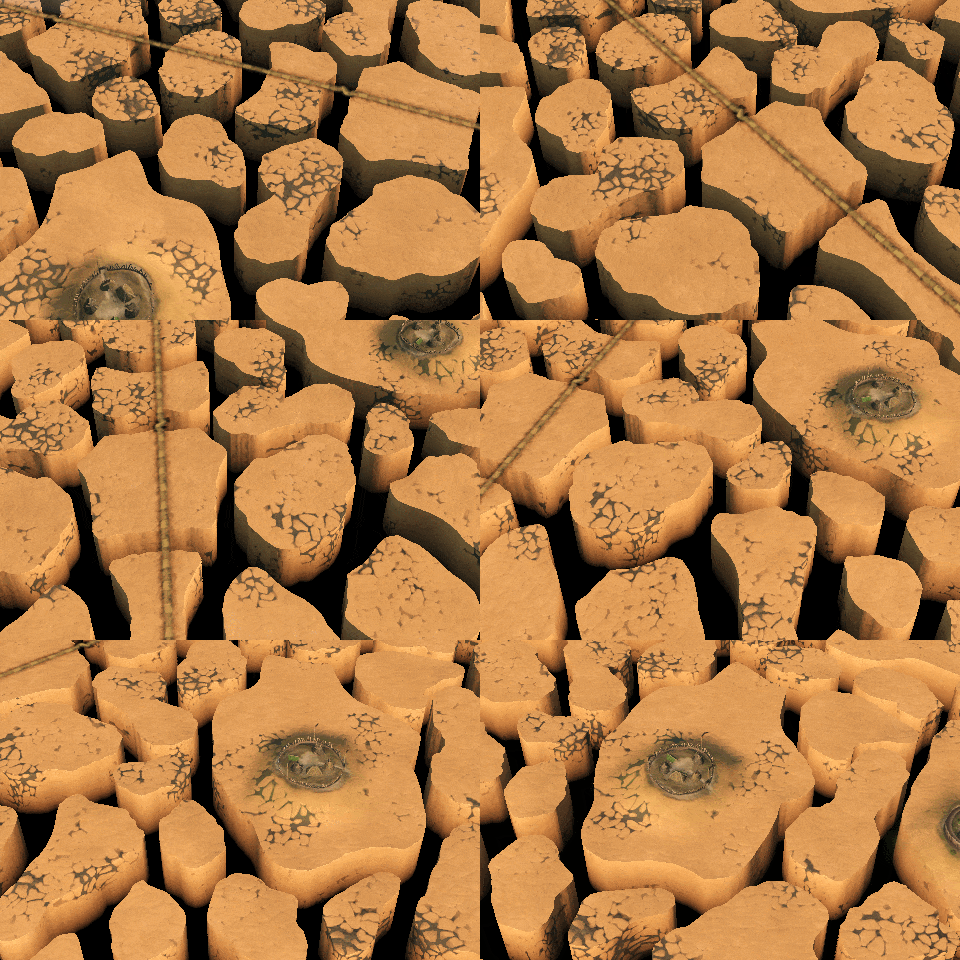
This repository contains shader code and mod integration example for the chasm terrain shader - the one used in The Way of Kings mod to render the Shattered Plains, as well as in Godherja: The Dying World for its rifts. The effect does not create any additional 3D geometry and is based on dynamically replacing the color of selected map pixels depending on camera position to create an illusion of a chasm with vertical walls, gradually fading to black, optionally with either discarded see-through pixels or a parallaxed cubemap background at the bottom.
The code has been updated to be compatible with CK3 version 1.10.2 (Quill).
Special thanks to Tobbzn for commissioning this effect for WoK and providing rigorous QA and debugging assistance; to Buckzor for coming up with the initial idea of a chasm terrain brush backed by a pixel shader; and to CK3 Mod Co-op for being a truly welcoming and helpful community.
Chasm effect itself is implemented in pixel shader code in gfx/FX/gh_chasm.fxh file and is designed to be called from gfx/FX/pdxterrain.shader, which vanilla uses to render map terrain.
By default, the shader applies chasm effect to map pixels marked with non-zero values in gfx/map/terrain/GH_chasms.png texture. The look of chasm bottoms is determined by gfx/map/terrain/GH_chasm_types.png (see "Chasm Types", and chasm walls - by the terrain textures on map spots to which the effect is applied.
To support drawing chasms in map editor it is also possible to temporarily switch to using a custom terrain brush with red properties channel (see "Using CK3's Map Editor").
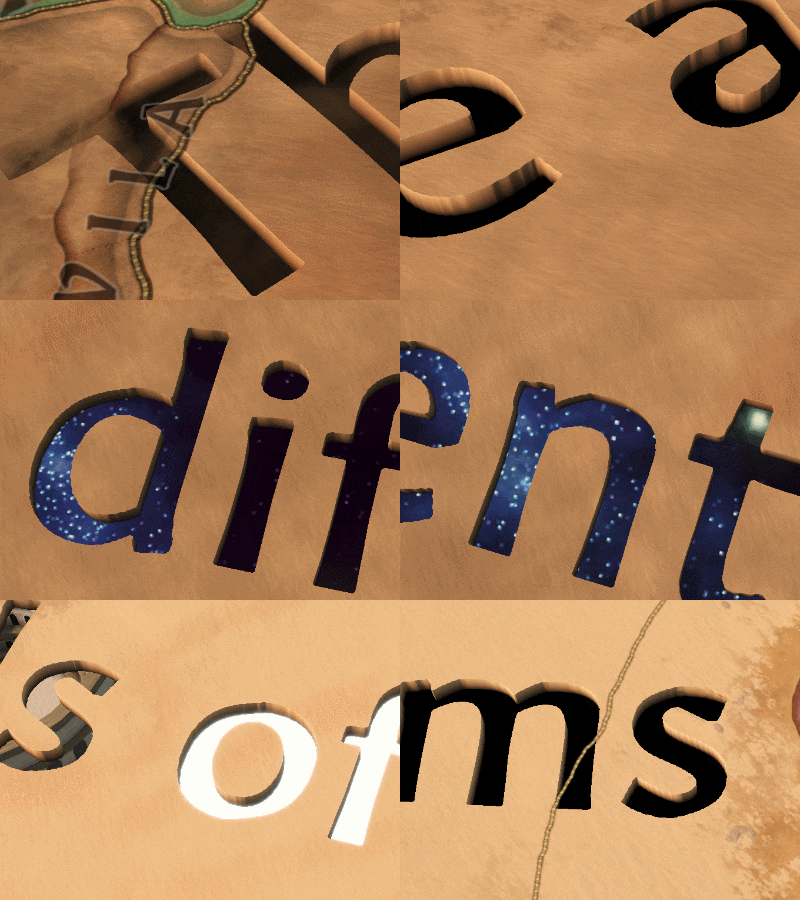
This repo's mod folder contains a valid mod descriptor and can itself be loaded as a mod to play around with the effect on top of a vanilla (or other vanilla-sized) map, assuming you don't have any mods that also contain changes to terrain shader or custom terrain brushes. For the sake of example, the two aforementioned chasm textures have been set up to create several chasms in the lower part of the map (north Africa in case of vanilla), arranged in the shape of a short text phrase.
Chasm shader will apply one of 3 visual effects to chasm bottoms, depending on the pixel color in gfx/map/terrain/GH_chasm_types.png at coordinates where a particular chasm is located.
Note that this texture doesn't determine the actual positions or silhouettes of chasms themselves - that is entirely controlled via gfx/map/terrain/GH_chasms.png. This means you can, for example, fill the entire GH_chasm_types.png texture with a single color, if you want all of your chasms to have the same type regardless of where they are on the map.
The 3 supported chasm types are as follows.
| Chasm Type | GH_chasm_types.png Pixel Color (RGB) |
Example Visuals | Notes |
|---|---|---|---|
| Black (Single-color) | BLACK (00000) |
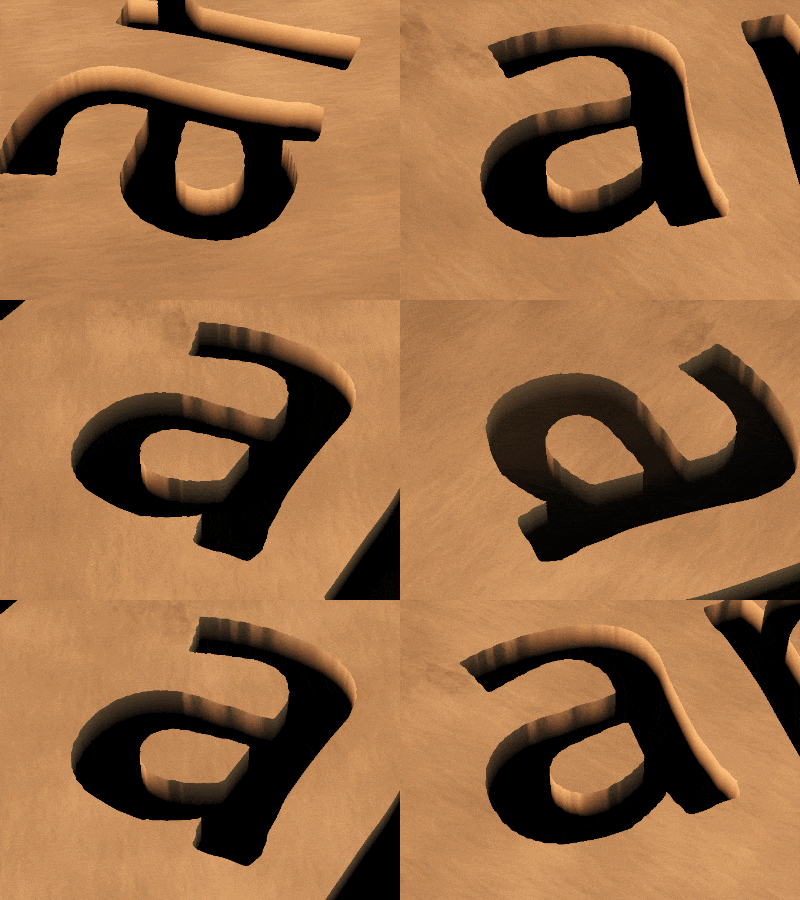 |
Bottoms use a single color (black by default). The color can be changed by modifying CHASM_BOTTOM_COLOR constant in gh_chasm.fxh. |
| Rift | RED (FF0000) |
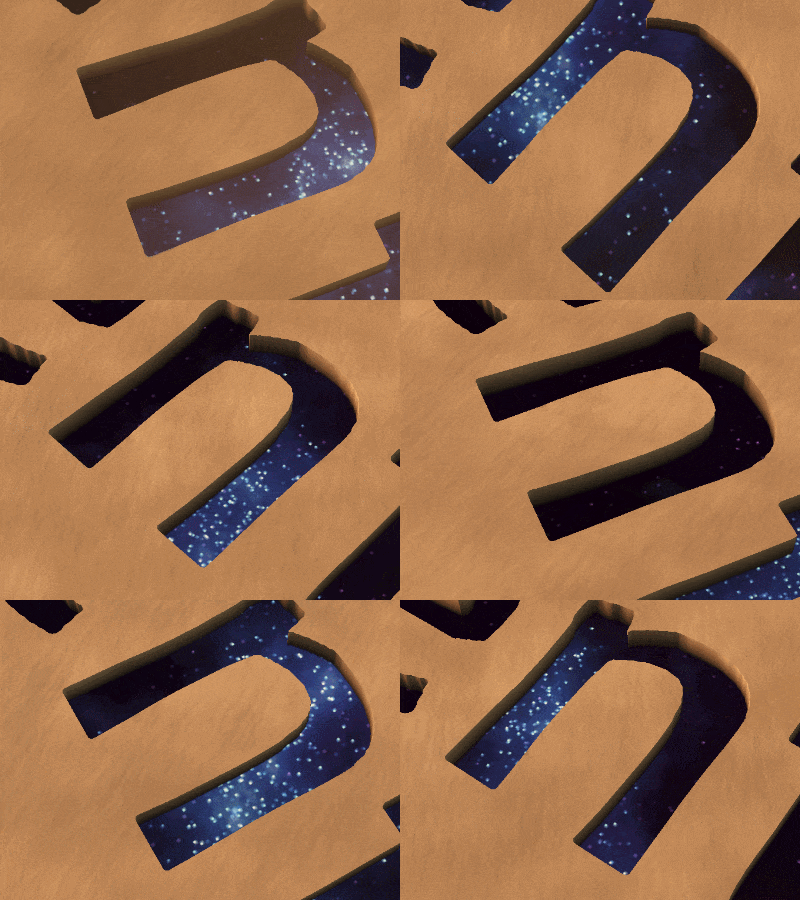 |
Bottoms show a parallaxed background from a cubemap texture (a starry space environment by default). Background can be changed by replacing gfx/map/environment/gh_rift_layer_0.dds. |
| See-through | GREEN (00FF00) |
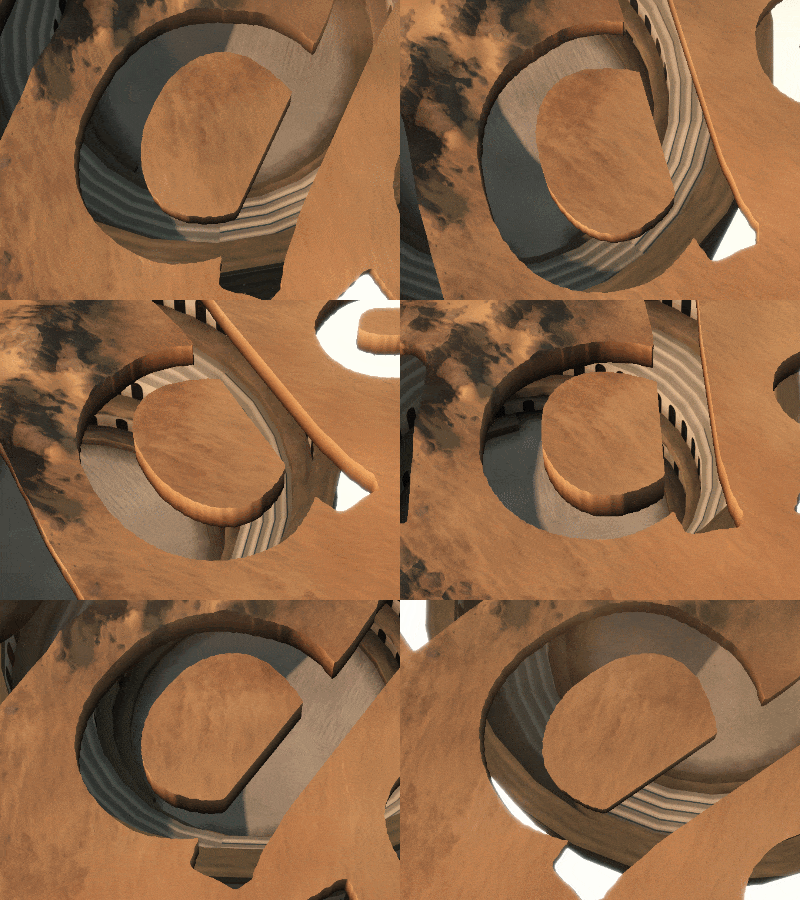 |
Chasm bottom pixels are discarded, revealing any models placed underneath the terrain, including the skybox if one is set up. |
Note that GH_chasm_types.png provided by this repo has a couple of spots already marked to demonstrate all 3 types of chasms - you might want to start by filling it with a single color or otherwise modifying it for your mod.
Follow these steps to integrate chasm effect into your own mod:
- Copy all of the
.shaderand.fxhfiles that don't yet exist in your mod fromgfx/FX, including thecw/subfolder. If your mod already has some of these shader files, you'll need to manually merge in changes from this repo's versions of these files into yours.
For convenience, all the changes to vanilla files are marked with either MOD(wok-chasm) or MOD(godherja) comments in .shader and .fxh files -
you can just search for this string and copy/replace all pieces of code surrounded by this comment.
-
Create your own
gfx/map/terrain/GH_chasm_types.pngandgfx/map/terrain/GH_chasms.pngtextures or copy the ones from this repo. These textures should have the same resolution as your map dimensions. Fully black textures are fine to begin with, see next section for information on how to fill them with actual data. Note that the versions of these textures provided by this repo already contain some example data and have vanilla map size (8192x4096). -
Copy the rift cubemap texture
gfx/map/environment/gh_rift_layer_0.ddsinto your mod or create your own at the same path. This should be a cubemap DDS usingBC3/DXT5compression, with MIP-maps. -
(Optional.) Copy the blacked-out
steppe_01_properties.ddsto your mod'sgfx/map/terrainfolder. This will prevent chasm shader in chasm edit mode from interpreting vanilla steppes as chasms (see "Using CK3's Map Editor" for more info on that). -
(Optional.) If you intend to use CK3's map editor to paint chasms, you'll need chasm terrain brushes. Any brush with a non-zero red properties channel will work.
You can use the two brushes included in the repo - to do that just copy the remaining texture files from this repo's gfx/map/terrain folder and either copy the entire materials.settings file or merge in the last 2 brush definitions from it:
    {
        name=		"WoK Chasm - Desert wavy 01"
        diffuse=	"wok_chasm_desert_wavy_01_diffuse.dds"
        normal=		"wok_chasm_desert_wavy_01_normal.dds"
        material=	"wok_chasm_desert_wavy_01_properties.dds"
        mask=		"wok_chasm_desert_wavy_01_mask.bmp"
        id =		"wok_chasm_desert_wavy_01"
    }
    {
        name=		"WoK Chasm - Drylands 01 cracked"
        diffuse=	"wok_chasm_drylands_01_cracked_diffuse.dds"
        normal=		"wok_chasm_drylands_01_cracked_normal.dds"
        material=	"wok_chasm_drylands_01_cracked_properties.dds"
        mask=		"wok_chasm_drylands_01_cracked_mask.bmp"
        id =		"wok_chasm_drylands_01_cracked"
    }
Note that if your mod uses map dimensions different from vanilla (8192x4096), you'll need to provide your own *_mask textures matching your map size.
Alternatively, you can make your own chasm brushes - you can take *_diffuse, *_normal and *_properties textures from any vanilla brush or make your own, the only requirement is that you modify the properties texture in such a way that it has a non-zero red channel. The shader doesn't use exact values of the red properties channel, it only checks for non-zero, so just setting the red channel to 255 is fine.
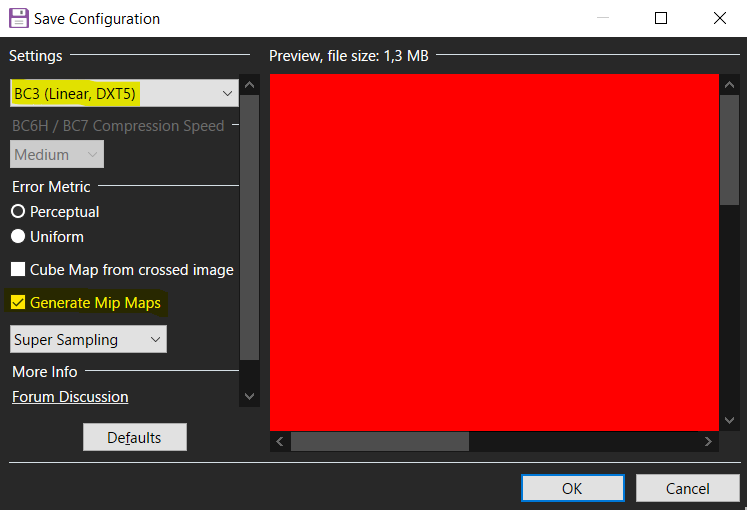
When making your own terrain brush textures or editing existing ones, keep in mind that they need to be saved as DDS files with BC3/DXT5 format and mip-maps. The following screenshot illustrates proper settings to achieve that on saving a DDS in Paint.NET.
The textures of your brush determine the look of your chasm's walls, up to the point where chasm depth exceeds its width. Chasm shader essentially "folds" the map texture along the brink, so as depth increases you'll see first the texture of your chasm brush and then the surrounding texture next to chasm.
You can use either an external graphics editor (GIMP, Paint.NET, etc.), or CK3's buit-in map editor to add chasms to your mod's map.
Using the map editor requires more setup and is generally more fiddly, but you might decide to use it if you want to have a live preview as you paint your chasms.
Otherwise just changing GH_chasms.png texture using any graphics editor is preferable.
Regardless of which way you use to paint the chasms themselves, you'll want to edit gfx/map/terrain/GH_chasm_types.png as described in mark regions for different chasm types.
The simplest way to add chasms to your map is to edit gfx/map/terrain/GH_chasms.png map texture directly using any graphics editor such as GIMP or Paint.NET, and mark the desired chasm spots using white pixels, while leaving everything else black. Specific PNG format for this texture doesn't matter - a regular 32bit PNG is fine.
Alternatively, you do have an option to paint chasms in map editor. To do so, run it either by providing -mapeditor argument to CK3, or by issuing map_editor console command.
To see a live preview of the chasms you paint, you'll need to enable chasm edit mode using the following console command from map editor:
shader_debug GH_CHASM_EDIT_MODE
This shader mode has a much higher performance impact than the default, so will not be used in-game, but in map editor it does allow you to have a preview of your chasms as you draw them.
In this mode GH_chasms.png is ignored completely. Instead chasms are rendered in spots on the map with non-zero red channel in the properties texture. This channel was chosen to signify "chasmness", since it's currently unused by the vanilla game (see "How to Add Terrain Textures" spoiler here). Curiously, there is a single vanilla terrain properties texture - steppe_01_properties.dds - which does have non-zero red channel, but in my experiments it didn't seem to have any visual meaning. For chasm shader not to interpret vanilla steppes as chasms, this texture needs to have its red channel zeroed and so this repo provides a blacked-out version of this file.
Special terrain brushes with red properties textures can be used to paint chasms on the map. For the sake of example this repo defines two such brushes in gfx/map/terrain/materials.settings ("WoK Chasm - Desert wavy 01" and "WoK Chasm - Drylands 01 cracked", based on vanilla "Desert wavy 01" and "Drylands 01 cracked" respectively). Textures for these brushes are located in gfx/map/terrain/. You can define your own chasmic brushes - more on that in step 4 of "Integrating into Your Mod" section.
When you're done painting, you'll need to save changes in map editor, then copy the _mask texture from gfx/map/terrain for the brush you painted your chasms and save it as gfx/map/terrain/GH_chasms.png. If you painted using more than one chasm brush, you'll need to combine their _mask textures using additive blending and save the result as GH_chasms.png.
To verify your work without reloading the game, you can issue the following console commands after you save GH_chasms.png.
shader_debug GH_CHASM_EDIT_MODE
reload texture gfx/map/terrain/GH_chasms.png
Note that the shape of chasm walls will undergo a slight change when toggling GH_CHASM_EDIT_MODE.
Besides selecting one of the supported chasm types and replacing gfx/map/environment/gh_rift_layer_0.dds cubemap, you have other means of customizing the look (and performance impact) of chasms. While shader code comes ready to be used out of the box, there are several #defines and constants at the top of gh_chasm.fxh, which you can tweak to achieve various visual effects or adjust performance.
GH_CHASM_ENABLED - comment out with // to disable the chasm effect altogether - useful for debugging and checking performance impact.
GH_CHASM_SYMMETRY_ENABLED - uncomment to enable 8-sector mirrored symmetry (like on the Shattered Plains in WoK), and be able to make use of symmetry options.
GH_CHASM_SYMMETRY_GUIDES_ENABLED - uncomment to enable rendering of helper lines and circle denoting the primary sector and range for symmetry.
GH_TERRAIN_LOW_SPEC - this enables less performance-intensive config for players with low graphics settings; it's defined from *LowSpec map Effects in pdxterrain.shader (assuming you copied corresponding changes) but you can define it manually or enable it via shader_debug GH_TERRAIN_LOW_SPEC console command, if you want to have a look at how chasms will look on low graphics settings.
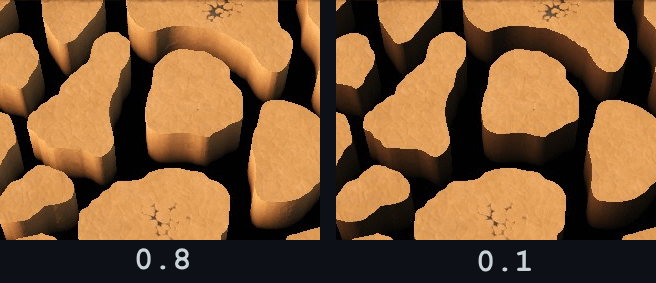
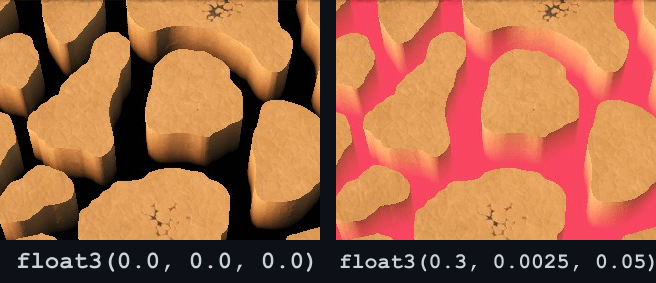
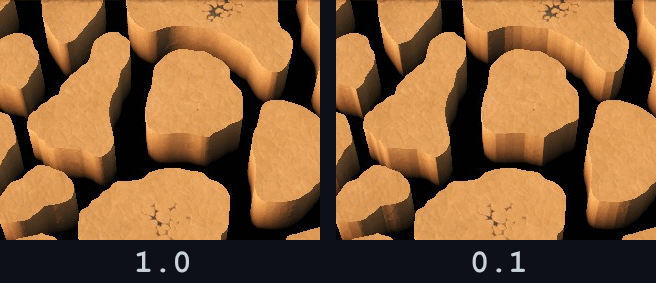
Values of the following constants can be changed to tweak the look of the chasm. Where it makes sense, pictures have been added to illustrate the difference a given constant's value makes.
gh_chasm.fxh each of them has 2 values defined - one for higher fidelity and another for higher FPS, GH_TERRAIN_LOW_SPEC define is what controls if the latter value is used. The higher fidelity values specified in this repo were selected to produce near-60 FPS on an RTX 2060 with the camera zoomed in to view the chasmic landscape of the Shattered Plains in WoK. Depending on your chasm configuration and PC specs you're targeting, you might wish to modify these values.
Valid values: 0.0 to 1.0
Controls how smooth the color change between flat terrain and chasm wall should be, normals notwithstanding. 1.0 means completely smooth, the closer to 0.0 the more abrupt. Mainly useful in GH_TERRAIN_LOW_SPEC mode, where normals are not determined by default.
Valid values: float3 with components 0.0 to 1.0 (RGB)
Determines the color, to which chasm pixels fade as perceived depth approaches CHASM_MAX_FAKE_DEPTH. For default chasm type this is also the color of chasm bottoms. Set to black by default but other colors can be used to create a colored fog or light from the deep effect.
Valid values: greater than 0.0
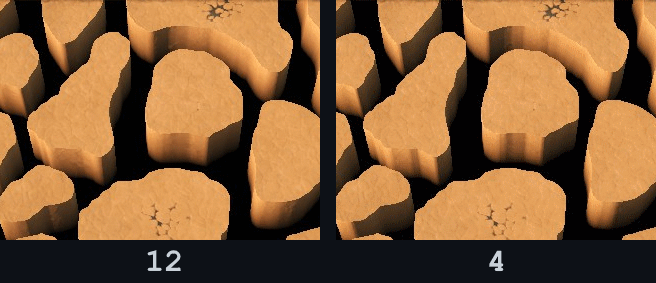
Affects the apparent smoothness of chasm walls by controlling the distance at which wall normal samples are taken. Bigger values lead to smoother walls, however values higher than 1.0 might lead to some visually incorrect shading. Values between 0.5 and 1.0 were found to produce reasonably-looking smooth walls without artifacts. This setting is not used in GH_TERRAIN_LOW_SPEC mode by default, since wall normals are not determined.
Valid values: greater than 0.0
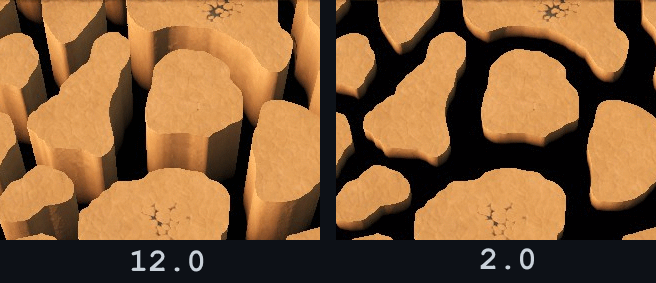
Controls max "depth" in world space units, at which chasm walls are still visible - past this point they are completely faded into CHASM_BOTTOM_COLOR. This setting has a direct effect on shader performance, higher values have higher performance cost.
Valid values: greater than 0.0
Technical setting. Controls how far the shader will look for the chasm brink when analyzing a given pixel. Higher values have higher performance cost; at low values some artifacts might be visible at shallow camera angles.
Valid values: greater than 0.0
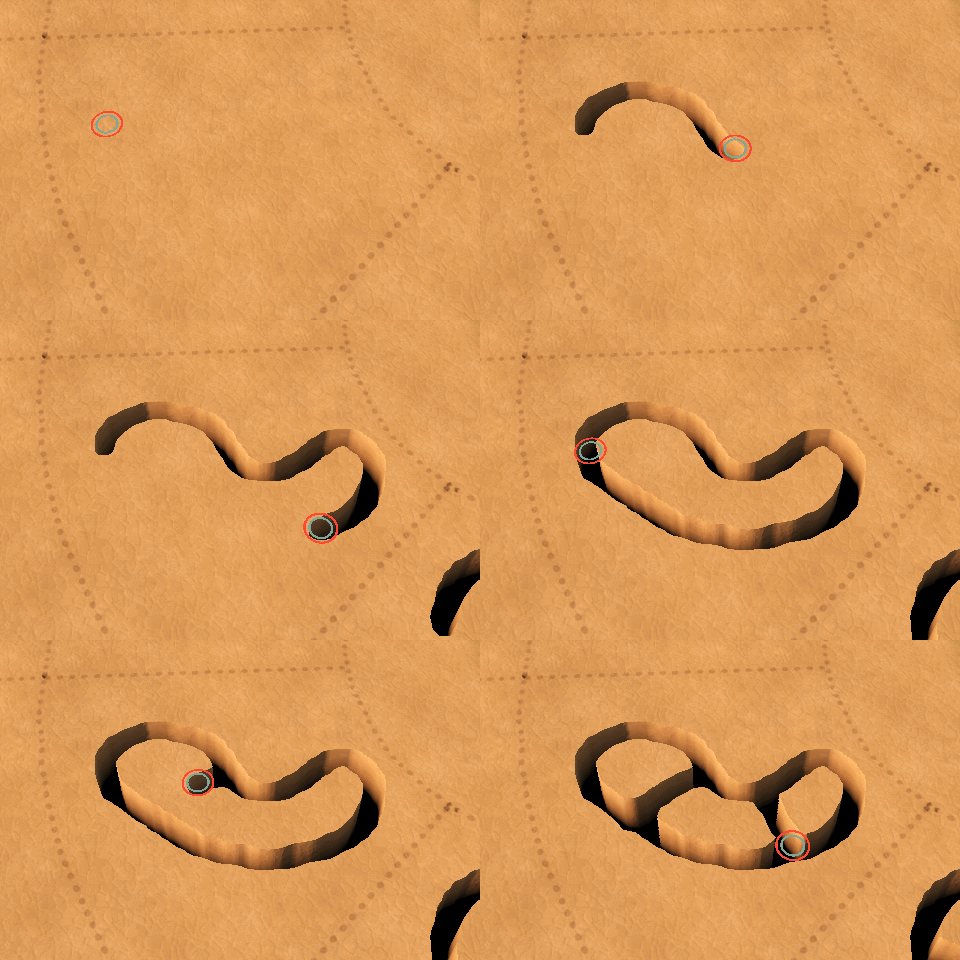
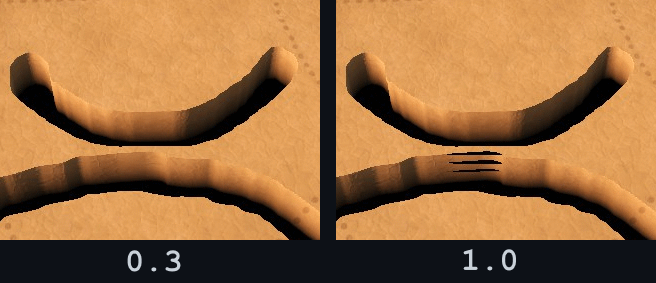
Technical setting. Effectively determines how close two chasms can be located next to each other without suffering from "hole in the wall" graphical artifacts, which can be seen in the picture. Lower values have higher performance cost.
Valid values: greater than 0.0 but not greater than CHASM_SAMPLE_STEP
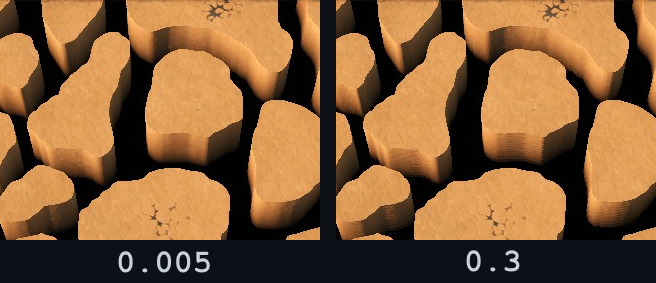
Controls how vertically smooth chasm walls are. At high values horizontal bands will be noticeable. Lower values have higher performance cost.
Valid values: non-negative integers
Determines how many samples are taken to determine normal directions for chasm walls. Value of 0 means chasm wall normals are not determined at all, which leads to all chasm walls having the same flat shading - this is the behavior used by default for GH_TERRAIN_LOW_SPEC mode. The smaller the value, the noisier wall shading will look. Higher values have higher performance cost.
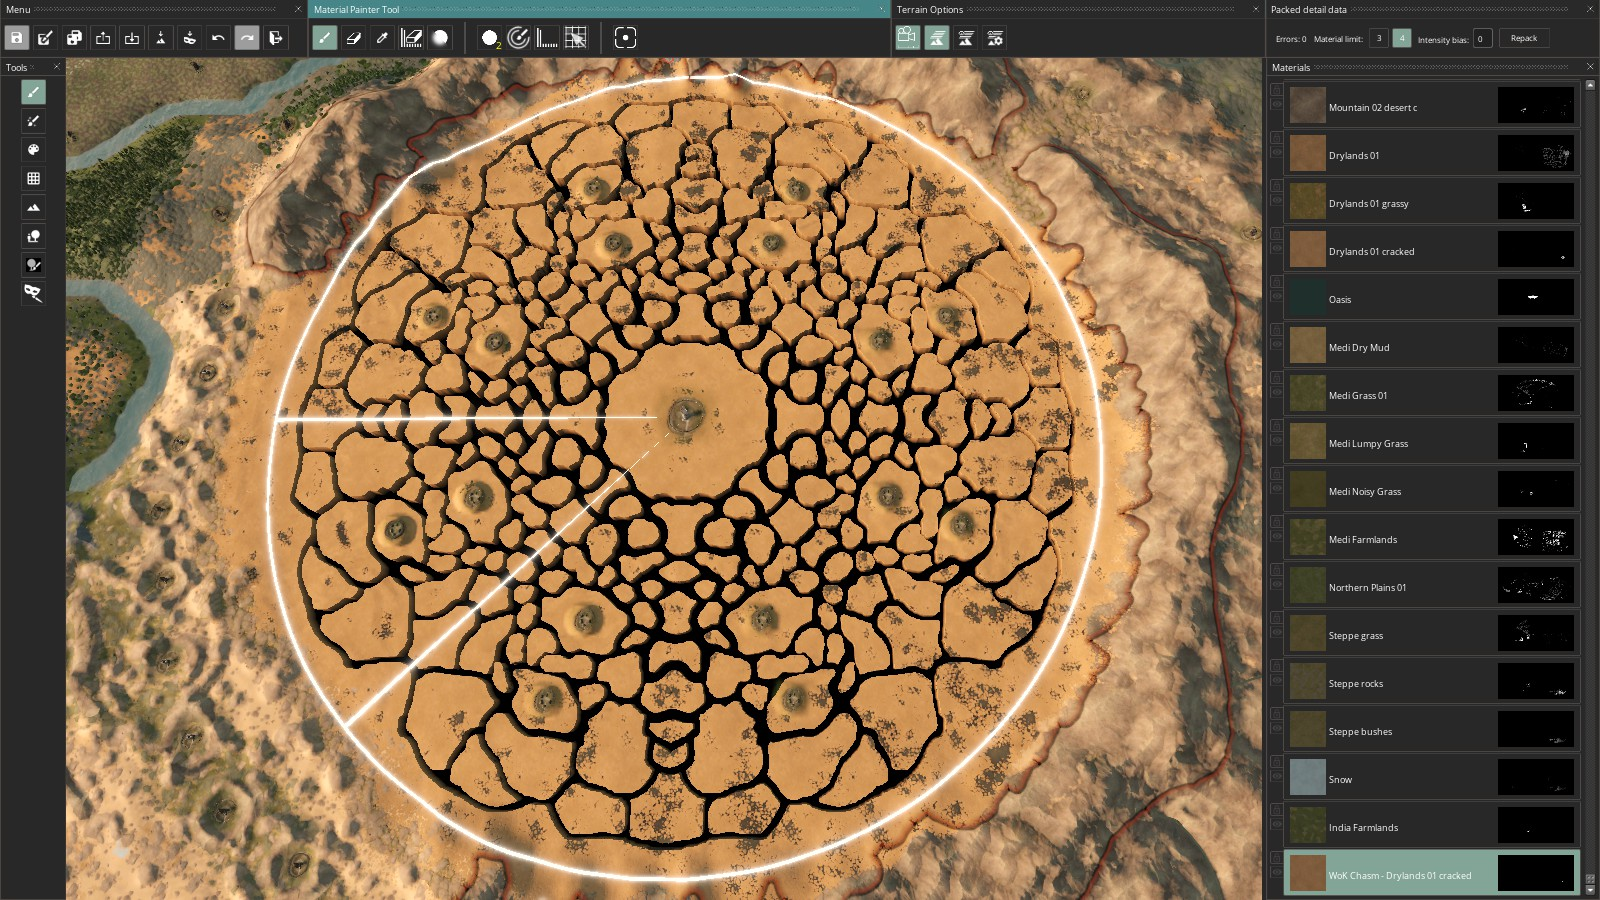
The Way of Kings uses a symmetrical pattern for the chasms on the Shattered Plains. gh_chasm.fxh provides the functionality to support this symmetry, which is enabled by defining GH_CHASM_SYMMETRY_ENABLED. Additionally, GH_CHASM_SYMMETRY_GUIDES_ENABLED can be defined while mapping chasms to provide a visual aid showing both the range of symmetry and the primary symmetry sector, from which chasm values will be duplicated across other symmetry sectors. The screenshot below shows how this looks in the map editor with WoK map.
Note that with symmetry enabled chasm brushes within symmetry range will only have an effect inside of the primary symmetry sector, from which they will be duplicated to other sectors of the circle.
The following constants control symmetry behavior.
Valid values: float2 with non-negative components (XY map coordinates)
Point on the map to be used as the center of symmetry. Coordinate values to use can be found by hovering over the desired point on the map in debug mode or using a material sampling tool in map editor.
Valid values: greater than 0.0
Radius around CHASM_SYMMETRY_CENTER at which chasm symmetry applies. Outside of this range symmetry is not used.
Valid values: float3 with components 0.0 to 1.0 (RGB)
Color of the symmetry guides shown when GH_CHASM_SYMMETRY_GUIDES_ENABLED is defined.
