Linkit plugin for Craft 3
One link field to rule them all... This plugin adds a custom fieldtype which enables support for linking to email addresses, telephone numbers, URL's and Craft element types.
New for Craft 3
- Link to Users and specify a profile url rule
- New social links
- Completely rewritten for Craft 3
- Easily extendable, create your own custom link types
Requirements
This plugin requires Craft CMS 3.1.2 or later.
Installation
Plugin Store
Log into your control panel, hit up the 'Plugin Store', search for this plugin and install.
Composer
Open terminal, go to your Craft project folder and use composer to load this plugin. Once loaded you can install via the Craft Control Panel, go to Settings → Plugins, locate the plugin and hit “Install”.
cd /path/to/project
composer require fruitstudios/linkit
Updating from Craft 2
Version 1.0.7 includes migration scripts for Craft 2, just install or update via the plugin store and Linkit will handle everything else.
Backup before installing / updating and note that only native link types (email, url, phone, entry, asset, category and product) can be updated. Settings for custom link types will be overwritten and although content will remain in place, it may cause issues unexpected issues with your templates.
For help on migrating custom link types see the docs and if you run into issues during the update just open a GitHub issue.
Configuring Linkit
Once installed, create a new field and choose the Linkit fieldtype. You'll then have the option of configuring what link type will be available to this field.
The following link types are available:
Basic
- Email Address
- Telephone Number
- URL
Social
- Linked In
- YouTube
Elements
- Entry
- Category
- User
- Asset
- Product
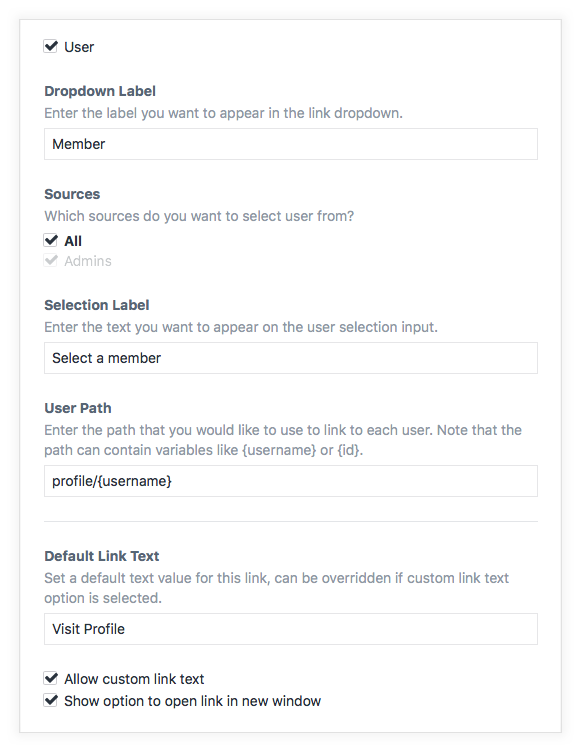
Each link type has additional option to allow further customisation. For example, the User link type allows you to set a default path...
You can also customise the dropdown labels that appear on the field.
Using Linkit
Template Variables (Basic Use)
Output the custom field to get a ready built html link...
{{ entry.linkItField | raw }}
or in full...
{{ entry.linkItField.link }} or {{ entry.linkItField.getLink() }}
Create a customised html link...
{% set attributes = {
    title: 'Custom Title',
    target: '_self',
    class: 'my-class',
    "data-custom": 'custom-data-attribute'
} %}
{{ entry.linkItField.link(attributes) }}
Template Variables (Advanced Use)
Each Linkit field returns a Linkit model with the following tags...
{{ entry.linkItField.url }} or {{ entry.linkItField.getUrl() }}
{{ entry.linkItField.text }} or {{ entry.linkItField.getText() }}

{{ entry.linkItField.type }}
{{ entry.linkItField.typeHandle }}

{{ entry.linkItField.hasElement }}
{{ entry.linkItField.available }} or {{ entry.linkItField.isAvailable() }}

{{ entry.linkItField.target }}
{{ entry.linkItField.targetString }}
{{ entry.linkItField.linkAttributes }}
{{ entry.linkItField.customText }}
If your link is an element link you also have access to the following...
{{ entry.linkItField.element }} or {{ entry.linkItField.getElement() }}
or via the specific element types...
{{ entry.linkItField.entry }} or {{ entry.linkItField.getEntry() }}
{{ entry.linkItField.asset }} or {{ entry.linkItField.getAsset() }}
{{ entry.linkItField.category }} or {{ entry.linkItField.getCategory() }}
{{ entry.linkItField.user }} or {{ entry.linkItField.getUser() }}
{{ entry.linkItField.product }} or {{ entry.linkItField.getProduct() }}
Example Usage
If you have created a field called 'linkItField' with a User link type like so...
{{ entry.linkItField.link }}
would output <a href="/profile/USERNAME">Visit Profile</a> which is the default user path that is created in the setting and the user would be available at...
{{ entry.linkItField.user }}
A Note On Element Status
To match first party element fieldtypes, Linkit now links to and allows users to select disabled elements when using element link types, we have added a new method to allow you to determine if a link is available (enabled) for the current site, as such the following will return a boolean value
{{ entry.linkItField.avialable }} or {{ entry.linkItField.isAvialable() }}
you can use this to work out if you should display a link
{% if entry.linkItField.available %}
    {{ entry.linkItField.link | raw }}
{% endif %}
You can still access the linked element and any other attributes should you need to access a disabled element
{# So long as it exists the link is always returned irrelevant of status #}
{% set element = entry.linkItField.element %}
{% if element %}
    {{ element.title }} - {{ element.url }}
{% endif %}
Custom Link Types
You can easily create your own link types,
Full documenation is coming soon, for now, take a look at the models folder. Each link type is a seperate model, just extend Link or ElementLink, depending on your needs, and everything will be set up for you.
Hook up the requirements and register custom link types in your plugin (or modules) init()...
<?php

...

use fruitstudios\linkit\Linkit;
use fruitstudios\linkit\events\RegisterLinkTypesEvent;
use fruitstudios\linkit\services\LinkitService;

use developer\plugin\models\CustomType;

...

public function init()
{
    parent::init();

    Event::on(LinkitService::class, LinkitService::EVENT_REGISTER_LINKIT_FIELD_TYPES, function (RegisterLinkTypesEvent $event) {
        $event->types[] = new CustomType();
    });

}
If you think they are super useful and you agree we can look to add them to the core plugin for everyone to use.
Brought to you by FRUIT


