What is Sketchmine?
Sketchmine is a toolkit for creating, validating, and maintaining Sketch and Sketch symbol files. Most parts are used to generate Sketch symbol libraries out of Angular components. See Stefan Baumgartner and Katrin Freihofner's talk at AngularConnect to learn more about our workflow and what you can do with Sketchmine.
But there's more. Sketchmine can also be used to validate Sketch files against a self defined ruleset. To make sure all fonts, colours and other variables follow your design system.
The parts
- app-builder Generates an angular app with the information of the code-analyzer.
- changelog-generation
@internalpackage to generate our changelog. - code-analyzer Creates a JSON representation of the provided code. Supports Angular.
- dom-agent A DOM traverser that is injected by the browser to scrape the information out of the page.
- helpers Collection of platform independent helpers.
- node-helpers Collection of Node.js helpers.
- sketch-builder Scrapes a webpage and generates .sketch file.
- sketch-color-replacer Replaces a set of colors in a .sketch file.
- sketch-file-builder Generates a .sketch file with all the provided resources.
- sketch-file-format AST of the .sketch file format with all functionality to generate a .sketch file.
- sketch-object-id-collector Collects information about the symbols and their overrides in a sketch file.
- sketch-svg-parser Parses SVG elements and converts it to Sketch shapes
- sketch-validation-interface The Angular application that is used as interface for the Kraken validation plugin.
- sketch-validation-plugin The Kraken validation plugin. A linting plugin for Sketch.
- sketch-validator Validates Sketch JSON with the provided rules. Available in UMD, CJS, and ESM formats.
- sketch-validator-nodejs-wrapper A Node.js wrapper around the sketch validator package that uses a .sketch file to validate it.
Getting started
Architecture
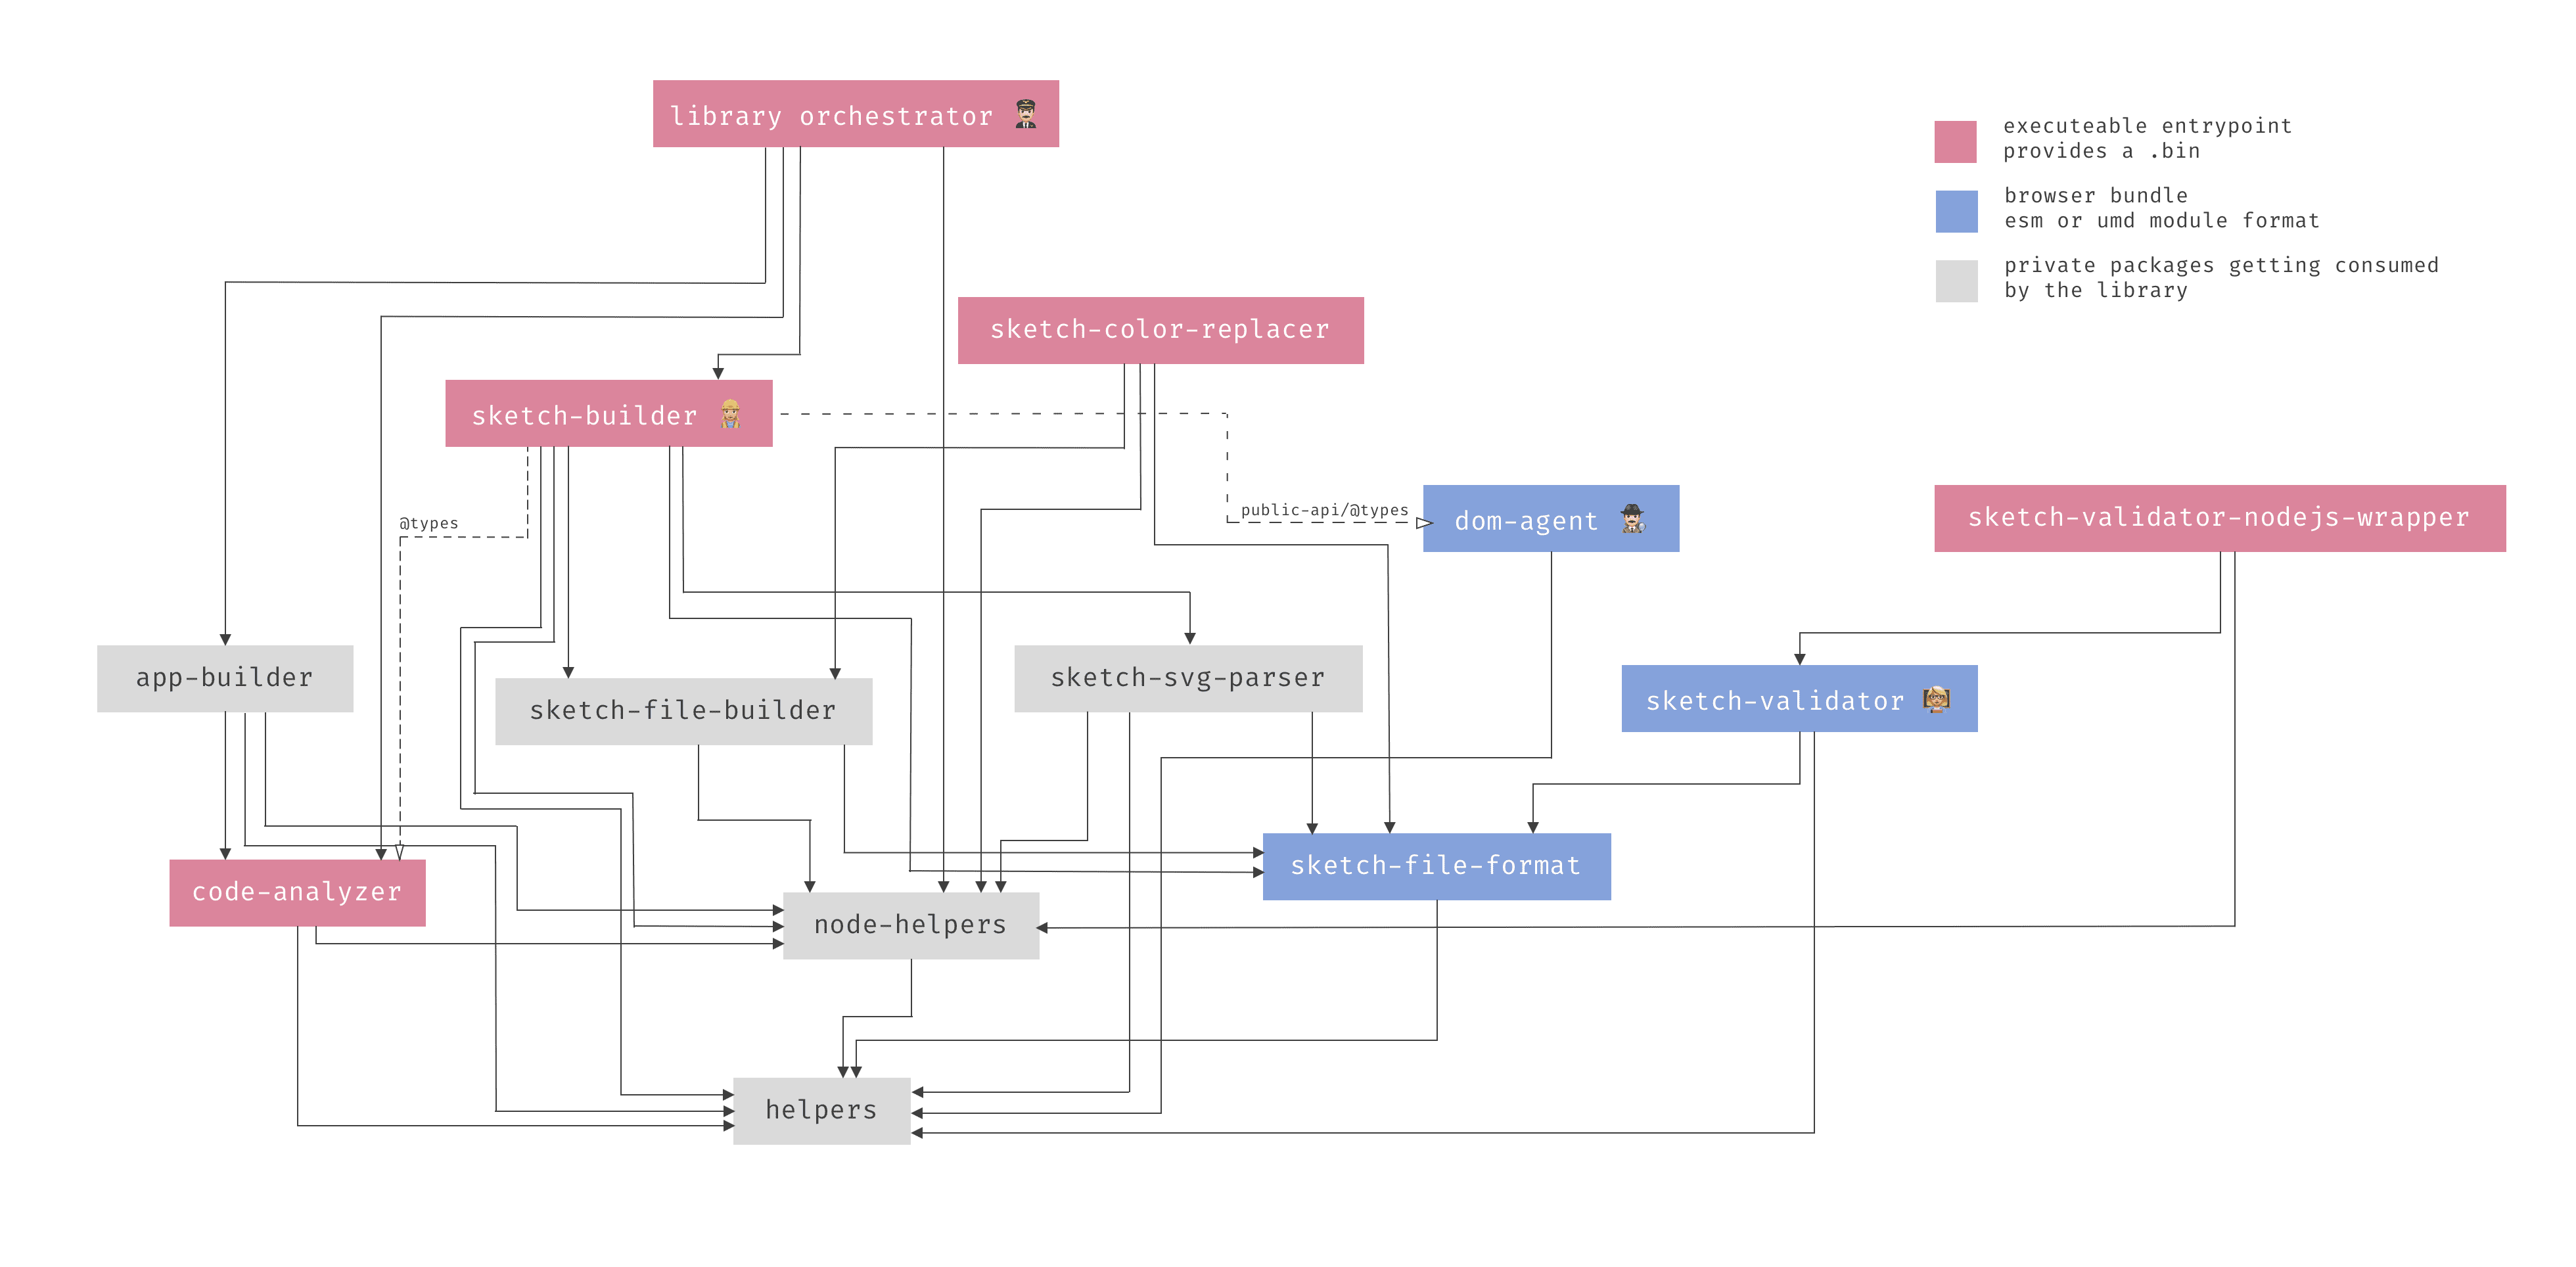
Sketchmine follows a mono-repo approach. All officially maintained modules and dependencies are in the same repository.
The tool for managing the mono-repo @sketchmine has been extracted out as Lerna
Dependency graph
Installation
To start contributing and developing you have to run yarn install to install all the necessary dependencies.
after that you can switch to any package in the ./packages folder and start to get your hands dirty 👷🏼.
If you want to run tasks across all packages, you'll find Lerna to be very useful. You can use the NPM scripts in the root package folder or you can execute all tasks with the lerna run build command to execute the yarn build command in every package. For further information, check out the Lerna documentation.
How to get up and running
You have several options for getting started with the library. If you want to develop locally, skip ahead to the Run without Docker section. If you need to develop something on the CI/CD Docker image, decide if you want to use docker-compose, which is the easy way, or if you want to use plain Docker without composer (this is how Jenkins uses Docker).
Docker: the Jenkins way 🐳
- Build the image
docker build \
  -t ${YOUR_TAG} \
  --build-arg GIT_PASS=$GIT_PASS \
  --build-arg GIT_USER=$GIT_USER \
  --build-arg GIT_BRANCH=${ANGULAR_COMPONENTS_BRANCH} \
.- Run the image
It's important that you set the environment variable -e DOCKER=true for the headless Chrome tasks like the sketch-generator and the library. Additionally, you can set a second variable like -e DEBUG=true to see verbose logging.
# mount angular components into docker image
docker run -it -v $(pwd)/_tmp/:/lib/_tmp/ -e DOCKER=true --cap-add=SYS_ADMIN ${container} ls -lah _tmp

# generate library
docker run -it -v $(pwd)/_tmp/:/lib/_tmp/ -e DOCKER=true --cap-add=SYS_ADMIN ${container} node dist/library

# use validation
docker run -it -v $(pwd)/_tmp/:/lib/_tmp/ -e DOCKER=true --cap-add=SYS_ADMIN ${container} node dist/sketch-validator --file="/path/to/file.sketch"
Run with docker-compose
To get started with docker-compose, create the following file:
touch .env
echo 'GIT_PASS=${password}\nGIT_USER\n=${user}\nGIT_BRANCH=feat/poc-sketch' > .env
Then run docker-compose up.
Run without Docker
To run without Docker in a local development environment, begin by running:
sh postinstall.shThis step will prepare everything for you so you can start developing.
The Angular components will be checked out to the _tmp directory and the library app shell will be moved in the correct location.
If you run the library, node dist/library and the .sketch file will be generated automatically. 🤘🏻
Docker registry
Following each successful master build of a new Docker image, the library is generated and deployed to the Docker registry. You can view the list of available tags in the Docker registry tag list.
Clean up your docker images and containers
After this commands every image and container has to be pulled again and created. Clean reset if the hard drive is messed up.
docker stop $(docker ps -a -q)
docker rm -v $(docker ps -a -q)
docker rmi $(docker images -q)
Available commands
npm run build           # build all the parts
npm run build:dev       # build with watch flag
npm run test            # run all the unit tests and e2e tests
npm run lint            # lint the project
node dist/${part}       # run the specified part of the library
Debugging
There are some debugging variables you can use to modify console output.
They're specified in the .vscode/launch.json file, to be parsed while debugging with VSCode.
The environment Variable of process.env.SKETCH = 'open-close' opens and closes the Sketch app automatically on a MacOS machine.
process.env.DEBUG = 'true';
process.env.DEBUG_SVG = 'true';
process.env.DEBUG_BROWSER = 'true';
process.env.DEBUG_TRAVERSER = 'true';
process.env.SKETCH = 'open-close';
Open and close sketch.app on MacOS for easier development.
process.env.SKETCH = 'open-close';Testing
Because testing is so important and ensures good quality code, we at Dynatrace use Jest as our testing library. Jest ships with a built-in mocking library. To gain confidence with the testing syntax, see the Jest documentation. Jest follows the Jasmine convention.
The files must contain the pattern **/*.test.ts for unit tests and, for end-to-end testing, **/*.e2e.ts. All tests should stay in the tests folder. Even though it's possible to place tests in the src folder if there's good reason.
To execute the tests, run yarn test. This will run the Jest test and provide you with coverage for the package.
Important
All tests should be wrapped in a describe method with the prefix of the package: [sketch-builder] › ... like the following example:
//... import statements

describe('[${package}] › ${folder} › ${description of the suite}', () => {

// .. your tests should be placed here.

});
Maintainers
|
|
Lukas Holzer |
|
|
Lara Aigmüller |
License
MIT license — copyright 2019 Dynatrace Austria GmbH


