Ethernet Over Serial Guide
Developed for Flashgate Technology Inc. and Provent Technologies Co.
Getting Started
We will use PPP (Point-to-Point-Protocol) to give a Variscite access to ethernet with only a serial connection.
Aliases
- ‘host’: The Variscite that has access to ethernet via an Ethernet cable.
- ‘device’: The Variscite that does not have access to ethernet.
Materials Needed
- 2x Variscite SOM
- 3x Jumper cable
- 1x PC with Debian or Ubuntu installed - used for building Kernel
- 1x 4gb or larger SD card
- 1x SD card reader
Optional
- 1x extra keyboard - for device Variscite
- 1x extra monitor with HDMI in - for device Variscite
Kernel Modifications
At the time of writing, we are using Debian Jessie Release 2 - 4.1.15. By default, the Kernel does not have PPP enabled.
To enable PPP, we must rebuild the Kernel.
Part 1 - Building the New Kernel
The following commands were taken from the Variscite Wiki: http://variwiki.com/index.php?title=VAR-SOM-MX6_Debian_R2
(Assuming your machine is running Debian jessie, see wiki for Ubuntu packages if your machine is running Ubuntu)
Install required packages
sudo apt-get install -y binfmt-support qemu qemu-user-static debootstrap kpartx
sudo apt-get install -y lvm2 dosfstools gpart binutils git lib32ncurses5-dev python-m2crypto
sudo apt-get install -y gawk wget git-core diffstat unzip texinfo gcc-multilib build-essential chrpath socat libsdl1.2-dev
sudo apt-get install -y autoconf libtool libglib2.0-dev libarchive-dev
sudo apt-get install -y python-git xterm sed cvs subversion coreutils texi2html bc
sudo apt-get install -y docbook-utils python-pysqlite2 help2man make gcc g++ desktop-file-utils libgl1-mesa-dev
sudo apt-get install -y libglu1-mesa-dev mercurial automake groff curl lzop asciidoc u-boot-tools mtd-utils
Deploy source
$ cd ~
$ git clone https://github.com/varigit/debian-var.git -b debian_jessie_varsommx6_var02 var_som_mx6_debian
Modify kernel configuration (part 1)
From "12 How-to: Modify kernel configuration"
cd ~/var_som_mx6_debian/src/kernel
sudo make ARCH=arm mrproper
sudo make ARCH=arm imx_v7_var_defconfig
sudo make ARCH=arm menuconfig
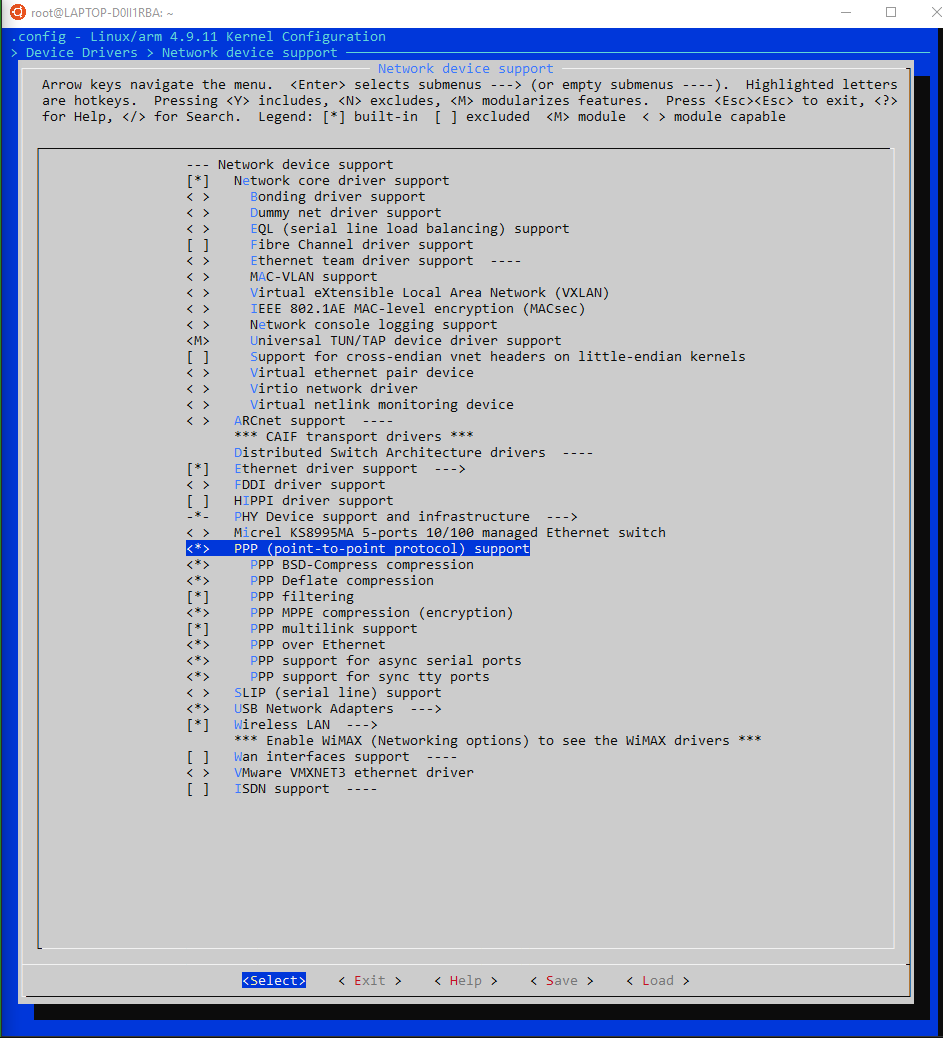
Enable PPP (Point-to-Point Protocol)
- Navigate to Device Drivers
- Navigate to Network Device Support
- Go to everything PPP related and Press 'Y' so it has a (*) (should look similar to image below)
- Save Kernel by using Arrow key -> Right until the bottom text hovers over (S)ave
- Press Enter to Save. Do not fill out a name for the config file. Press enter again.
- Exit the menu config
Modify kernel configuration (part 2)
From "12 How-to: Modify kernel configuration"
sudo make ARCH=arm savedefconfig
sudo cp arch/arm/configs/imx_v7_var_defconfig arch/arm/configs/imx_v7_var_defconfig.orig
sudo cp defconfig arch/arm/configs/imx_v7_var_defconfig
Build the kernel
Do NOT run the commands in "4.1 Build all". It will overwrite the config you just modified.
Run all commands in "4.2 Build by parts"
cd ~/var_som_mx6_debian
./make_var_som_mx6_debian.sh -c bootloader
./make_var_som_mx6_debian.sh -c kernel
./make_var_som_mx6_debian.sh -c modules
./make_var_som_mx6_debian.sh -c rootfs
./make_var_som_mx6_debian.sh -c rtar
Create boot SD card
- Plug SD card into machine
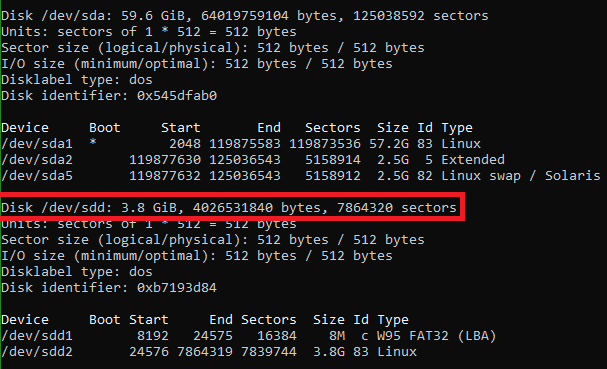
- Run fdisk -l to find where the SD card is

- Outlined in red is my SD card. It is at /dev/sdd
- Run command below but replace /dev/sdX with your SD card location (e.g. /dev/sdd)
./make_var_som_mx6_debian.sh -c sdcard -d /dev/sdX
Done
You have an SD card with the Point-to-Point Protocol enabled.
- Plug the SD card into the Variscite MX6 Custom board.
- Hold the middle button and switch the power on
- The board will boot from the SD card
Optional - Flash SD card to internal memory (eMMC)
While logged into the Variscite (user: linaro pass: linaro) run the following commands:
sudo su
debian-install.sh -b mx6cb -t res
Part 2 - Physical Set Up
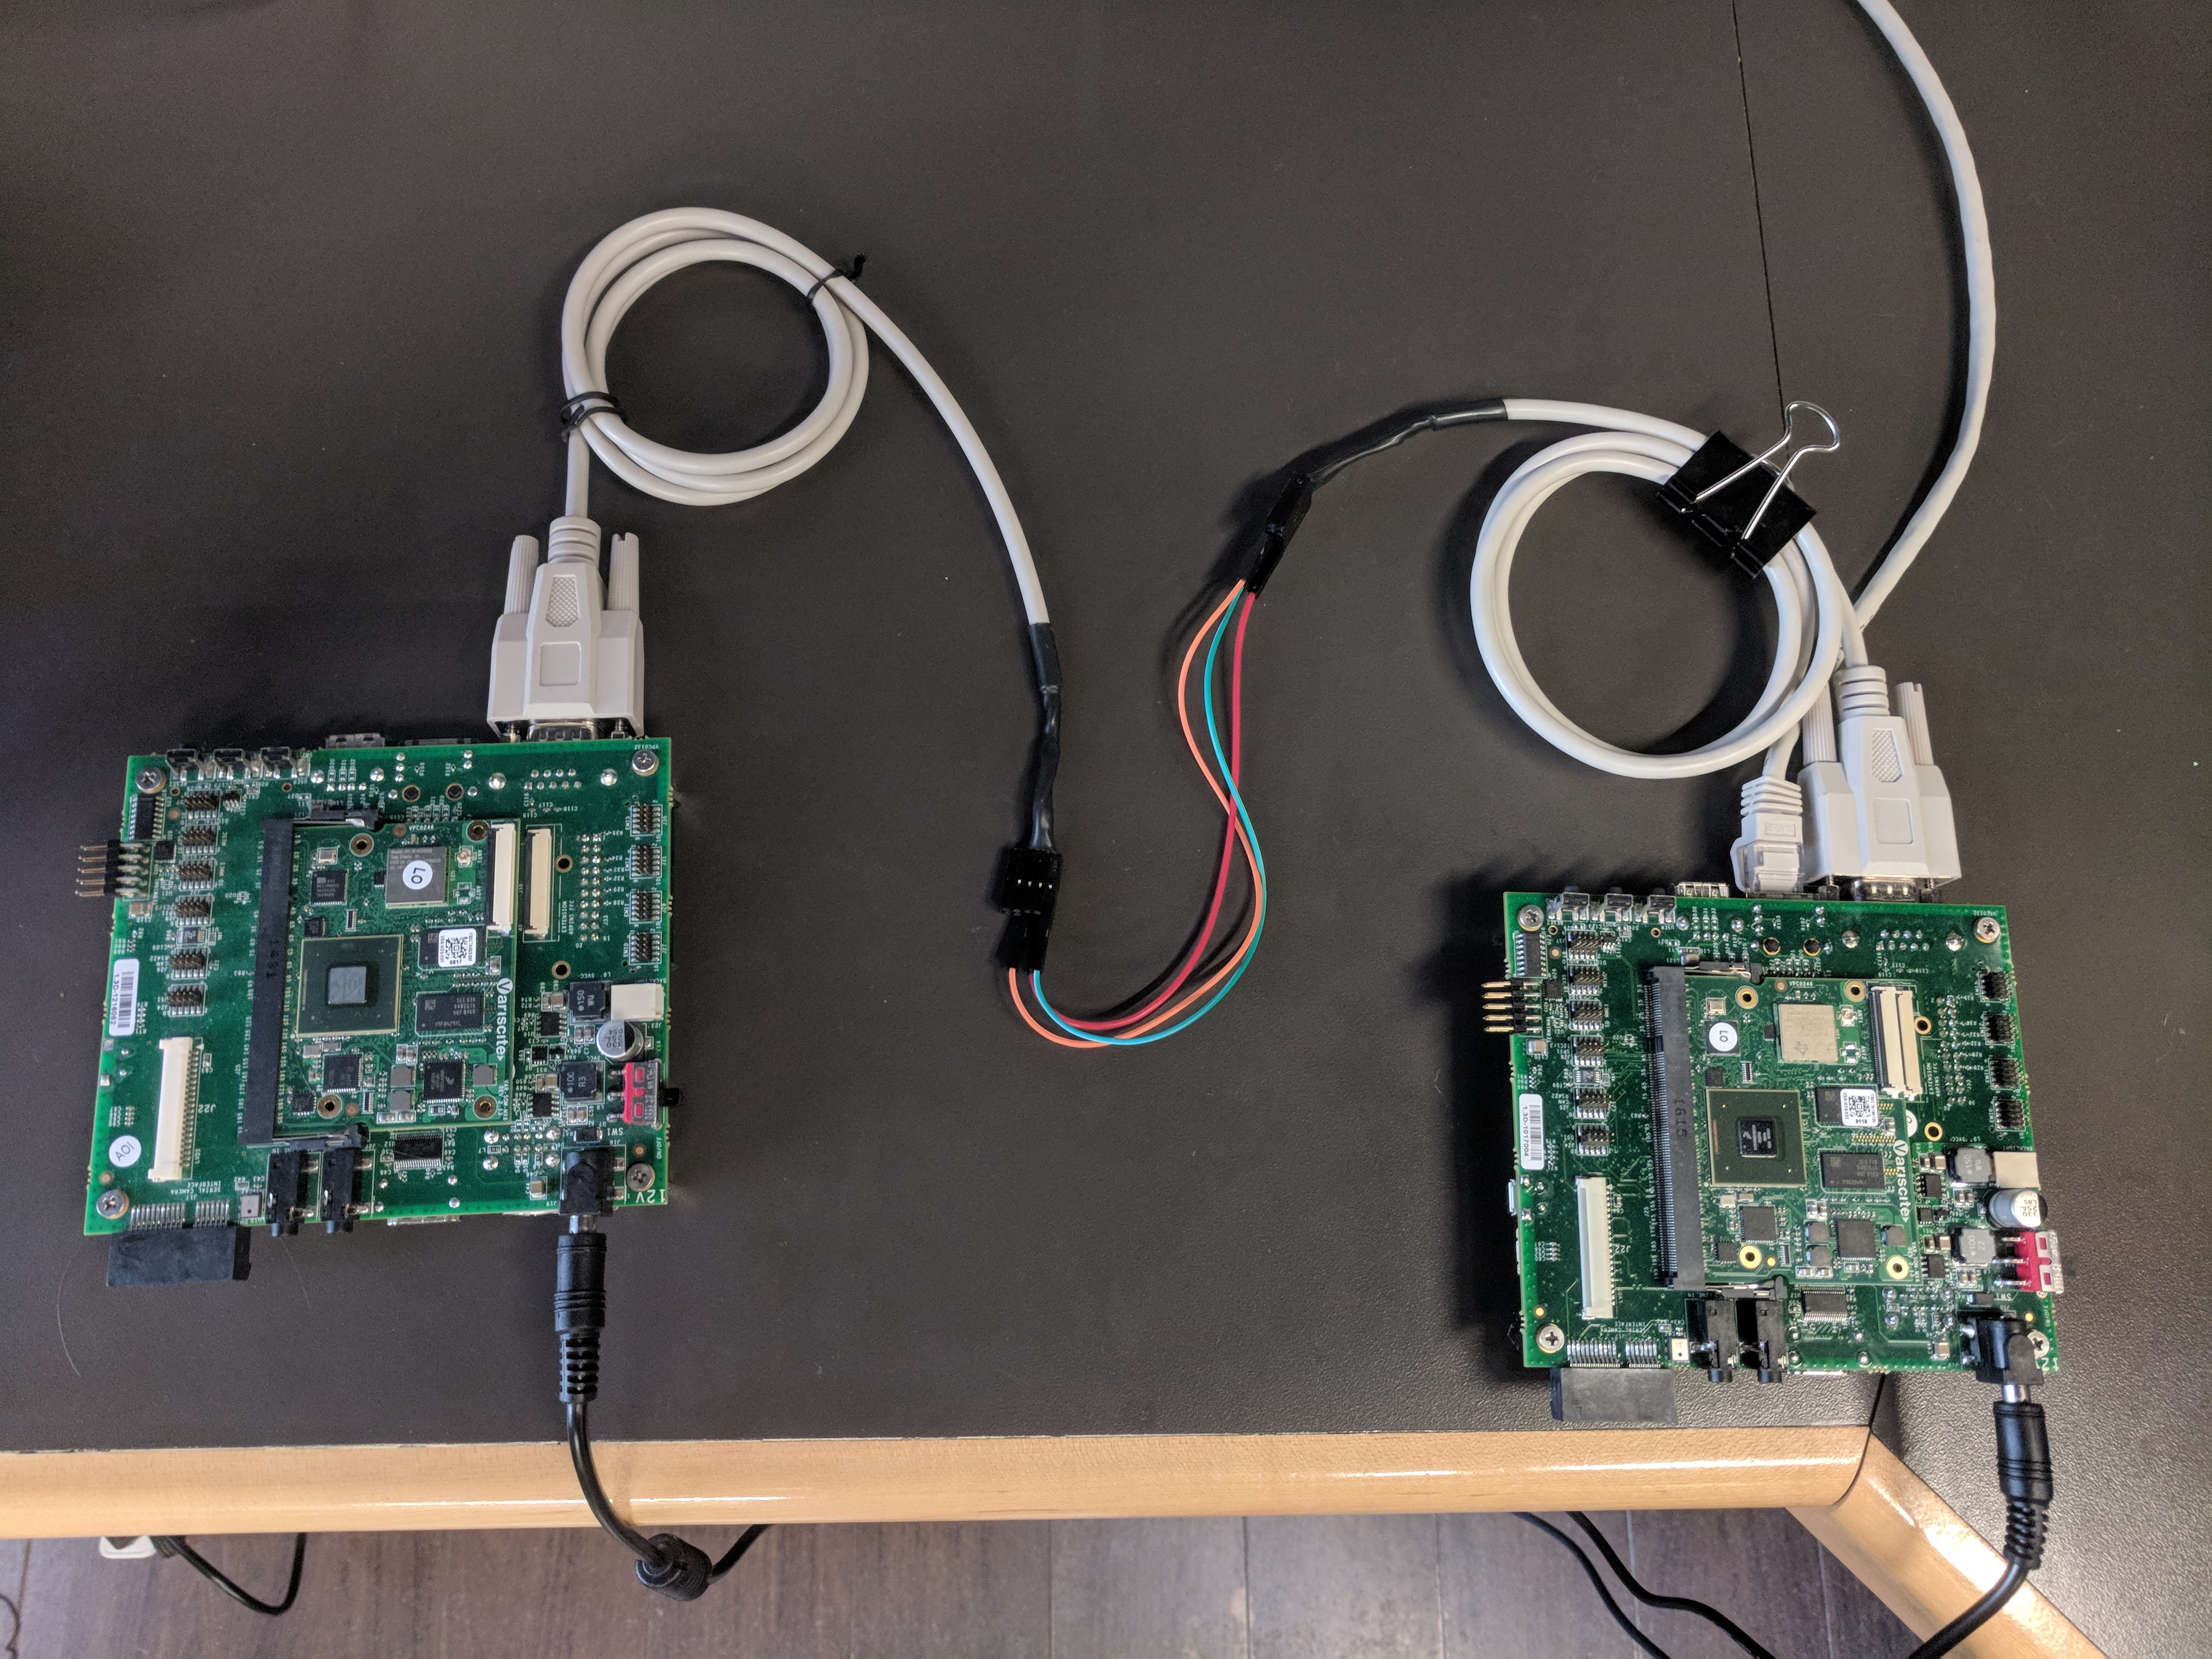
The 2 Variscites must be connected over Serial.
In the end the set up will look similar to this:
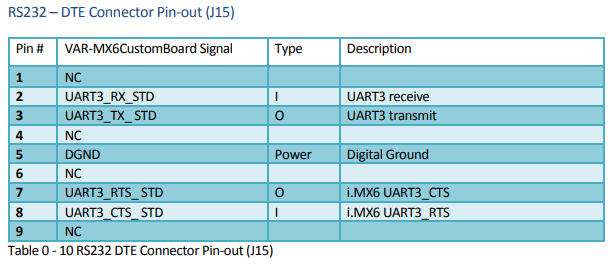
The pin-out for the default RS232 sourced from https://www.variscite.com/wp-content/uploads/2017/12/VAR-MX6CustomBoard-Datasheet.pdf:
Following the pin-out:
- RX = pin 2
- TX = pin 3
- GND = pin 5
Wire the host and device together
- Connect RX (host) -> TX (device)
- Connect TX (host) -> RX (device)
- Connect GND (host) -> GND (device)
Part 3 - Connect
Now that the Kernel is ready and the two Variscites are physically connected, it is time to share the ethernet connection.
Enable ip forwarding on the host
- On the host Variscite (the one with ethernet) and run these commands:
sudo su
apt-get install -y nano
nano /etc/sysctl.conf
- Find this line:
#net.ipv4.ip_forward=1
- Uncomment the line by removing the '#' at the start.
- Save and exit by pressing CTRL+X then pressing Y.
Connect: host
On the host Variscite, run this command:
pppd -d noauth nocrtscts xonxoff passive local maxfail 0 nodetach 192.168.10.18:192.168.10.19 persist proxyarp /dev/ttymxc2 38400
Connect: device
Using a keyboard and monitor attached to the device Variscite, run this command:
pppd -d noauth nocrtscts xonxoff passive local maxfail 0 defaultroute persist nodetach 192.168.10.19:192.168.10.18 /dev/ttymxc2 38400
Test
- Try pinging the device
ping 192.168.10.18
- Try ssh'ing into the device
ssh linaro@192.168.10.18
Making changes
- Change IP address
- Switch 192.168.10.18 and 192.168.10.19 to new IP addresses.
- NOTE: They must not be used by any other device.
- Change baud rate
- Change 38400 to new baud rate, e.g. 152000
- Change tty
- Switch /dev/ttymxc2 with other terminal, e.g. ttyS0
Debugging
- Error running pppd:
Peer refused to agree to our IP address
Connect time 0.1 minutes.
Sent 2650 bytes, received 2650 bytes.
sent [IPCP TermReq id=0xcc "Refused our IP address"]
rcvd [IPCP TermReq id=0xcc "Refused our IP address"]
sent [IPCP TermAck id=0xcc]
rcvd [IPCP TermAck id=0xcc]
sent [LCP TermReq id=0x3 "No network protocols running"]
rcvd [LCP TermAck id=0x3]
Connection terminated.
Solution: IP Addresses do not match or are already in use. Check the IP Addresses in the pppd command.
Original Reference
“Share Internet to the Raspberry Pi Zero” - The Magpi Magazine, 2016 https://www.raspberrypi.org/magpi/share-internet-to-the-raspberry-pi-zero/


