This repository forms the basis of Task 2 for the Classification Predict within EDSA's Data Science course. It hosts template code which will enable students to deploy a basic Streamlit web application.
As part of the predict, students are expected to expand on this base template; increasing the number of available models, user data exploration capabilities, and general Streamlit functionality.
If you've ever had the misfortune of having to deploy a model as an API (as was required in the Regression Sprint), you'd know that to even get basic functionality can be a tricky ordeal. Extending this framework even further to act as a web server with dynamic visuals, multiple responsive pages, and robust deployment of your models... can be a nightmare. That's where Streamlit comes along to save the day! ⭐
In its own words:
Streamlit ... is the easiest way for data scientists and machine learning engineers to create beautiful, performant apps in only a few hours! All in pure Python. All for free.
It’s a simple and powerful app model that lets you build rich UIs incredibly quickly.
Streamlit takes away much of the background work needed in order to get a platform which can deploy your models to clients and end users. Meaning that you get to focus on the important stuff (related to the data), and can largely ignore the rest. This will allow you to become a lot more productive.
For this repository, we are only concerned with a single file:
| File Name | Description |
|---|---|
base_app.py |
Streamlit application definition. |
| ⚡ WARNING ⚡ |
|---|
| Do NOT clone this repository. Instead follow the instructions in this section to fork the repo. |
As described within the Predict instructions for the Classification Sprint, this code represents a template from which to extend your own work. As such, in order to modify the template, you will need to fork this repository. Failing to do this will lead to complications when trying to work on the web application remotely.
To fork the repo, simply ensure that you are logged into your GitHub account, and then click on the 'fork' button at the top of this page as indicated within the figure above.
As a first step to becoming familiar with our web app's functioning, we recommend setting up a running instance on your own local machine.
To do this, follow the steps below by running the given commands within a Git bash (Windows), or terminal (Mac/Linux):
- Ensure that you have the prerequisite Python libraries installed on your local machine:
pip install -U streamlit numpy pandas scikit-learn- Clone the forked repo to your local machine.
git clone https://github.com/{your-account-name}/classification-predict-streamlit-template.git- Navigate to the base of the cloned repo, and start the Streamlit app.
cd classification-predict-streamlit-template/
streamlit run base_app.py
If the web server was able to initialise successfully, the following message should be displayed within your bash/terminal session:
  You can now view your Streamlit app in your browser.

    Local URL: http://localhost:8501
    Network URL: http://192.168.43.41:8501
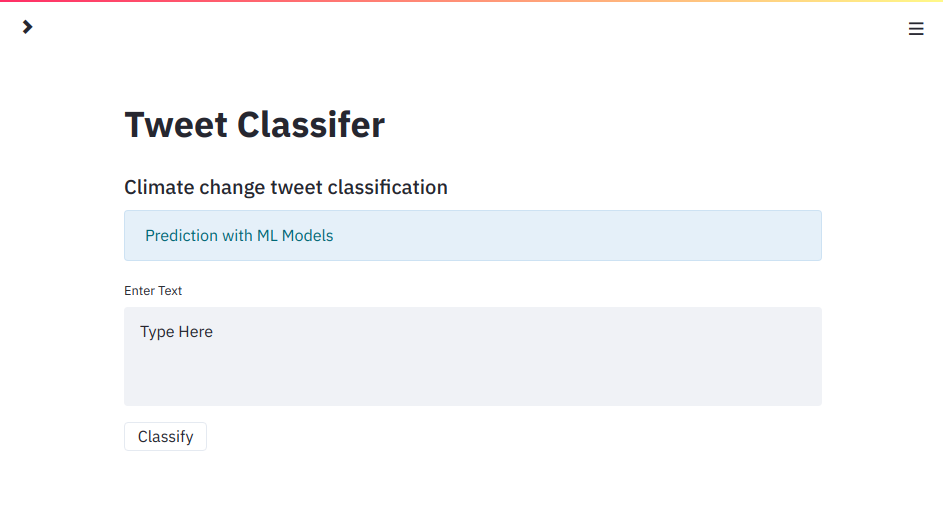
You should also be automatically directed to the base page of your web app. This should look something like:
Congratulations! You've now officially deployed your first web application!
While we leave the modification of your web app up to you, the latter process of cloud deployment is outlined within the next section.
The following steps will enable you to run your web app on a remote EC2 instance, allowing it to the accessed by any device/application which has internet access.
Within these setup steps, we will be using a remote EC2 instance, which we will refer to as the Host, in addition to our local machine, which we will call the Client. We use these designations for convenience, and to align our terminology with that of common web server practices. In cases where commands are provided, use Git bash (Windows) or Terminal (Mac/Linux) to enter these.
- Ensure that you have access to a running AWS EC2 instance with an assigned public IP address.
[On the Host]:
- Install the prerequisite python libraries:
pip install -U streamlit numpy pandas scikit-learn- Clone your copy of the API repo, and navigate to its root directory:
git clone https://github.com/{your-account-name}/classification-predict-streamlit-template.git
cd classification-predict-streamlit-template/| ℹ️ NOTE ℹ️ |
|---|
In the following steps we make use of the tmux command. This programme has many powerful functions, but for our purposes, we use it to gracefully keep our web app running in the background - even when we end our ssh session. |
-
Enter into a Tmux window within the current directory. To do this, simply type
tmux. -
Start the Streamlit web app on port
5000of the host
streamlit run --server.port 5000 base_app.pyIf this command ran successfully, output similar to the following should be observed on the Host:
You can now view your Streamlit app in your browser.

  Network URL: http://172.31.47.109:5000
  External URL: http://3.250.50.104:5000
Where the specific Network and External URLs correspond to those assigned to your own EC2 instance. Copy the value of the external URL.
[On the Client]:
-
Within your favourite web browser (we hope this isn't Internet Explorer 9), navigate to external URL you just copied from the Host. This should correspond to the following form:
http://{public-ip-address-of-remote-machine}:5000Where the above public IP address corresponds to the one given to your AWS EC2 instance.
If successful, you should see the landing page of your streamlit web app:
[On the Host]:
-
To keep your web app running continuously in the background, detach from the Tmux window by pressing
ctrl + band thend. This should return you to the view of your terminal before you opened the Tmux window.To go back to your Tmux window at any time (even if you've left your
sshsession and then return), simply typetmux attach-session.To see more functionality of the Tmux command, type
man tmux.
Having run your web app within Tmux, you should be now free to end your ssh session while your webserver carries on purring along. Well done ⚡!
This section of the repo will be periodically updated to represent common questions which may arise around its use. If you detect any problems/bugs, please create an issue and we will do our best to resolve it as quickly as possible.
We wish you all the best in your learning experience 🚀


