Docker image for NMR software. Running on Ubuntu 16.04 LTS.
The README with links can be found by clicking here
A screencast can be seen on YouTube by clicking here.
The purpose is to make a container with relevant NMR software for daily processing of data.
Consider this workflow:
- Unpack data with commands bruker, varian or qMDD to test.ft2
- Inspect test.ft2 in nmrDraw or start a JupyterLab, and make images with nmrglue and matplotlib.
- Use the JupyterLab, to write your work process and include images and math text.
- Prepare data files in JupyterLab
- Execute a script for relax, depending on the data files.
You now have a Jupyter notebook, with images+math+workflow, which you can share and send to collaborators. See the example section of relaxation analysis, for such an example
This images includes software for:
- relax with OpenDX -> Jump to commands
- NMRPipe -> Jump to commands
- MddNMR -> Jump to commands
- nmrglue -> Jump to commands
- Art Palmers software: ModelFree4, FastModelFree, Quadric, PDBinertia -> Jump to commands
- Sparky -> Jump to commands
- CcpNmr Analysis 2.4 -> Jump to commands
- JupyterLab-> Jump to commands
- mMass Mass Spectrometry Tool-> Jump to commands
For deleting images, go to -> Developer section
For examples, go to -> Examples section
docker pull tlinnet/relax# See images on machine
docker images# First make sure XQuartz is running
open -a XQuartz
# In XQuartz -> Preferences > Security, make sure the tick
# "Allow connections from network clients" is ON.
# Then set DISPLAY options.
xhost + `ifconfig|grep "inet "|grep -v 127.0.0.1|cut -d" " -f2`
# Then make alias and run.
alias dr='docker run -ti --rm -p 8888:8888 -e DISPLAY=$(ifconfig|grep "inet "|grep -v 127.0.0.1|cut -d" " -f2):0 -v /tmp/.X11-unix:/tmp/.X11-unix -v "$PWD":/home/jovyan/work --name relax tlinnet/relax'
# Run it
# With no arguments, starts Jupyter notebook
dr
# Or else start bash, to start programs
dr bashTo make this easier on a mac, consider adding this to HOME/.bash_profile
# Start docker, if it is not running
alias drdocker='open -a /Applications/Docker.app/Contents/MacOS/Docker'
# Start  XQuartz, if it is not running
alias drx='open -a XQuartz; xhost + `ifconfig|grep "inet "|grep -v 127.0.0.1|cut -d" " -f2`'

# Run "Docker Relax": dr
alias dr='docker run -ti --rm -p 8888:8888 -e DISPLAY=$(ifconfig|grep "inet "|grep -v 127.0.0.1|cut -d" " -f2):0 -v /tmp/.X11-unix:/tmp/.X11-unix -v "$PWD":/home/jovyan/work --name relax tlinnet/relax'

# Run "Docker Relax Execute ": For example: dre bash
# This is when then Docker Relax image is already running.
alias dre='docker exec -it relax'# Start relax in GUI
dr relax -g
# Start OpenDX
dr dx
# Try OpenMPI for running with multiple CPU. Not tested.
# To start into bash
dr bash
# Then in terminal try
mpirun --version
mpirun -np 2 echo "hello world"
mpirun --report-bindings -np 2 echo "hello world"# Start nmrDraw. It apparently takes 1-2 min to open window?
dr nmrDraw# First need to start terminal before running qMDD
dr bash
qMDDHave a look here, for longer example together with JupyterLab is explained here.
dr python -c "import nmrglue; print(nmrglue.__version__)"- Art Palmers: ModelFree4, FastModelFree, Quadric, PDBinertia
# modelfree
dr modelfree4

# FastModelFree
dr setupFMF

# quadric-diffusion
dr quadric_diffusion
dr r2r1_tm

# PDBinertia
dr pdbinertiadr sparkydr analysisFirst make aliases as described in aliases for mac
Then run
# Jupyter Notebook is running by default.
dr
Then visit in our browser: http://0.0.0.0:8888
NOTE: If you by accident use: http://0.0.0.0:8888/tree, the JupyterLab extension will NOT work.
GUI for working with Mass Spectrometry
dr mmass
# Open mzML files right away
dr mmass Analysis.mzMLTo open a bash terminal in the container, when it is running
docker exec -it relax bash
# Or with the alias defined from above
dre bashThis will build 6 docker images, chained after each other. This is to save time in the building phase.
- Image makes apt-get install of packages
- Install python packages with pip and conda
- Setup the user
- Setup NMRPipe and qMDD
- Setup Palmers software, Sparky and Analysis
- Setup mMass
- Clone and scons build relax
- Build the main Dockerfile, with relax updated last
source build_Dockerfile.shRestart docker on a mac, if it "hangs".
killall Docker
drdocker
Delete container and images. This will destroy all your images and containers.
It will not be possible to restore them!
# Delete all containers:
docker ps
docker rm $(docker ps -a -q)
docker rm --force $(docker ps -a -q)

# Delete all dangling images
docker images -f dangling=true
docker rmi $(docker images -qf dangling=true)

# Delete all images
docker images
docker rmi $(docker images -q)- http://fabiorehm.com/blog/2014/09/11/running-gui-apps-with-docker
- https://blog.jessfraz.com/post/docker-containers-on-the-desktop
First go to a folder, on your computer, where you can download nmrglue example files.
This example contains a Python script separate.py which separates 2D spectra from an array of 2D data in a Bruker data set.
We can use curl and unzip from the container already.
# First make a directory where to download example files
mkdir -p $HOME/Downloads/nmrglue_ex
cd $HOME/Downloads/nmrglue_ex

dr curl -O https://storage.googleapis.com/google-code-archive-downloads/v2/code.google.com/nmrglue/example_separate_2d_bruker.zip
dr unzip example_separate_2d_bruker.zip
Then start a Jupyter. The dr alias is explained here.
# Start Docker Relax Labbook
dr
Then visit in our browser: http://0.0.0.0:8888.
Create a new Python 3 notebook. Paste this is into cells, and execute with shift+enter
import nmrglue as ng

# read in the NMR data
dic, data = ng.bruker.read('separate_2d_bruker/arrayed_data.dir', shape=(7360, 640), cplex=True)
# Write it out
array_size = 23
for i in range(array_size):
dir_name = "separate_2d_bruker/%02d"%(i)
print("Creating directory:", dir_name)
ng.bruker.write(dir_name, dic, data[i::array_size], overwrite=True)
# list files
%ls separate_2d_bruker/00Voila!
This example is taken from Listing S4 from the 2013 JBNMR nmrglue paper. In this example a 2D SSNMR spectrum is visualized using the script plot_2d_pipe_spectrum.py
mkdir -p $HOME/Downloads/nmrglue_ex
cd $HOME/Downloads/nmrglue_ex

curl -O https://storage.googleapis.com/google-code-archive-downloads/v2/code.google.com/nmrglue/jbnmr_s4_2d_plotting.zip
unzip jbnmr_s4_2d_plotting.zip
Then start a JupyterLab. The dr alias is explained here.
# Start Docker Relax Labbook
dr
Then visit in our browser: http://0.0.0.0:8888.
Create a new Python 3 notebook. Paste this is into cells, and execute with shift+enter
Jupyter magic commands starts with %. See more here and here.
# This will list all magic commands
%lsmagic
# List the folder content
%ls s4_2d_plotting

import nmrglue as ng
import matplotlib.pyplot as plt
%matplotlib inline

# read in data
dic, data = ng.pipe.read("s4_2d_plotting/test.ft2")

# find PPM limits along each axis
uc_15n = ng.pipe.make_uc(dic, data, 0)
uc_13c = ng.pipe.make_uc(dic, data, 1)
x0, x1 = uc_13c.ppm_limits()
y0, y1 = uc_15n.ppm_limits()

# plot the spectrum
fig = plt.figure(figsize=(10, 10))
fig = plt.figure()
ax = fig.add_subplot(111)
cl = [8.5e4 * 1.30 ** x for x in range(20)]
ax.contour(data, cl, colors='blue', extent=(x0, x1, y0, y1), linewidths=0.5)

# add 1D slices
x = uc_13c.ppm_scale()
s1 = data[uc_15n("105.52ppm"), :]
s2 = data[uc_15n("115.85ppm"), :]
s3 = data[uc_15n("130.07ppm"), :]
ax.plot(x, -s1 / 8e4 + 105.52, 'k-')
ax.plot(x, -s2 / 8e4 + 115.85, 'k-')
ax.plot(x, -s3 / 8e4 + 130.07, 'k-')

# label the axis and save
ax.set_xlabel("13C ppm", size=20)
ax.set_xlim(183.5, 167.5)
ax.set_ylabel("15N ppm", size=20)
ax.set_ylim(139.5, 95.5)
fig.savefig("spectrum_2d.png")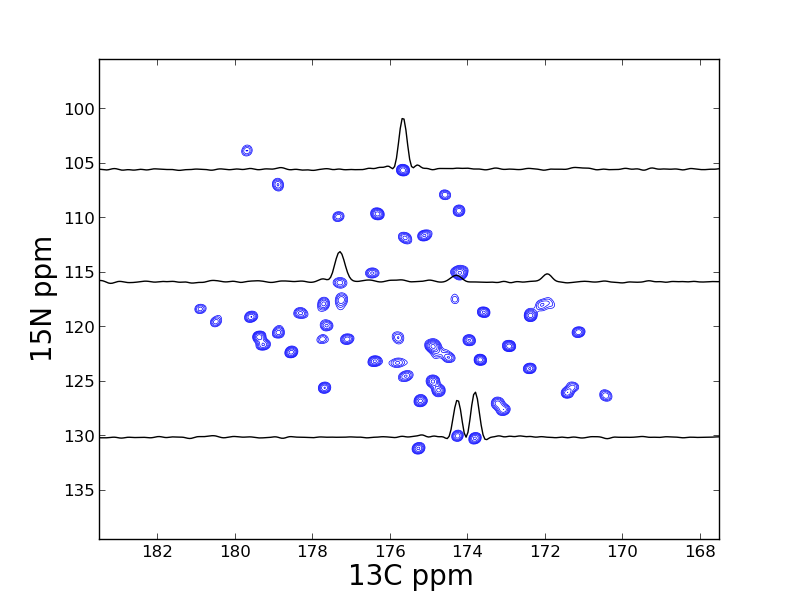
This example is taken from Listing S12 - S15 in the 2013 JBNMR nmrglue paper. In this example a series of 3D NMRPipe files containing relaxation trajectories for a solid state NMR experiment and analyzed.
The code has here been refactored to a complete analysis in JupyterLab.
mkdir -p $HOME/Downloads/nmrglue_ex
cd $HOME/Downloads/nmrglue_ex

# Copy the notebook
curl -O https://raw.githubusercontent.com/tlinnet/docker_relax/master/JupyterLab/relaxation_analysis.ipynb
Then start a Jupyter. The dr alias is explained here.
# Start Docker Relax Labbook
dr
Then visit in our browser: http://0.0.0.0:8888.
Open notebook. Go throug cells and execute with shift+enter.
Please see the notebook online here for reference, and follow it.
Everything is handled in Jupyter
- The data is downloaded with bash command curl
- The data is unpacked with bash command unzip
- The data is arranged into folders
- The data is analysed with NMRPipe script peakHN.tcl
- The spectrum is plotted in matplotlib in Jupyter
- An analysis script for relax is written and executed
- All data is analysed in relax