Helidon Sock Shop
This project is an implementation of the microservices based application using Helidon Microservices Framework.
The application is an online store that sells, well, socks, and is based on the canonical SockShop Microservices Demo originally written and published under Apache 2.0 license by Weaveworks.
You can see a working demo of the original application here.
This demo still uses the original front end implementation provided by Weaveworks, but all back end services have been re-implemented from scratch to use Helidon MP and showcase its features and best practices.
Table of Contents
Architecture
The application consists of a Node.js-based front end (the same one that is used in the original
WeaveSocks demo application) and 6 back end services (rewritten from the ground up on top of
Helidon, implementing the API that the legacy front-end service expects).

-
Product Catalog, which provides REST API that allows you to search product catalog and retrieve individual product details;
-
Shopping Cart, which provides REST API that allows you to manage customers' shopping carts;
-
Orders, which provides REST API that allows customers to place orders;
-
Payment, which provides REST API that allows you to process payments;
-
Shipping, which provides REST API that allows you to ship orders and track shipments;
-
Users, which provides REST API that allows you to manage customer information and provides registration and authentication functionality for the customers.
Each service has a core module, which is where most of the code for the service is (domain model, JAX-RS resources, etc.), and which also provides a basic in-memory implementation of the data store that is useful for testing.
Most services also have one or more data store-specific modules, which build on the core module and demonstrate integrations of popular data stores with Helidon (MySQL, Mongo, Redis, etc.)
You can find more details for each service within documentation pages for individual services, which can be accessed using the links above.
Project Structure
Each back end service described above has its own Github repo, so it can be versioned and released independently from other services.
In addition to that, there is also a main Sock Shop repository (the one you are currently in), which contains Kubernetes deployment files for the whole application, top-level POM file which allows you to easily build the whole project and import it into your favorite IDE, and a bash script that makes it easy to checkout and update all project repositories at once.
Quick Start
The easiest way to try the demo is to use provided Docker images and Kubernetes deployment scripts from this repo.
Kubernetes scripts depend on Kustomize, so make sure that you have a newer version of kubectl
that supports it (at least 1.14 or above).
If you do, you can simply run the following command from the sockshop directory
and and set the SOCKSHOP_BACKEND variable to one of the following values,
indicating the type of back-end you want to deploy.
core- In-memory only back-endcoherence- Coherence back-endmongo- MongoDB back-endmysql- MySQL database back-endredis- Redis back-end
Note: We create a namespace called sockshop-${SOCKSHOP_BACKEND} so we can deploy multiple back-ends at a time.
$ export SOCKSHOP_BACKEND=core

$ kubectl create namespace sockshop-${SOCKSHOP_BACKEND}

namespace/sockshop-core created

$ kubectl apply -k k8s/${SOCKSHOP_BACKEND} -n sockshop-${SOCKSHOP_BACKEND}
This will merge all the files under the specified directory and create all Kubernetes resources defined by them, such as deployment and service for each microservice.
Port-forward the front-end UI using the following
Mac/Linux
$ export FRONT_END_POD=$(kubectl get pods -n sockshop-${SOCKSHOP_BACKEND} -o jsonpath='{.items[?(@.metadata.labels.app == "front-end")].metadata.name}')
$ kubectl port-forward -n sockshop-${SOCKSHOP_BACKEND} $FRONT_END_POD 8079:8079
Windows:
kubectl get pods -n sockshop-%SOCKSHOP_BACKEND% -o jsonpath='{.items[?(@.metadata.labels.app == "front-end")].metadata.name}' > pod.txt
SET /P FRONT_END_POD=<pod.txt
kubectl port-forward -n sockshop-%SOCKSHOP_BACKEND% %FRONT_END_POD% 8079:8079
Note: If you have installed into a namespace then add the
--namespaceoption to allkubectlcommands in these instructions.
You should be able to access the home page for the application by pointing your browser to http://localhost:8079/.
You should then be able to browse product catalog, add products to shopping cart, log in as an
existing test user (username: user, password: pass) or register as a new user, place an order,
browse order history, etc.
Once you are finished, you can clean up the environment by executing the following:
$ kubectl delete -k k8s/${SOCKSHOP_BACKEND} -n sockshop-${SOCKSHOP_BACKEND} Complete Application Deployment
The Quick Start shows how you can run the application locally, but that may not be enough if you want to experiment by scaling individual services, look at tracing data in Jaeger, monitor services via Prometheus and Grafana, or make API calls directly via Swagger UI.
To do all of the above, you need to deploy the services into a managed Kubernetes cluster in the cloud, by following the same set of steps described above (except for port forwarding, which is not necessary), and performing a few additional steps.
Pre-Requisites
You must download and install envsubst for your platform from
https://github.com/a8m/envsubst and make it
available in your PATH.
Expose Application via a Load Balancer
Note: This is assuming you have deployed one of the back-ends via the instructions in the previous section.
-
Create the Load Balancer
$ kubectl apply -f k8s/optional/ingress-controller.yaml

$ kubectl get services -n ingress-nginx
NAME            TYPE           CLUSTER-IP       EXTERNAL-IP       PORT(S)                      AGE
ingress-nginx   LoadBalancer   AAA.BBB.CCC.DDD   WWW.XXX.YYY.ZZZ  80:31475/TCP,443:30578/TCP   17s
Once you have been assigned an external IP address, continue to the next step.
-
Setup Domains
You must have access to a top level domain for which you can create sub-domains to allow access to the application via a Load Balancer (LB).
For example if your top level domain is
mycompany.comthen you should create a single wildcard DNS entry*.sockshop.mycompany.comto point to your external load balancer IP address. -
Create the ingress
Each time you use a different back-end you will need to create a new ingress.
In your terminal, export (or SET for Windows) your top level domain and the backend you are using.
For example for domain
sockshop.mycompany.comandcorebackend, use the following$ export SOCKSHOP_DOMAIN=sockshop.mycompany.com $ export SOCKSHOP_BACKEND=core $ envsubst -i k8s/optional/ingress.yaml | kubectl apply -n sockshop-${SOCKSHOP_BACKEND} -f - $ kubectl get ingress -n sockshop-${SOCKSHOP_BACKEND} NAME HOSTS ADDRESS PORTS AGE mp-ingress mp.core.sockshop.mycompany.com XXX.XXX.XXX.XXX 80 12d sockshop-ingress core.sockshop.mycompany.com,jaeger.core.sockshop.mycompany.com,api.core.sockshop.mycompany.com XXX.XXX.XXX.XXX 80 12d
-
Access the application
Access the application via the endpoint http://core.sockshop.mycompany.com/
Install the Jaeger Operator
-
Install the Jaeger Operator
The command below will create observability namespace and install Jaeger Operator into it. You only need to do this once, regardless of the number of backends you want to deploy.
$ kubectl create -f k8s/optional/jaeger-operator.yaml
-
Deploy All-in-One Jaeger Instance
This is required for each back-end namespace.
$ kubectl create -f k8s/optional/jaeger.yaml -n sockshop-${SOCKSHOP_BACKEND} -
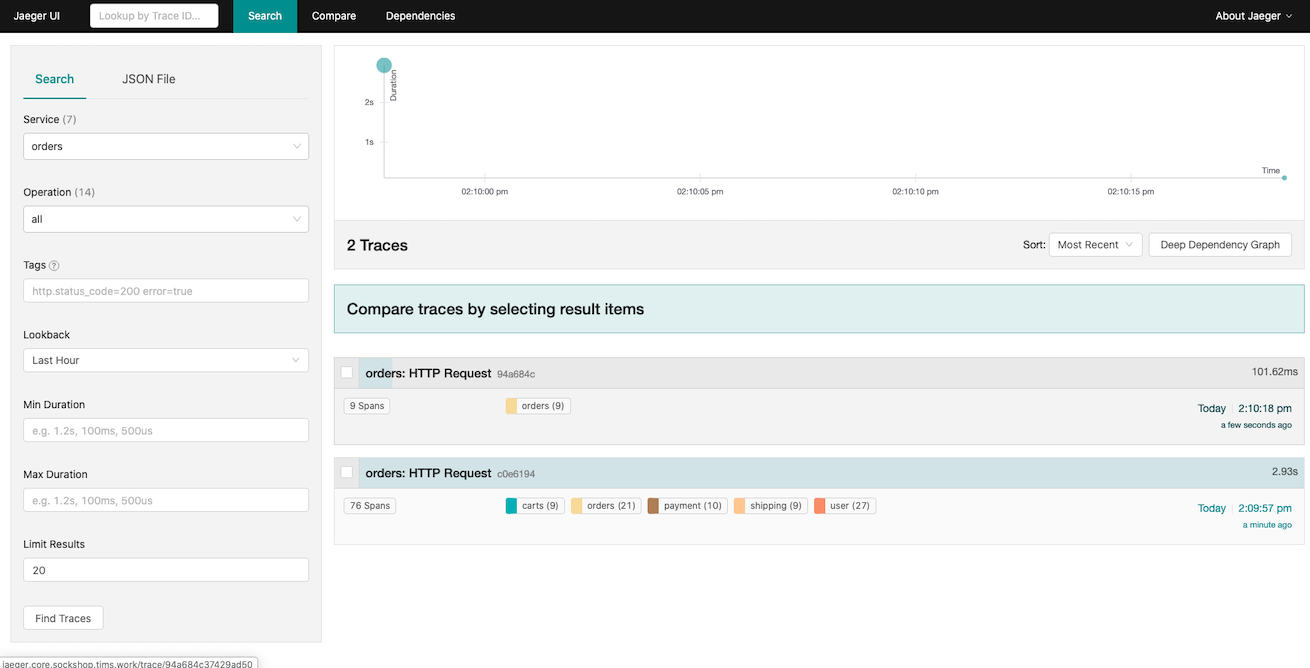
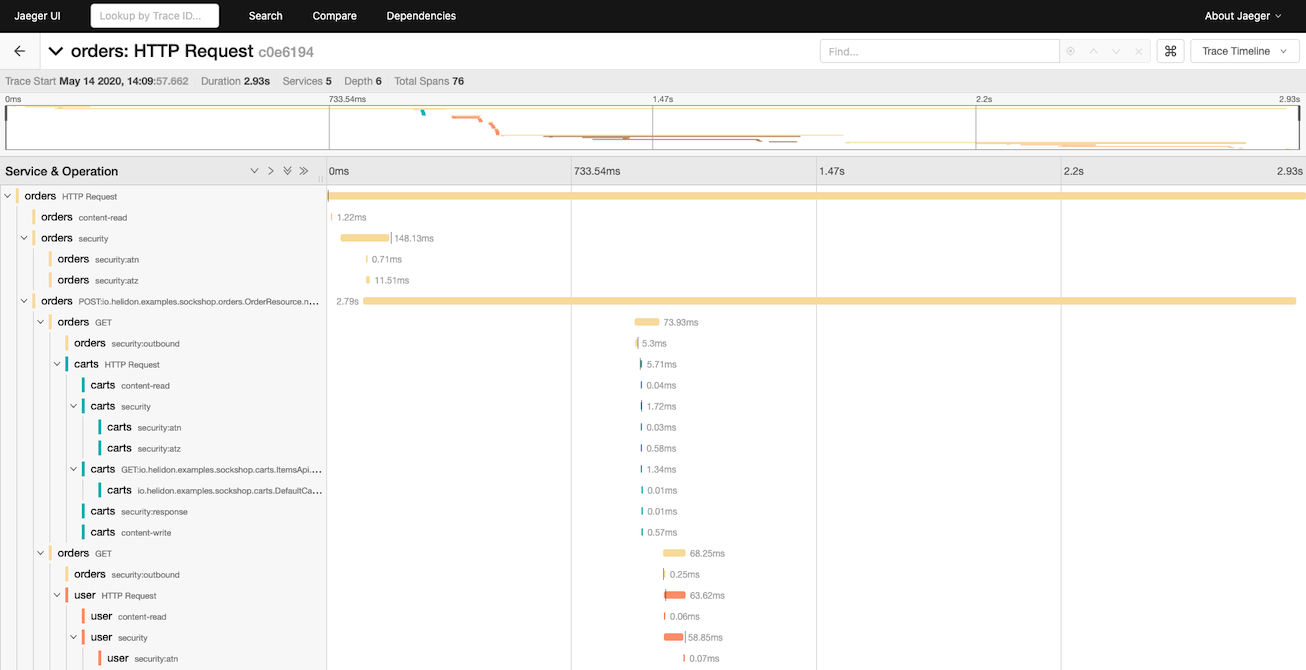
Exercise the Application and access Jaeger
Cessing the Jaeger UI at http://jaeger.core.sockshop.mycompany.com/, you should see the trace information similar to the images below, allowing you to see how long each individual operation in the call tree took.


Access Swagger
-
Deploy Swagger UI
This is required for each back-end namespace.
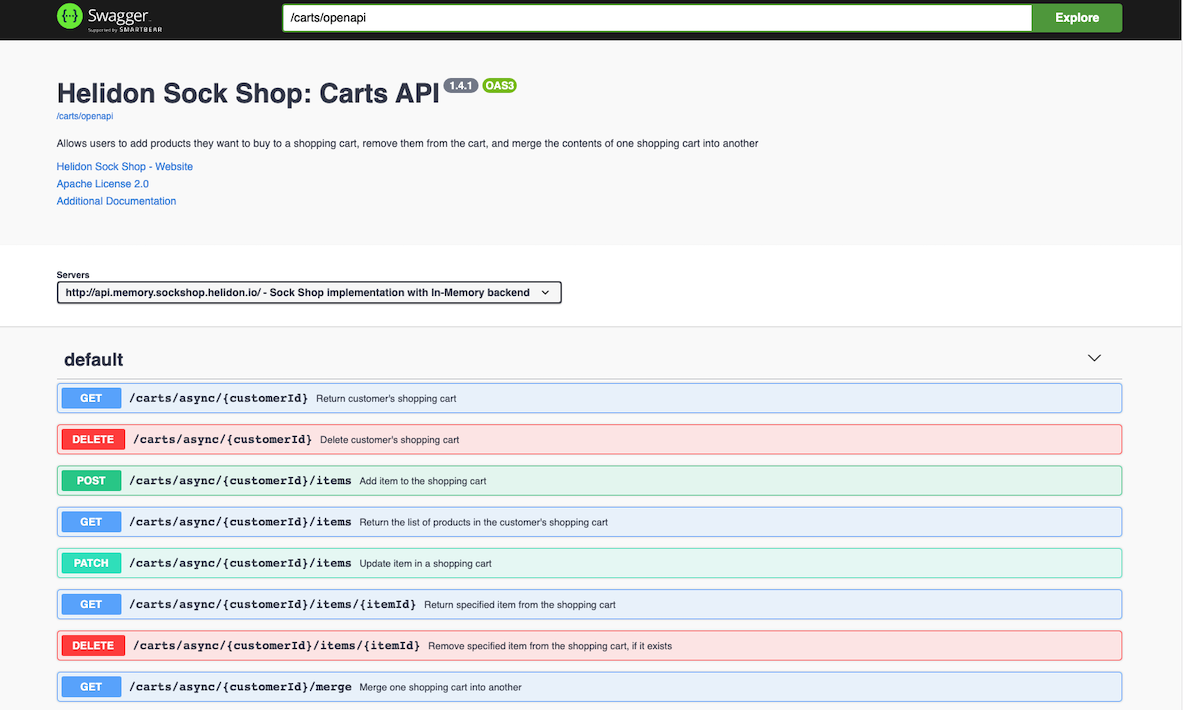
$ kubectl create -f k8s/optional/swagger.yaml -n sockshop-${SOCKSHOP_BACKEND}Access the Swagger UI at http://mp.core.sockshop.mycompany.com/swagger/.
Enter /carts/openapi into the Explore field at the top of the screen and click on Explore button. You should see the screen similar to the following, showing you all the endpoints for the Carts service (and their payloads), and allowing you to make API requests to it directly from your browser.

Cleanup
-
Cleanup the ingress
To cleanup the ingress for your deployment, execute the following: for each
SOCKSHOP_BACKENDyou previously installed:$ export SOCKSHOP_DOMAIN=sockshop.mycompany.com $ export SOCKSHOP_BACKEND=core $ envsubst -i k8s/optional/ingress.yaml| kubectl delete -f - -n sockshop-${SOCKSHOP_BACKEND}
-
Remove the deployed services
To cleanup the deployed services, execute the following for each
SOCKSHOP_BACKENDyou previously installed:$ export SOCKSHOP_DOMAIN=sockshop.mycompany.com $ export SOCKSHOP_BACKEND=core $kubectl delete -k k8s/${SOCKSHOP_BACKEND} -n sockshop-${SOCKSHOP_BACKEND}
-
Remove the Load Balancer
If you wish to remove your load balancer, execute the following:
$ kubectl delete -f k8s/optional/ingress-controller.yaml
-
Remove Jaeger
$ kubectl delete -f k8s/optional/jaeger-operator.yaml
For each namespace you installer Jaeger into, execute the following:
$ kubectl delete -f k8s/optional/jaeger.yaml -n sockshop-${SOCKSHOP_BACKEND} -
Remove Swagger
For each namespace you installer Swagger into, execute the following:
$ kubectl delete -f k8s/optional/swagger.yaml -n sockshop-${SOCKSHOP_BACKEND}
Development
If you want to modify the demo, you will need to check out the code for the project, build it locally, and (optionally) push new Docker images to the repository of your choice.
Checking Out the Project
The easiest way to checkout the source code for all the services is to run the provided
update.sh script:
$ mkdir helidon-sock-shop
$ cd helidon-sock-shop
$ bash <(curl -s https://raw.githubusercontent.com/helidon-sock-shop/sockshop/master/update.sh)
Once you have the code locally, you can update it to the latest version by running the same script locally:
$ cd helidon-sock-shop
$ . sockshop/update.sh
Note: Make sure that you run the update script from the same top-level directory that you used to checkout all the services into or it will fail.
Building the Code
You can build individual services by running mvn clean install within top-level directory
for each service, but if you want to build the whole project at once, there is an easier
way: simply run mvn clean install within the sockshop directory.
This will compile the code for each service, run the tests, and install module JARs into the local Maven repo.
Creating Docker Images
Pre-built Docker images are already available on DockerHub,
so you can simply run docker pull to download them and use locally.
However, if you are making changes to various service implementations and need to re-create Docker images, you can easily do that in several different ways.
If you only want to build Docker images locally, make sure that you have Docker Daemon running and execute the following:
$ mvn package -Pdocker -DskipTestsYou can then tag images any way you want and push them to a Docker repo of your choice using standard Docker commands.
On the other hand, if you cannot or do not want to run Docker locally, you can push images directly to the remote repository:
$ mvn package -Pdocker -DskipTests -Ddocker.repo=<your_docker_repo> -Djib.goal=buildNote: You should replace
<your_docker_repo>in the command above with the name of the Docker repository that you can push Docker images to.
Note: We use Jib Maven Plugin to create and publish Docker images, with a default Jib goal set to
dockerBuild, in order to create local image. Changing the goal tobuildviajib.goalsystem property allows you to push images to a remote repository directly.
Running Modified Application
Kubernetes deployment scripts in this repository reference Docker images from the default
Docker Hub repository, helidon/sockshop. You will not be able to push the images to that repo,
which is why you had to specify -Ddocker.repo argument in the command above.
In order to deploy the application that uses your custom Docker images, you will also have to modify
relevant deployment.yaml files within sockshop repository to use correct names for your
Docker images.
License
Apache License 2.0