Espressif IDF and PlatformIO extensions are popular choices for developing ESP32 projects in C/C++ using Visual Studio Code. Espressif IDF (IoT Development Framework) is the official development framework from Espressif Systems, the manufacturer of the ESP32 microcontroller. It is a very powerful and flexible framework, but it can also be quite complex to use, especially for beginners.
PlatformIO is a more user-friendly alternative to the IDF. It is a build system that can manage the compilation and flashing of ESP32 projects (but also Arduino, STM32, AVR, ...), as well as providing a variety of other features, such as integrated debugging support.
| Feature | Espressif IDF | PlatformIO |
|---|---|---|
| Official framework | Yes | No |
| Power and flexibility | High | Medium |
| User friendliness | Low | High |
| Ease of use | Low | High |
| Documentation | Good | Good |
| Community support | Medium | Large |
-
Follow these instructions: Installation on Linux and Windows and install Espressif IDF extension.
-
It is recommended to start by an example project. See how to create, build, and run your first project.
NOTE: Please note that all available commands are accessible in VS Code in menu View > Command Palette... or by
Ctrl+Shift+Pshortcut, followed by a commandESP-IDF:
Command Description F1orCtrl+Shift+PCommand Palette where all commands are found ESP-IDF: Show Examples ProjectsList of available projects ESP-IDF: New projectCreate a new project via Command Palette ESP-IDF: Set Espressif device targetSelect your Espressif target (esp32, esp32s2, etc.) ESP-IDF: Build your projectBuild the project ESP-IDF: Build, Flash, and start a monitor on your deviceCombine build, flash and serial monitor in a single command ESP-IDF: Open ESP-IDF TerminalOpen ESP-IDF Terminal where you can use idf.pycommand-line toolidf.py create-project NAMECreate a new project titled NAMEin ESP-IDF Terminalidf.py menuconfigOpen project configuration idf.py buildBuild the project idf.py flash monitorFlashing esp-idf project and open serial monitor Ctrl+]orCtrl+)Exit the monitor Other common shortcuts in VS Code.
-
Download and install Visual Studio Code source code editor.
-
Run Visual Studio Code application:
-
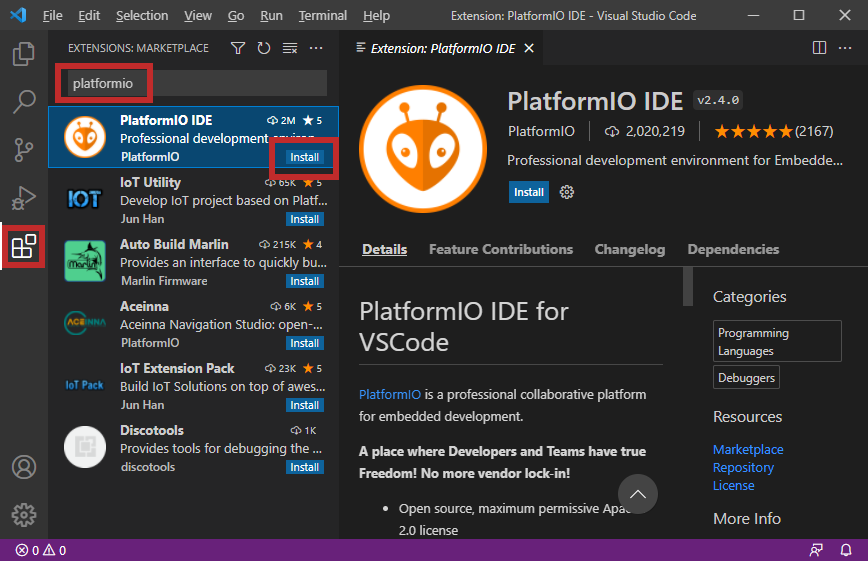
Open up the extensions viewer in menu View > Extensions Ctrl+Shift+X.
-
Type
platformiointo the search bar. -
Press Install button on the result
PlatformIO IDE. It may take a few minutes depending on your connection speed. Do not close any window and do not open other folders until the installing process is completed. -
After that, restart the Visual Studio Code application.
-
-
Create a new project:
-
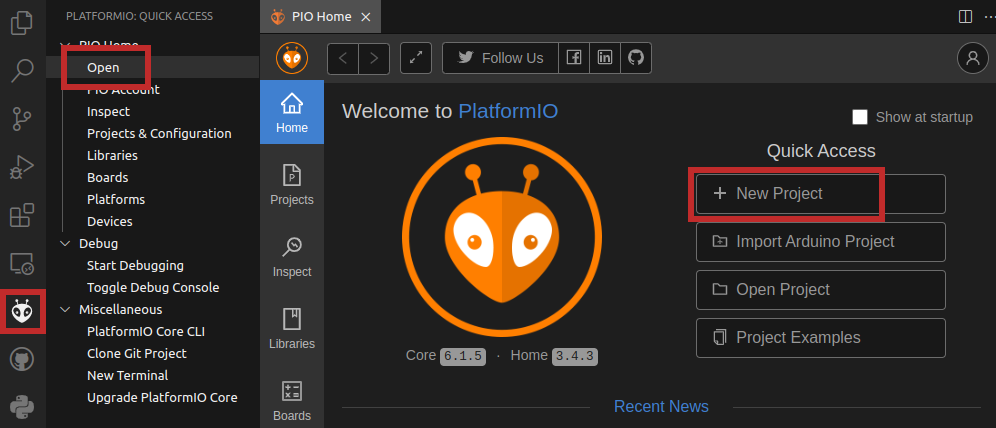
Click on the PlatformIO icon in the left-hand margin.
-
In menu PIO Home select Open.
-
Click to New Project button.
-
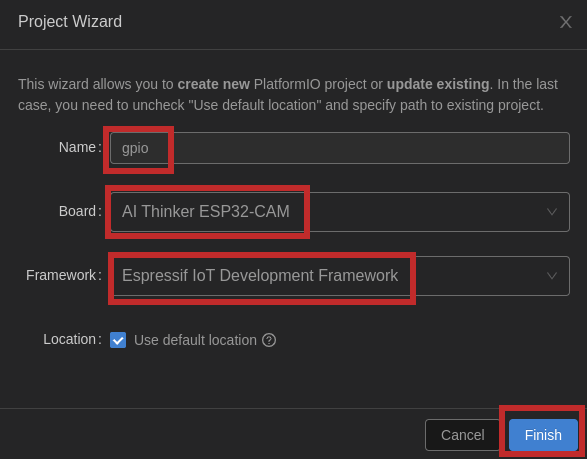
In project wizard, type
gpioas project name. -
Select ESP32 board you have.
-
Change framework to
Espressif IoT Development Frameworkand select location to your working folder. -
Click on the Finish button. The creation of the first project may takes a few minutes and the internet connection to download the needed libraries and frameworks is mandatory.
-
-
Code the application:
-
Copy/paste the basic template to your
GPIO > src > main.cfile. -
Add the following settings to
platformio.iniproject configuration file.monitor_speed = 115200 # DTR & RTS settings of the serial monitor must be OFF monitor_rts = 0 monitor_dtr = 0 # Enable ANSI color codes in serial monitor monitor_raw = yes
-
Connect your ESP32 board to USB port. (Mac users may need to install USB drivers, such as CH340.)
-
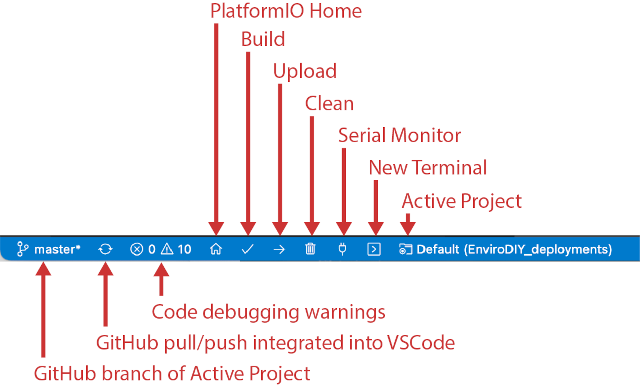
Compile and upload the code. The handy shortcuts for building and uploading the code is available on the blue footer taskbar. Hover over the icon to get its functionality. First, compile (build) the project and then upload it to ESP32 board. Open the Serial monitor. (At some platforms you have to press on-board reset button.)
-
-
For Espressif IDF
- Hello world
- Remote control of LED through HTTP server by tbravenec
- Introduction to FreeRTOS using LED blinking task by tbravenec
-
For PlatformIO
- Basic template with GPIO
- Logging methods
- Tasks
- I2C scan
- I2C DHT12 sensor
- Wi-Fi APs scan
- Wi-Fi GET requests to HTTP
- Wi-Fi & DHT12 & ThingSpeak
- Remote control of LED through HTTP server by tbravenec
- Introduction to FreeRTOS using LED blinking task by tbravenec
| Version | Result (yyyy-mm-dd) | Note |
|---|---|---|
| Linux Mint 21.2 (Victoria) | OK (2024-01-06) | Laptop |
| Windows 10 | OK (2022-11-18) | HomeOffice |
| Linux Mint 20.3 (Una) | OK (2022-11-01) | Laptop |
# FYI: How to check OS version in Linux
cat /etc/os-release

# Or by Neofetch
neofetch- ESP32 brief overview (YouTube video)
- Git commands
- ESP32-CAM board
- FireBeetle board
- ESP32 structure, versions
-
Espressif Systems. ESP-IDF Programming Guide
-
Esp32 Tutorials. Install ESP32 ESP-IDF on Windows and Integrate with VS code
-
Pedro Minatel. ESP-IDF Development Tools Guide — Part I
-
Espressif Systems. Build Your First Project
-
Random Nerd Tutorials. ESP32-CAM AI-Thinker Pinout Guide: GPIOs Usage Explained
-
Renzo Mischianti. ESP32-CAM: pinout, specs and Arduino IDE configuration – 1


