The AWS Analytics Reference Architecture is a set of analytics solutions put together as an end-to-end example. It regroups AWS best practices for designing, implementing, and operating analytics platforms through different purpose-built patterns, handling common requirements, and solving customers' challenges.
This repository contains the codebase and getting started instructions of the AWS Analytics Reference Architecture.
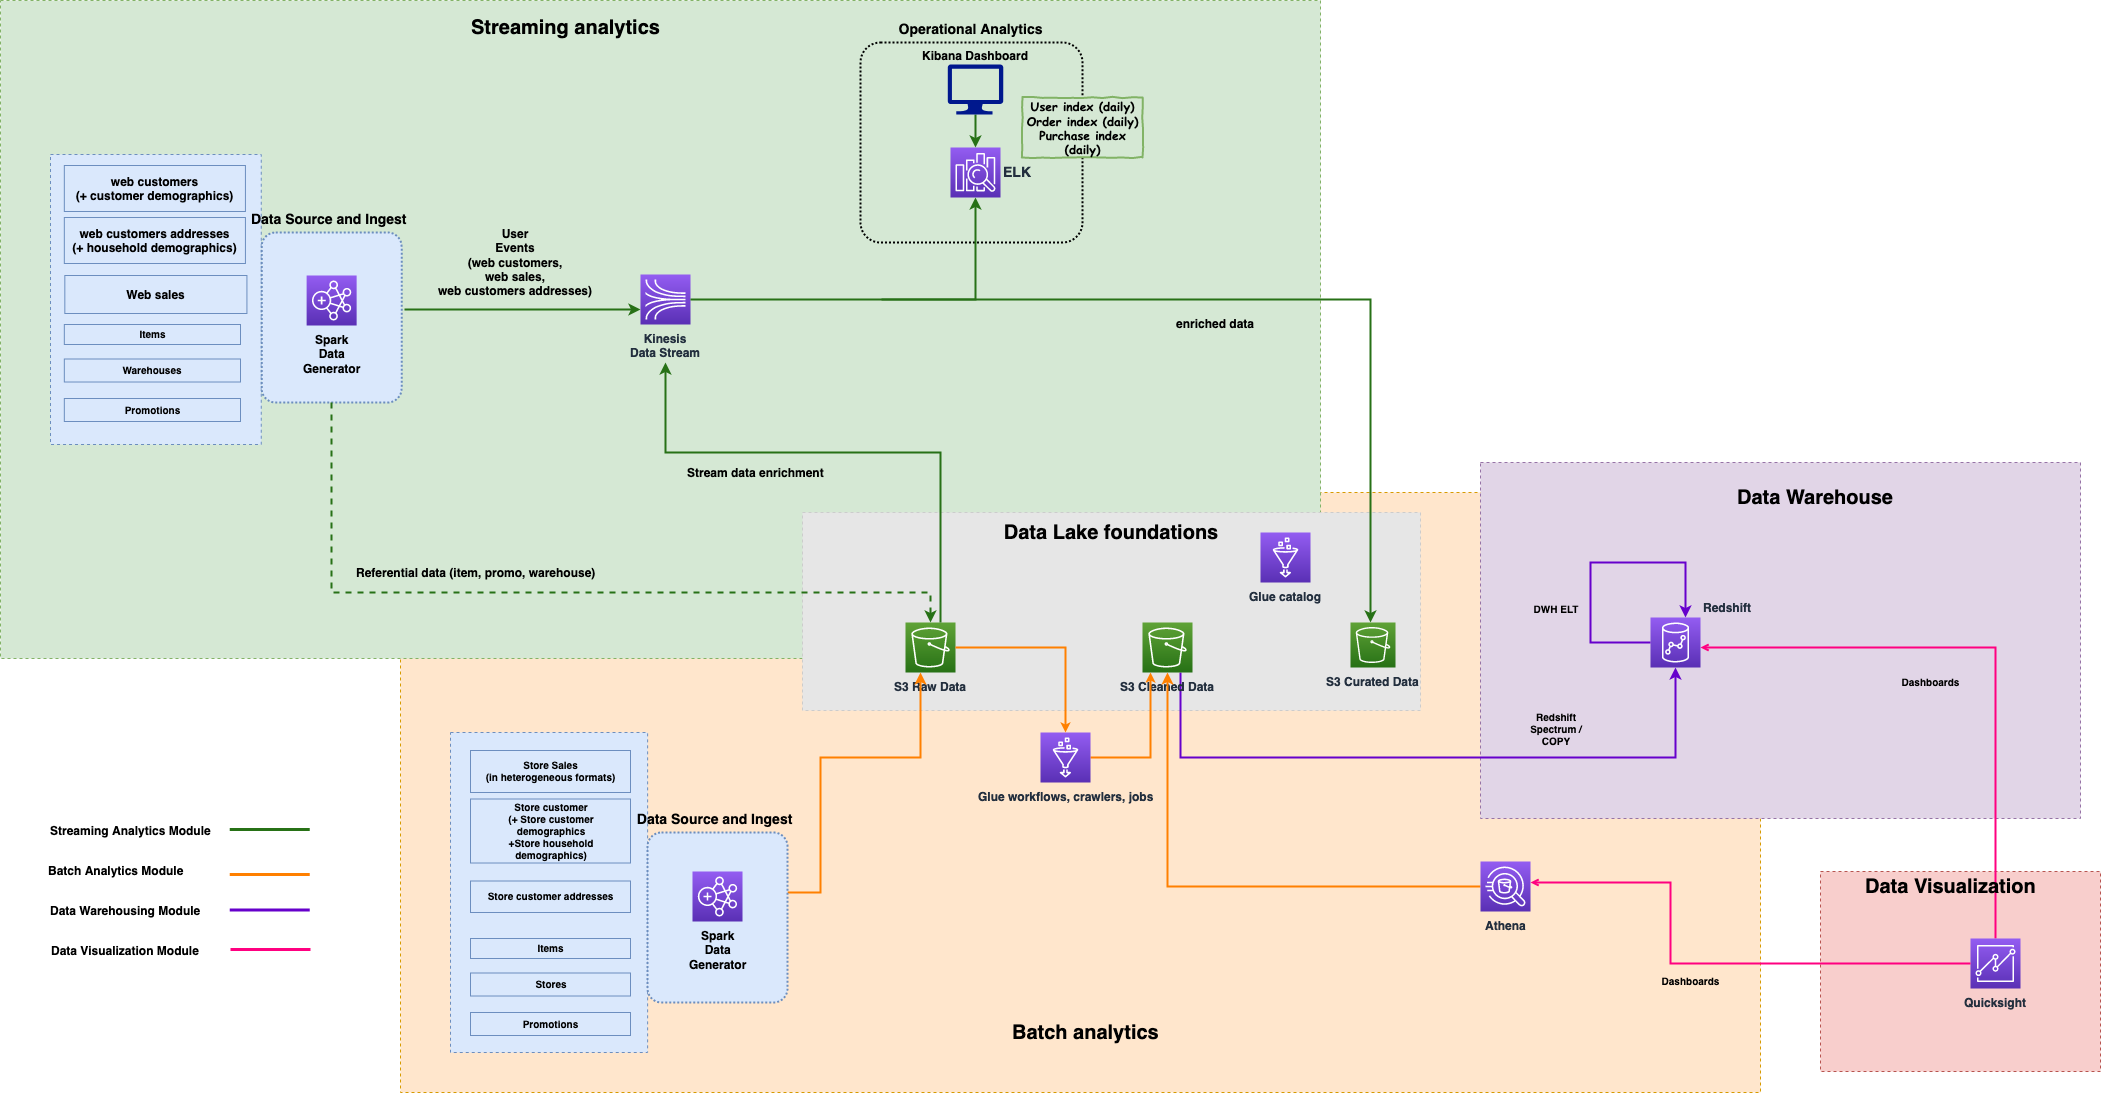
The background of this project, the description of the business cases, architecture, and individual patterns can be found in the documentation.
Return to Live Docs.
This section describes all steps that have to be performed to deploy the AWS Analytics Reference Architecture into an AWS account.
Before starting the deployment, ensure that the following steps are completed.
- Create an AWS account
- The Analytics Reference Architecture can only be deployed in eu-west-1 for the moment
- Subscribe to Amazon QuickSight (if you plan to deploy the data visualization module)
- Install the following components with the specified version on the machine from which the deployment will be executed:
- Python [3.8-3.9.2]
- Node [<15.6]
- Git
- AWS CDK: Please refer to the Getting started guide.
-
Clone this repository onto the machine from which you want to execute the deployment.
git clone https://github.com/aws-samples/aws-analytics-reference-architecture.git -
Create a Python virtual environment in the project's directory, source it, and install all dependencies.
cd aws-analytics-reference-architecture/refarch/aws-native python3 -m venv .env source .env/bin/activate pip install -r requirements.txt -
Deploy the main AWS CDK stack into your AWS account, providing the required parameters. If you install all modules, the Amazon QuickSight username (which can also be an IAM role) to which access should be granted to, as well as your QuickSight home region (the one selected during the QuickSight sign-up process) have to be specified.
cdk deploy --parameters QuickSightUsername=<ROLE/USERNAME> --parameters QuickSightIdentityRegion=<REGION>Alternatively or additionally, you can disable modules. The batch, data warehouse, data visualization, and streaming modules can be enabled/disabled using the respective context variable:
EnableBatch/EnableDWH/EnableDataviz/EnableStreaming. To disable, for example, the data visualization module, the following argument has to be used.cdk deploy -c EnableDataviz=false
-
Configure Amazon QuickSight:
- To link the clean data S3 bucket to the QuickSight account:
- Visit the QuickSight web console
- Click on your username in the upper right corner
- Go to "Manage QuickSight"
- Click "Security & permissions"
- Select "Add or remove" in the "QuickSight access to AWS services" section
- Click on the "Details" link at "Amazon S3" and click the "Select S3 buckets" button
- Select, i.e., check the box of, the S3 bucket named like the value of the CloudFormation output key
CleanS3Bucketfrom the main CDK stack (namedara) deployed into your account. The bucket name has the following format:ara-clean-data-<account-id> - Click "Finish" and then "Update" to confirm the selection
- To create the QuickSight VPC Connection:
- Visit the QuickSight web console
- Click on your username in the upper right corner
- Go to "Manage QuickSight"
- Click "Manage VPC connections"
- Click "Add VPC connection"
- Enter a "VPC connection name" of your choice, e.g.,
ara - Choose the "VPC ID" as the value of the CloudFormation output key
VPCIDfrom the main CDK stack (namedara) deployed into your account - Select one of the subnets that IS NOT shown in the outputs
SUBNETID0andSUBNETID1from the main CDK stack - Copy and paste the value of the CloudFormation output key
QuickSightSecurityGroupIdfrom the main CDK stack into the "Security Group ID" field - Click "Create"
- Note down the "VPC connection ARN" of the newly created VPC connection shown on the "Manage VPC connections" page
- To link the clean data S3 bucket to the QuickSight account:
-
Deploy a second CDK stack, called
DataVizRedshiftStack, passing the ARN of the VPC connection from the previous step.cd dataviz/dataviz_redshift_cdk cdk deploy --parameters VpcConnectionArn=<VPC_CONNECTION_ARN>
The main CDK stack also deploys the streaming module (if not explicitly disabled), which includes:
- Streaming data generation from TPC-DS to Kinesis and S3
- The Kinesis Data Analytics for Flink application
- The Amazon Elasticsearch Service domain
Once deployed, you need to create a master user for Elasticsearch and add it to the master group in Amazon Cognito.
Open the Cognito UI in the AWS console, select "Manage User Pools", click on the user pool named ara_user_pool, and choose the "Users and groups" menu. To start adding a new user, click the "Create user" button:

In the pop-up dialog, provide a username, password, and e-mail address, check "Send an invitation to this new user?" and "Mark email as verified?", uncheck "Mark phone number as verified?", and confirm with "Create user" to add the new master user:

The master user is created with a temporary password that has to be changed at first authentication. Note the unique user identifier (UUID) displayed in the "Username" column as shown on the next screen:

Now, add the master user to the master-user-group that has been created by the CDK stack. Switch to the "Groups" tab and select the group's name:

Click the "Add users" button at the group's detail page:

Click the + icon in front of the master user shown in the list, identified by the UUID:

A message will confirm that the user has been added successfully to the group:

Once the master user is added, you can connect to Kibana using the URL exposed in the streaming module's nested stack outputs (stack name start with ara-StreamingModuleNestedStack and output key starts with EsDomainkibanaUrl) and the temporary credential used to create the user.
The data is already being indexed in Elasticsearch, but you will need to add a new index pattern (use pattern ara-sales-* to get started) in Kibana to start seeing it.
For security reasons, the Redshift cluster is in a private subnet. Therefore, you won't be able to connect directly to the cluster with a SQL client, e.g., psql or a JDBC/ODBC client like DataGrip or Tableau. To connect to the cluster, you need to create an SSH tunnel via the bastion host. Host and connection details for the bastion host are available in the CDK and CloudFormation output:
- The secret name containing the keypair is in
ara-Redshift-bastion-keypair-secret - The bastion host DNS to connect is in
ara-Redshift-bastion-dns - The Redshift hostname and port are in
ara-Redshift-hostnameandara-Redshift-port
The following are the required syntax and examples of how to create the tunnel and connect via psql. The commands need to be run in a command line environment like Terminal on Mac or cmd on Windows.
Download the private key pair from AWS Secret Manager
aws secretsmanager get-secret-value \
  --secret-id <ara-Redshift-bastion-keypair-secret> \
  --query SecretString \
  --output text >> bastion-host-key-pair.pem
Change key file permissions
chmod 400 bastion-host-key-pair.pem
Create SSH tunnel:
ssh -N -L <local_port>:<ara-Redshift-hostname>:<ara-Redshift-port> ec2-user@<ara-Redshift-bastion-dns> -i bastion-host-key-pair.pem
e.g.
ssh -N -L 5400:ara-redshift-cluster-1.ckkq2ei6ah54.eu-west-1.redshift.amazonaws.com:5439 ec2-user@34.251.89.55 -i bastion-host-key-pair.pem
Connect to Redshift with psql: (Multiple Redshift users and password are available in AWS Secret Manager)
psql -h <localhost> -p <local_port> -U <redshift_user> -d <redshift_database>
e.g.
psql -h localhost -p 5400 -U dwsuser -d dev
- (If the data visualisation module has been deployed) Delete the QuickSight VPC Connection, otherwise destroying the stack will fail.
- (If the data visualisation module has been deployed) Destroy the stack called
DataVizRedshiftStack.cd dataviz/dataviz_redshift_cdk/ cdk destroy # confirm "Are you sure you want to delete: ara-dataviz-redshift (y/n)?" with y - Destroy the main AWS CDK stack.
cd ../..
cdk destroy
# confirm "Are you sure you want to delete: ara (y/n)?" with y
Please refer to the contributing guidelines for details.
The documentation is made available under the Creative Commons Attribution-ShareAlike 4.0 International License. See the LICENSE file.
The sample code within this documentation is made available under the MIT-0 license. See the LICENSE-SAMPLECODE file.