the GDELT Project monitors the world's broadcast, print, and web news from nearly every corner of every country in over 100 languages and identifies the people, locations, organizations, themes, sources, emotions, counts, quotes, images and events driving our global society every second of every day, creating a free open platform for computing on the entire world.
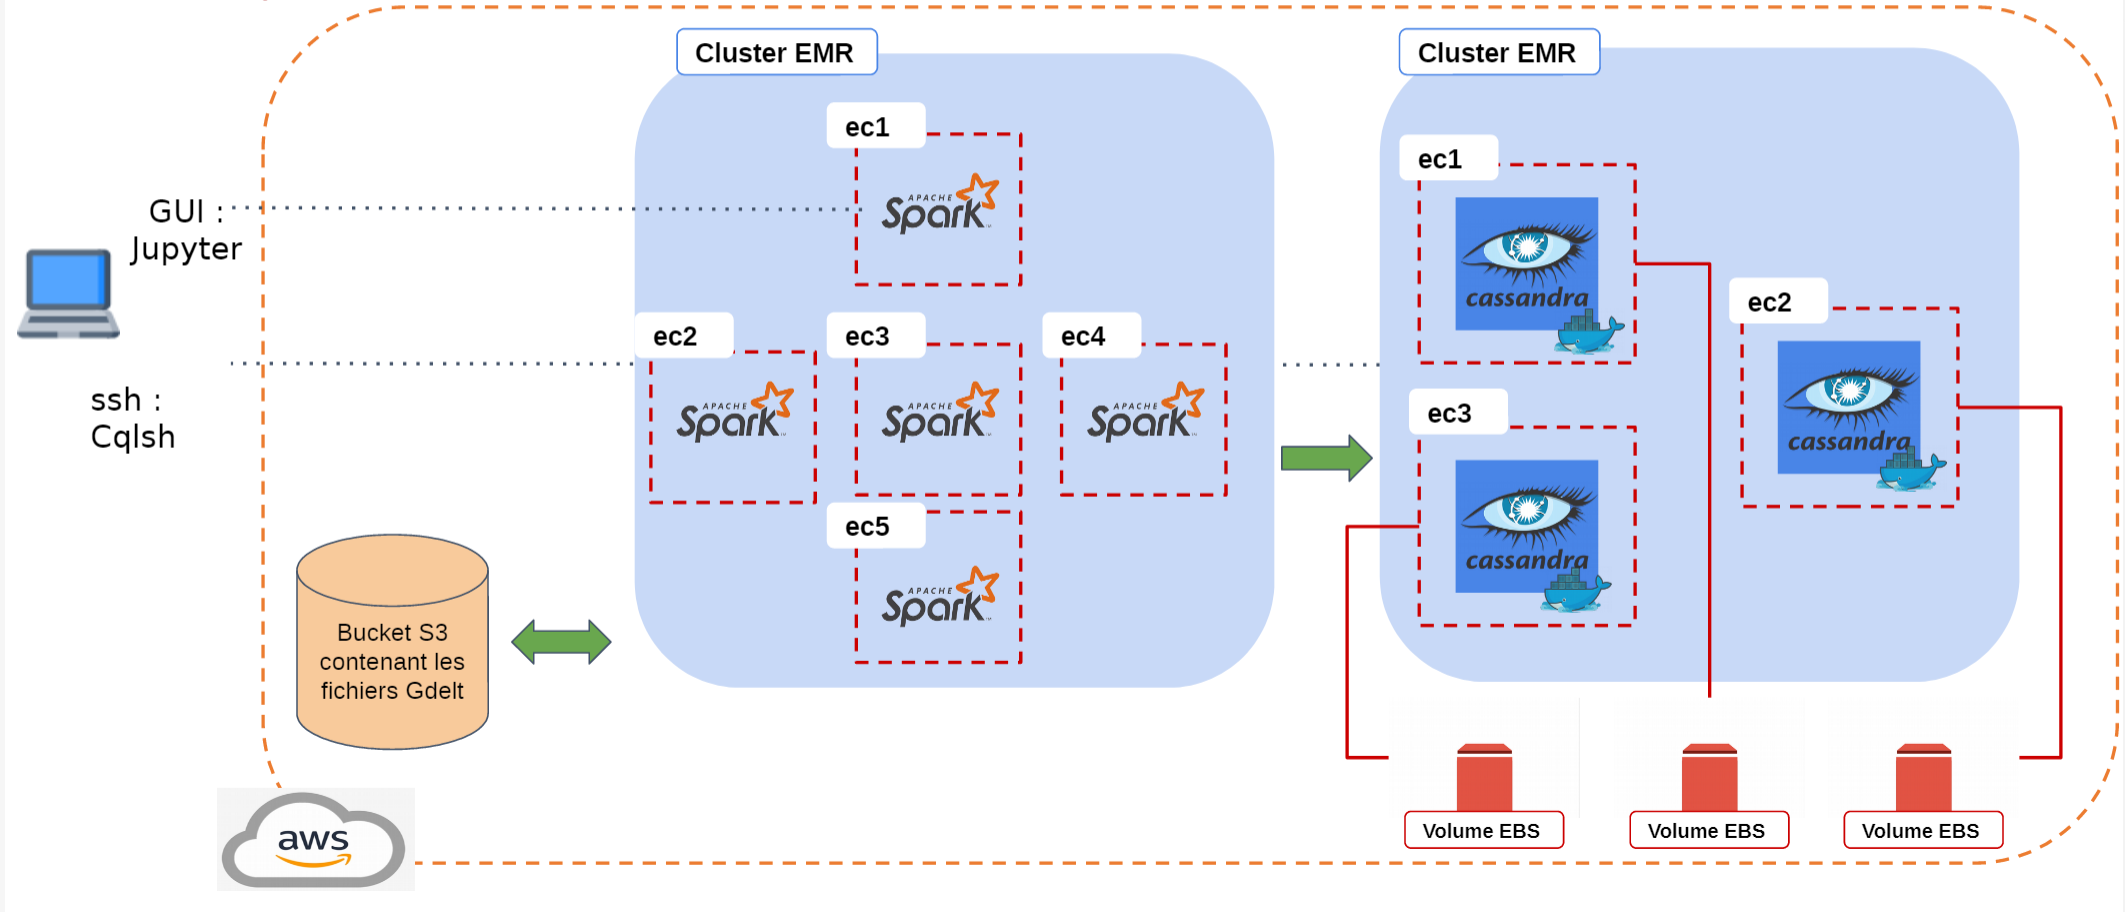
The goal of this project is to propose a resilient and efficient distributed storage system on AWS that allow users to query some information on GDELT dataset.
You need to install the following dependencies before the creation of the platform
Configure aws2 cli
First, aws2 cli needs to know your credentials to communicate with aws services through your account. By creating a
credential file in the ~/.aws folder, aws2 cli will be able to interact with the platform :
$ vim ~/.aws/credentialsThen copy-past the following lines with your keys instead of X:
[default]
aws_access_key_id=XXXXXXXXXX
aws_secret_access_key=XXXXXXXXXXX
aws_session_token=XXXXXXXXXXA key pair is required to connect to the cluster machines. If not already configured, this key pair may be generated from the EC2 dashboard, section key pairs. Or through AWS cli:
$ aws2 ec2 create-key-pair --key-name gdeltKeyPair-educate __Copy the content of the private key, surrounded by ----- BEGIN RSA PRIVATE KEY ----- and ----- END RSA PRIVATE KEY ----- to gdeltKeyPair-educate.pem
The access rights of the gdeltKeyPair-educate.pem file shall be restricted to you only:
$ chmod 600 gdeltKeyPair-Student.pemYou may check the availability of your key pair with:
$ aws2 ec2 describe-key-pairsNote that key pairs are restricted to each user.
gdeltKeyPair-educate.pem for the name of the pem file is mandatory.
$ git clone [repo_url]
$ mkdir GDELT-Explore/secrets && cp [path_to_pem] secrets/gdeltKeyPair-educate.pem$ cd GDELT-Explore/
$ pip install -r requirements.txtIn the script/ folder, there is a gdelt.py script file which contains the cli for the project. This cli provides options to:
- Create the ec2 instances for the cluster
- Create the EBS volumes make cassandra data persistent
- Attach a volume to an ec2 instance
- Deploy a cassandra container on many ec2 instances
To get some help, run the following command:
$ python script/gdelt.py --help$ python script/gdelt.py --create_cluster sparkCaveats:
- The number of S3 connections need to be increased to at least 100, see sparkConfiguration.json and [1]
- Open the
##" Create a Cassandra cluster
$ python script/gdelt.py --create_cluster cassandraCreate the volumes:
$ python script/gdelt.py --create_volume 3 [availability zone of the cluster]Attach a volume (A volume need to be formatted when you use it for the first time):
$ python script/gdelt.py --attach_volume --first_time [instance_id] [volume_id]Deploy Cassandra nodes
$ python script/gdelt.py --deploy_cassandra [instance_id_1 starts with 'i-'] [instance_id_2] ... [instance_id_n]CQLSH
You can access to the Cassandra cluster with the console:
$ ssh -i [path_to_pem] hadoop@[public_dns_instance]Once connected to the instance, enter in the docker node to run the cqlsh console:
$ docker exec -it cassandra-node cqlshYou can also check the status of the different cluster nodes:
$ docker exec -it cassandra-node nodetool statusYou have two ways to access the cluster:
- Jupyter
- Spark-submit
Jupyter
A remote jupyter container run on the master node of the spark cluster. To access it, you need to get the token of the notebook:
$ ssh -i ./secrets/gdeltKeyPair-educate.pem hadoop@[cluster master DNS]Once connected to the master node, run the following command to obtain the name or id of the jupyter container.
$ docker psCopy the name or id of the container then use it to acces the container's console.
$ docker exec -it [name_or_id] bash
$ jupyter notebook list
Keep the token provide by the notebook. You will use it later.
Now, you need to open inbound connections on port from the master node to you local computer
$ ssh -N -L 8088:localhost:10000 -i secrets/gdeltKeyPair-educate.pem hadoop@[cluster master DNS]You can acces the jupyterlab UI by open the following link jupyterlab. Don't forget to paste the requested token.
Reference: https://docs.aws.amazon.com/emr/latest/ManagementGuide/emr-web-interfaces.html
Spark submit
Initially create a S3 bucket to load the program to:
$ aws s3api create-bucket --bucket fufu-program --region us-east-1 --acl aws-exec-readCopy the Jar to S3:
$ aws s3 cp target/scala-2.11/GDELT-Explore-assembly-0.1.0.jar s3://fufu-program/jars/Submit the job to Spark using add-steps on the EMR cluster, example for the GDELT download:
$ aws emr add-steps --cluster-id [id starting with 'j-'] --steps file://script/submitMainDownload.json

$ aws emr list-steps --cluster-id [id starting with 'j-']
$ aws2 emr describe-step --cluster-id [id starting with 'j-'] --step-id [id starting with 's-']Check cluster status:
$ aws2 emr list-clustersDescribe cluster, given the id listed in above command :
$ aws emr describe-cluster --cluster-id [id starting with 'j-']Terminate cluster:
$ aws2 emr terminate-clusters --cluster-ids [id starting with 'j-']The ETL is split into two parts:
- Download the data from GDELT to an S3 storage
- Transform and load to Cassandra the required views
First part is 1 program. The second part is split into 4 programs corresponding to the 4 queries specified in the project goals.
All 5 ETL programs are in the Scala SBT project.
- Scala Build Tool (SBT)
- IntelliJ IDE
- Git
All the JAR dependencies are installed automatically through SBT
- With Git, clone the project from the Github source repository
- Open the project folder with IntelliJ
- When first loading the project IntelliJ, the SBT files shall be imported
- When pulling source code update from Github, it might be required to reload the SBT file
- Logging configured in src/main/resources/log4j.properties
- Currently to console (TO COMPLETE)
Either :
-
Through IntelliJ build
-
Or with the command:
$ sbt assembly
-
Or, with run of a program included:
$ ./build_and_submit.sh [programName]
-
Or, with deploy and run to AWS included :
$ ./aws_build_and_submit.sh [cluster ID starting with 'j-'] [script/submissionScript.json]
As seen above, some of the build scripts also deploy and run the program. It is also possible to run the program from the command line.
To run locally :
$ spark-submit --class fr.telecom.[ProgramName] target/scala-2.11/GDELT-Explore-assembly-*.jarTo run locally from the IntelliJ user interface:
- Edit a run configuration
- Select the class of the main program to run
- Set the program option: --local-master
- Set the classpath module to 'mainRunner'$
- Save edit and execute
On AWS :
$ aws2 emr add-step --cluster-id [ID of cluster start with 'j-'] [file://script/submissionScript.json]This will create a step on the cluster, the step surveillance is as explained in section "Cluster surveillance"
All ETL programs (MainDownload, MainQueryX) have the following options:
- --ref-period : define the reference period as the prefix to the GDELT files. Example : '20190115'. Default set in class fr.telecom.Context
- --local-master : to be used in Intellij to force declaration of the Spark master as local
- --from-s3 : use data from S3 for the MainQuery, and to S3 if Cassandra IP is not set (below)
- --cassandra-ip : to use within the EMR cluster only, sets the private IP of one of the Cassandra nodes (LATER : more than one !)
Create a folder /tmp/data
Run the MainDownload program from the IDE or using spark-submit as explained above
Specific command line options :
- --index : download the masterfile indexes first
- --index-only : download the masterfile indexes and stop
- --to-s3 for the MainDownload to save files to S3
See section "Run ETL programs", to apply with script/submissionMainDownload.json
NOTE : if running a new Cassandra cluster, edit the submission scripts to set the private IP of one of the Cassandra nodes.
| Class | AWS submission scripts |
|---|---|
| fr.telecom.MainQueryA | script/submissionMainQueryA.json |
| fr.telecom.MainQueryB | script/submissionMainQueryB.json |
| fr.telecom.MainQueryC | script/submissionMainQueryC.json |
| fr.telecom.MainQueryD | script/submissionMainQueryD.json |
aws2 emr add-steps --cluster-id [cluster_id] --steps "file://[json_file]"USE gdelt;
SELECT * FROM querya LIMIT 20;USE gdelt;
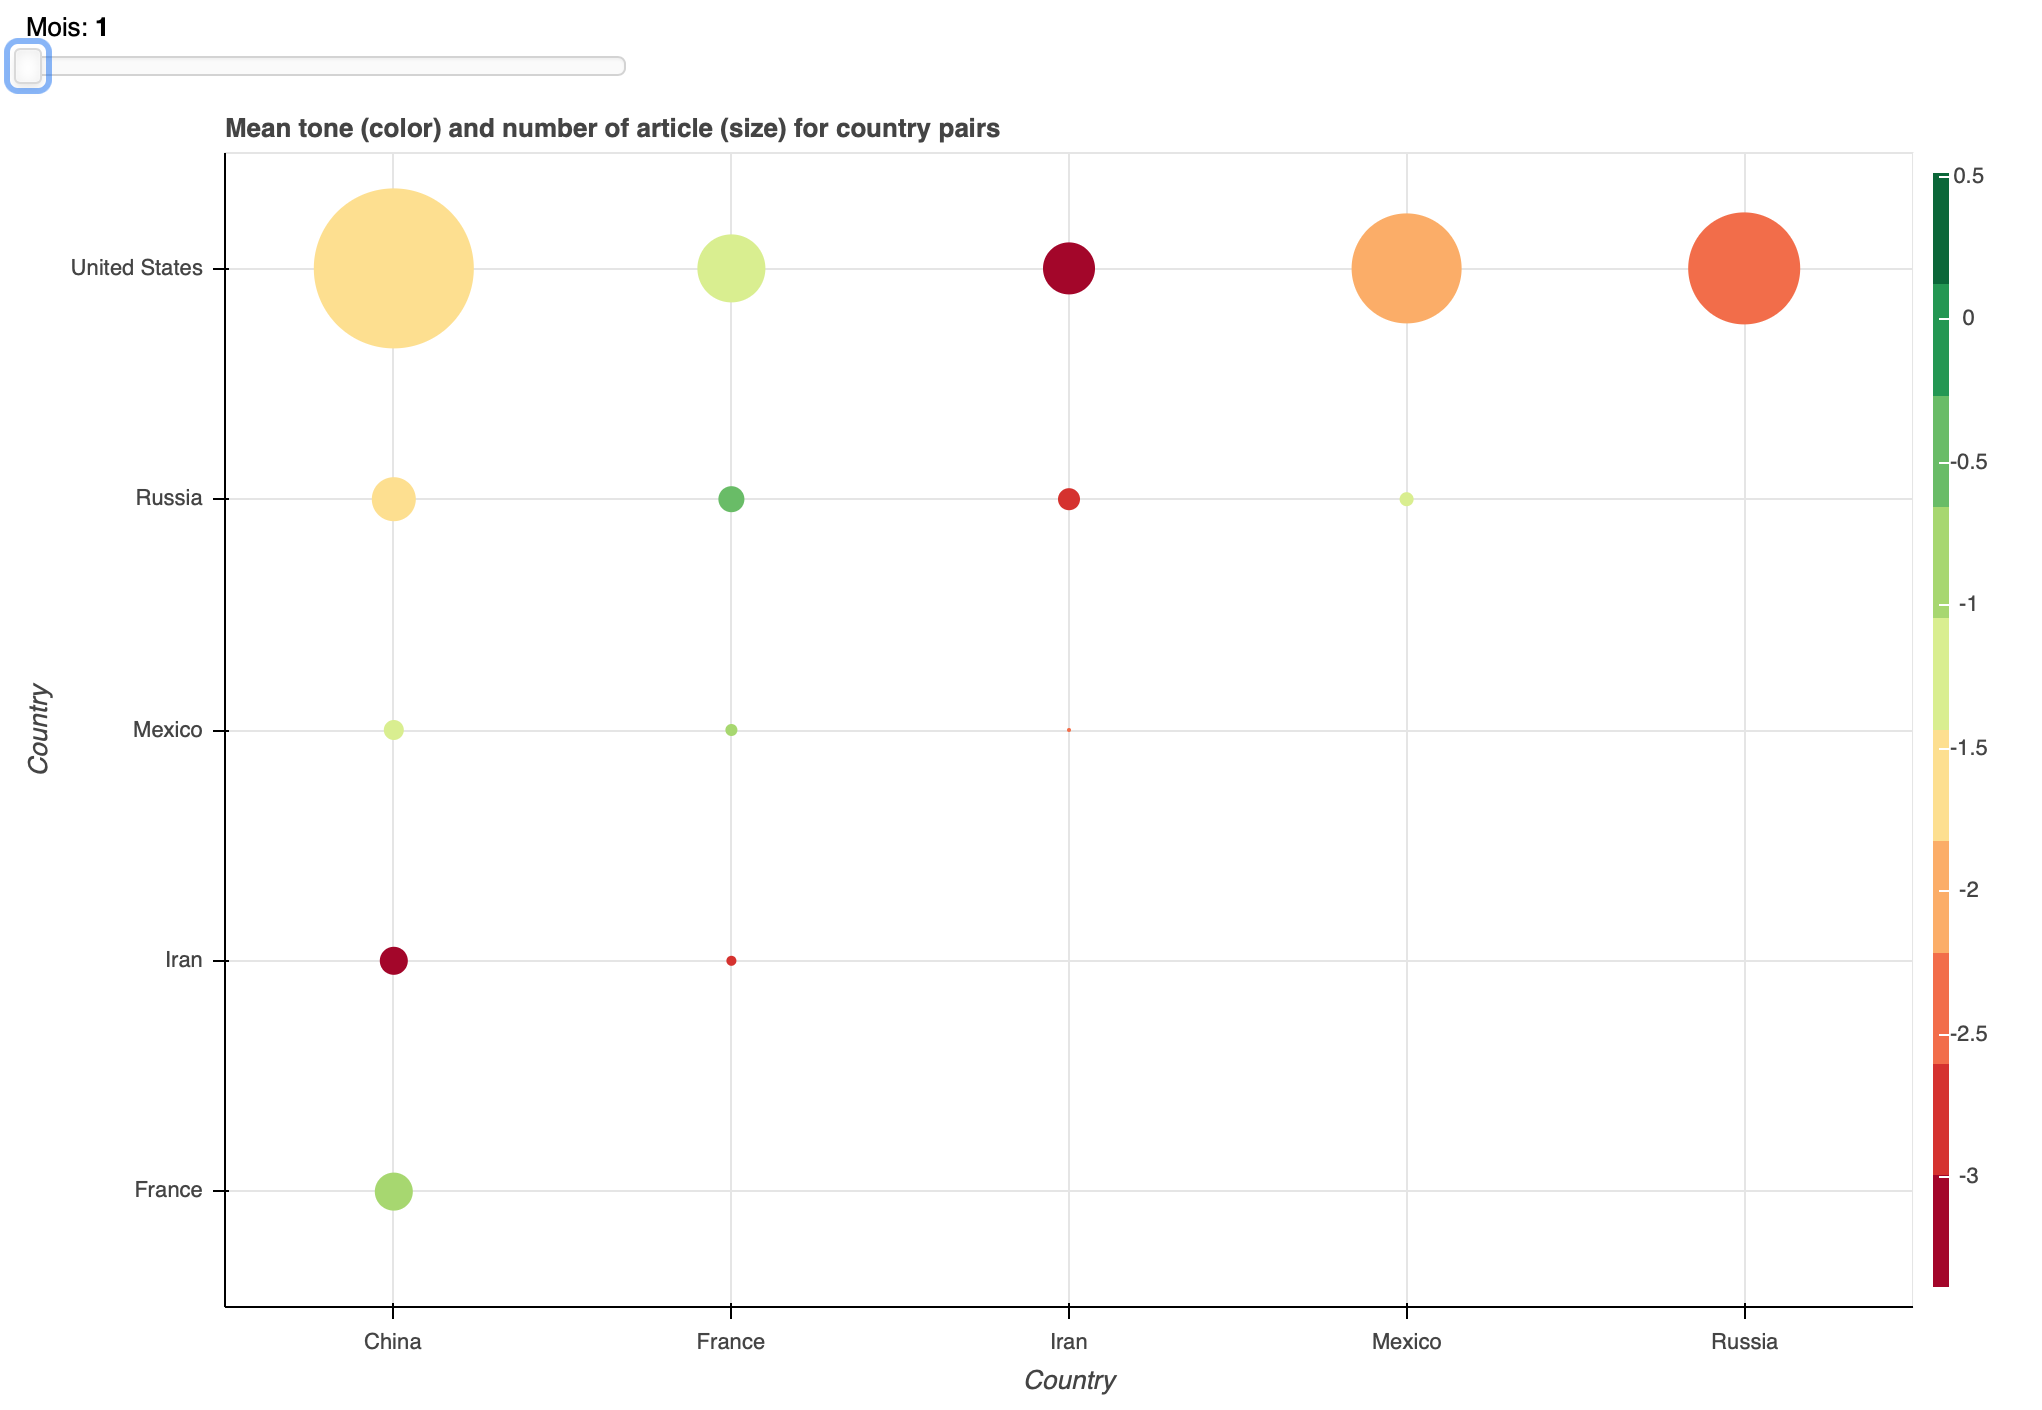
SELECT * FROM queryd LIMIT 20;This Cassandra table stores the mean tone and the number of articles for each country pair present in GDELT GKG relation for each day of the year 2019. The aim of this notebook is to exhibit some results from this table.
The link bellow show the interactive plot of the mean tone and the number of articles per country pairs:
Interactive visualtisation of mean tone and number of articles per country pairs


