My code, namely the files found under the 'KinectMocap' directory, is provided under a Creative Commons Attribution license (http://creativecommons.org/licenses/by/3.0/). As such, you are free to use the code for any purpose as long as you remember to mention our names (Torben Sko and Beau Vardos) at some point. Also please note that my code is provided AS IS with NO WARRANTY OF ANY KIND, INCLUDING THE WARRANTY OF DESIGN, MERCHANTABILITY AND FITNESS FOR A PARTICULAR PURPOSE.
Also provided in this Git repository is the work of Mirage, found in the folder titled 'Mirages MayaOpenNIServer (version)'. For licensing details, please consult Mirage's homepage (http://d.hatena.ne.jp/Mirage/)
-
To start make sure you have...
-
A USB Kinect, i.e. the one sold separately to the Xbox
-
A Windows computer. This is only required for the capture process. Once the motion data is in your scene, you can jump OS if need be.
-
Maya 2010 or above. Of note, students can get a free 13 month Maya licence through the Autodesk Education Community (http://students.autodesk.com/)
-
-
Get your Kinect setup and working with your PC by the following this guide: http://www.brekel.com/?page_id=170
I would recommend using the exact software suggested, down to the same version.
-
Grab files provided in this repository and copy those contained within the two MayaScript directories (KinectMocap/MayaScripts and MiragesMayaOpenNIServer/MayaScript) into your computer's Maya scripts folder. Your scripts folder should be located at
C:/.../My Documents/maya/scripts -
Place the remaining contents of the
MayaOpenNIServerfolder somewhere on your computer.
-
Run the
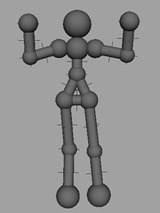
MayaOpenNIServer.exeexecutable found within theMayaOpenNIServer\binfolder. Once the Kinect footage is visible on screen (this can take a little while) you need stand in front of the Kinect and hold a surrender pose, like so:
-
Once you're satisfied it's working, click the 'Start Server' button
-
Open Maya and open the script editor. A shortcut to the script editor is pictured below:

-
Under the MEL tab, enter the following code:
source mayaKinectMocap.mel;
mayaKinectCaptureTest();
showMocapWindow();
Execute this code using one of the blue arrow buttons located at the top of the script editor window. The following window should appear:

-
Using the windows that pop up you can then...
-
Create nulls: creates some locators that will move once you connect to the OpenNI Server
-
Connect: connects to the OpenNI Server. If you're still being tracked by the server, you should see the locators move
-
Start: starts recording the locator (i.e. the actor) movement
-
Stop: stops recording the locator movement
-
Auto rig: creates and attaches some geometry to the Kinect locators. You can do this either before or after recording the movement, however if done before, it could cause your computer to slow down during the recording process
-
-
Film a background for your character
-
You will need to track the camera movement in 3D by following a tutorial like this one: http://www.youtube.com/watch?v=7l4enkIrufI
-
Once you render your character from the perspective of your animated camera (with a transparent background), you will need to composite the character and background together using a program like Nuke or After Effects