This repository is a guide on creating a virtual environment that should nearly match that of viper.datasci.danforthcenter.org. The primarly differences between this and the actual server is that this requires additional configuration for users, groups, and data location.
-
Download CentOS 8
http://mirror.mobap.edu/centos/8.0.1905/isos/x86_64/CentOS-8-x86_64-1905-boot.iso
-
Set installation source
Currently, there's a known bug (#16456) during a minimal installation of CentOS 8. It requires that you set the Installation Source manually.
Currently, the fix is to add the following as a mirrorlist
http://mirrorlist.centos.org/?release=8&arch=x86_64&repo=BaseOS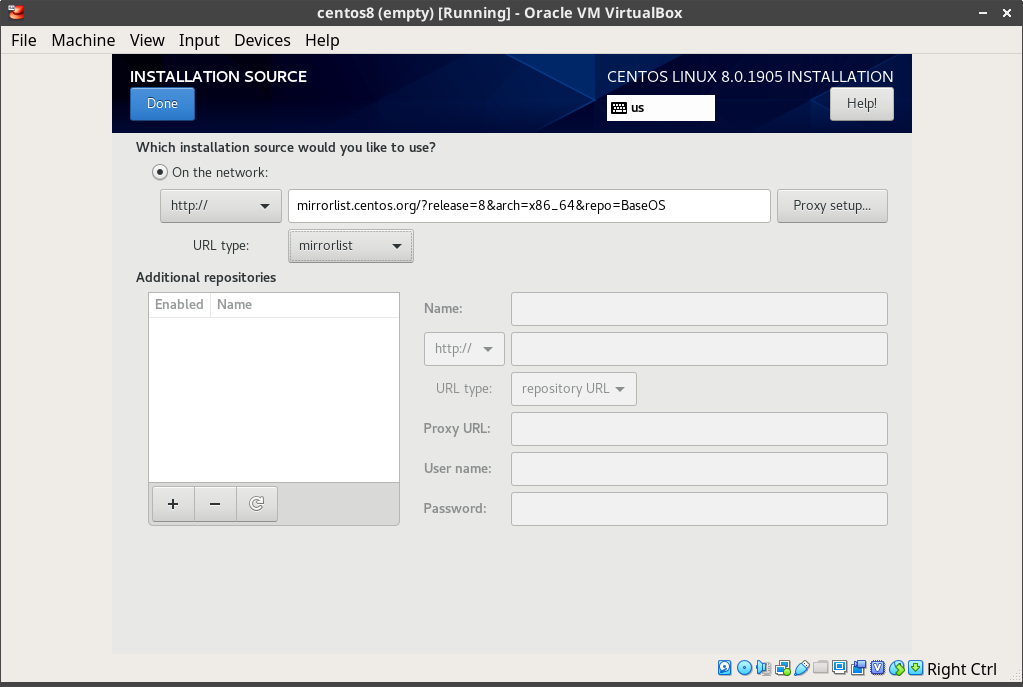
-
Turn on network
-
Set Installation Destination (configures disk partitions)
- Select Custom for Storage Configuration, Click Done
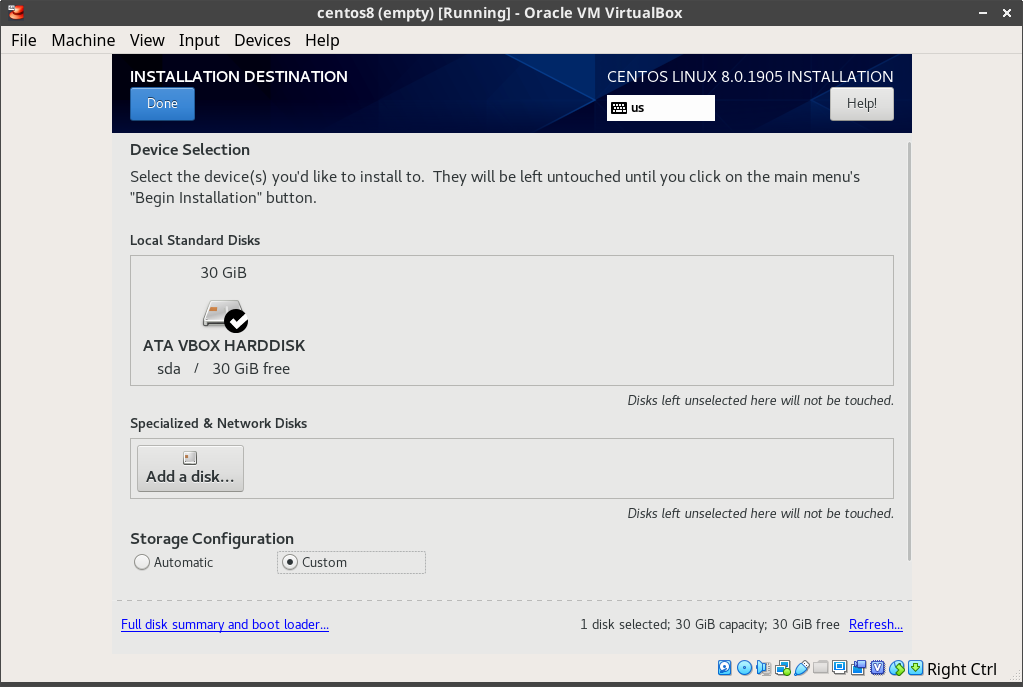
- Click Click here to create them automatically to generate the recommended partitions.
-
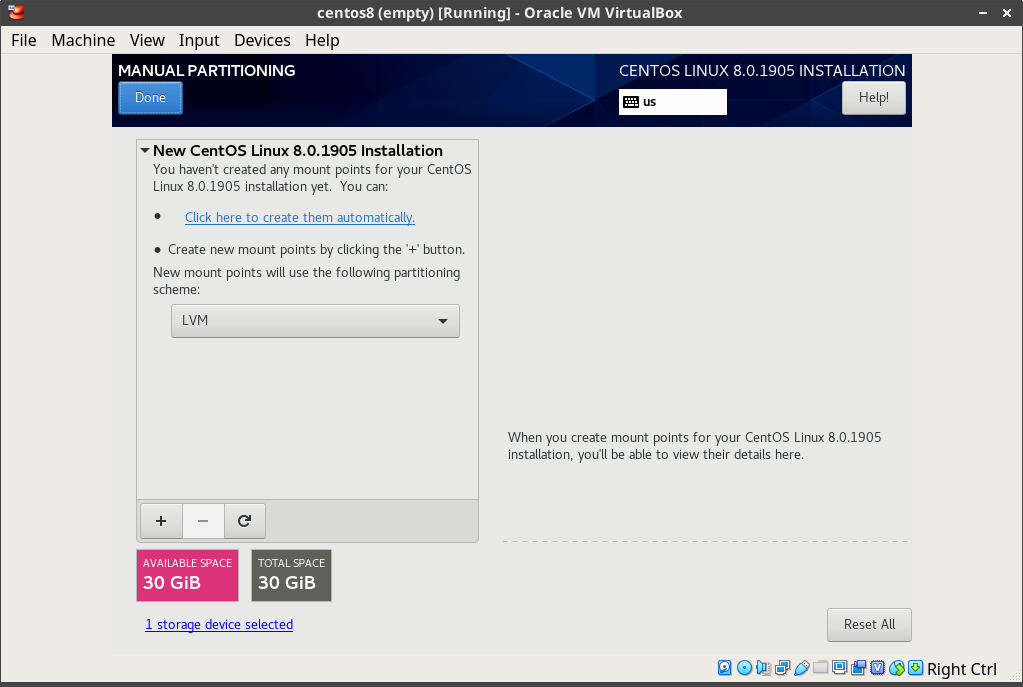
Check generated partitions
This should create a
/boot(ext4),/(xfs, LVM), and/swap(swap, LVM) partitions.
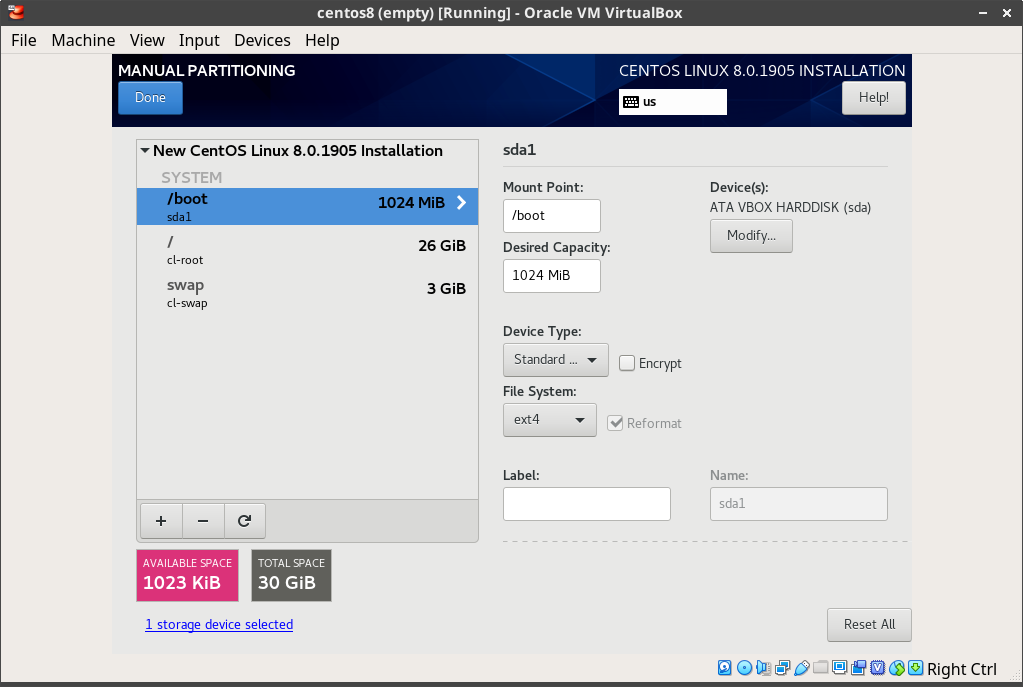
- Click Done, and then Accept Changes
-
Set Software Selection
- Check Base Environment to Server
- Check Add-Ons:
- GNOME
- Network File System Client
- Graphical Administration Tools
- Headless Management
- Scientific Support
- System Tools
-
Click Begin Installation
- Set
rootpassword
- Set
-
Reboot


# Create supplementary users if needed
groupadd rootarch
usermod -aG rootarch root
adduser rsa-data
usermod -aG rootarch rsa-dataLog in as root and install package group, Server with GUI
dnf groupinstall -y "Server with GUI"
systemctl set-default graphical.target
systemctl isolate graphical.targetdnf update kernel*
# If kernel was updated, reboot
# Mount VirtualBoxGuestAdditions
# Device Menu > "Insert Guest Additions CD Image"... (download if necessary)
mkdir -pv /media/VirtualBoxGuestAdditions
mount -r /dev/cdrom /media/VirtualBoxGuestAdditions
# Install Guest Additions dependencies
dnf install -y https://dl.fedoraproject.org/pub/epel/epel-release-latest-8.noarch.rpm
yum install -y gcc kernel-devel kernel-headers dkms make bzip2 perl
# Add kernel environment variable
KERN_DIR=/usr/src/kernels/`uname -r`
export KERN_DIR
# Install Guest Additions
cd /media/VirtualBoxGuestAdditions
./VBoxLinuxAdditions.run
reboot-
Update system and install dependencies
dnf update -y dnf install -y epel-release git wget gcc-c++ cmake python2 python36 curl https://bootstrap.pypa.io/get-pip.py -o get-pip.py python3 get-pip.py rsync -avuP --stats tparker@stargate.datasci.danforthcenter.org:/shares/ctopp_share/data/repos/jdk/jdk-8u202-linux-x64.rpm . rpm -ivh jdk-8u202-linux-x64.rpm alternatives --set java /usr/java/jdk1.8.0_202-amd64/jre/bin/java git clone https://github.com/Topp-Roots-Lab/operations-scripts.git --branch master --single-branch -
Install TigerVNC
dnf install -y tigervnc-server tigervnc-server-module
-
Add VNC endpoints
A VNC server can be started with the
vncservercommand, but for easier use, we've opted to use aliases in~/.bashrcfor handle this. Add the following commands to each user's.bashrc; make sure to replace thePORT_NUMBERwith an unused port number and then update any documentation to reflect its assignment. Currently, we are keeping track of who has been assigned which port in a Google Sheet.# ~/.bashrc # ... # VNC Server alias startvnc="vncserver :<PORT_NUMBER>" alias killvnc="vncserver -kill :<PORT_NUMBER>"
If additional configuration is needed, e.g., changing the default screen resolution, make these changes in the user's
~/.vnc/configfile.NOTE about VNC passwords: Once a user has access a VNC endpoint at least once, their password is stored in
$HOME/.vnc/passwdby default. Therefore, for anyone that has started their VNC server in the past, you should not need to set a password. Otherwise, use the following command to set the password for the user.sudo -u <username> vncpasswd
Make sure to open ports for VNC endpoints
Allow port in firewall
Make sure to replace the port number with the correct value when allowing it through the firewall. VNC uses ports starting at 5900, so add the assigned port to 5900 to get the actual port. E.g., If you assign porn
126to someone, open the port6026.firewall-cmd --permanent --add-port=5900+<PORT_NUMBER>/tcp firewall-cmd --reload
-
Disable screen locking and session timeout
As root, add the following lines to
/etc/dconf/db/local.d/00-screensaver. Create the file if it does not exist. [[1]]# /etc/dconf/db/local.d/00-screensaver [org/gnome/desktop/session] idle-delay=uint32 0 [org/gnome/desktop/screensaver] lock-enabled=falseMake sure to update
dconfafter making your changes.dconf update
-
(Optional) Fix Authentication Required Pop-ups
You may encounter the following alert:
Authentication Required
Authentication is required to create a color managed device
As a workaround, we can grant the permission to all users. This issue seems to have come about during the transition to Ubuntu 18.04 and is also affecting CentOS 8. Add the following rules to
/etc/polkit-1/localauthority/50-local.d/45-allow-colord.pkla; create the file if it does not already exist. [[2]]# /etc/polkit-1/localauthority/50-local.d/45-allow-colord.pkla [Allow Colord all Users] Identity=unix-user:* Action=org.freedesktop.color-manager.create-device;org.freedesktop.color-manager.create-profile;org.freedesktop.color-manager.delete-device;org.freedesktop.color-manager.delete-profile;org.freedesktop.color-manager.modify-device;org.freedesktop.color-manager.modify-profile ResultAny=no ResultInactive=no ResultActive=yes [Allow Package Management all Users] Identity=unix-user:* Action=org.debian.apt.*;io.snapcraft.*;org.freedesktop.packagekit.*;com.ubuntu.update-notifier.* ResultAny=no ResultInactive=no ResultActive=yes
# Download RSA-GiA source
git clone https://github.com/tparkerd/rsa-gia.git --branch master --single-branch

# Install dependencies for RSA-GiA
dnf install -y ImageMagick

# Gia2d Dependency: png12, tiff
# https://centos.pkgs.org/8/centos-appstream-x86_64/libpng12-1.2.57-5.el8.x86_64.rpm.html
dnf install -y libpng12

# Libpng15
git clone https://github.com/glennrp/libpng.git --branch libpng15 --single-branch && cd libpng
./configure --exec-prefix=/usr --libdir=/lib64
make && make check && make install && cd ..

# libtiff3
# Compile libtiff3 (http://www.libtiff.org/)
wget http://download.osgeo.org/libtiff/tiff-3.9.7.tar.gz
tar -zvxf tiff-3.9.7.tar.gz && cd tiff-3.9.7/
./configure --exec-prefix=/usr --libdir=/lib64
make && make check && make install && cd ..

# Qt4
# https://github.com/qt/qt.git

# Q4 Dependencies
# https://doc.qt.io/archives/qt-4.8/requirements-x11.html
# NOTE(tparker): There is not an entry for libglib-2.0 or libpthread
# As far as I can tell the glibc-devel provides the necessary libraries for libglib-2.0
# And libpthread appears to already be installed by default for CentOS 8
# I added (libXtst-devel) because of https://www.programering.com/a/MjM3kjNwATA.html
dnf install -y libXrender-devel libXrandr-devel libXfixes-devel libXinerama-devel fontconfig-devel freetype-devel libXi-devel libXt-devel libXext-devel libX11-devel libSM-devel libICE-devel glibc-devel libXtst-devel

# https://download.qt.io/archive/qt/4.8/4.8.7/qt-everywhere-opensource-src-4.8.7.tar.gz.mirrorlist
# https://www.programering.com/a/MjM3kjNwATA.html
wget http://download.qt.io/archive/qt/4.8/4.8.7/qt-everywhere-opensource-src-4.8.7.tar.gz
tar -zxvf qt-everywhere-opensource-src-4.8.7.tar.gz && cd qt-everywhere-opensource-src-4.8.7/
echo 'yes' | ./configure  -opensource -shared -no-pch -no-javascript-jit -no-script
sed -i 's|view()->selectionModel()->select(index, QItemSelectionModel::Columns \& QItemSelectionModel::Deselect);|view()->selectionModel()->select(index, static_cast<QItemSelectionModel::SelectionFlags>(QItemSelectionModel::Columns \& QItemSelectionModel::Deselect));|g' ./src/plugins/accessible/widgets/itemviews.cpp
gmake -j4
gmake install
ln -s /usr/local/Trolltech/Qt-4.8.7/lib/libQtCore.so.4 /usr/lib64/libQtCore.so.4
cd ..

# Create installation folder
mkdir -pv /opt/rsa-gia/bin /etc/opt/rsa-gia /var/log/rsa-gia

# Copies of binaries from CentOS 6 instance of Viper
cp -Rv rsa-gia/dist/centos6-binaries/* /opt/rsa-gia/bin

# Add java to system path in /etc/profile.d
echo 'export PATH="$PATH:/opt/java/java_default/bin:/opt/rsa-gia/bin"' > /etc/profile.d/rsagia.sh
echo 'export JAVA_HOME=/usr/java/jdk1.8.0_45' >> /etc/profile.d/rsagia.sh
source /etc/profile.d/rsagia.sh

# Install file manager tools
git clone https://github.com/Topp-Roots-Lab/rsa-tools.git
pip2 install -r rsa-tools/requirements.txt
mkdir -pv /opt/rsa-gia/bin/importer /opt/rsa-gia/bin/file-handlers /opt/rsa-gia/bin/gia-programs/quality-control/qc
cp -Rv rsa-tools/Importer/* /opt/rsa-gia/bin/importer/
cp -Rv rsa-tools/FileHandlers/* /opt/rsa-gia/bin/file-handlers/
cp -Rv rsa-tools/QualityControl/* /opt/rsa-gia/bin/gia-programs/quality-control/qc/

# Compile permission elevation scripts and set setuid
g++ /opt/rsa-gia/bin/importer/rsa-mv2orig-launcher.cpp -o /opt/rsa-gia/bin/importer/rsa-mv2orig-launcher
chown -v rsa-data:rootarch /opt/rsa-gia/bin/importer/rsa-mv2orig-launcher
chmod -v 4750 /opt/rsa-gia/bin/importer/rsa-mv2orig-launcher
chmod -v +x /opt/rsa-gia/bin/importer/rsa-mv2orig.py

g++ /opt/rsa-gia/bin/file-handlers/rsa-renameorig-launcher.cpp -o /opt/rsa-gia/bin/file-handlers/rsa-renameorig-launcher
chown -v rsa-data:rootarch /opt/rsa-gia/bin/file-handlers/rsa-renameorig-launcher
chmod -v 4750 /opt/rsa-gia/bin/file-handlers/rsa-renameorig-launcher
chmod -v +x /opt/rsa-gia/bin/file-handlers/rsa-renameorig.py

chown -v rsa-data:rootarch /opt/rsa-gia/bin/gia-programs/quality-control/qc/all_qc_folder.py
chmod -v +x /opt/rsa-gia/bin/gia-programs/quality-control/qc/all_qc_folder.py

# Setup data folders and set ownership & permissions
rsa-create-orig
echo 'yes' | rsa-setrights-orig
echo 'yes' | rsa-setrights-proc
chown -Rc rsa-data:rootarch /data
chmod -Rv a-x+X,u-x+rwX,g-swx+rwX,o-wx+rX /data

# Install templates into data folder
src_tmplt='/opt/rsa-gia/bin/rsa-gia-templates/*'
dest_tmplt='/data/rsa/rsa-gia-templates'
chown -v rsa-data:rootarch "$dest_tmplt"
chmod -v 2750 "$dest_tmplt"
cp -Rv $src_tmplt $dest_tmplt
# directories
find $dest_tmplt -mindepth 1 -type d -exec chown -v rsa-data:rootarch '{}' \;
find $dest_tmplt -mindepth 1 -type d -exec chmod -v 2750 '{}' \;
# files
find $dest_tmplt -mindepth 1 -type f -exec chown -v rsa-data:rootarch '{}' \;
find $dest_tmplt -mindepth 1 -type f -exec chmod -v 640 '{}' \;
rm -rvf /opt/rsa-gia/bin/rsa-gia-templates /opt/rsa-gia/bin/rsa-install-rsagiatemplates rsa-create-rsadata-rootarchrsa-mv2orig

# Create rsa-gia application shortcut
cp -Rv rsa-gia/dist/rsa-gia.desktop /usr/share/applications/

# Move configuration files
mv -v /opt/rsa-gia/bin/gia-java/default.properties /etc/opt/rsa-gia

# Manually create data foldres in /data/rsa/to_sort and assign appropriate
# permissions
# Placeholder script for testing
mkdir -pv /data/rsa/to_sort/root
chown -Rv rsa-data:rootarch /data/rsa/to_sort/
chmod -Rv a-x,u-x+rwX,g-wx+rX,o-rw+X /data/rsa/to_sort/

# Copy over extra templates
yes | cp -Rvf rsa-gia/dist/rsa-gia-templates /data/rsa/

# Copy application icons to pixmaps folder
cp -Rv rsa-gia/dist/rsa-gia.png /usr/share/pixmaps/Must be using a desktop environment--i.e., TigerVNC
Qt5.9 Module Selection

# Download and install dependencies
wget http://download.qt.io/archive/qt/5.9/5.9.8/qt-opensource-linux-x64-5.9.8.run
chmod +x qt-opensource-linux-x64-5.9.8.run
# Make sure to enable/select Qt 5.9.8 in component selection
./qt-opensource-linux-x64-5.9.8.run

git clone https://github.com/cnr-isti-vclab/meshlab.git --branch master --single-branch
git clone https://github.com/cnr-isti-vclab/vcglib.git --branch devel --single-branch

# Build Meshlab from source
QMAKE_FLAGS=('-spec' 'linux-g++' 'CONFIG+=release' 'CONFIG+=qml_release' 'CONFIG+=c++11' 'QMAKE_CXXFLAGS+=-fPIC' 'QMAKE_CXXFLAGS+=-std=c++11' 'QMAKE_CXXFLAGS+=-fpermissive' 'INCLUDEPATH+=/usr/include/eigen3' "LIBS+=-L`pwd`/lib/linux-g++")
MAKE_FLAGS=('-j4')
dnf install -y qt5-qtbase qt5-qtbase-devel qt5-qtscript qt5-qtscript-devel qt5-qtxmlpatterns qt5-qtxmlpatterns-devel mesa-libGLU mesa-libGLU-devel
ln -s /opt/Qt5.9.8/5.9.8/gcc_64/bin/qmake /usr/local/bin/qmake

pushd meshlab/src/external
qmake external.pro ${QMAKE_FLAGS[@]} && make ${MAKE_FLAGS[@]}

cd ../common
qmake common.pro ${QMAKE_FLAGS[@]} && make ${MAKE_FLAGS[@]}

cd ..
qmake meshlab_full.pro ${QMAKE_FLAGS[@]} && make ${MAKE_FLAGS[@]}
mkdir -p /opt/meshlab
cp -Rv distrib/* /opt/meshlab
popd

# Add to PATH
ln -sv /opt/meshlab/meshlab /usr/local/bin/meshlab
ln -sv /opt/meshlab/meshlabserver /usr/local/bin/meshlabserver
ln -sv /opt/meshlab/libcommon.so /usr/lib64/libcommon.so
ln -sv /opt/meshlab/libcommon.so.1 /usr/lib64/libcommon.so.1

# Copy desktop entry and icon
cp -Rv operations-scripts/servers/viper/meshlab/meshlab.desktop /usr/share/applications/
cp -Rv operations-scripts/servers/viper/meshlab/meshlab.png /usr/share/pixmaps/
echo 'model/vrml=meshlab.desktop' >> /usr/share/applications/mimeapps.listhttps://www.maizegenetics.net/tassel
This set up requires root access and a GUI interface. Personally, I used the default values and installed the program into /opt and creating symlinks in /usr/local/bin.
wget https://tassel.bitbucket.io/installer/TASSEL_5_unix.sh
chmod +x TASSEL_5_unix.sh
./TASSEL_5_unix.shhttps://github.com/lh3/minimap2
curl -L https://github.com/lh3/minimap2/releases/download/v2.17/minimap2-2.17_x64-linux.tar.bz2 | tar -jxvf -
mv -v minimap2-2.17_x64-linux/* /opt/minimap2
echo 'export PATH="$PATH:/opt/minimap2"' >> /etc/profile.d/minimap2.sh
echo 'export LD_LIBRARY_PATH="/opt/minimap2"' >> /etc/profile.d/minimap2.sh
source /etc/profile.d/minimap2.shhttps://github.com/nanoporetech
Guppy is a priorioty software and requires a log in to download its installation file. As a workaround, a copy of the installation file(s) is stored in the lab's share on the Center cluster.
tar -zxvf /shares/ctopp_share/data/repos/guppy/ont-guppy-cpu_3.2.1_linux64.tar.gz -C /opt
echo 'export PATH="$PATH:/opt/guppy"' >> /etc/profile.d/guppy.sh
echo 'export LD_LIBRARY_PATH="/opt/guppy"' >> /etc/profile.d/guppy.sh
source /etc/profile.d/guppy.shhttps://github.com/fenderglass/Flye
git clone https://github.com/fenderglass/Flye
cd Flye
python setup.py installTBD
# Install miniconda
wget https://repo.anaconda.com/miniconda/Miniconda3-latest-Linux-x86_64.sh | bash
# https://docs.conda.io/projects/conda/en/latest/user-guide/configuration/admin-multi-user-install.html

# Configure miniconda to include bioconda channel
# Set up bioconda
conda config --add channels biocondacurl -sL https://rpm.nodesource.com/setup_10.x | sudo bash -
yum install nodejs
npm install -g n
n latestvagrant plugin install vagrant-vbguest
vagrant upPlease create an issue to report any issues or errors you encounter while following this guide.
JavaFX library was removed in later versions, and it is a required dependency. It appears that JavaFX is not free for newer versions.
Originally, the application was installed into /opt/local/bin. I believe that the Filesystem Hierarchy Standard has changed since RSA-GiA original development. It seems like /opt/local/bin does not follow the current FHS, so I am choosing to place the files into /opt/rsa-gia. As such, must be added to PATH, and is done using /etc/profile.d
That being said, you could consider adding symlinks into the /usr/local/bin folder instead of adding /opt/rsa-gia to PATH.
Below is a list of files that have not changed from rsa-pipeline-2 installation and those found in /opt/local/bin/ on the CentOS 6.6 instance of viper.datasci.danforthcenter.org
checksum                          filepath
---                               ---
f1f1c86ab03226b10cc2ef48bc1e27a8  ./gia/rio2.zip
8bf7ce3c305533055691684edeb92b41  ./gia/readme.txt
46b0f7ff00f52d906b519780f9e521df  ./gia/authors.txt
0c960c799dc2198e0d7f180dd0b1ba68  ./gia/list_licenses.txt
fa7568429c94a676bc6417bdf47a4271  ./gia/settings.xml
d52c996c9fc43fd326c73637cd51e059  ./gia/copyright.txt
9ce5a0a21fe6256073a9e2a1ed0d0db2  ./gia/gia.log
84271c6175f6cfbd40e584482e0052bc  ./gia/interpreter
c3ba9125d03dca852be495de03433de0  ./gia/giaroots
261a52eac7cf229a435bcdfeeabc4508  ./rsa-fix-GLIBCXX_3.4.11-not_found-problem
01755093c5305029fd29371d70f8d578  ./rsa-chkrights-proc
8b6831c02a6faad854a3310e4acc27ed  ./rsa-chkrights-orig
f2409716c87609bf9df61057ef9ea9f7  ./skeleton3D/Skeleton
899b4676f7c440996cdd2693682f69f1  ./skeleton3D/rsa-pipeline-license.txt
f5da9e913756e1679a97a64558fe432f  ./rsa-create-rsadata-rootarch
4613660687de1a78a781fd214175adfc  ./rsa-pipeline-contributors.txt
f6b69096d34b1072b6e5fca97d770c95  ./rsa-setrights-orig
6de709f749b810b0c9f991f9f6a33a96  ./rsa-reconstruction3D
9843428df23f3383f13cf686cff98fc1  ./reconstruction3D-stl/recon-v4-stl
899b4676f7c440996cdd2693682f69f1  ./reconstruction3D-stl/rsa-pipeline-license.txt
71fdca3474ed993e626276d2c64a63ad  ./rsa-install-rsagiatemplates
899b4676f7c440996cdd2693682f69f1  ./rsa-pipeline-license.txt
85e2a7eda4dbf8709b86b8bf5b394763  ./rsa-skeleton3D
071f8524051589c9ab04eb07d87cc891  ./rsa-isosurface
7833abad312dd6afe8b44e41ebfc33bd  ./rsa-setrights-proc
899b4676f7c440996cdd2693682f69f1  ./reconstruction3D/rsa-pipeline-license.txt
2c4ed390ddfd56a009b6539557b9dd2a  ./reconstruction3D/Reconstruction
c469e97018e8665d00a0f6e02050784f  ./rsa-create-orig