This project is a Free to Use and Open Source under the MIT license, made in accordance with these rules.
It's a submission for the Diagrid AWS Hackathon
Covid came and went. This led to a huge lifestyle change in both individuals and organizations. Ordering stuff especially food, from home was and still is the norm.
Where i live,the concept of online delivery is still a thing of the past. It's incredibly difficult to reliably order stuff online and have it delivered to you without a ton of back and forth.
One of the main difficulty is the unknown wait times. You place an order, give your address and then pray to God. Because 7 times out of 10, the delivery agent gets your location mixed up and delivers your food elsewhere.
Most times, they have to do soo many deliveries that your food gets cold before it arrives.
You get zero observability into what location your food and delivery agent are exactly. How much time you have to wait or how long it'll take for the food to arrive.
The entire system is like most serverless apps. A black box. Zero insights into the system's internal functionality.
You just have to sit and pray everything goes smoothly and your meal arrives.
Don't get me started with "sending packages across the city".
In this workshop, we'll be looking at how to build a serverless microservice api for a realtime package delivery service using Diagrid's Catalyst API.
Catalyst helps you abstract away the complexities of building microservice architectures, by providing unified APIs for messaging, data and workflows, powered by open-source Dapr.
For Application decoupling and isolation, we will use AWS SQS/SNS as a message broker and MongoDB for state management. Both of which are supported by the Catalyst API's.
For synchronous communication between services, we will employ the Dapr request/response API, which will be elaborated on during the workshop.
Additionally, we will orchestrate payments within the API using Dapr Workflows.
Each microservice will correspond to a Catalyst App ID and will be independently deployed to AWS AppRunner using Docker and AWS Elastic Container Registry (ECR).
Finally, we'll implement a Graphql API using AWS AppSync with JavaScript Resolvers, Cognito, and AWS WAF (Web Application Firewall).
This setup will unify all AppRunner endpoints, offering real-time capabilities, security, authorization, rate limiting, and throttling.
The working Graphql API and how to deploy it can be found here
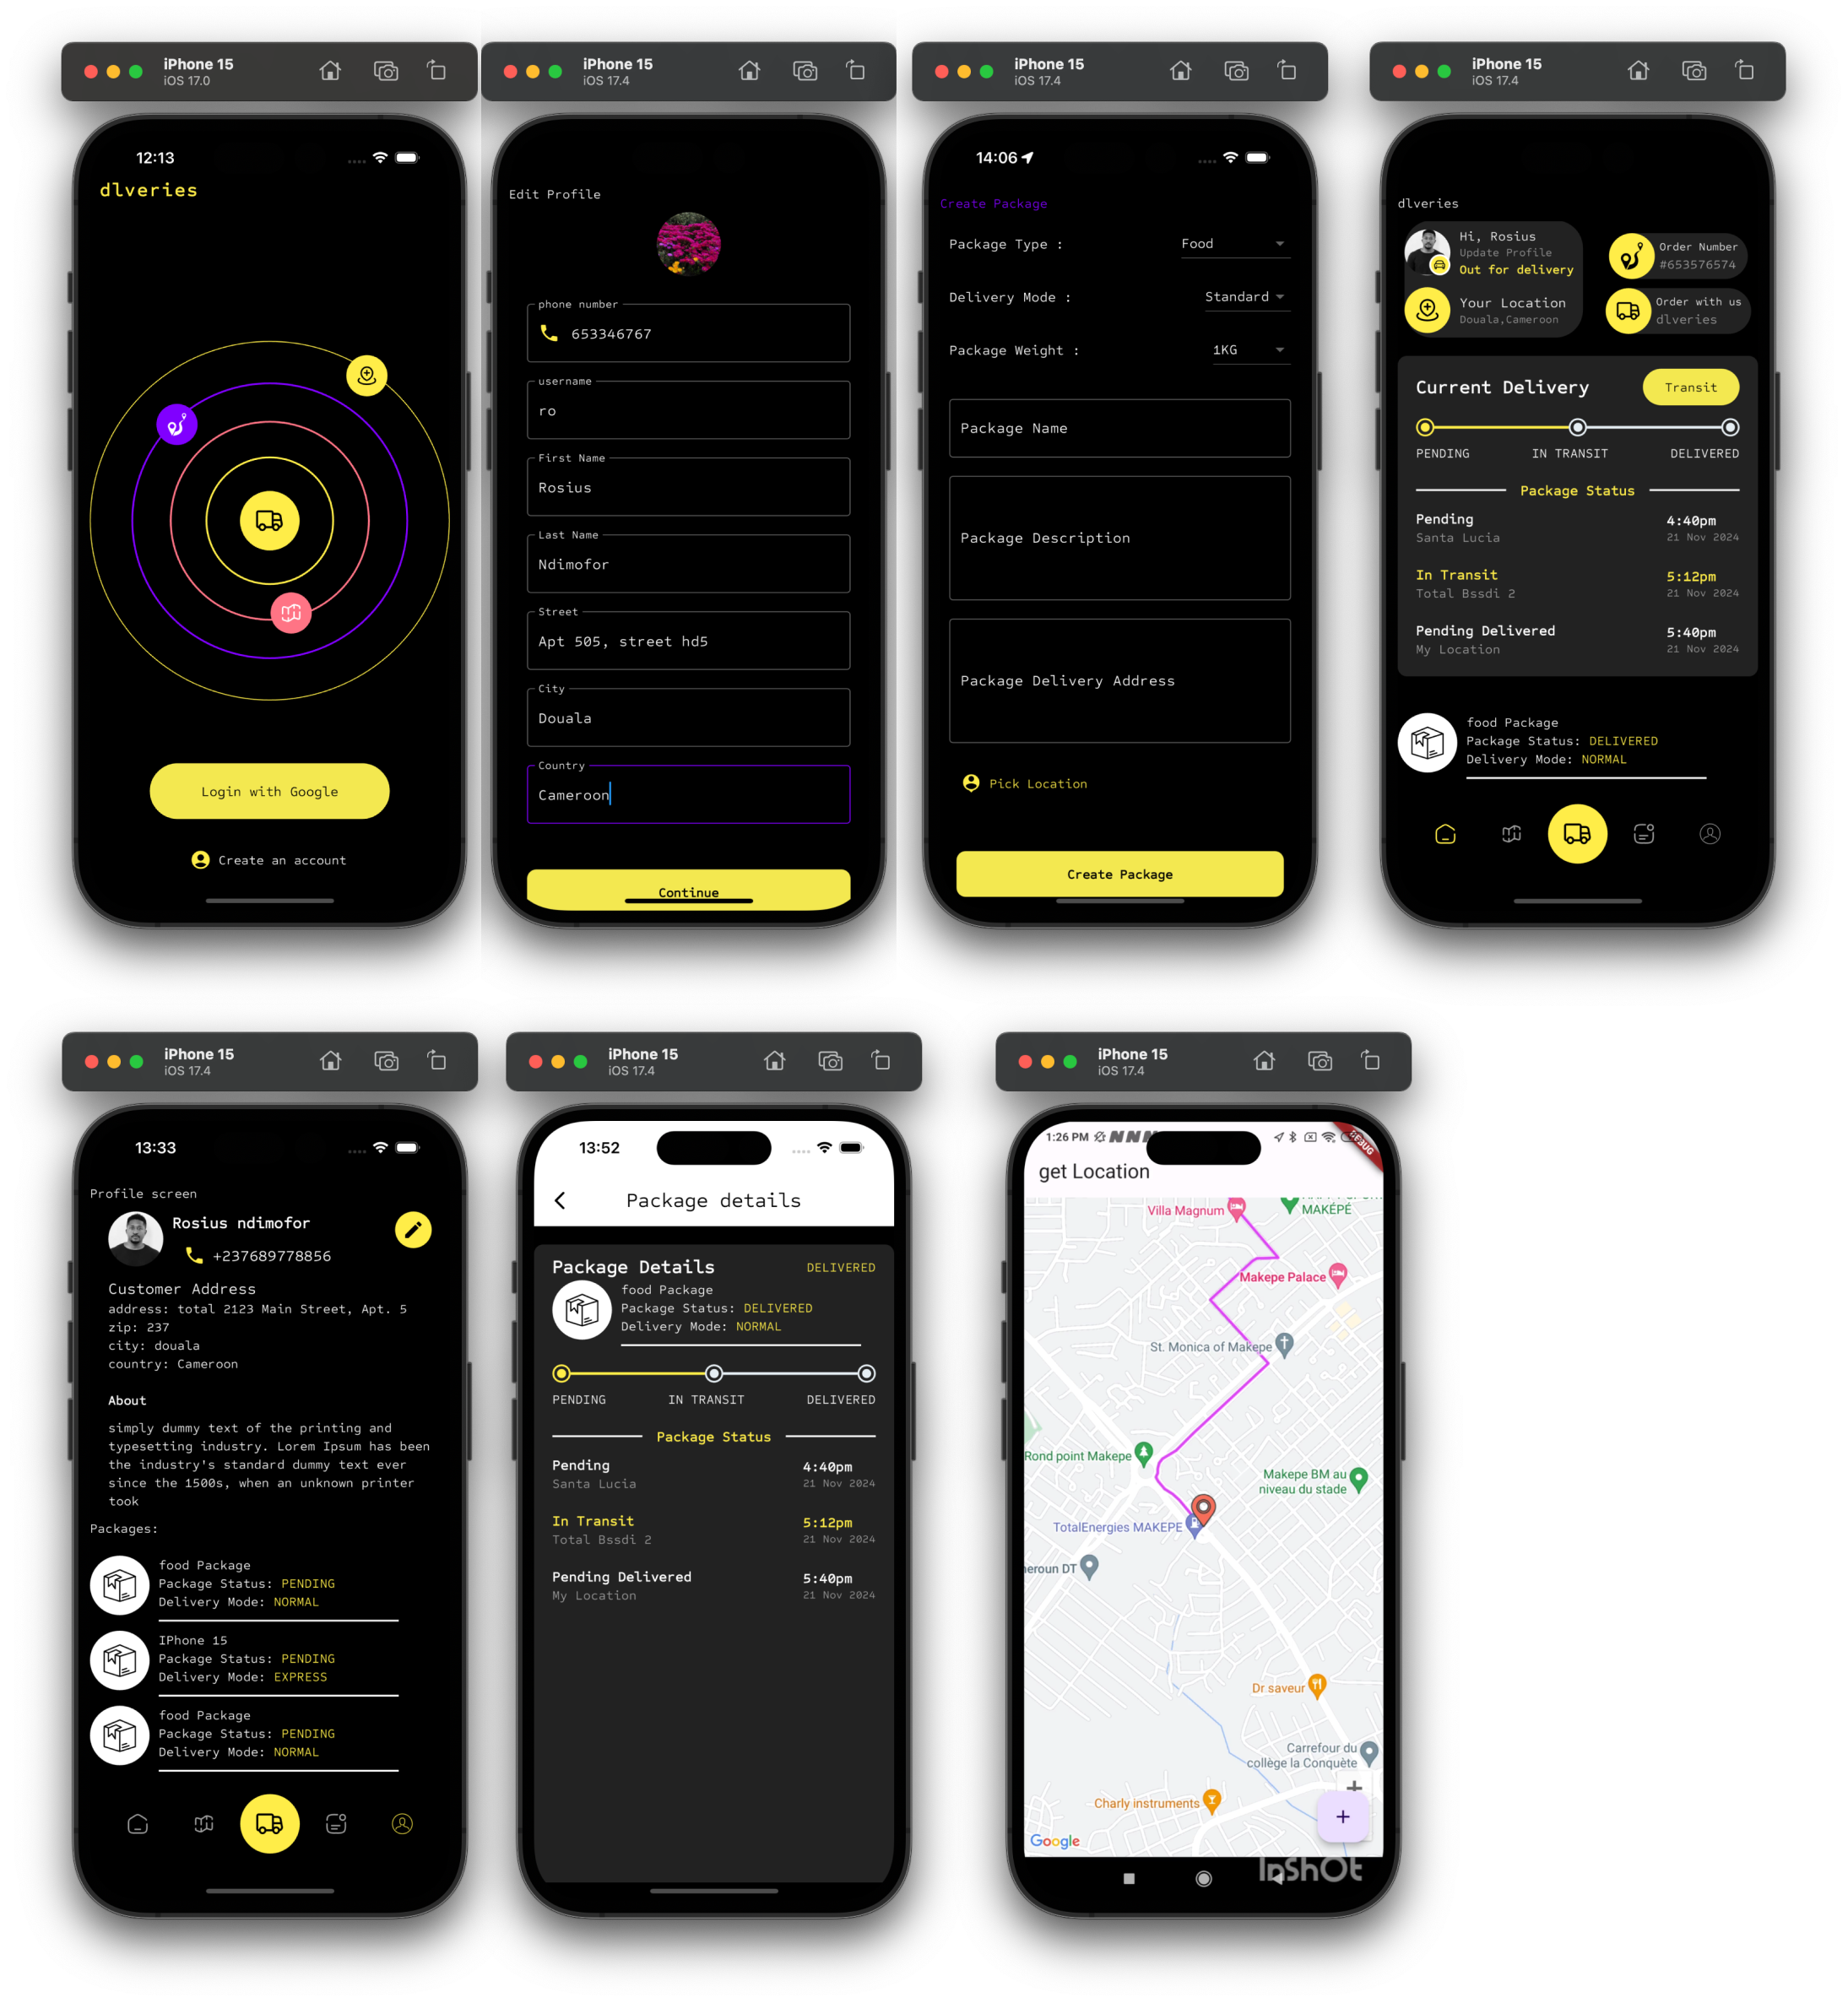
I've built a barebones mobile application to visually illustrate how to consume the GraphQL endpoint. Also, I illustrate the realtime aspect of the api, by showing a location marker moving along a polyline, across a map. Package location(longitude and latitude) updates are done every 5 seconds.
Destination location - Package location = Distance Left
Package Estimated time of arrival(ETA) can be calculated from Distance Left
package_delivery_1.mp4

Before proceeding, please ensure that you have these prerequisites installed.
- Python 3.8+(Python 3.10 is preferable)
- Vscode or Pycharm(Preferably)
I'm also assuming you already have a valid Catalyst Acccount. If you don't yet have one, joined the Catalyst early Access
# Install Dapr client SDK
pip3 install dapr

# Install Dapr gRPC AppCallback service extension
pip3 install dapr-ext-grpc
Please find more installation instructions here diagrid-catalyst
For state management, we'll use MongoDB. If you don't have a mongo db account yet, please follow this link to create one and also create a mongo db serverless instance. I'll show you how to do that below.
Once you've created a mongo db account, create a new project with any name of your choice. I'll name mine package_delivery.
Once created, click on the project name and proceed to the next screen.(Clusters).
On the far right corner of the Clusters screen, click on Create to create a new cluster. See screenshot below.

Inside the create cluster screen click on the serverless tab.
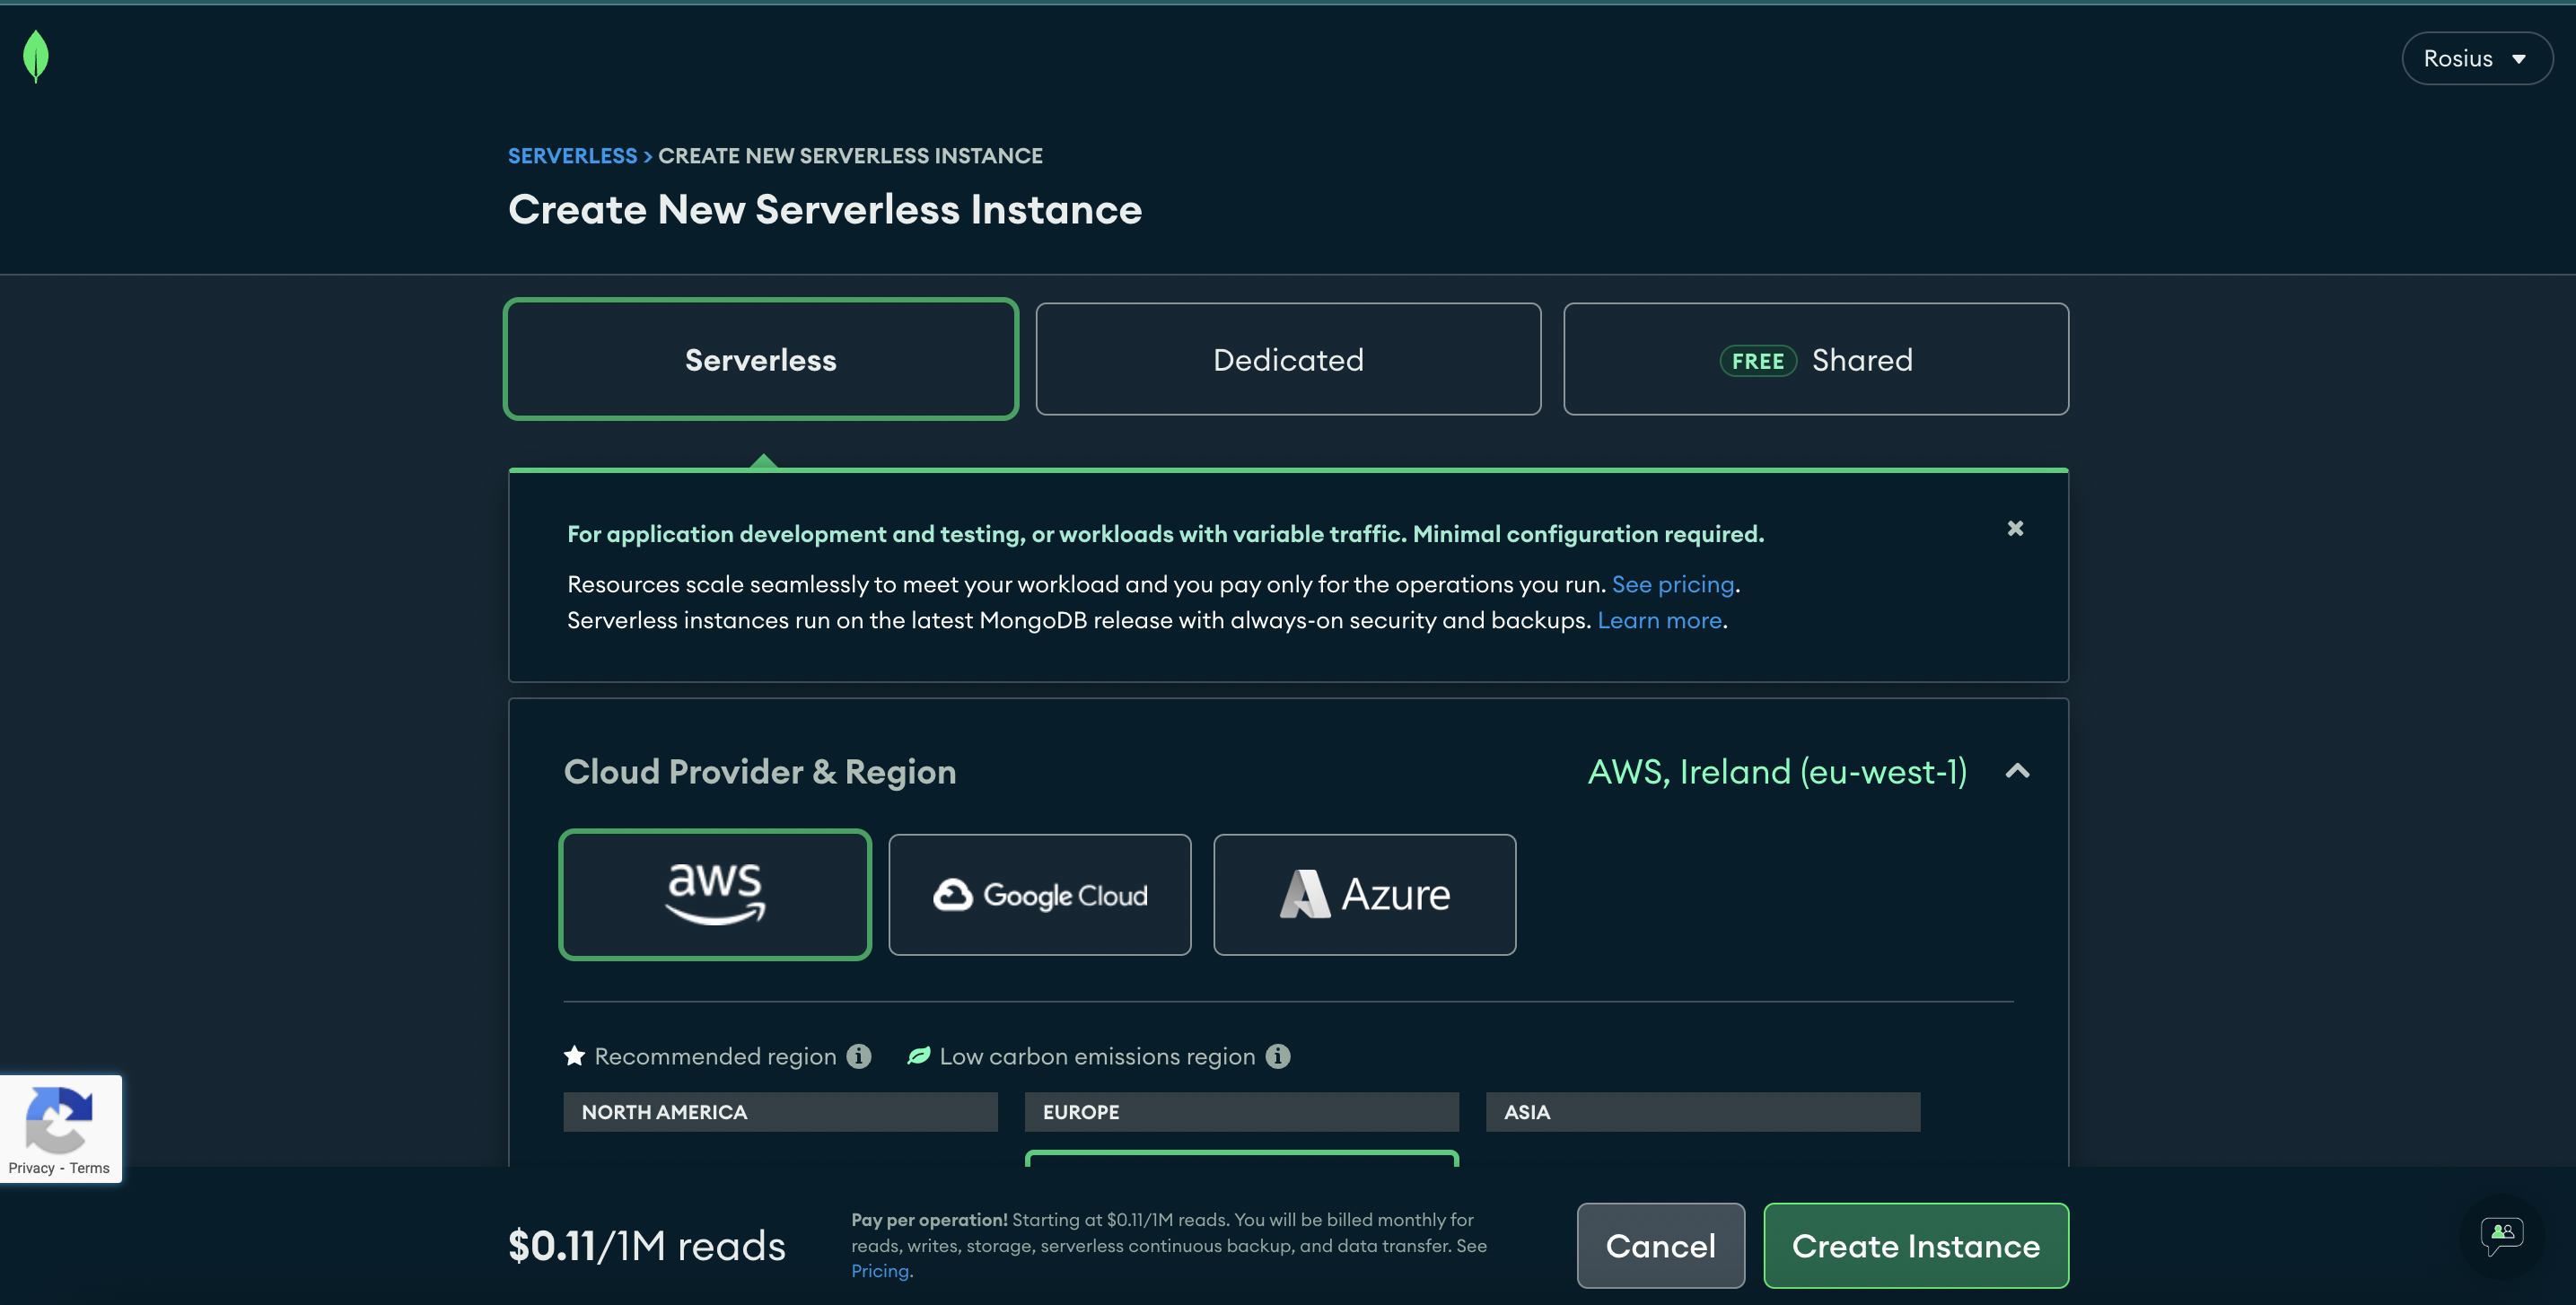
Next, give your instance a familiar name and then click on Create Instance.
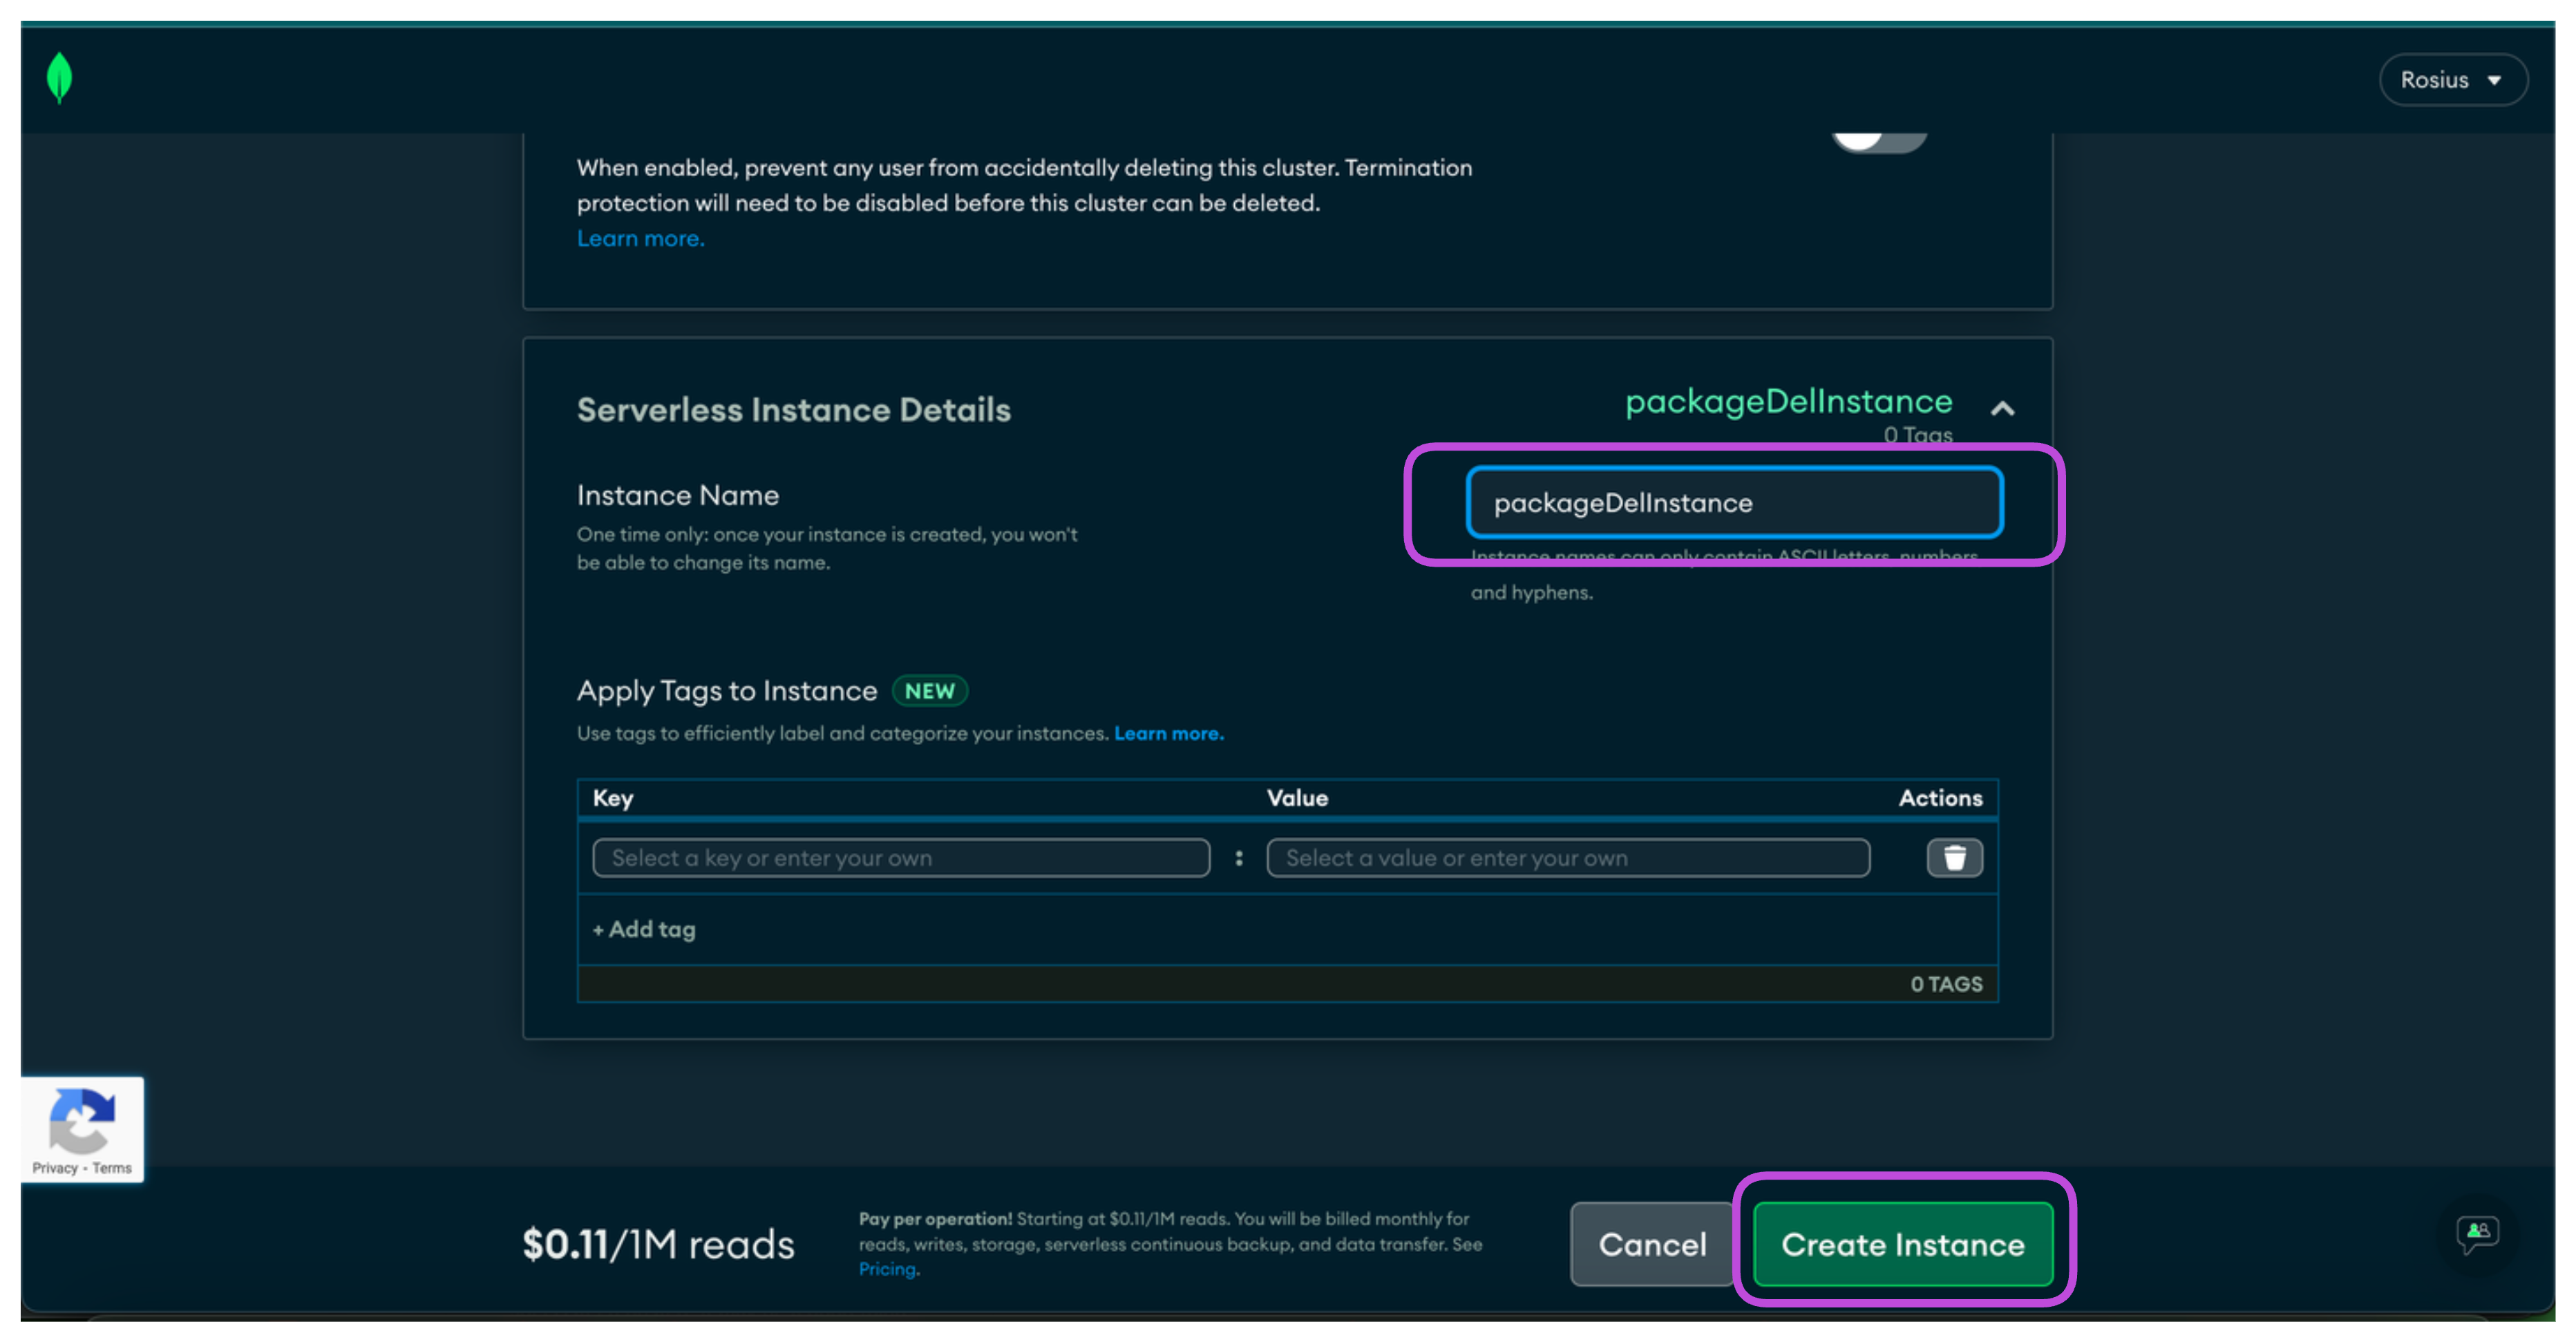
Bear in mind that you can also choose to use a shared free instance for this workshop. I used a serverless instance because i had already ran out of the free tier.
You'll need to input your credit card details before creating the serverless instance.
The next step is to create a username and password with administrative access to the instance we created above.
Under the Security tab, click on Database access and create a new
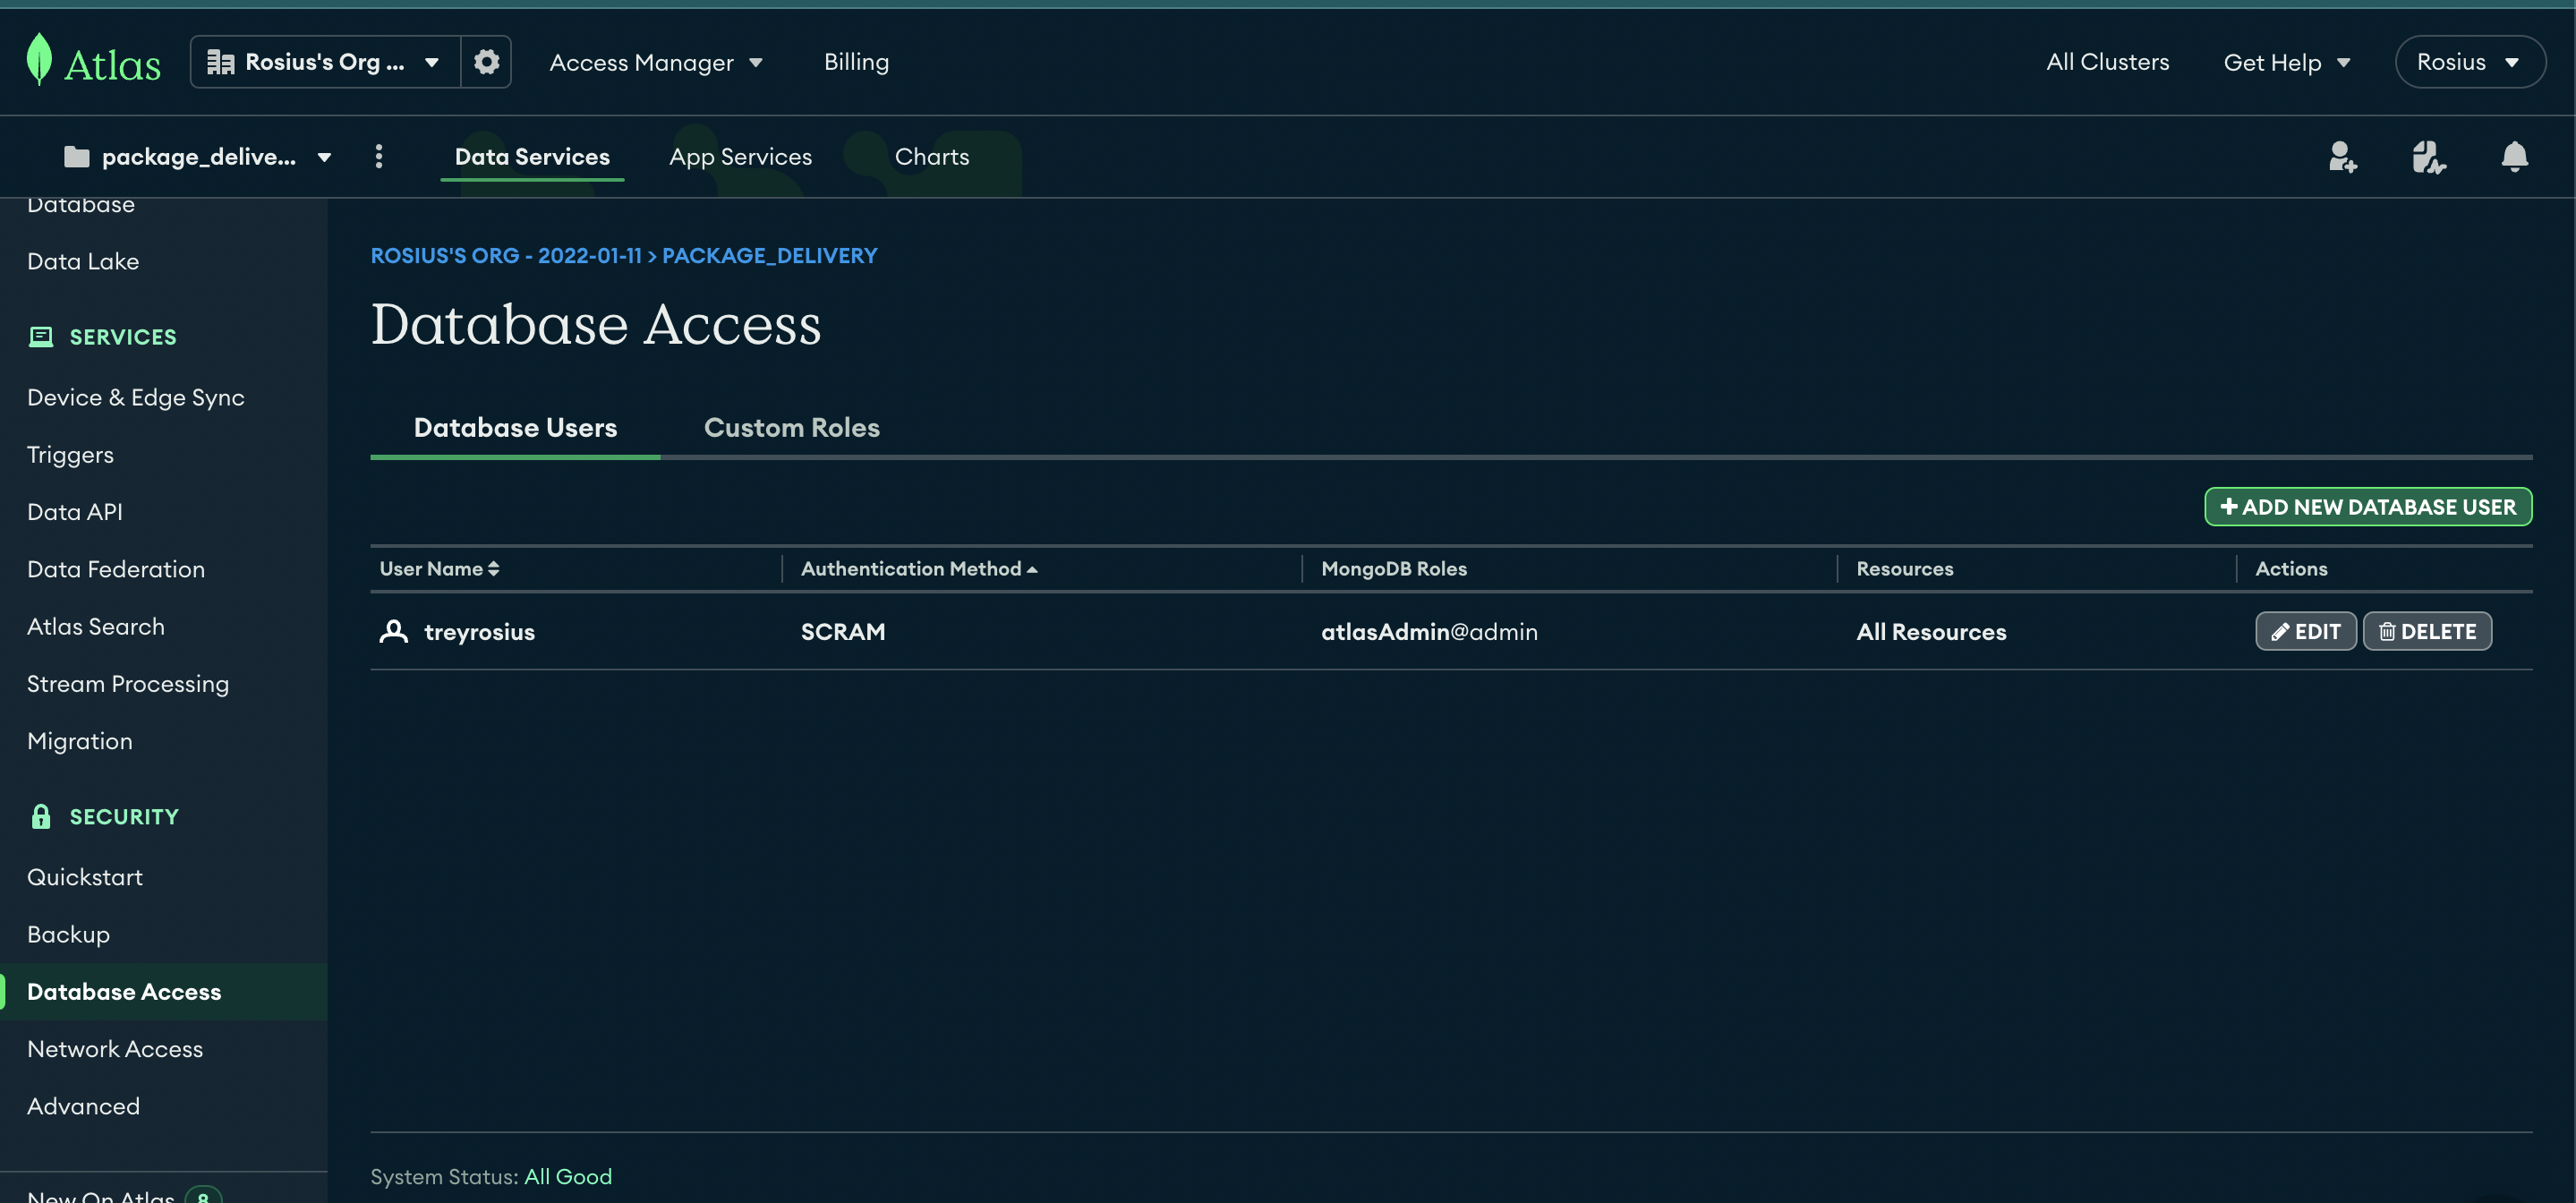
Add Password
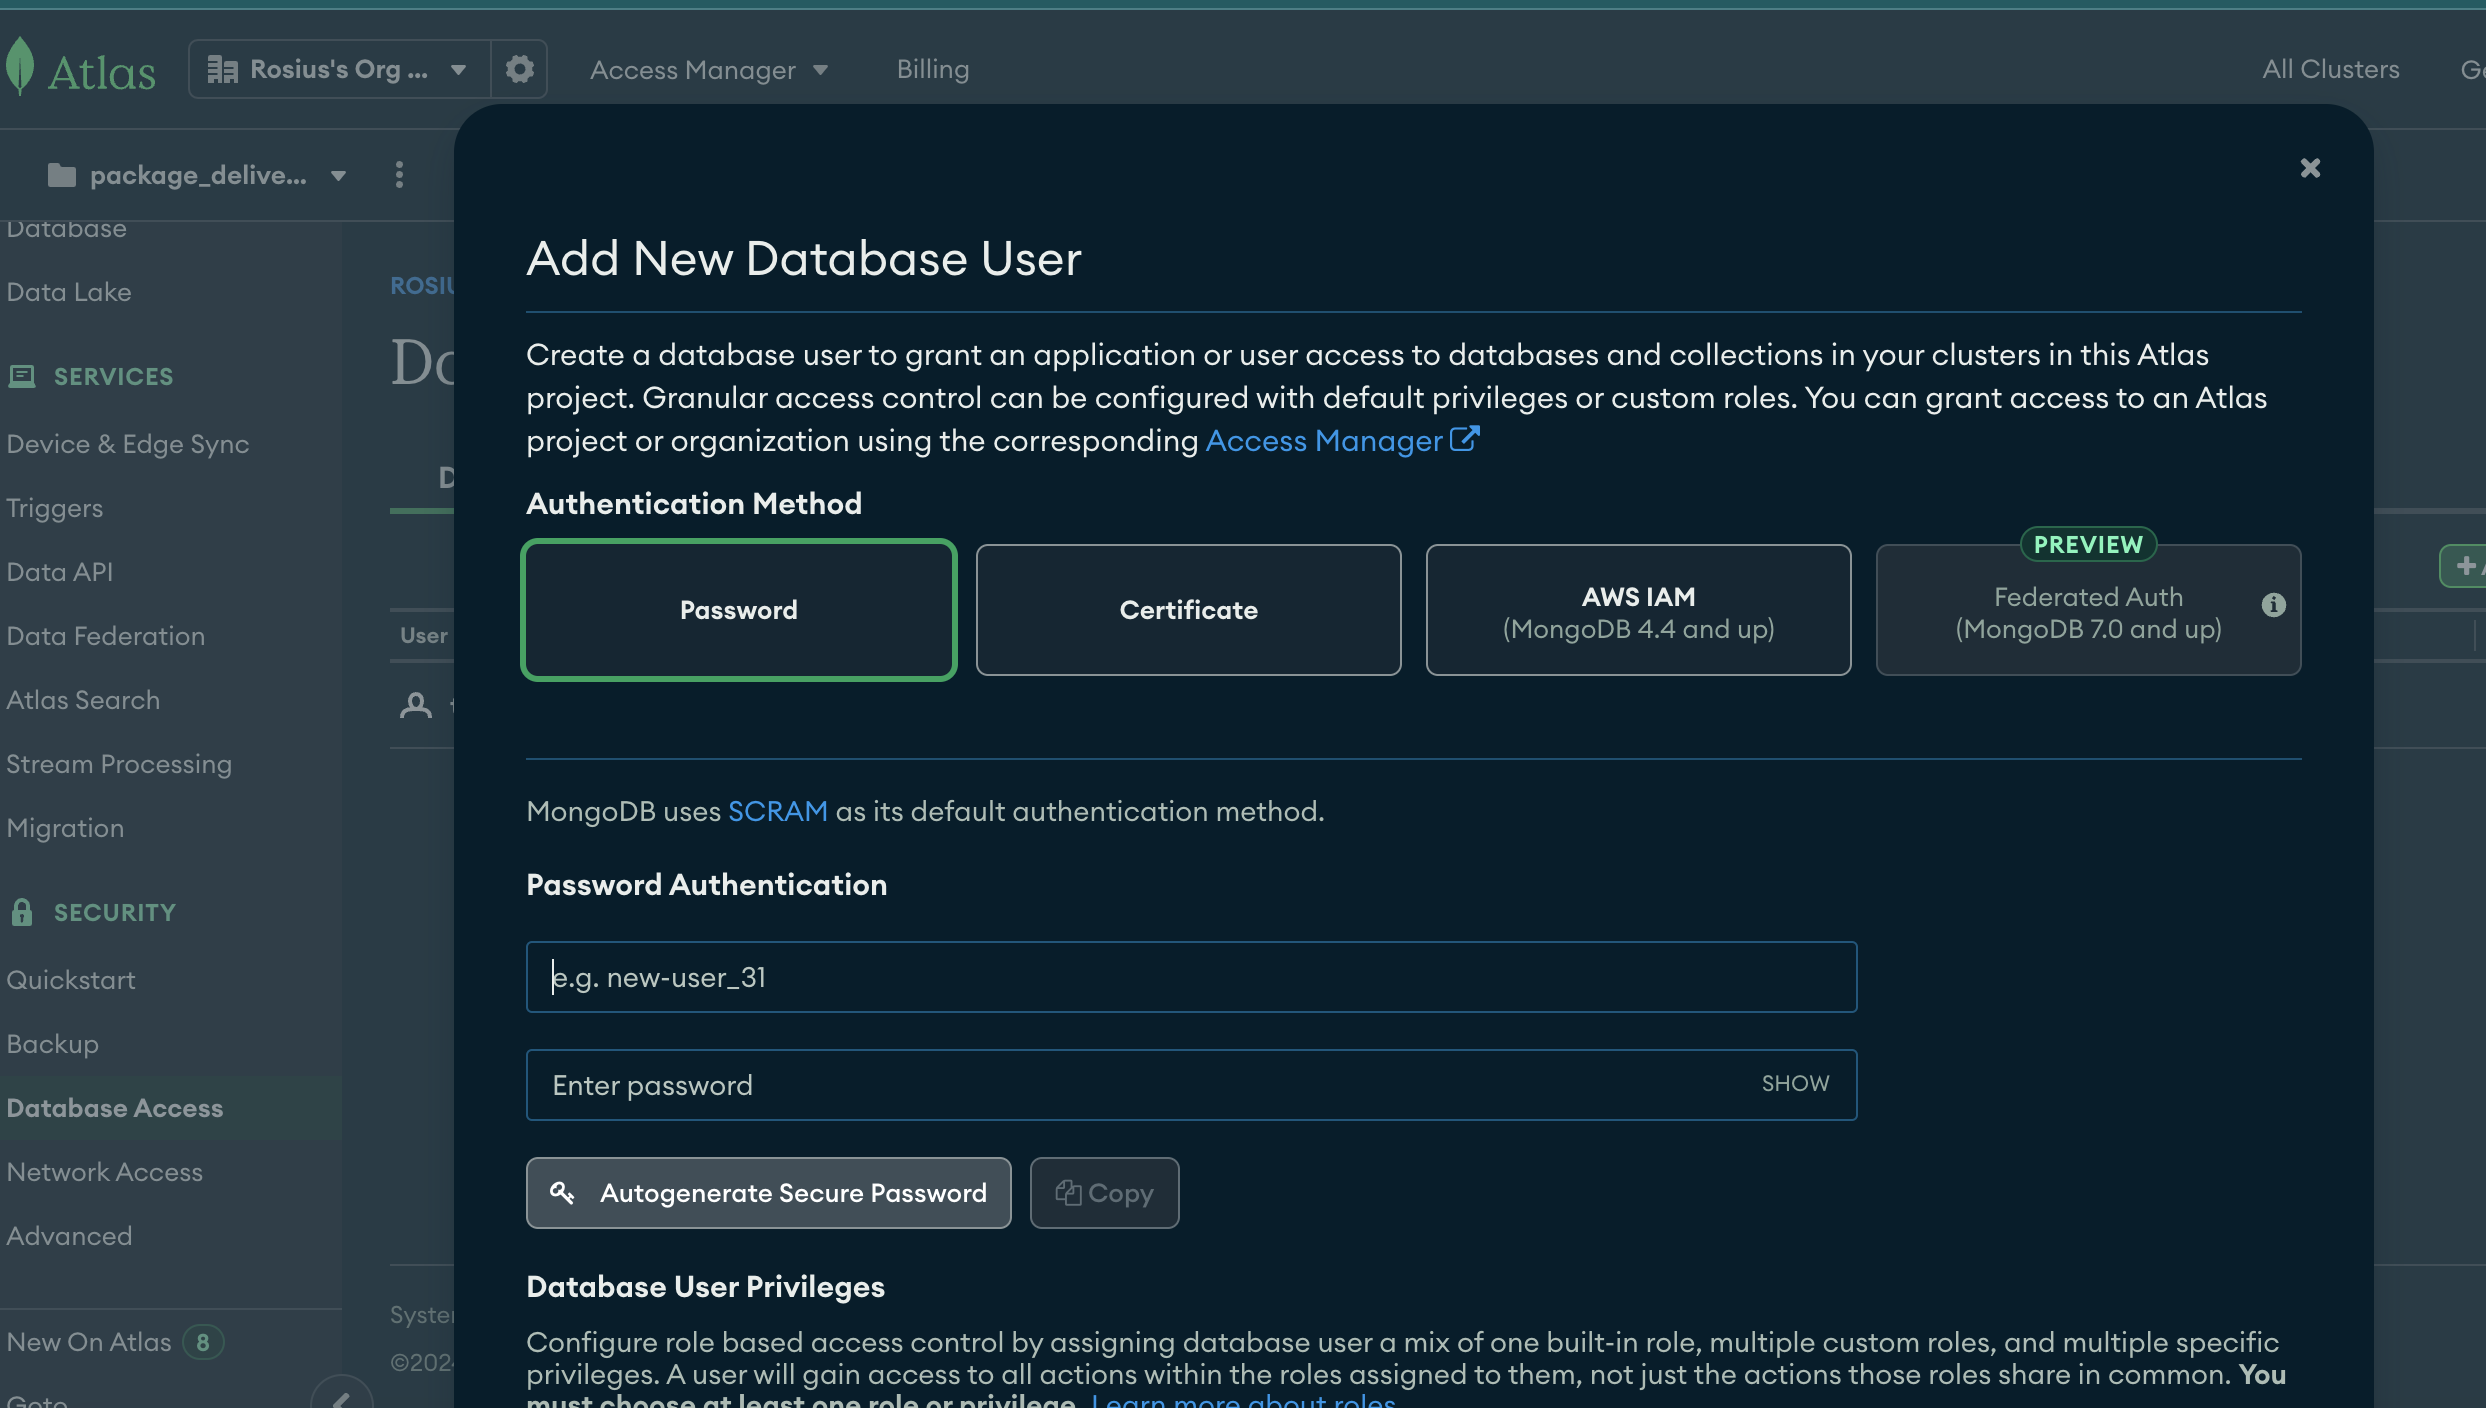
Select User Role.
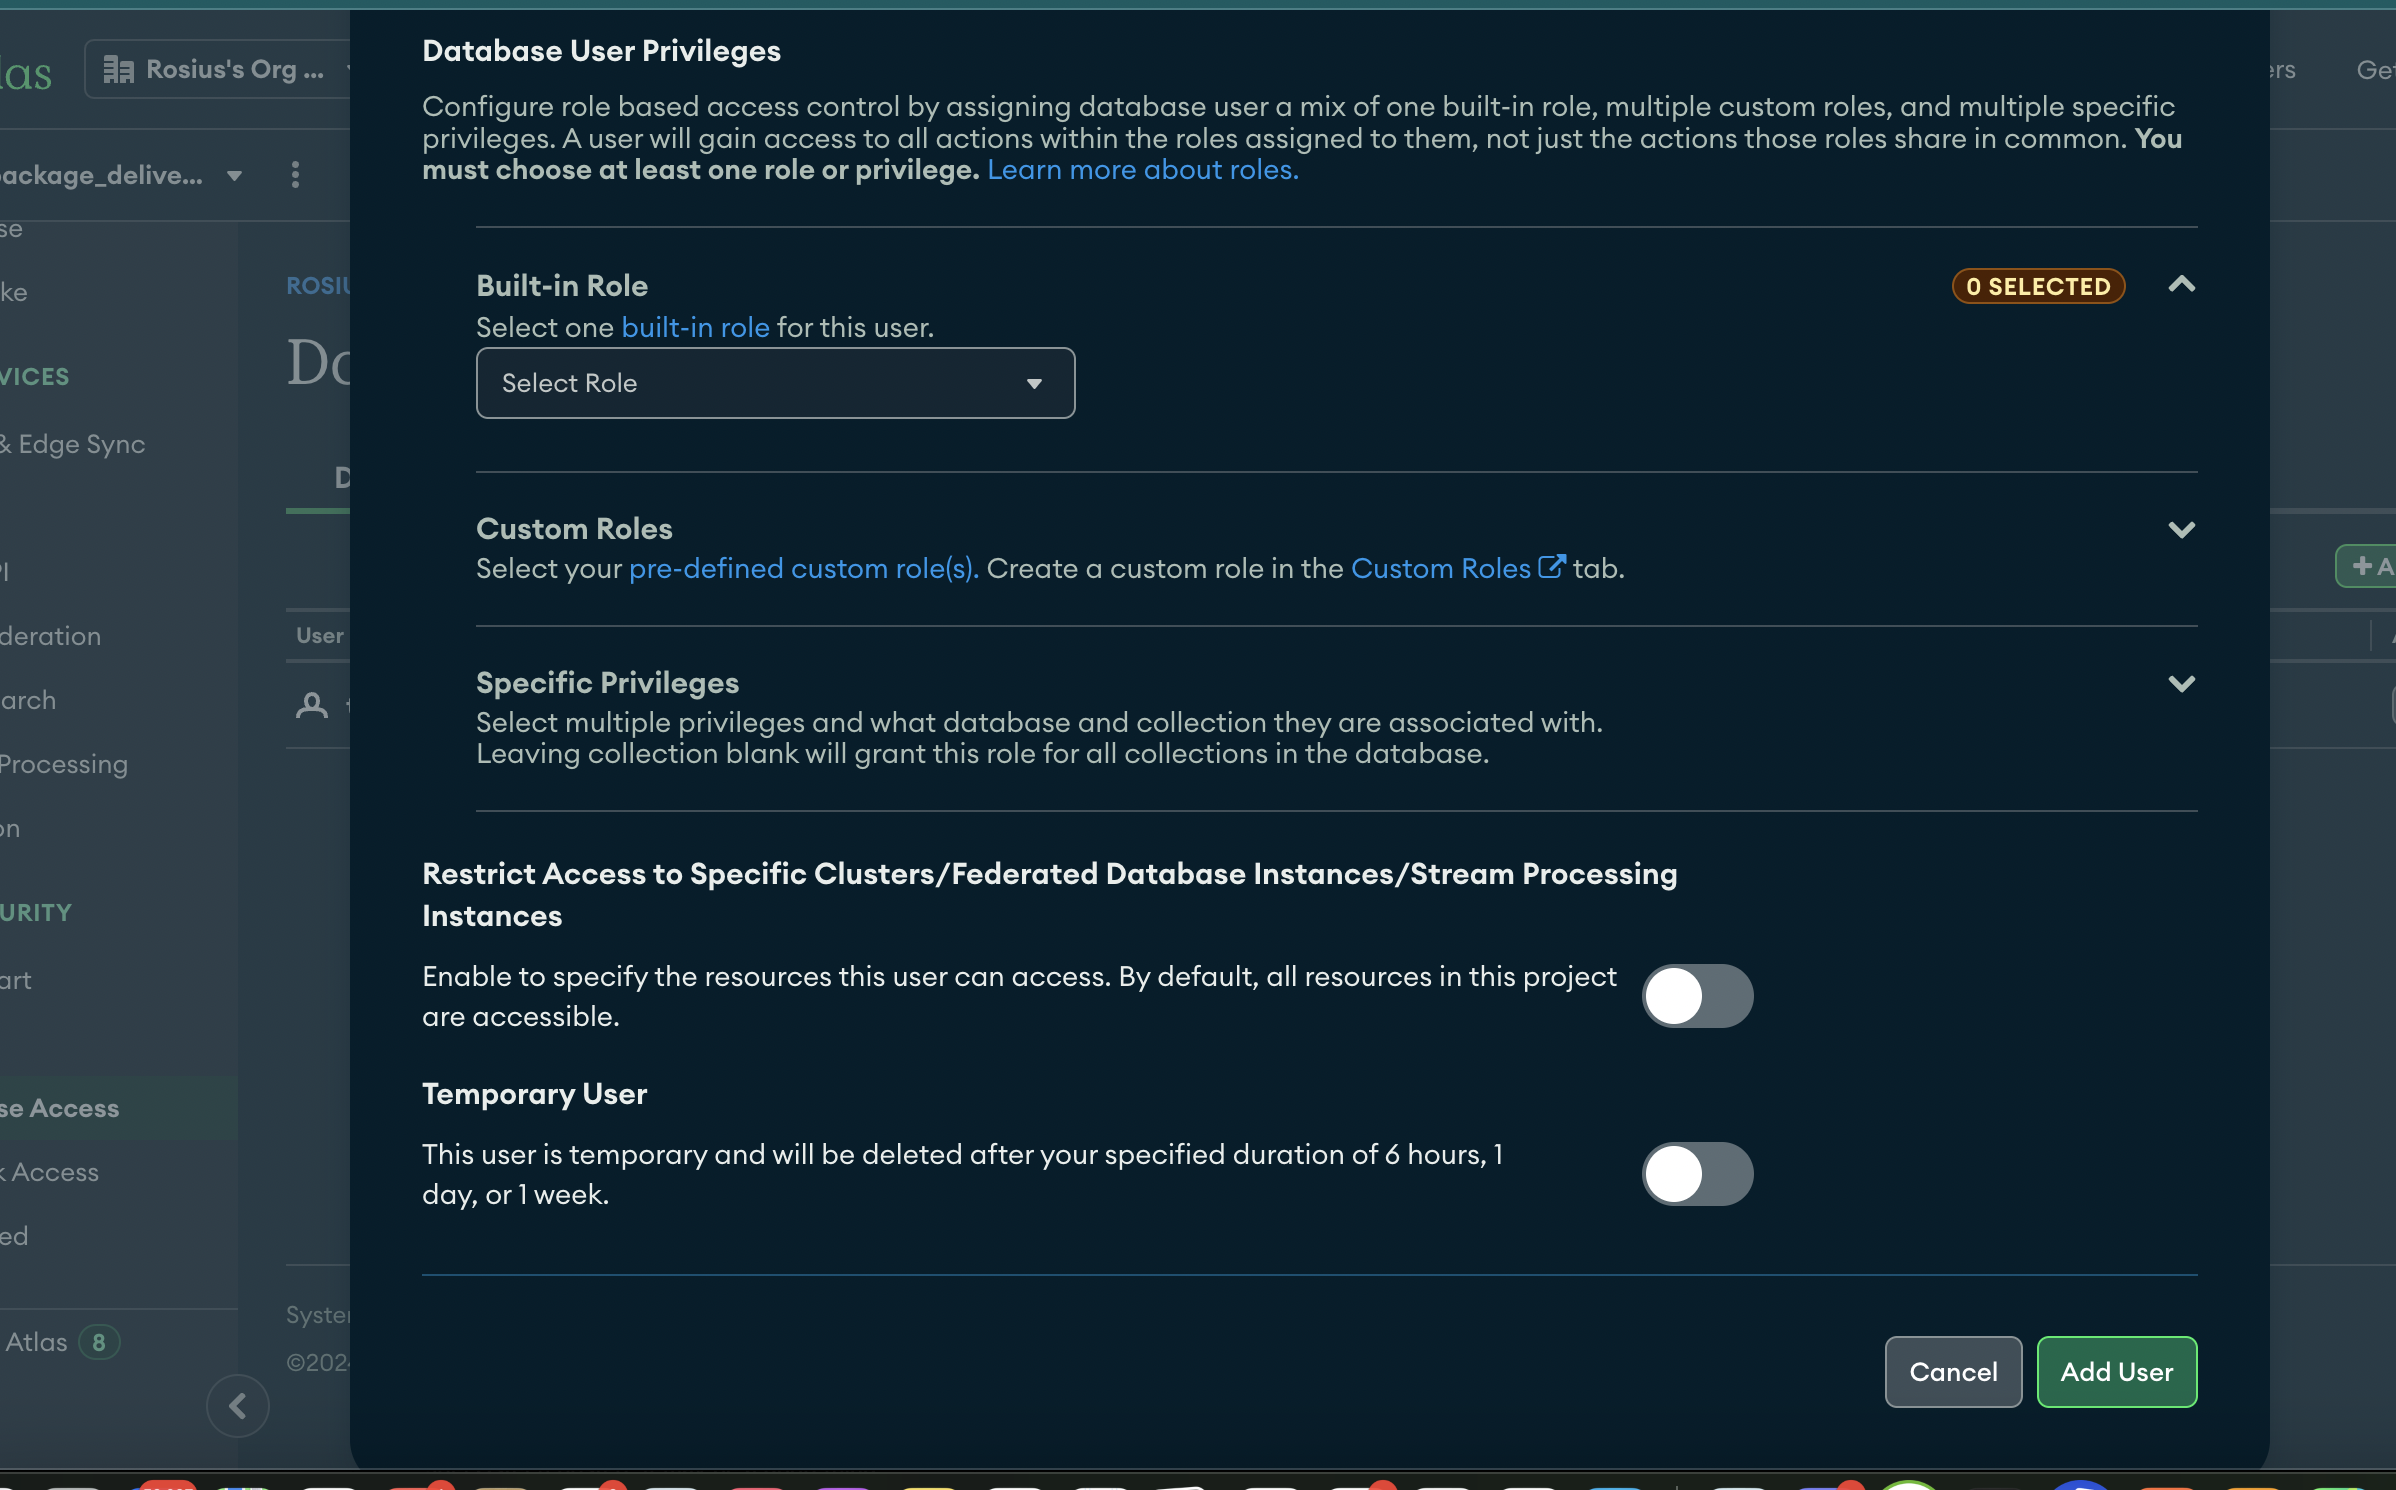
Take note of your database username and password. We'll be needed them when creating a state connection in Catalyst.
From your CLI, login to diagrid Catalyst using the following command
diagrid login
Then Confirm your login was successful
diagrid whoami
diagrid project create package-delivery-projectTo set this project as the default project in the Diagrid CLI, run:
diagrid project use package-delivery-projectCreate a new python project in pycharm, and set python version of the venv environment to 3.10.
The project should have a main.py file and a requirements.txt file for dependencies.
For this application, we'll have 6 services, each of which corresponds to a Catalyst App ID as illustrated in the image below.
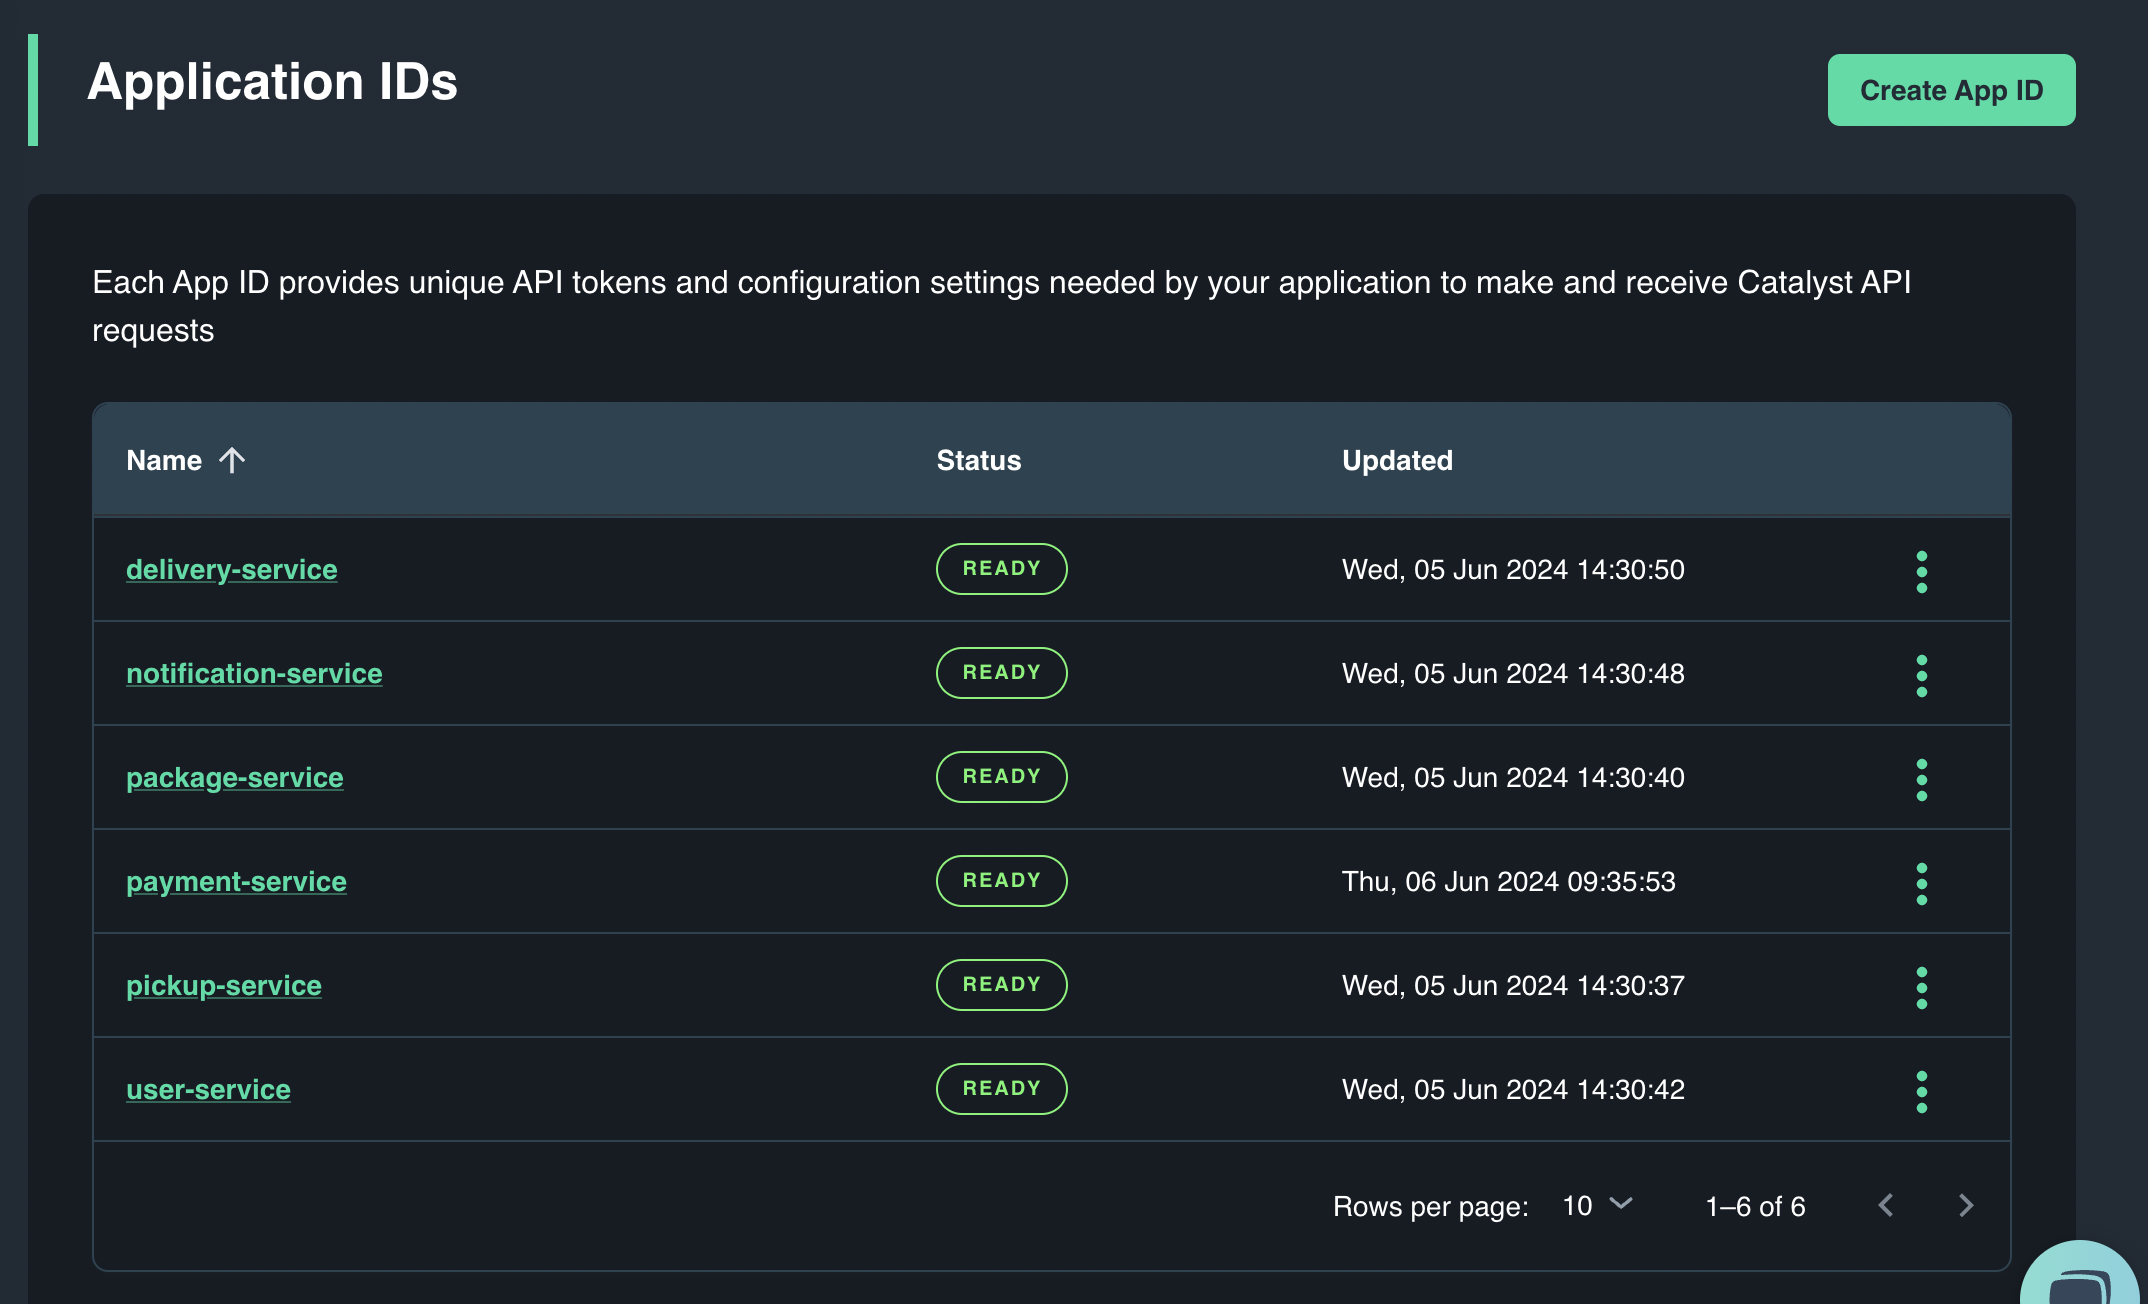
You can read more about Catalyst Application Identities here https://docs.diagrid.io/catalyst/concepts/appids
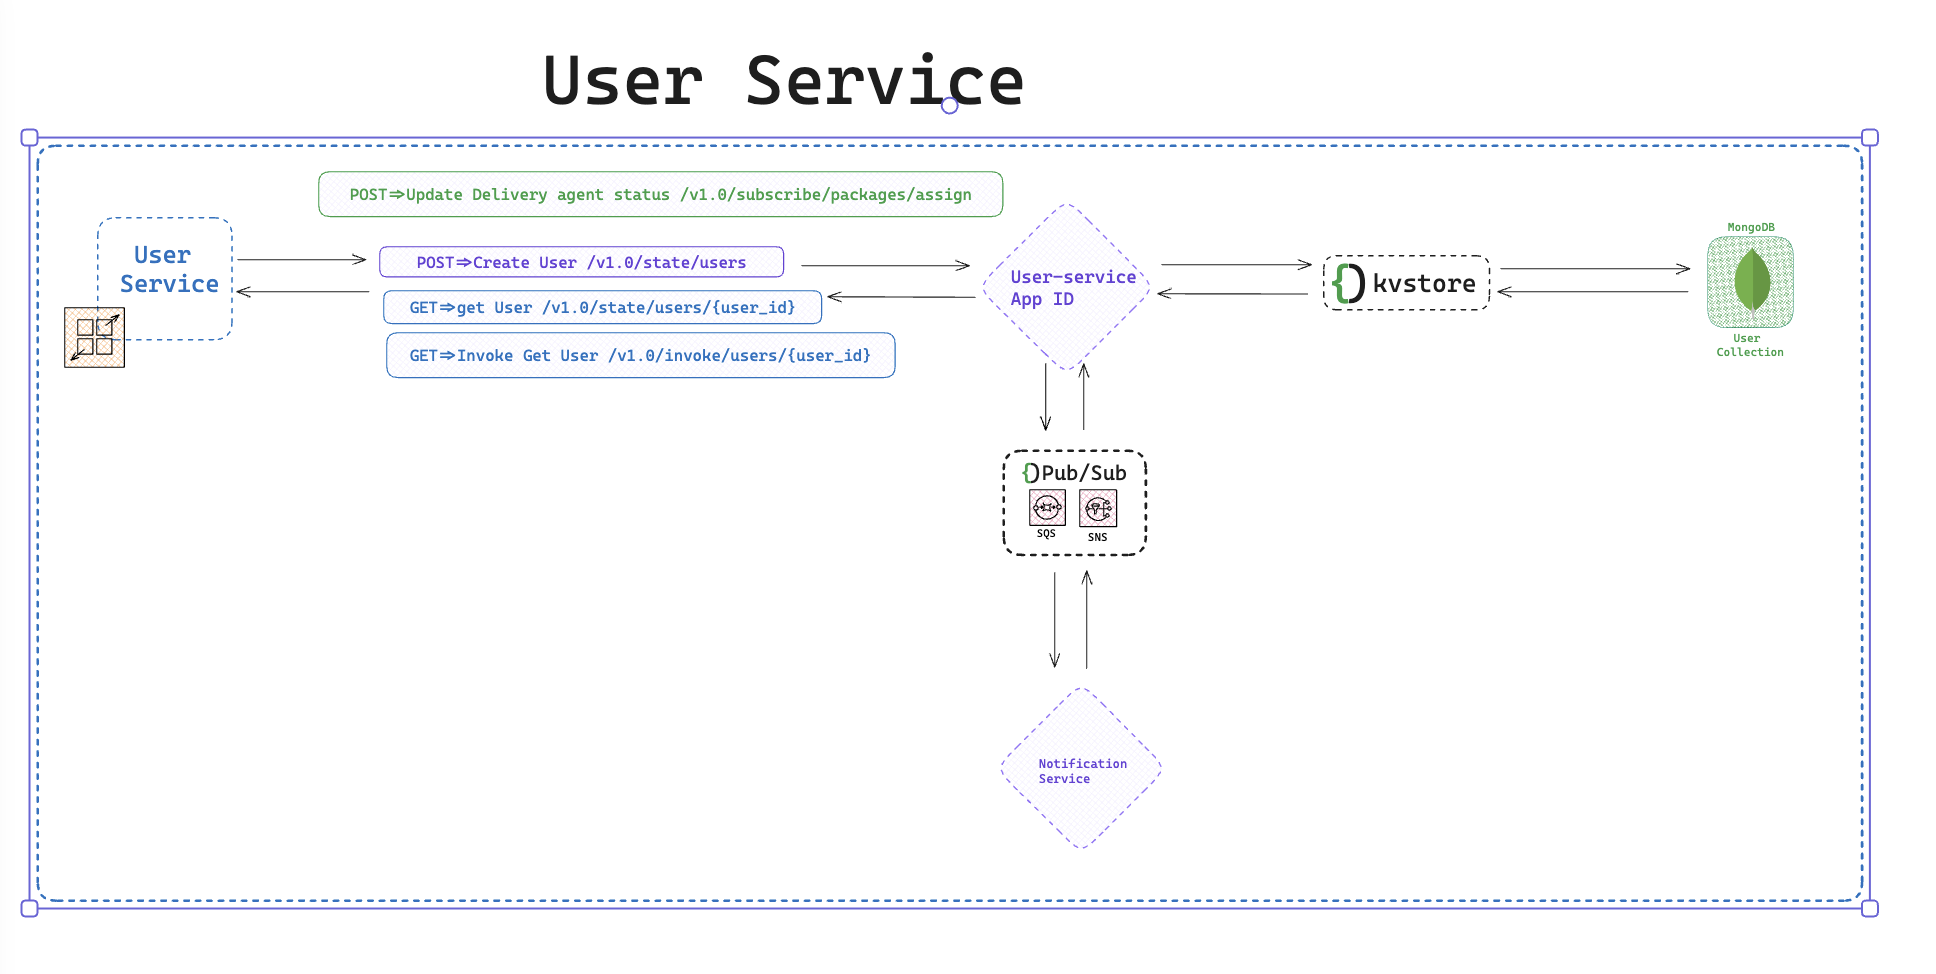
Responsible for handling User Account functionalities such as creating/updating/reading/deleting user information.
This service is also responsible for invoking requests and sending/receiving events such as
- Delivery user account created event
- User deleted Event
- Update delivery agent status event
Within your created project,from the Catalyst Interface,click on Create App ID. Name your app Id user-service.
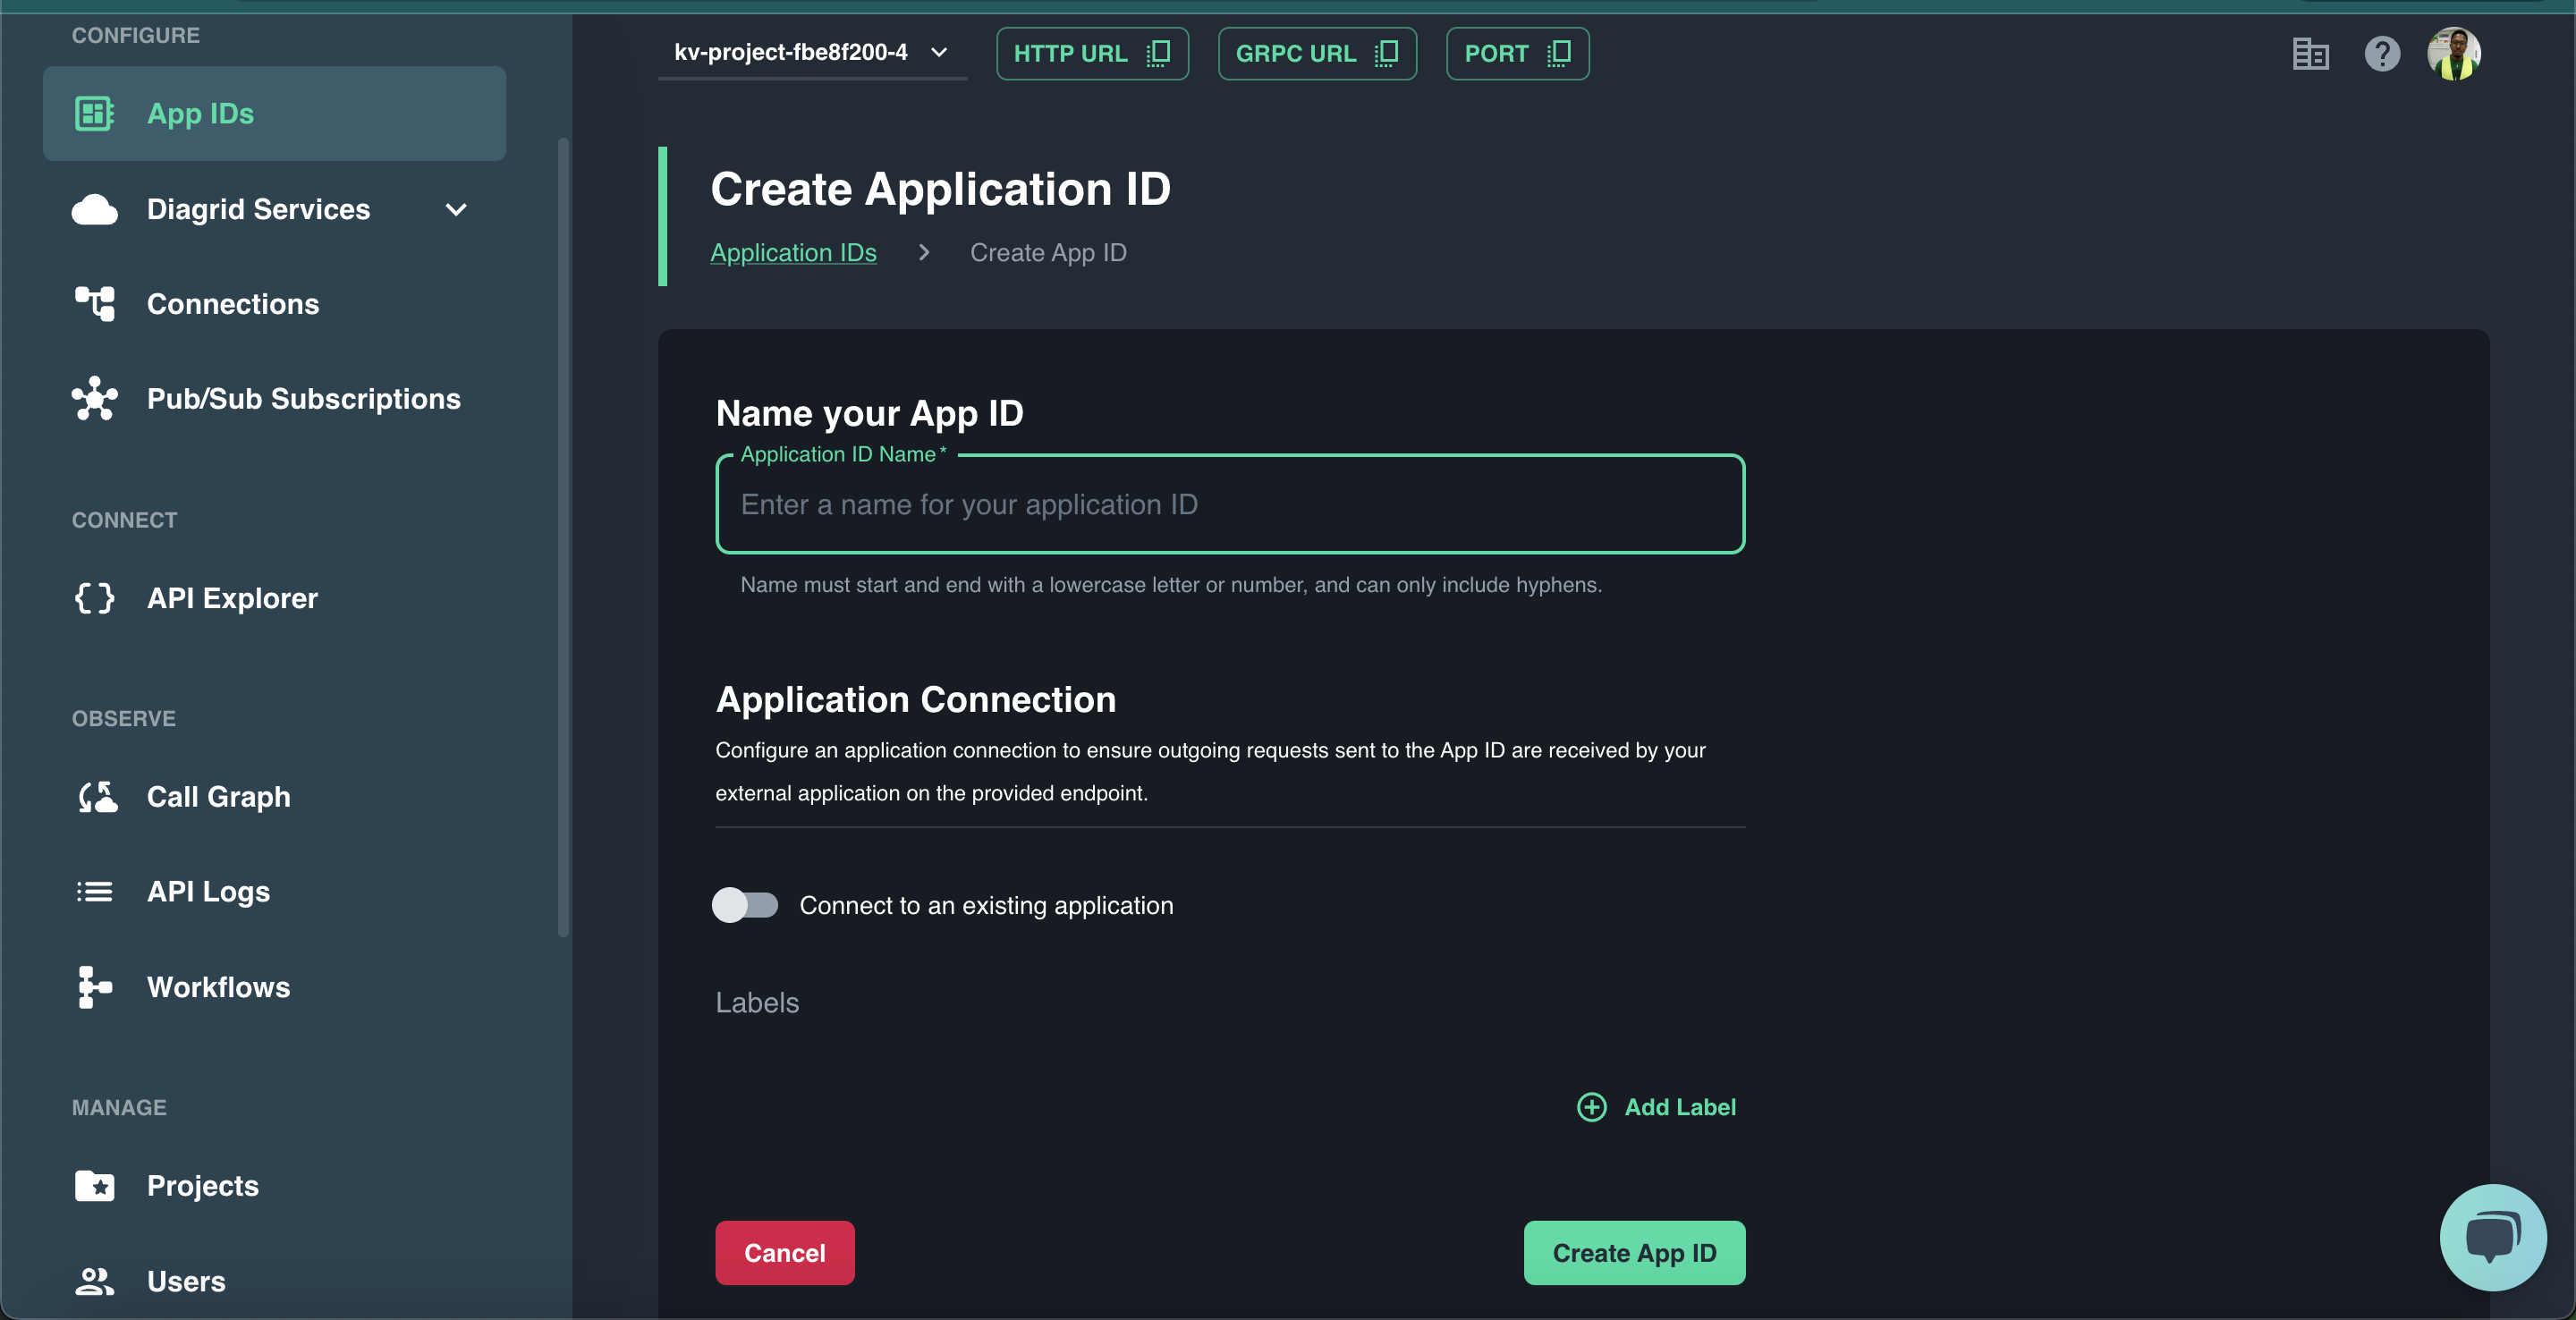
Once created navigate to the connections screen.
N.B: You'll repeat the above steps when creating the rest of the App IDs.
Let's add a state management connection for this user-service.
From the Connection screen, click on Create Connection. Select state as the connection type.
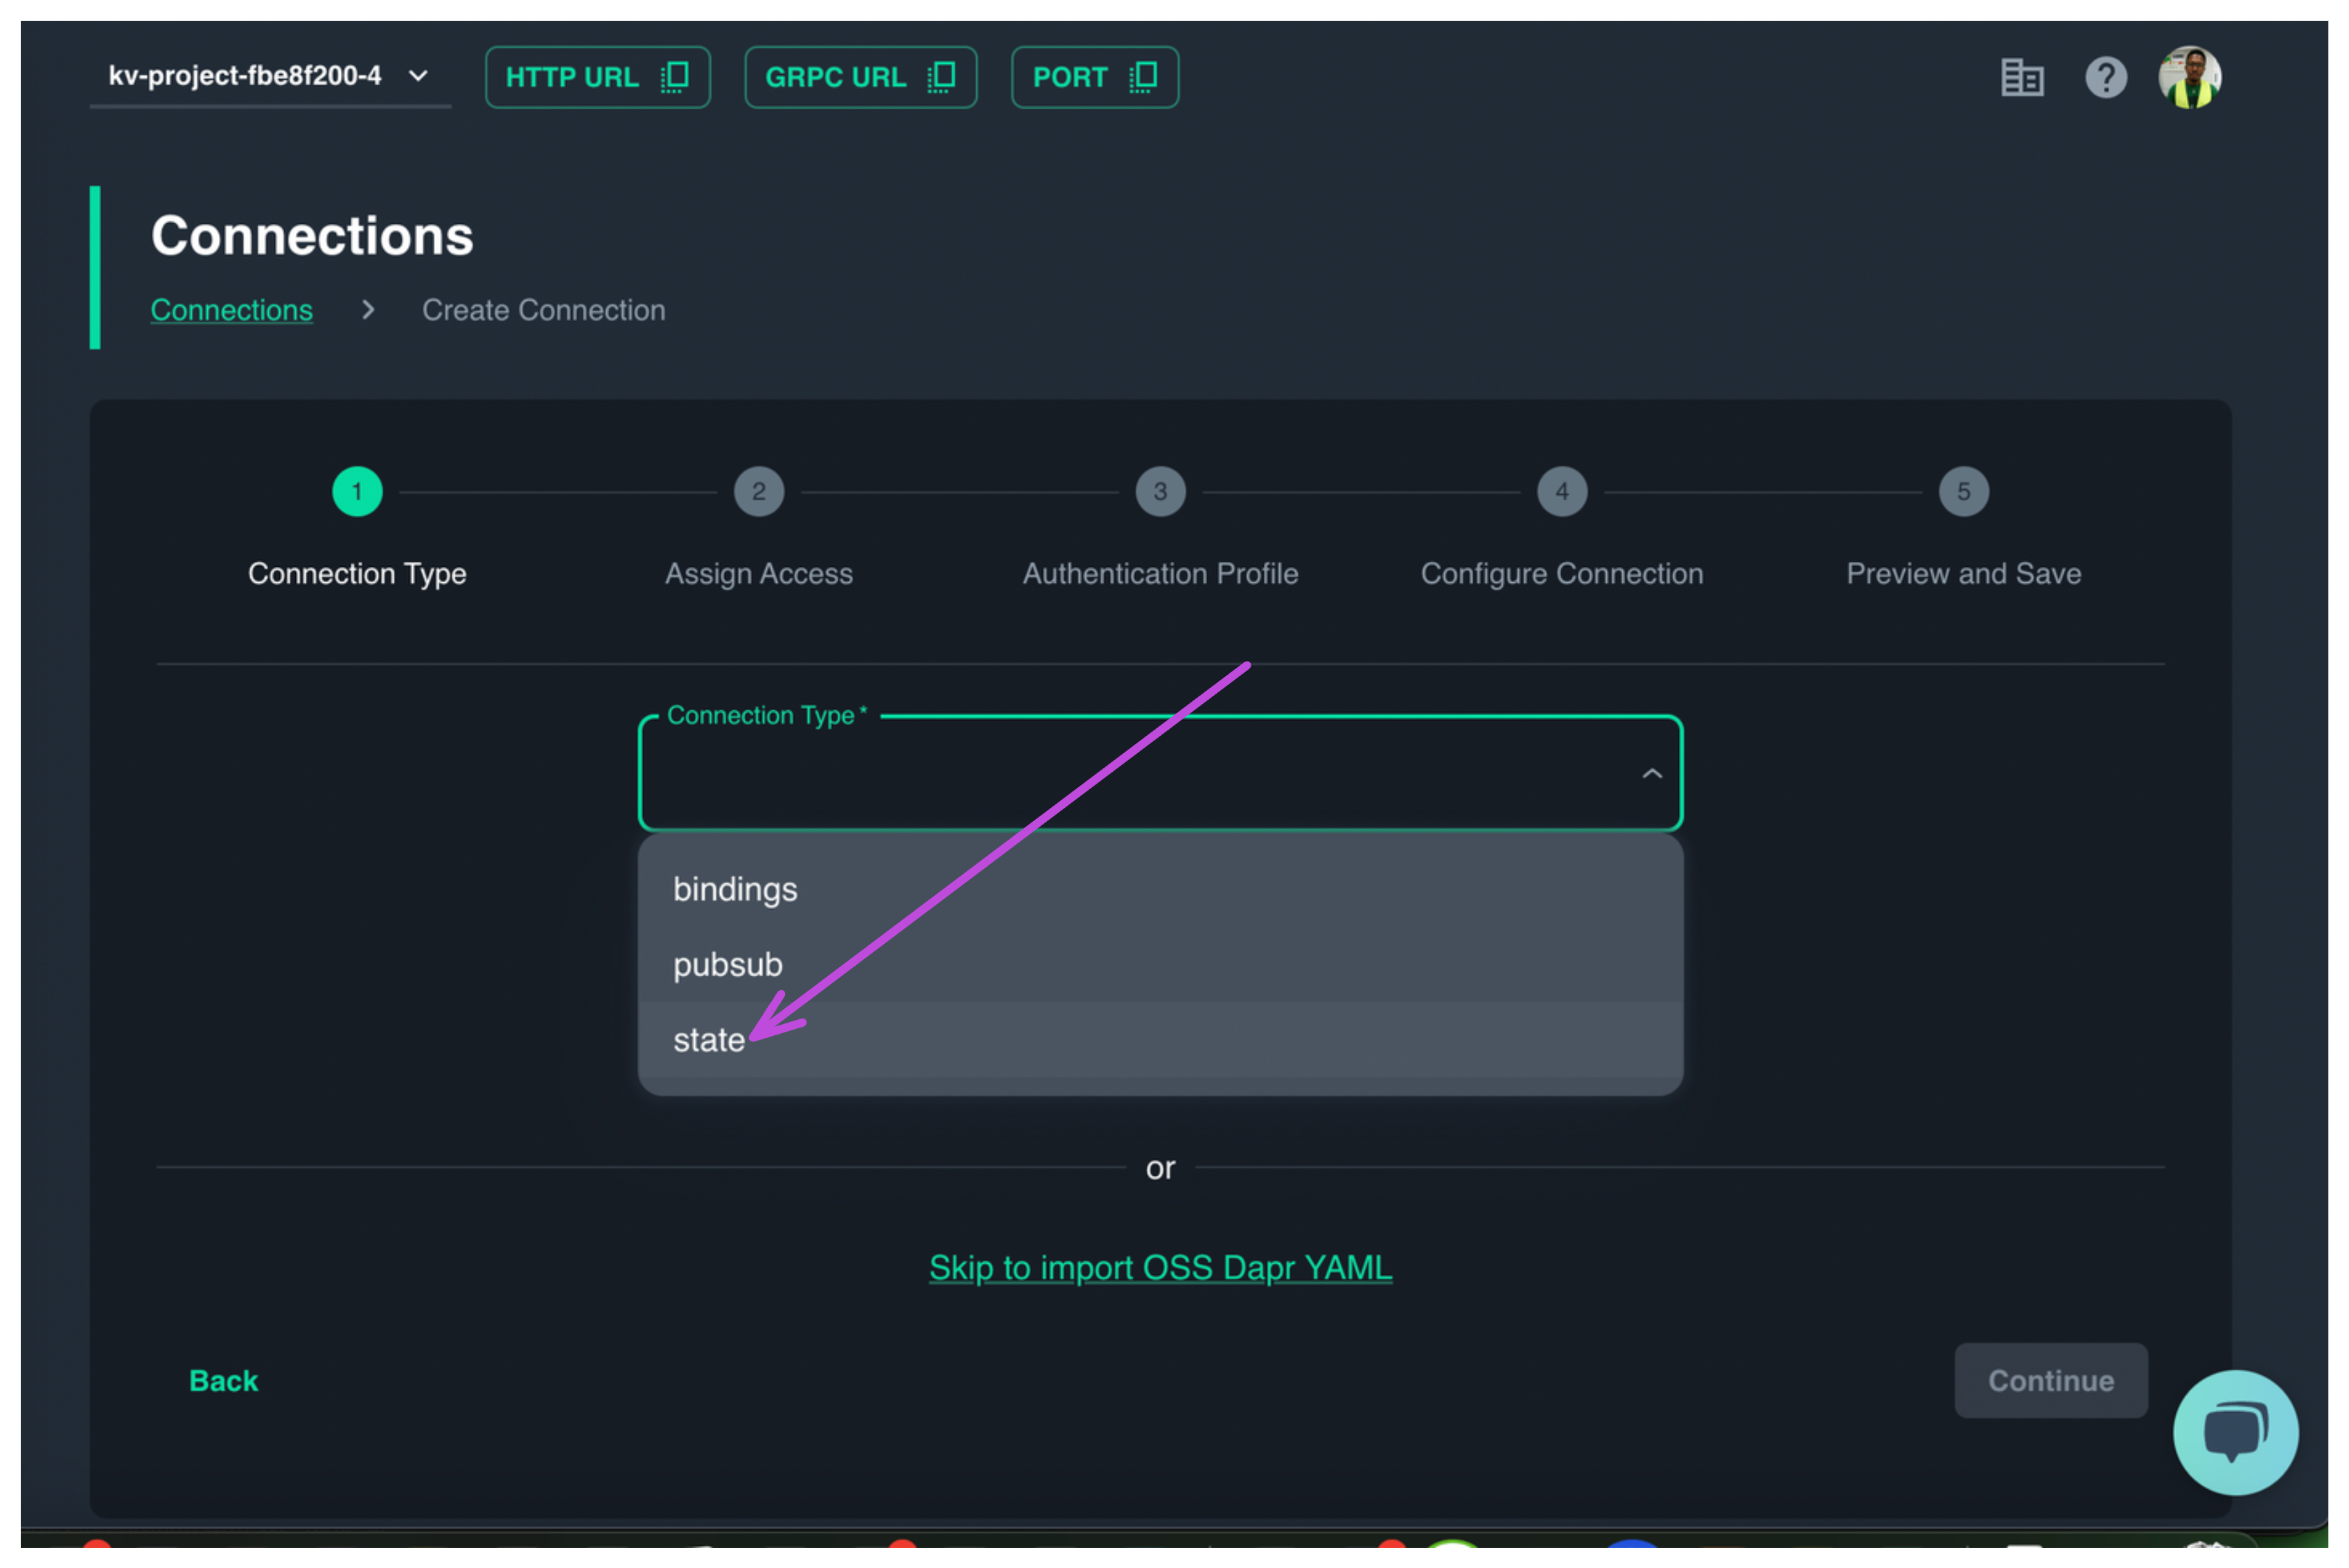
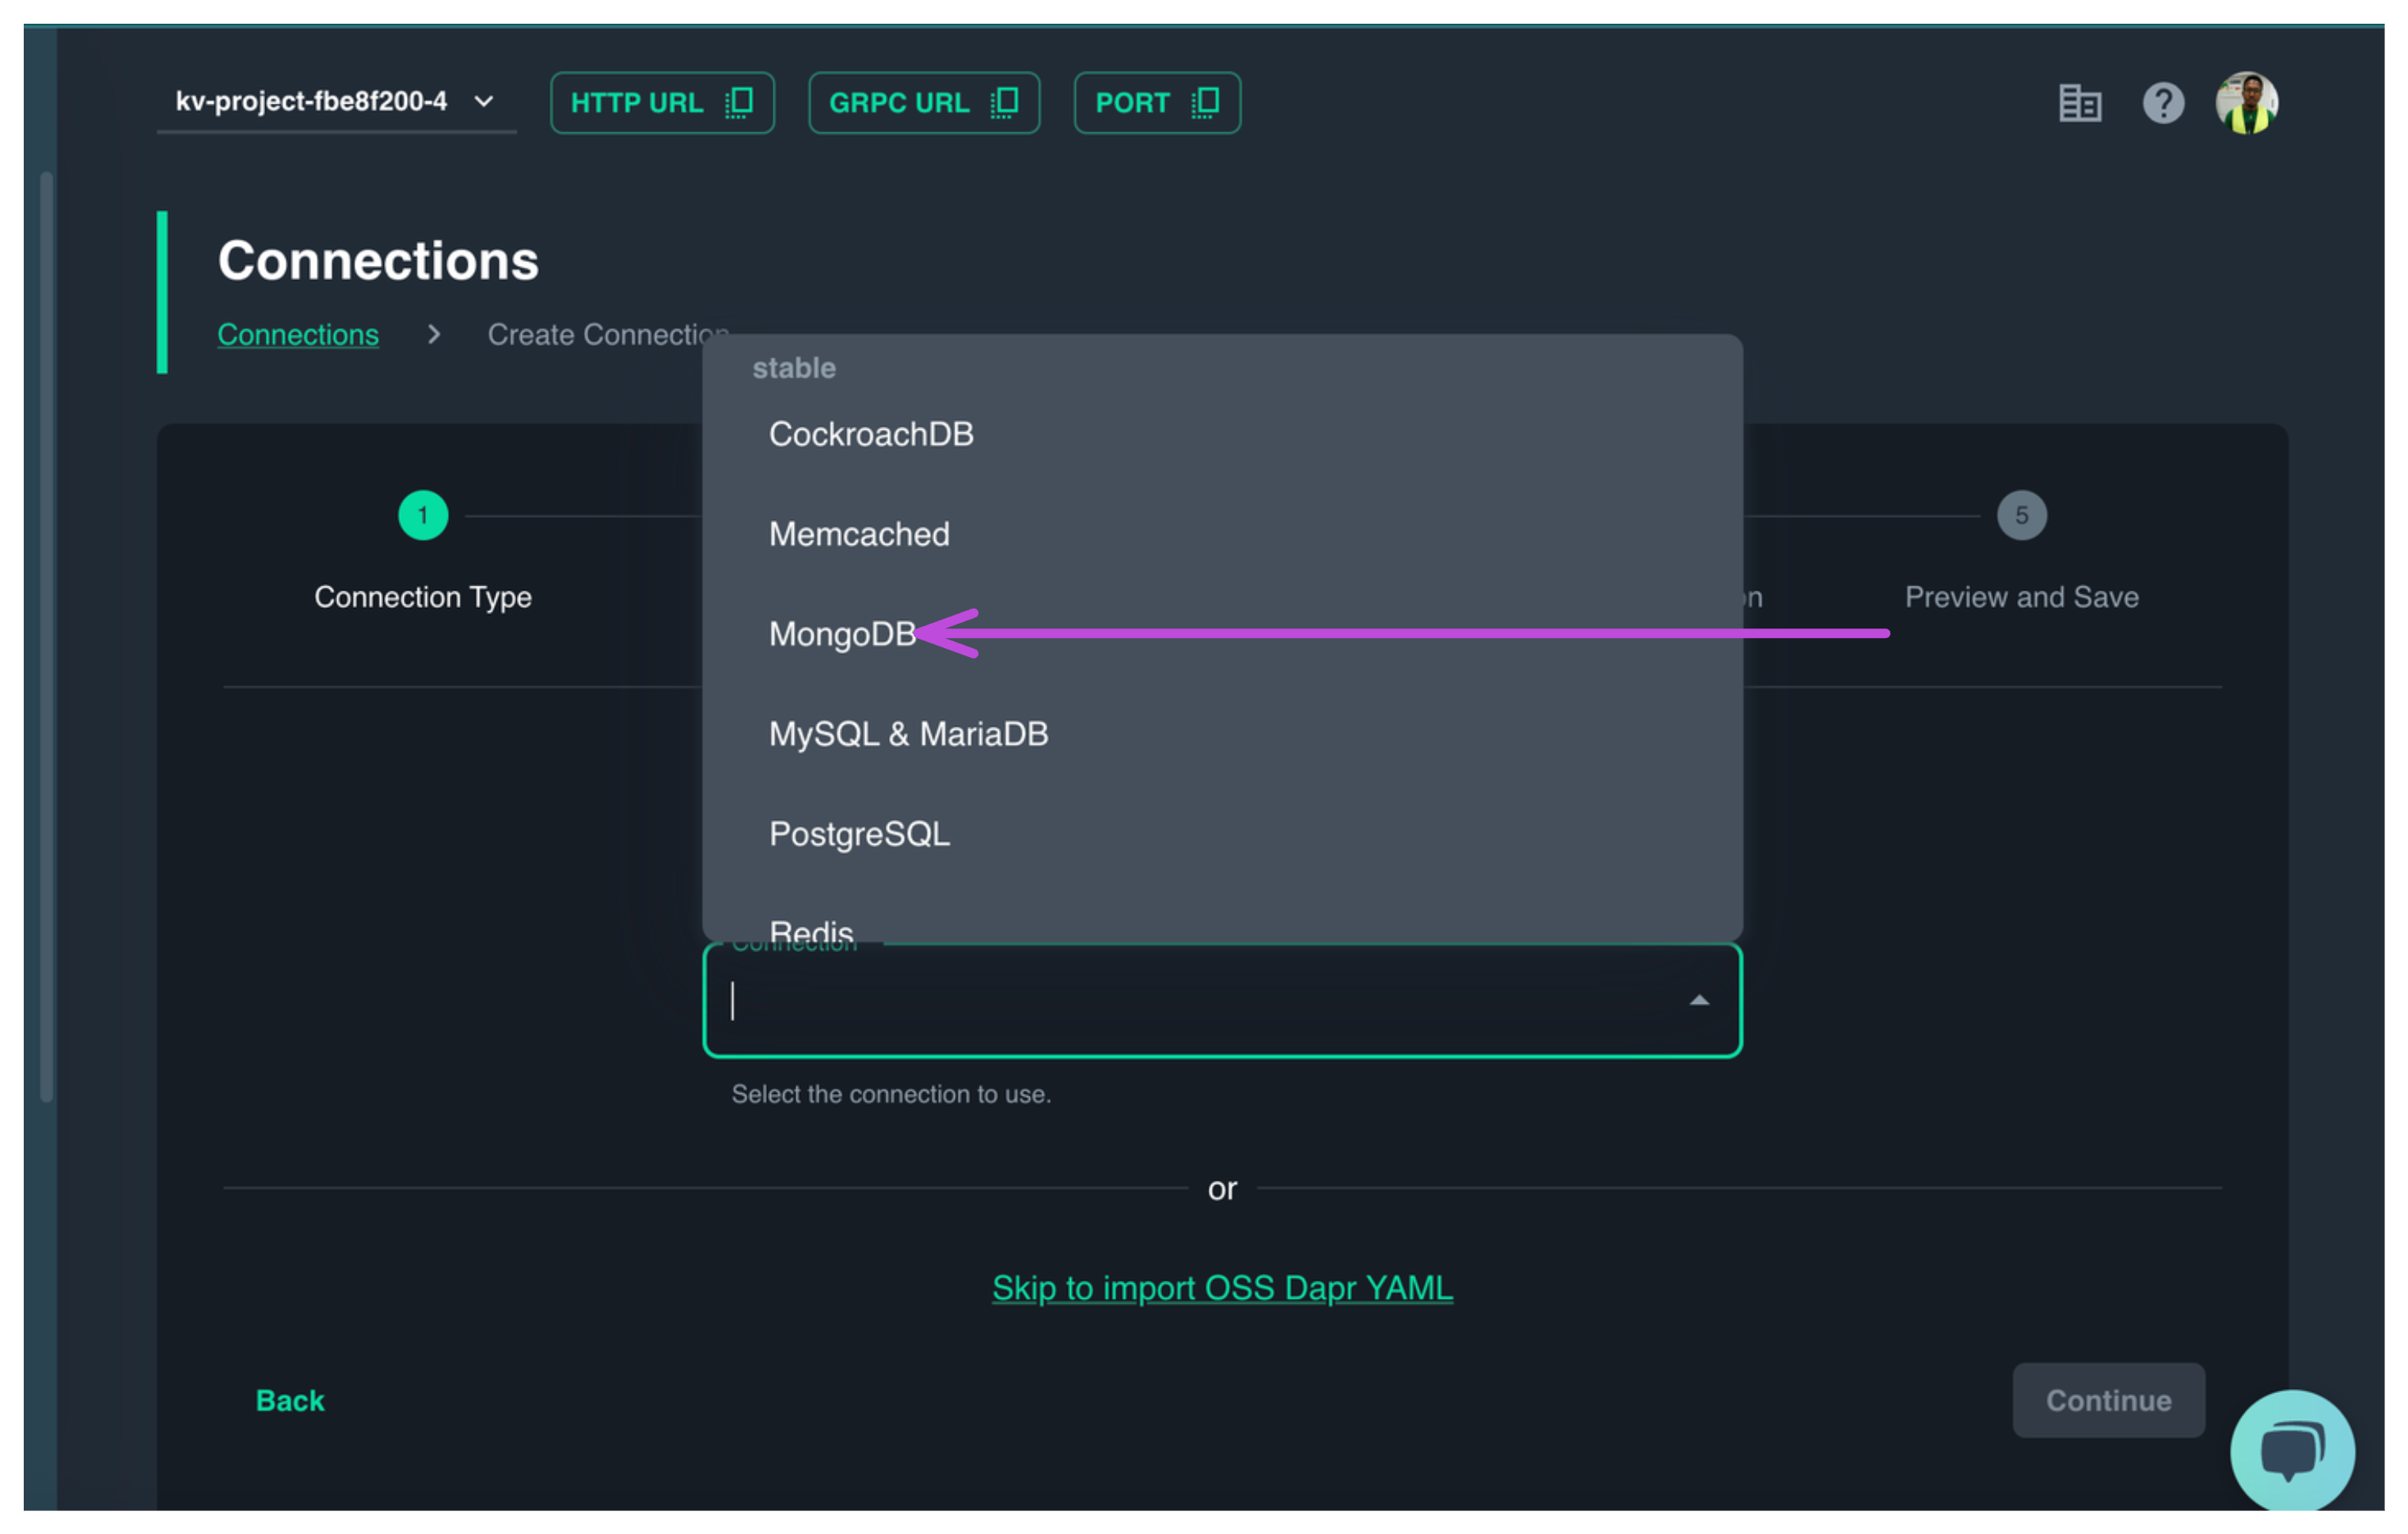
Select MongoDB as the connection.
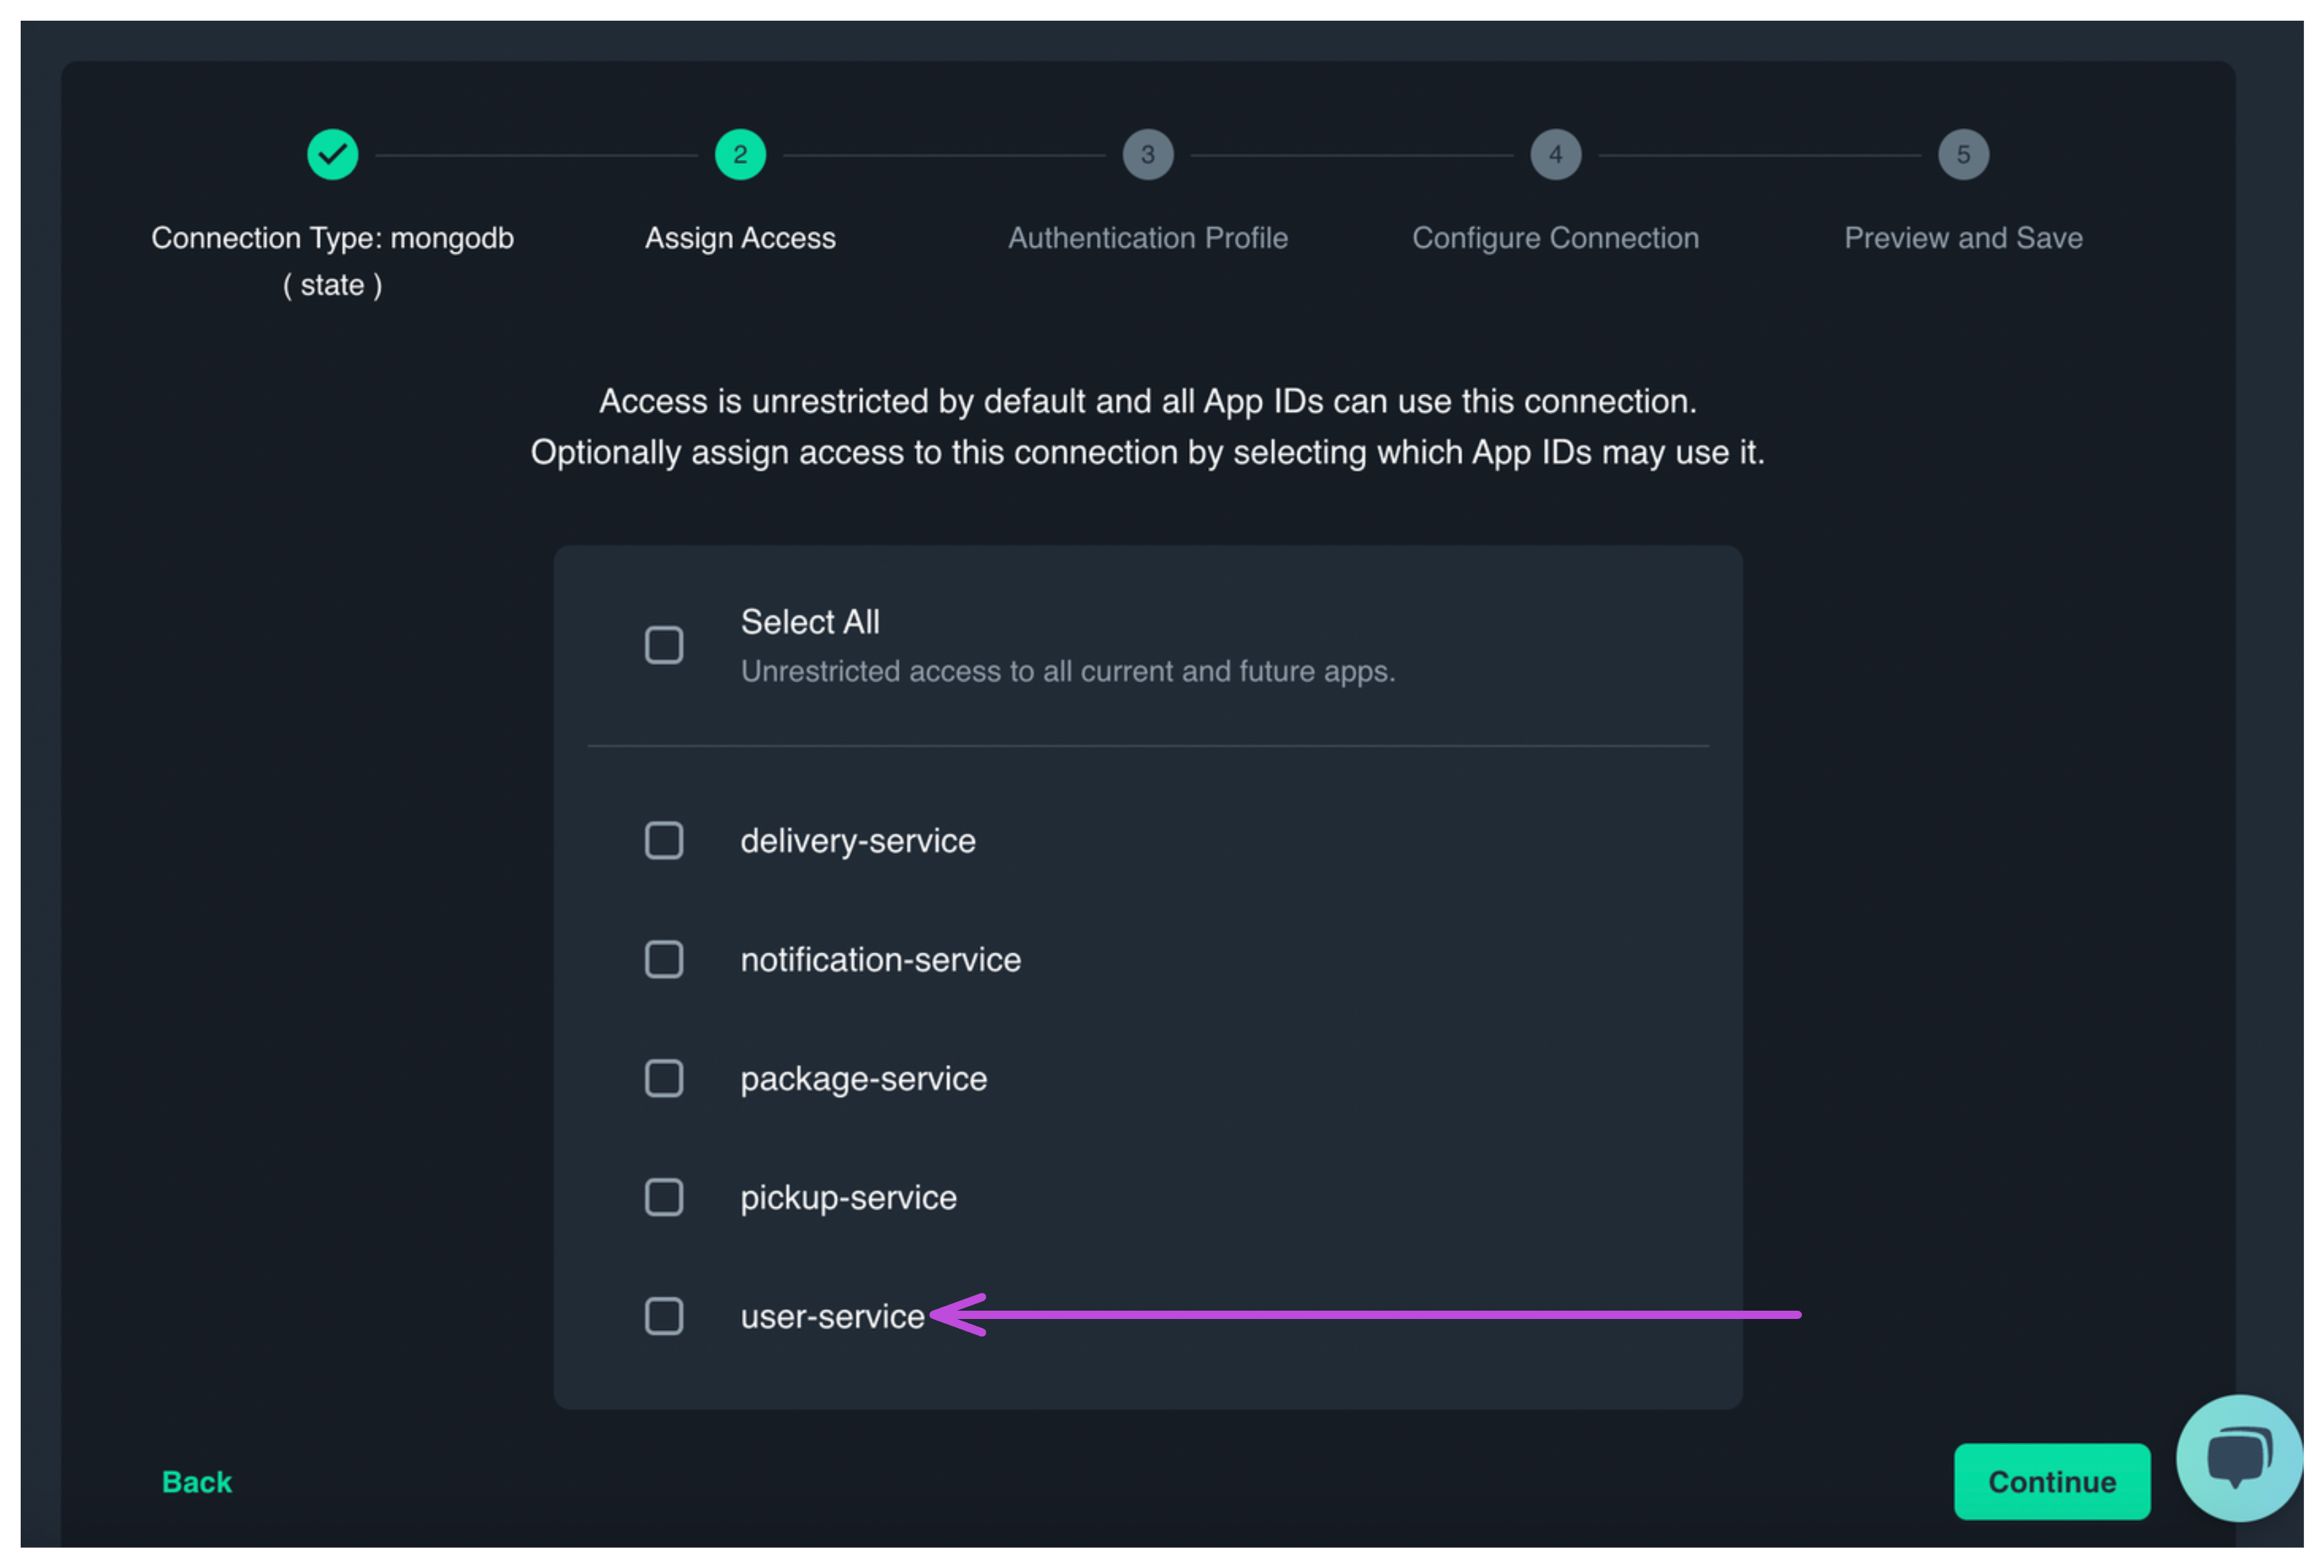
Assign Access to your user-service app id you created above.
In the authentication profile tab, select username and password
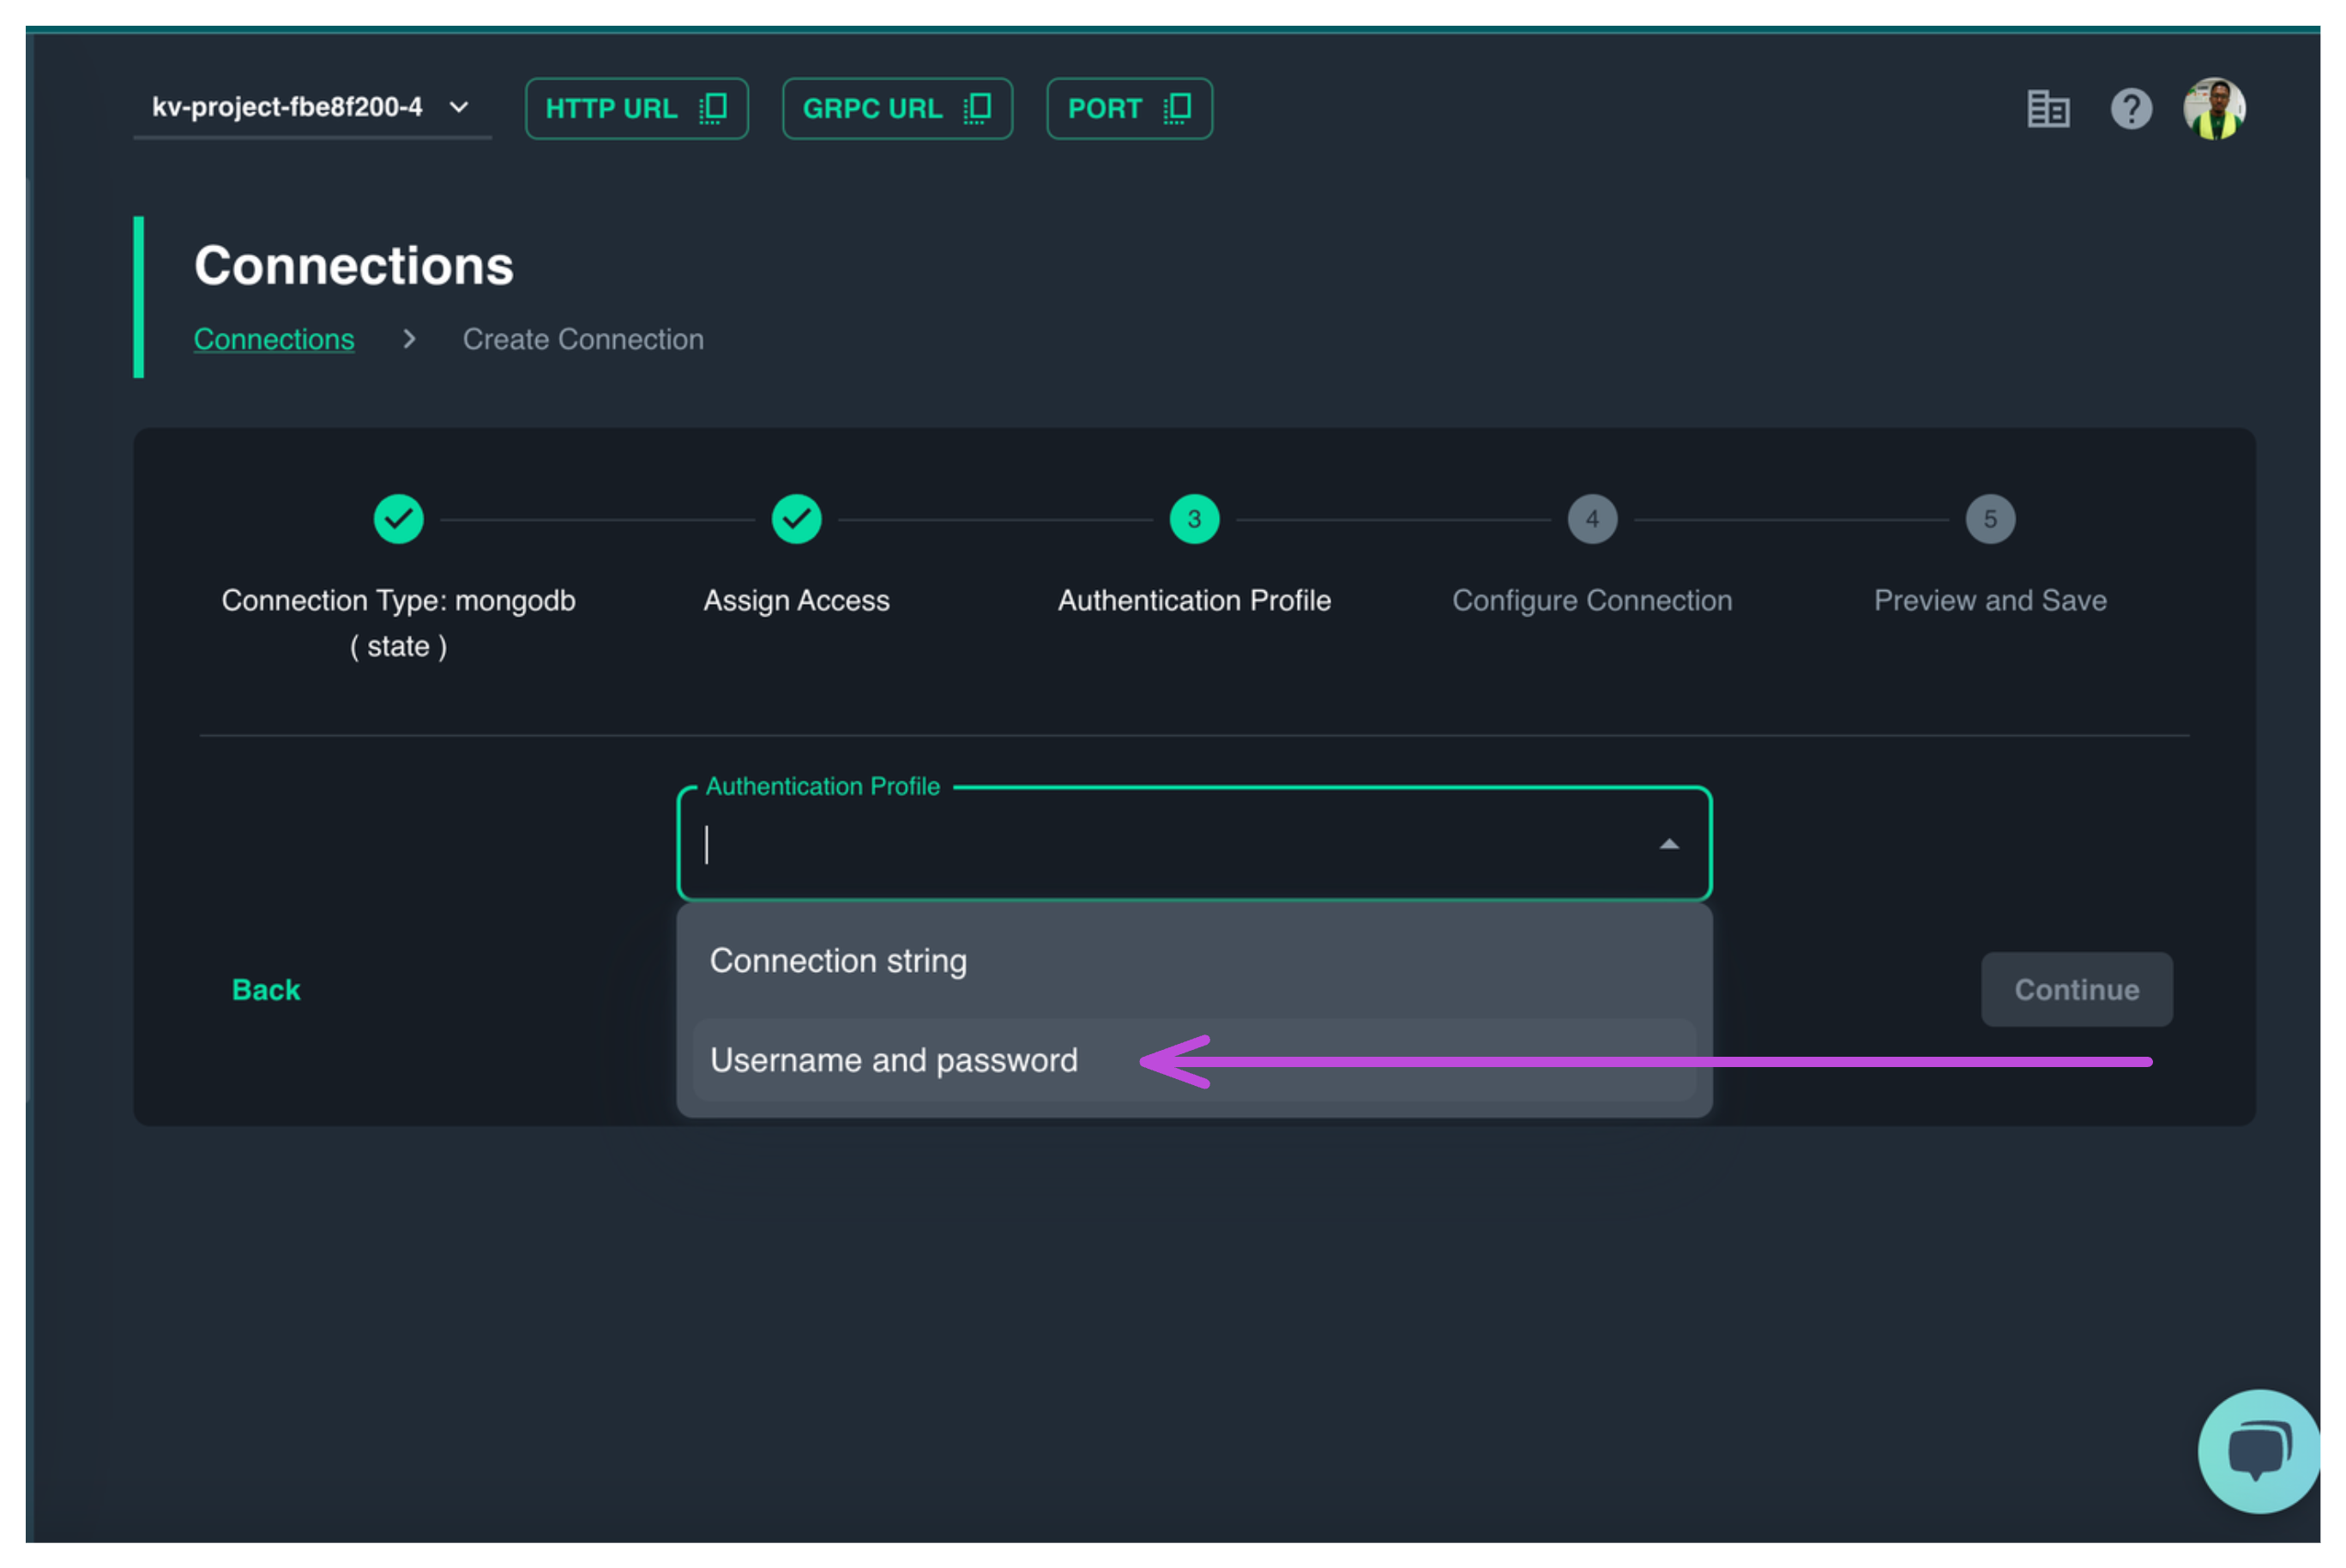
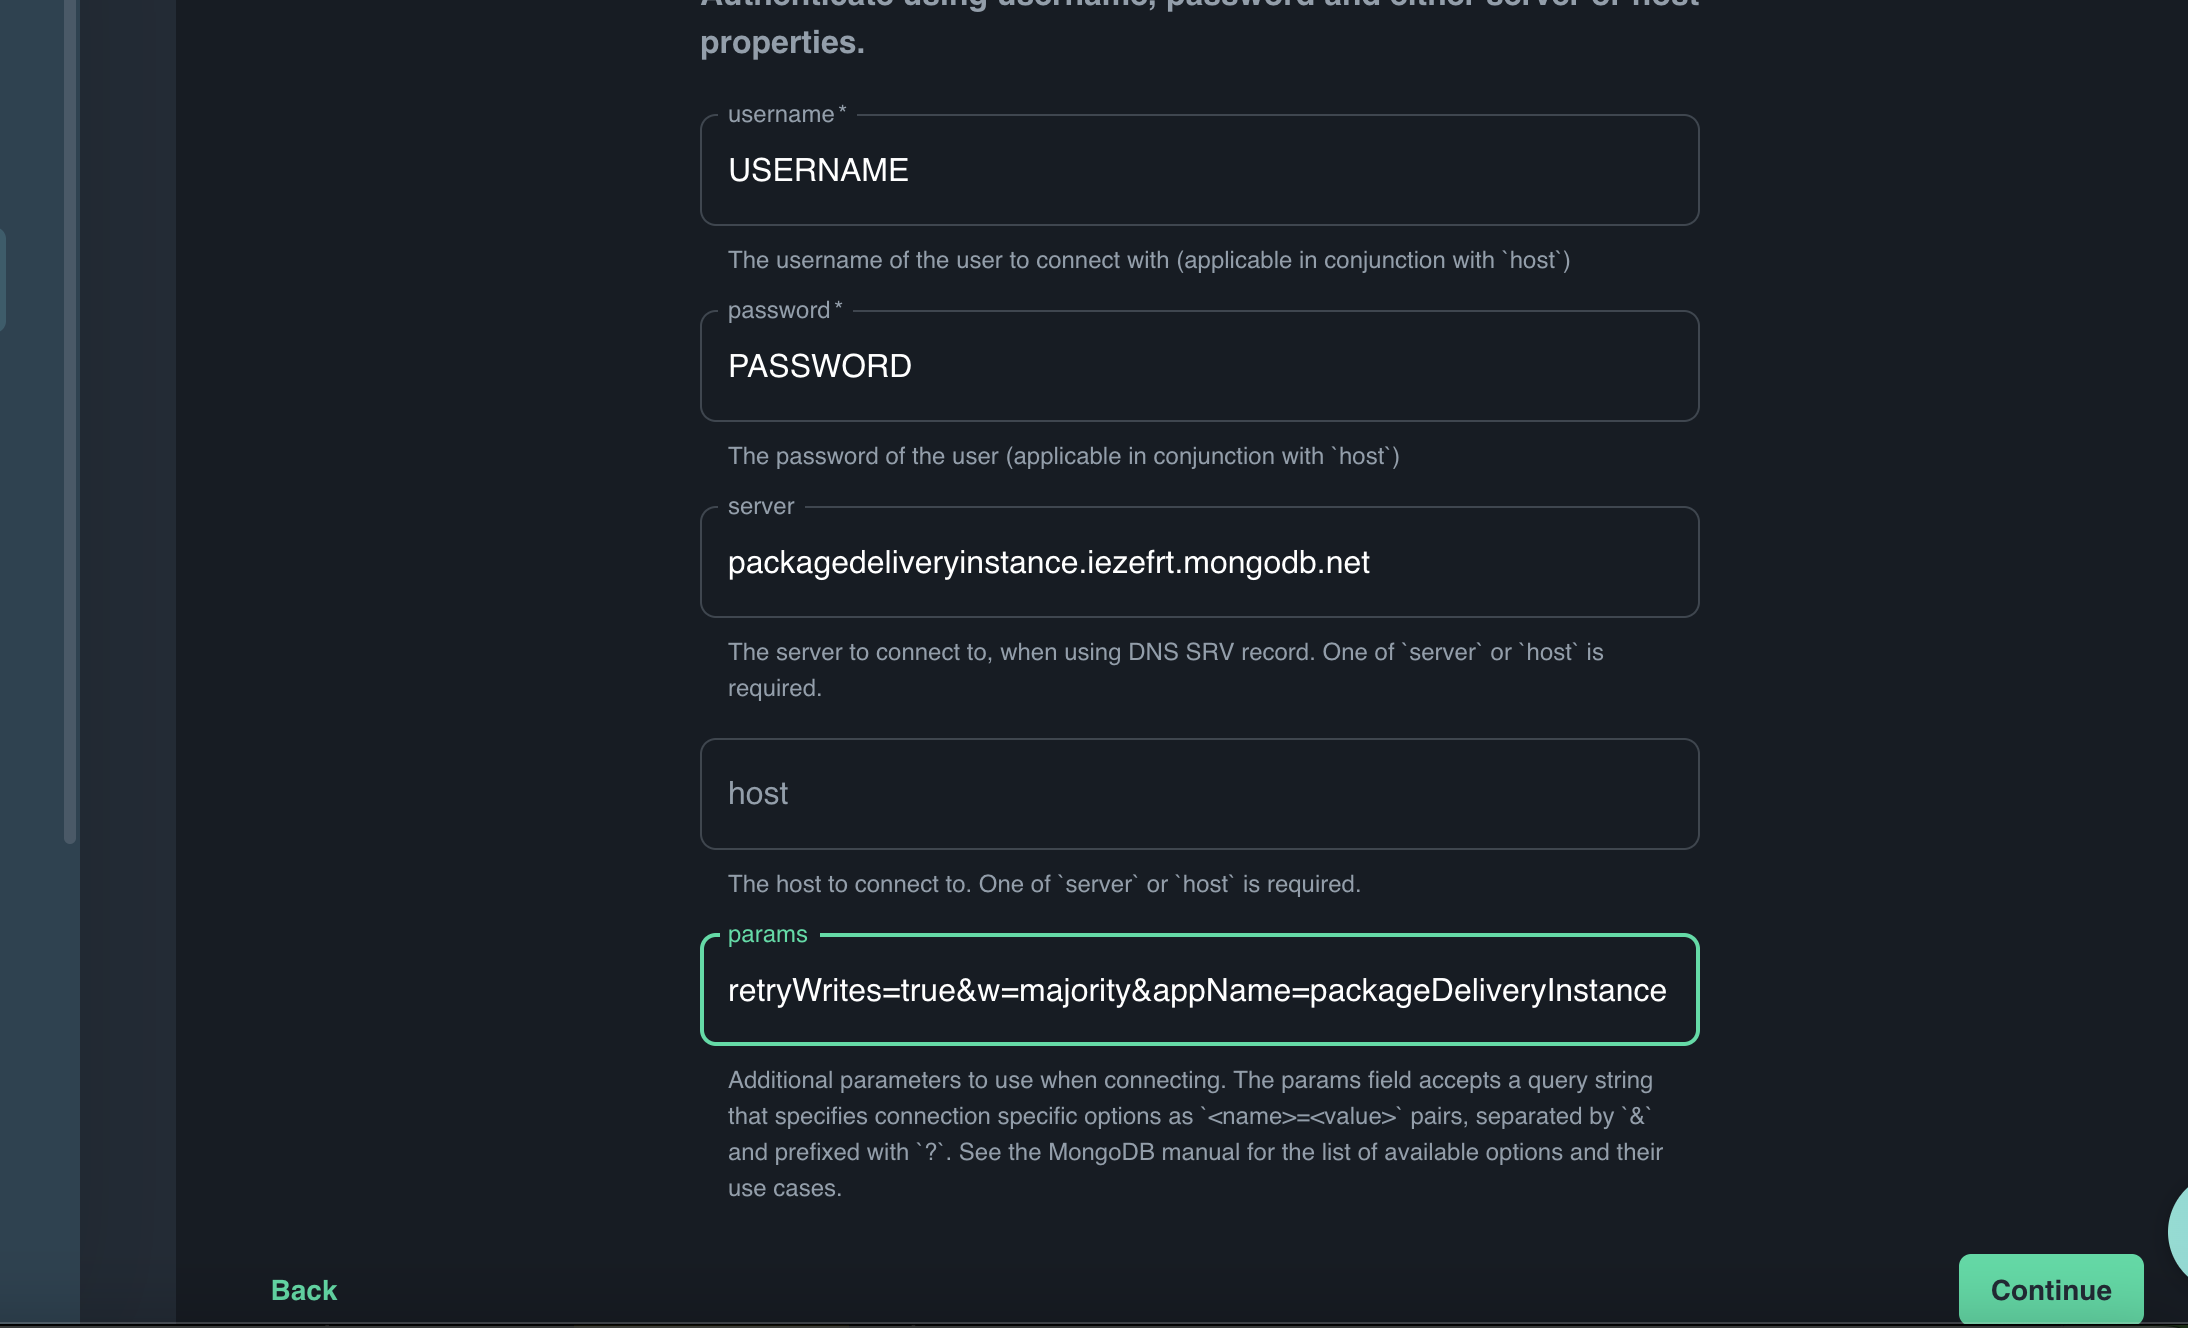
Enter the username and password you created in MongoDB to access this database.
Also, you'll have to add the server string and parameters.
Sign into your MongoDB account and navigate to your instance.
Click on the green button which reads Connect.

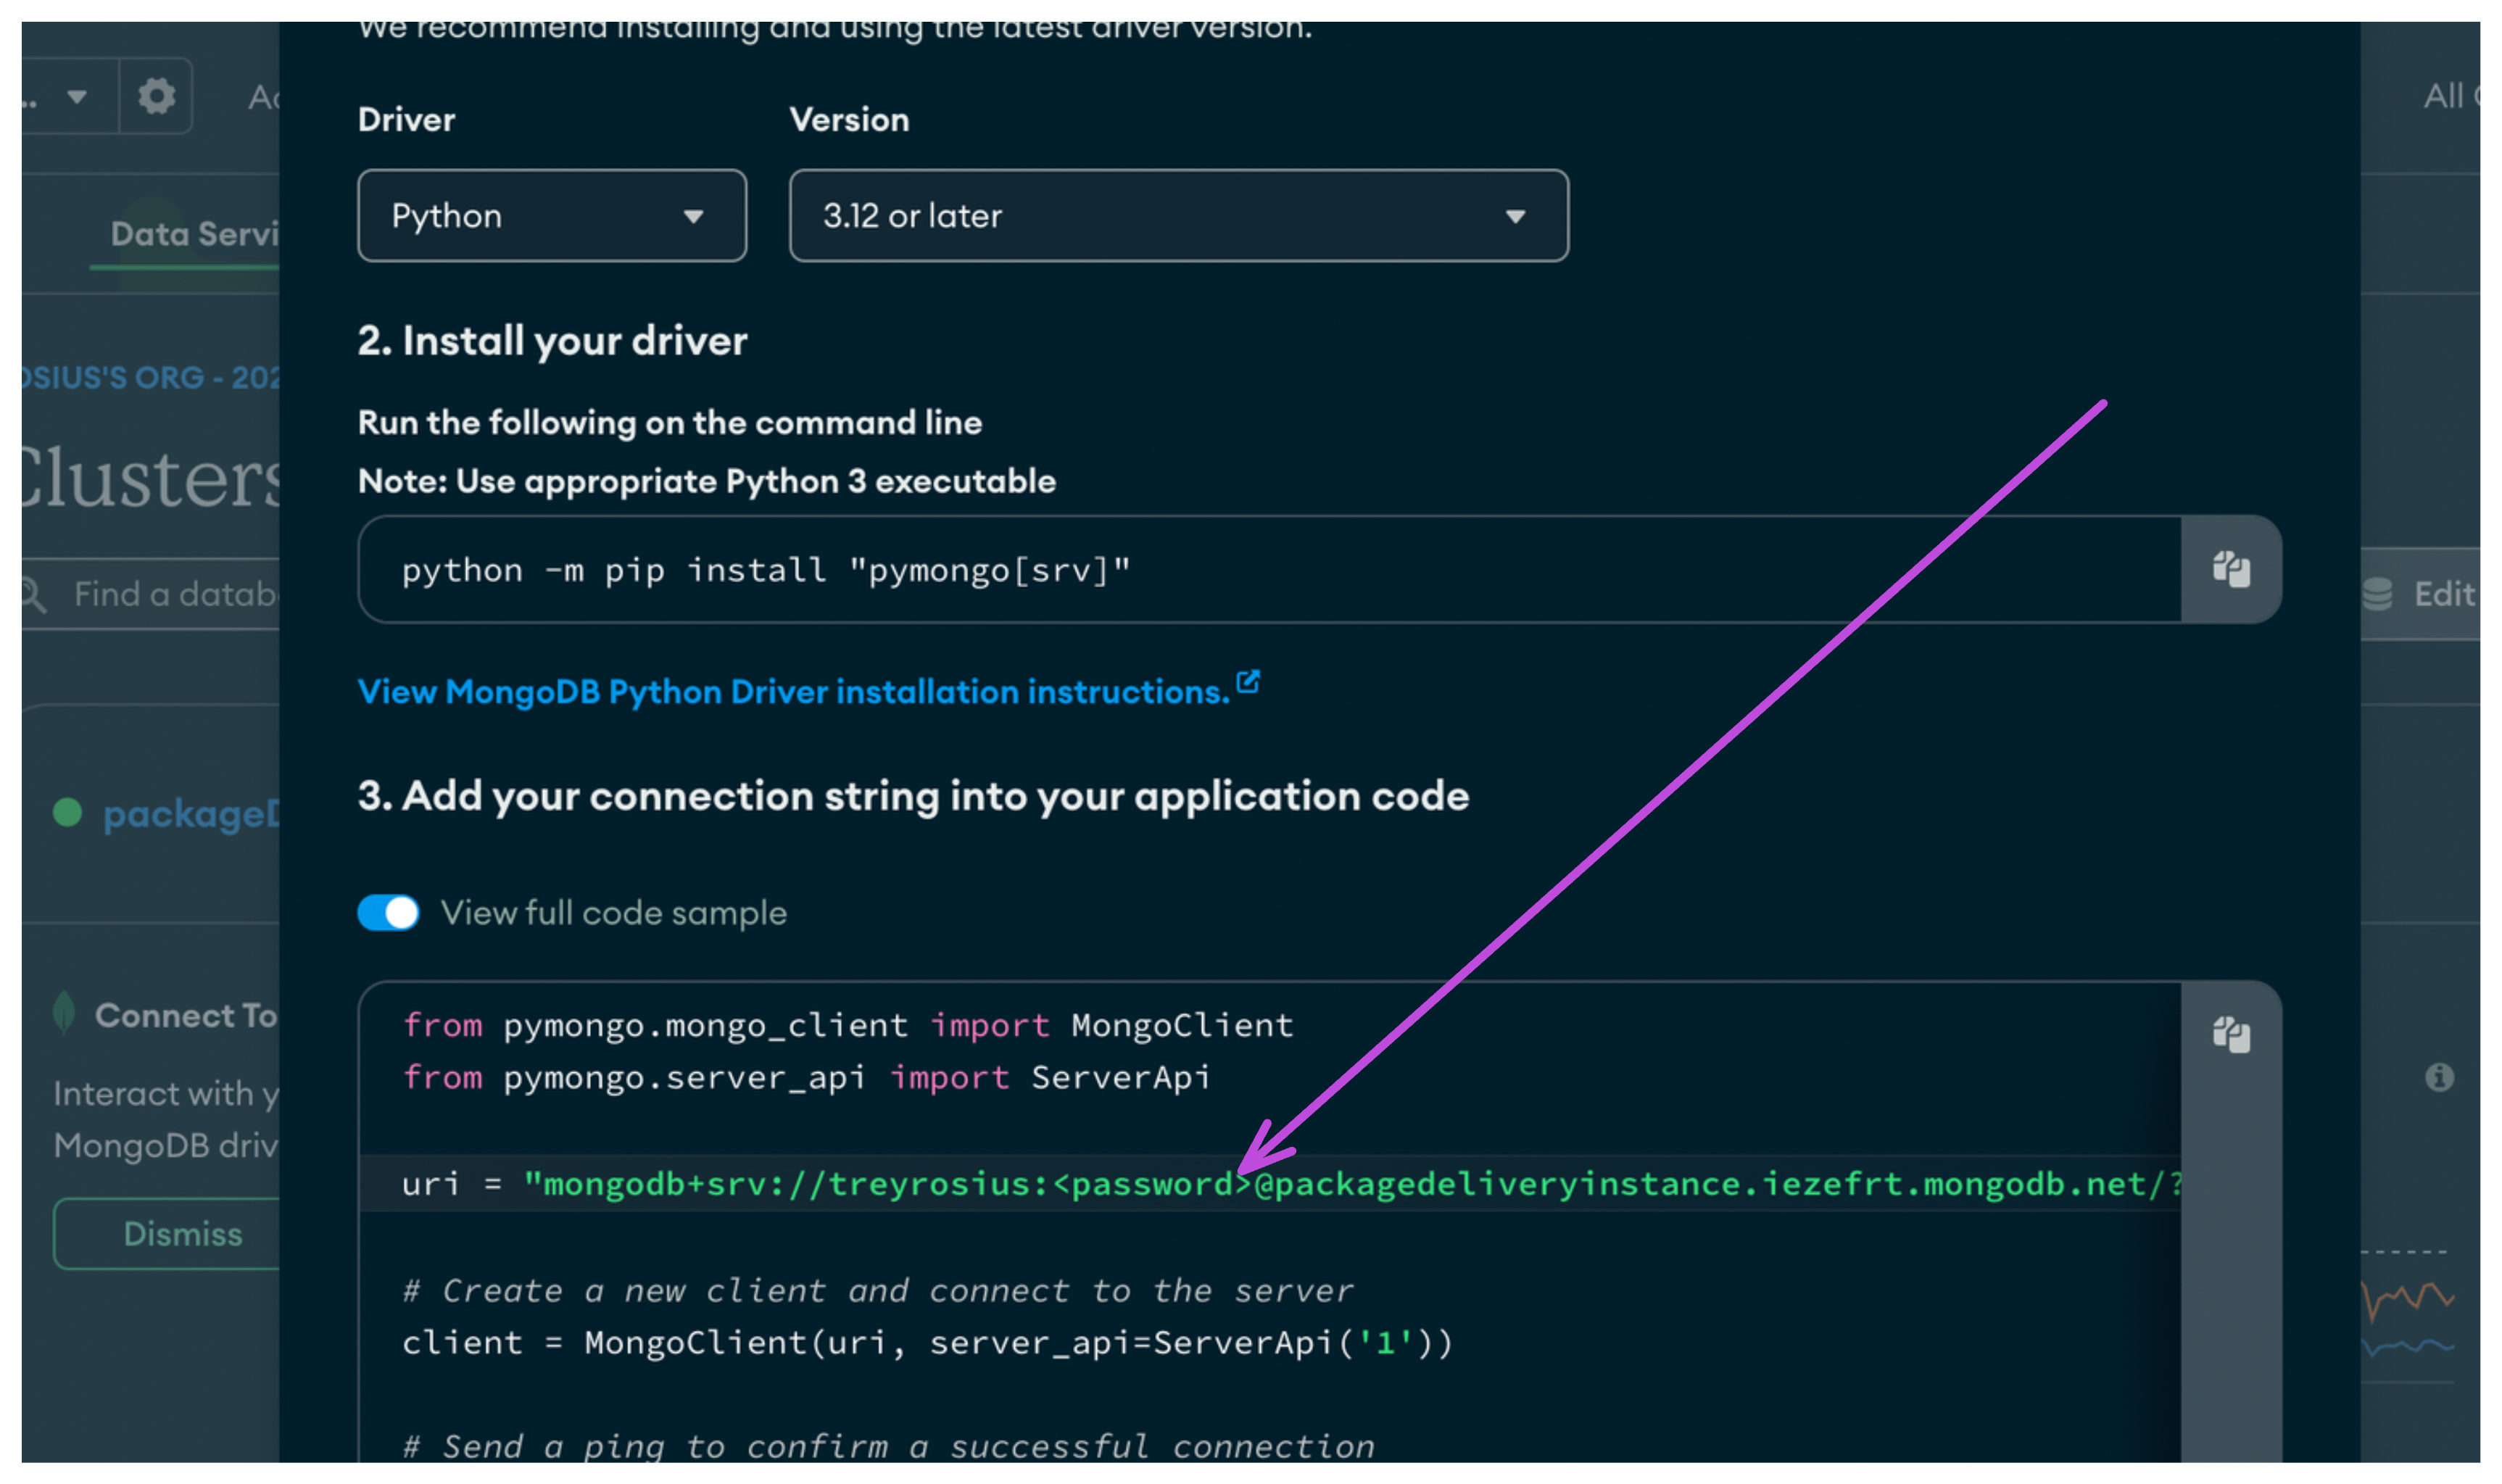
In the next screen, click on drivers
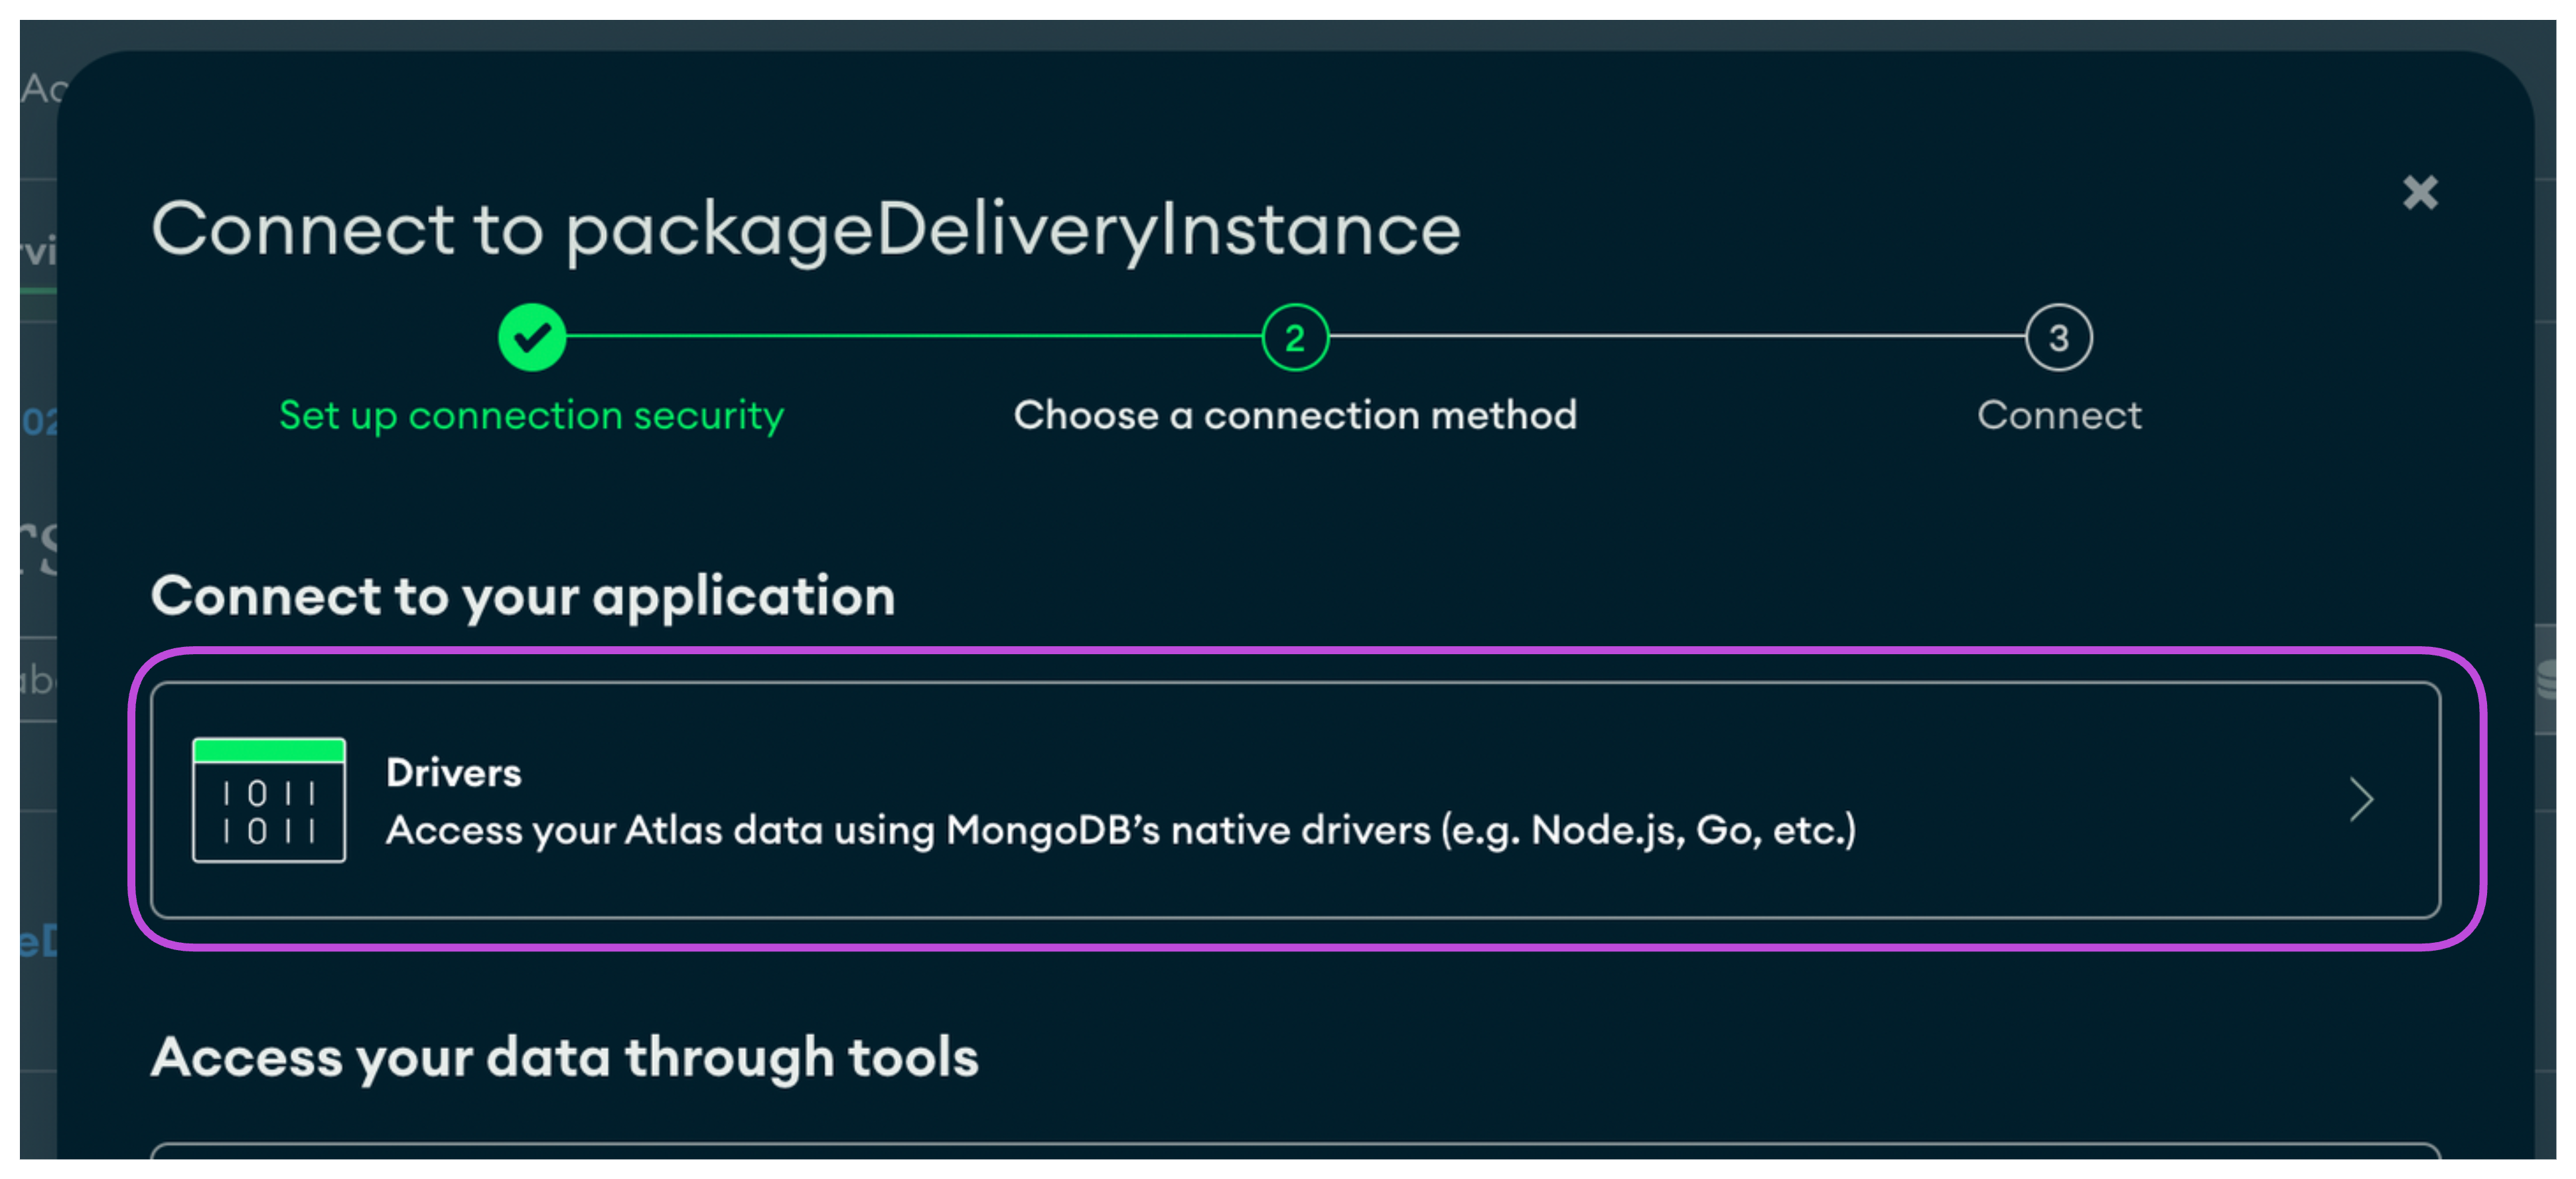
Then copy the connection string.
In the next screen (Configure Connection), set Connection Name to usersdb or whatever you prefer and then add a collectionName = users.
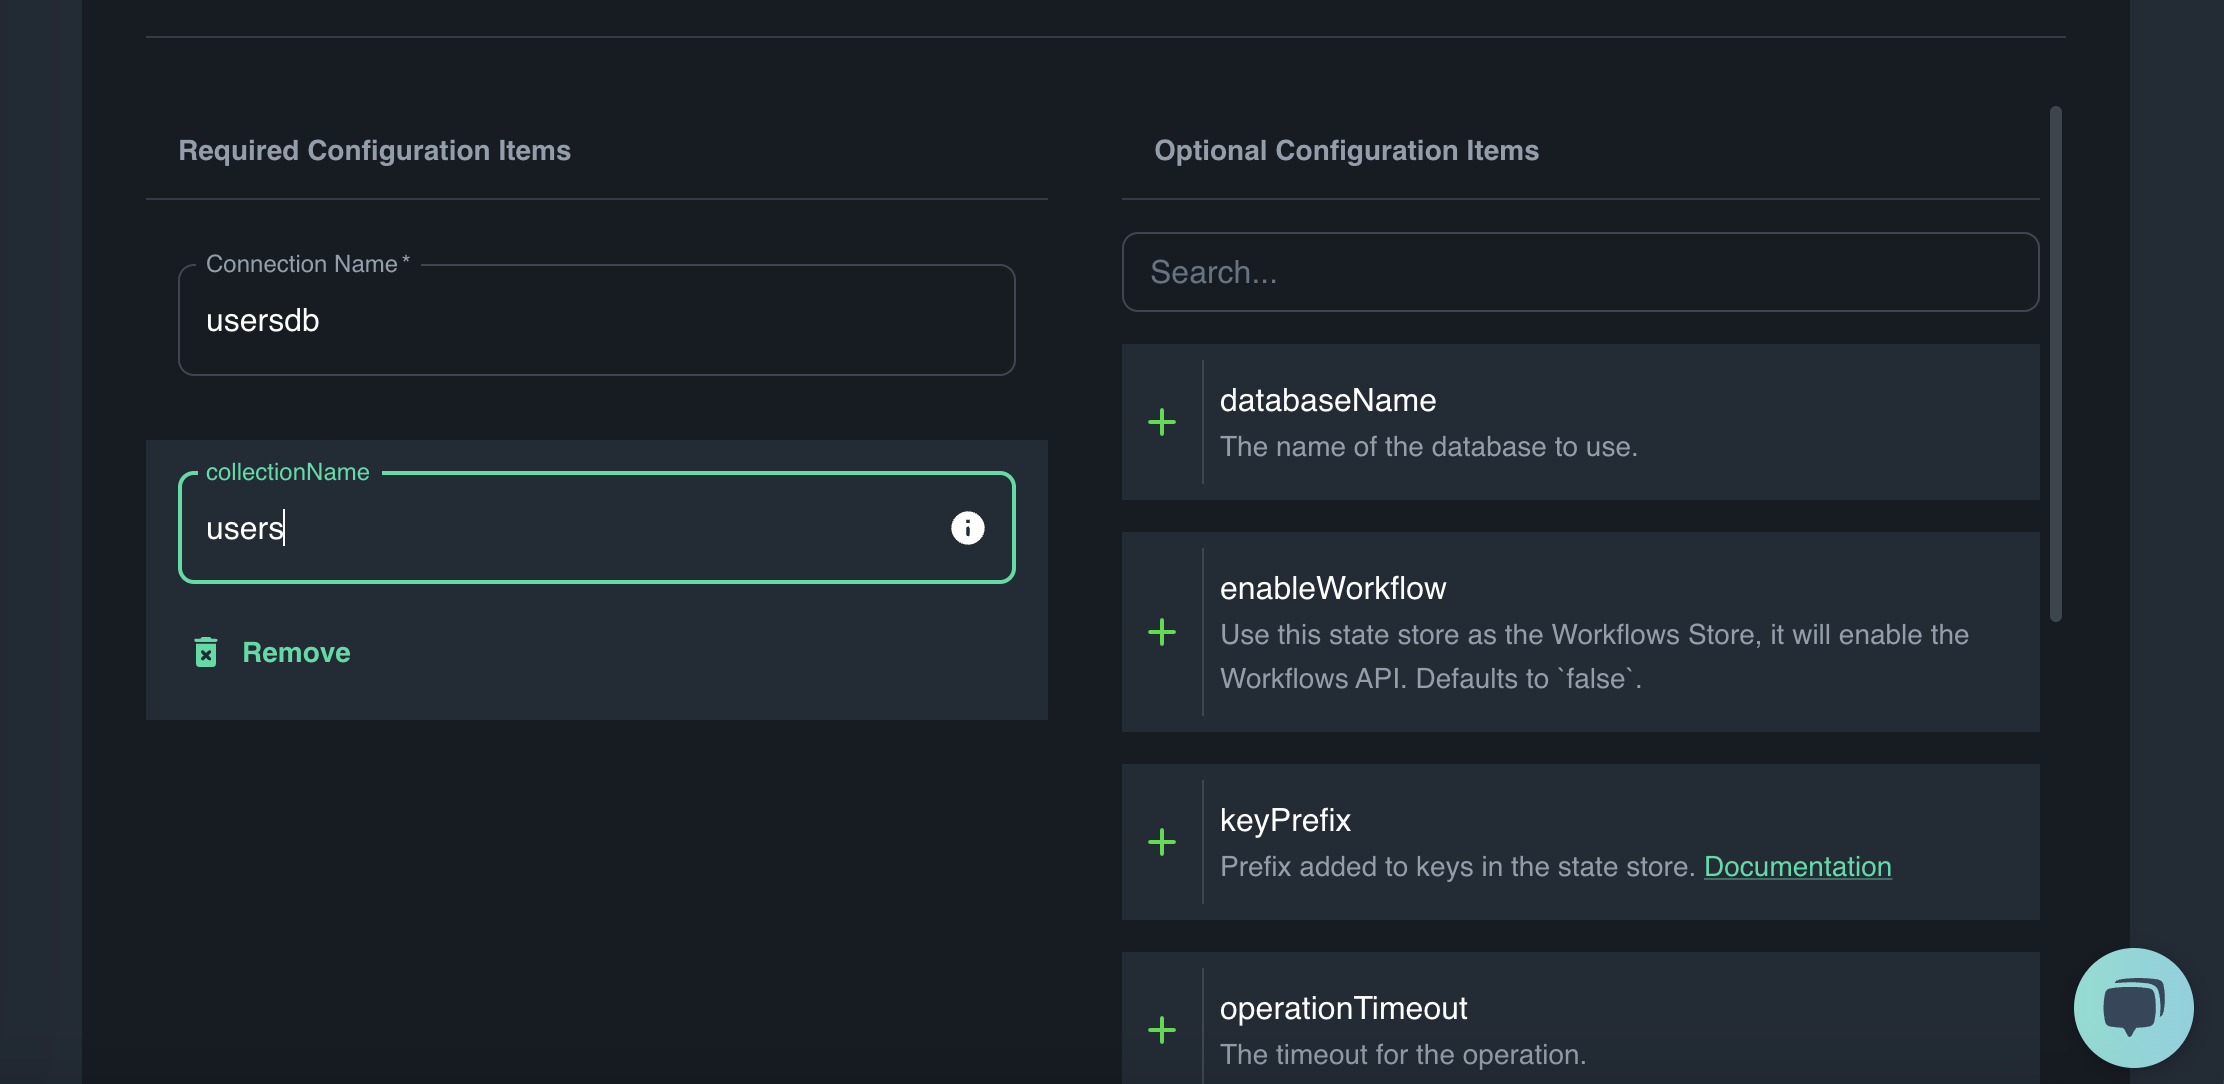
Click on continue and save.
N.B You'll replicate these same steps to create state management connections for
packagesdb,deliverydbandpaymentsdblater on.
Communication between services in our application will be done through events. We'll be using AWS SQS/SNS as the message brokers for this application.
Log into your AWS Console and create credentials for the AWS CLI.
Configure your CLI using the command
aws configure
and then pass in the ACCESS_KEY_ID and ACCESS_SECRET when asked.
Follow this visual guide incase you need assistance. CREATE IAM USER
Navigate to the Diagrid Catalyst Console, click on connections, select pubsub as connection type and AWS SNS/SQS as Connection.
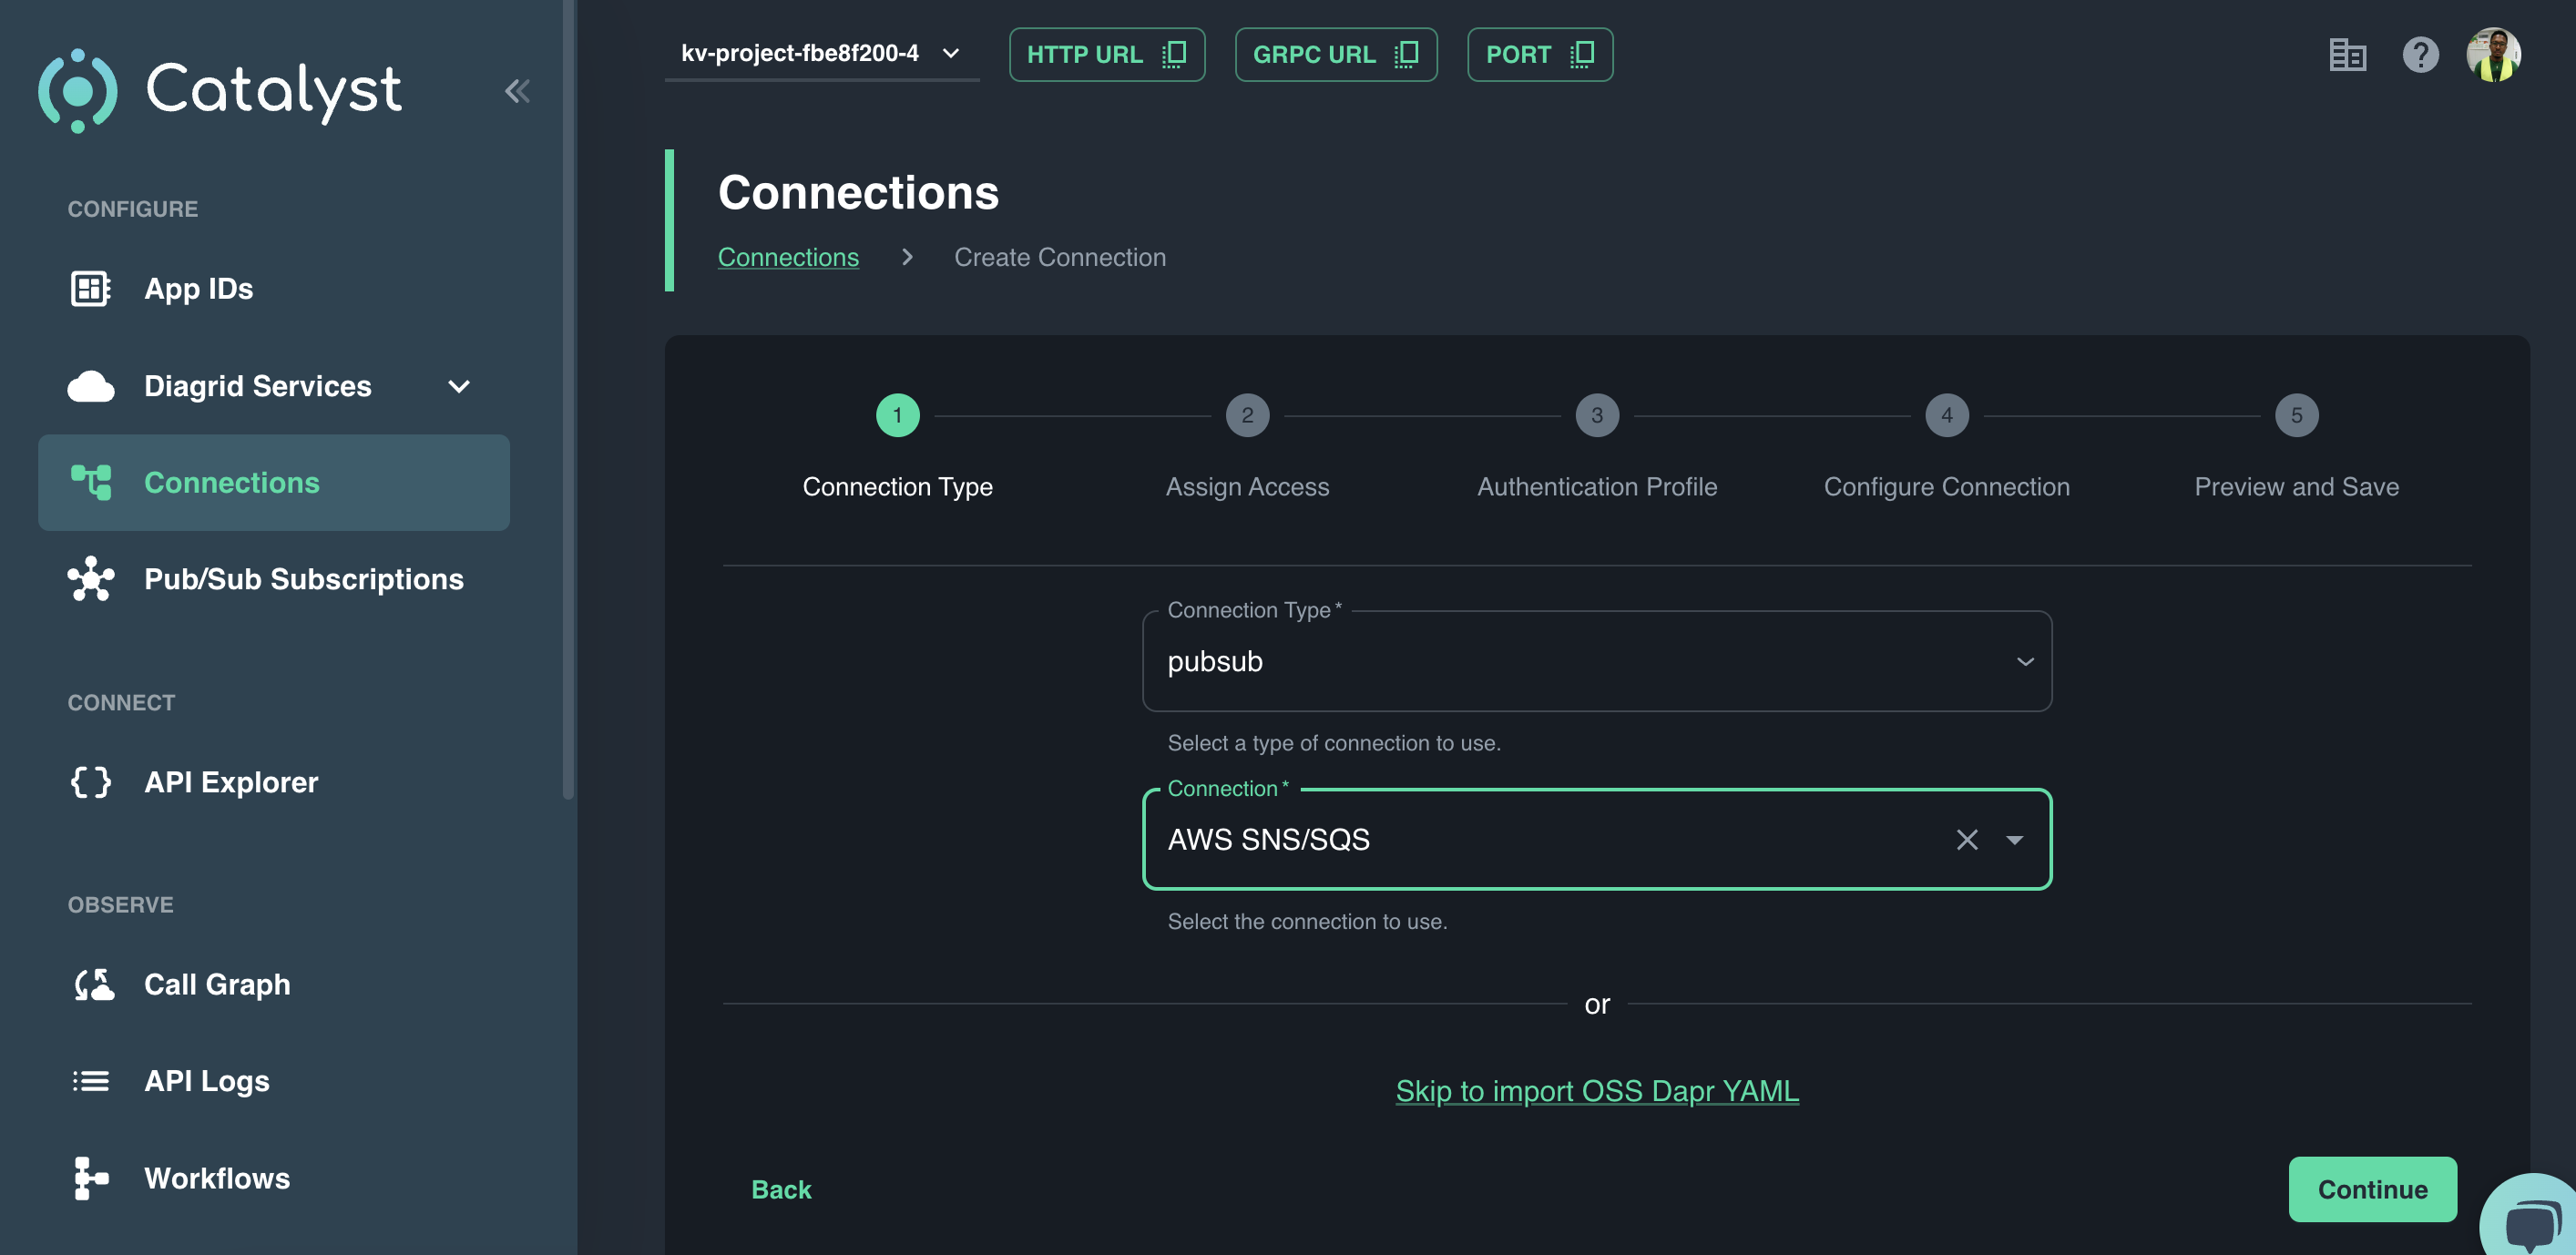
Click on Next.
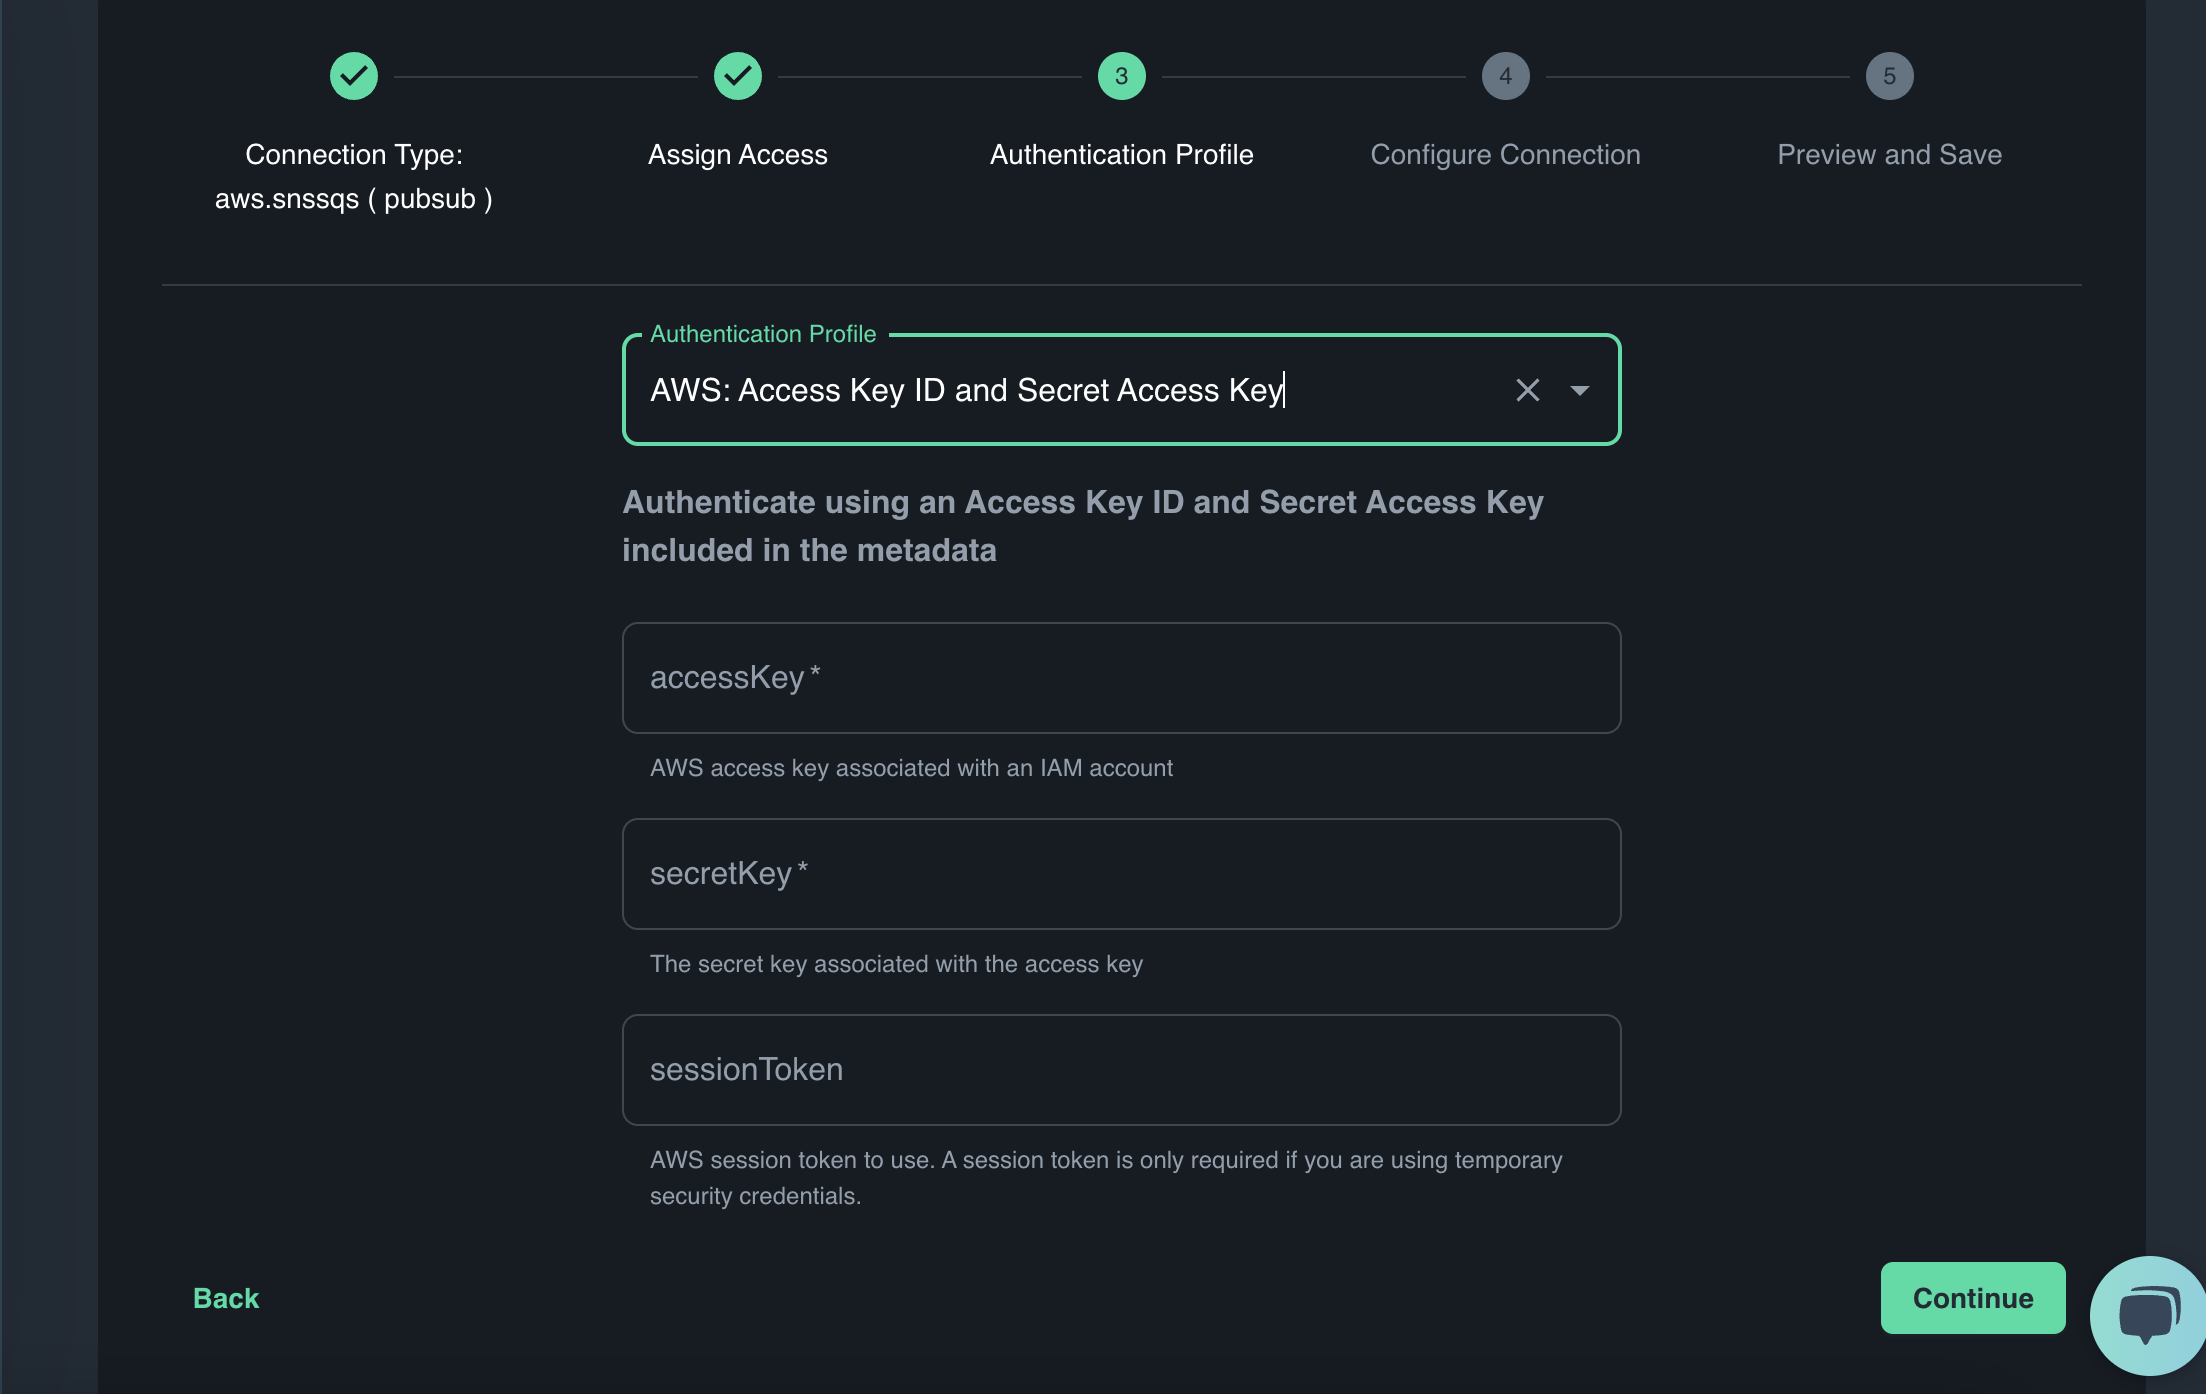
Check the Select All Checkbox because we want all our services to have access to this pub/sub.
Put in your access key id and secret key and click continue.
Put in a connection name of your choice and region, i used awssqs and us-east-1 as the name and region respectively.
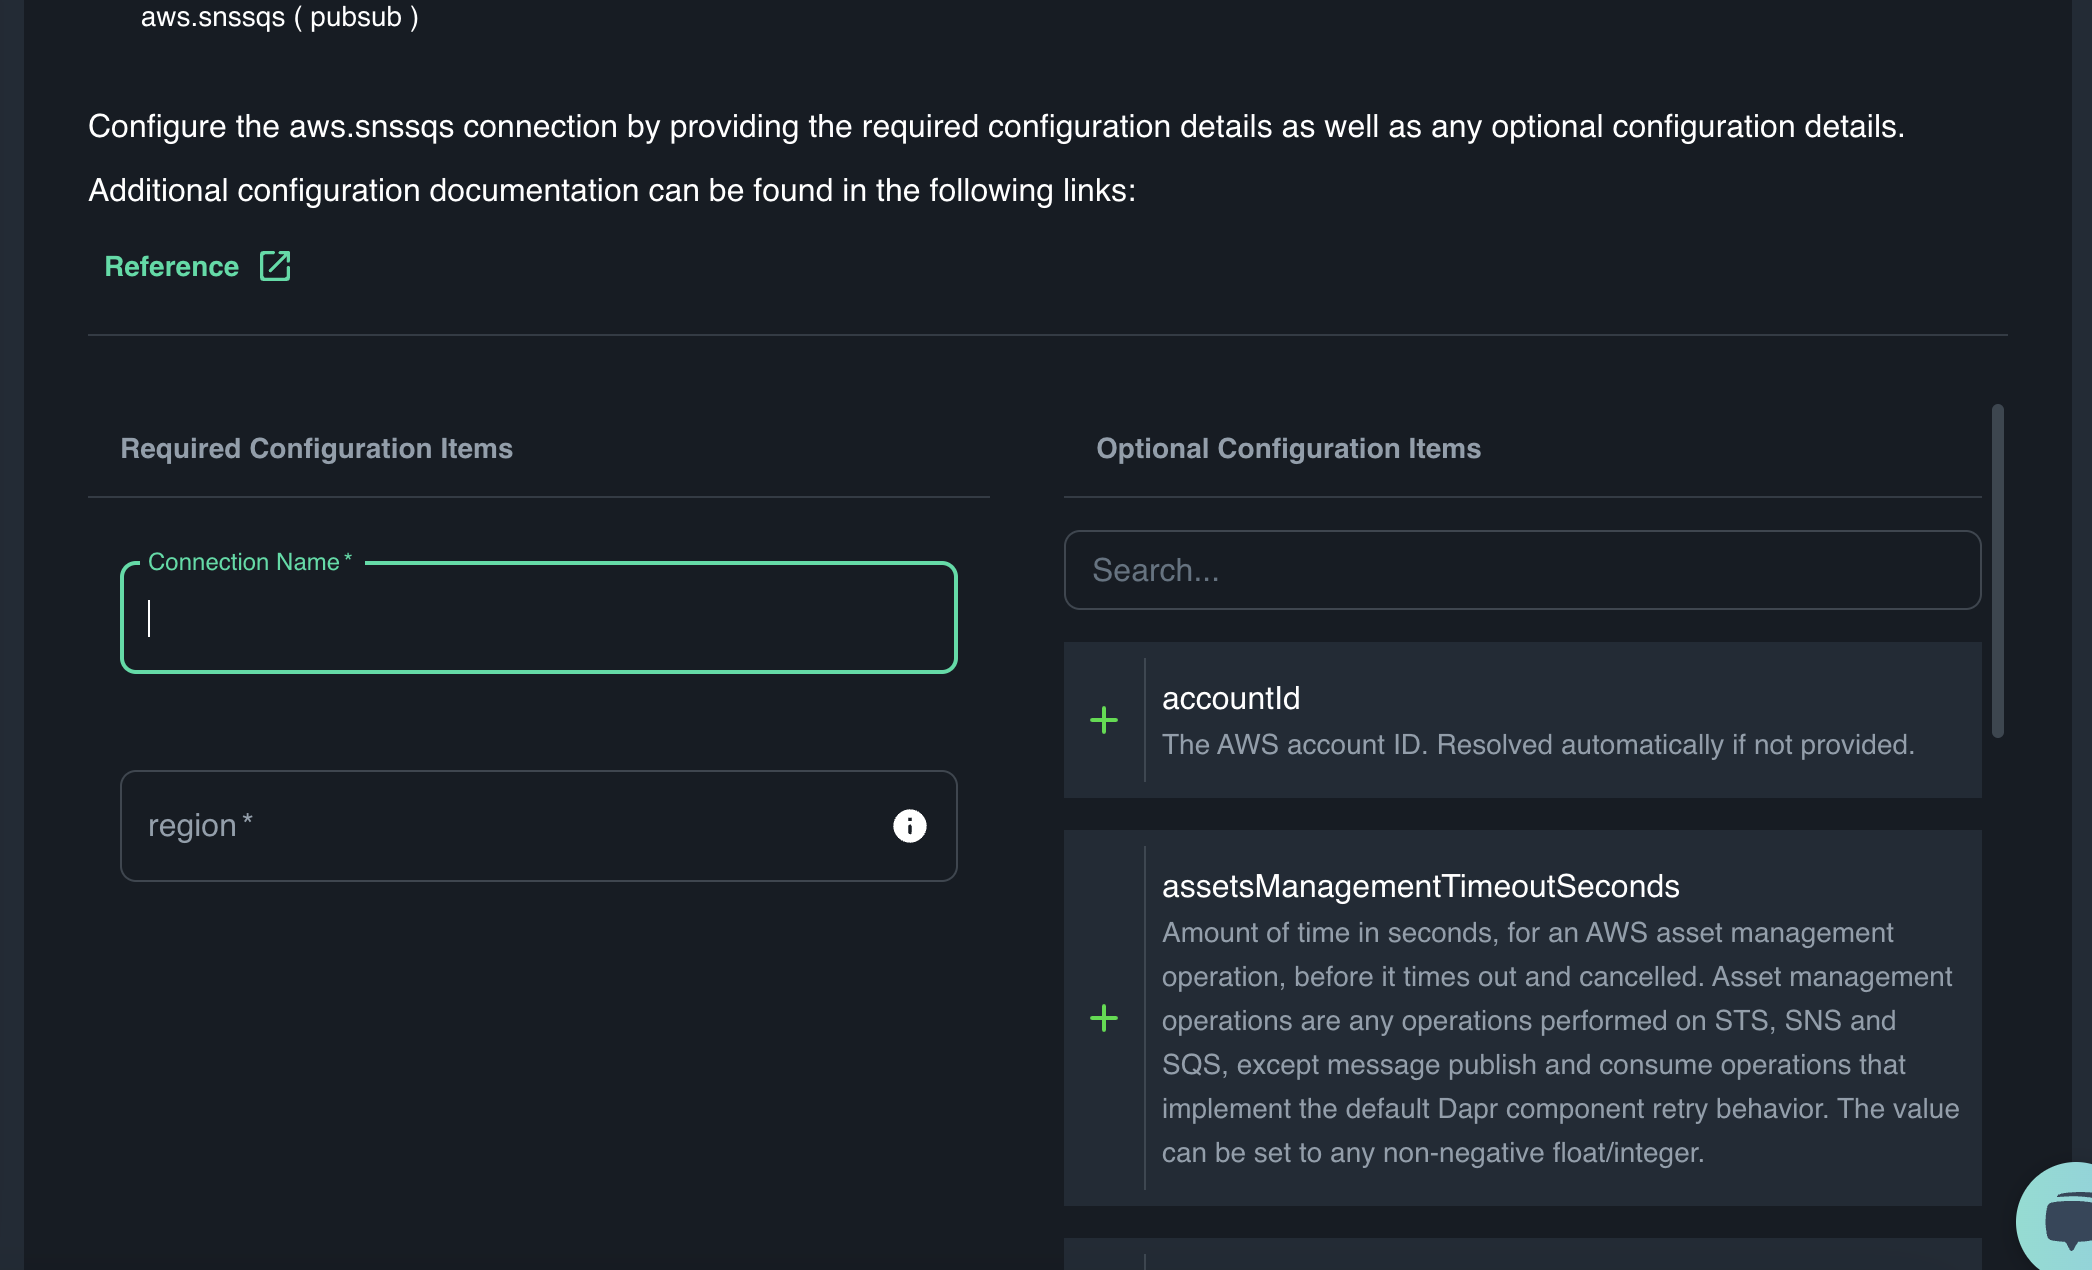
Click on continue and save.
Right now, we'll have to develop the app locally, while accessing the Catalyst API's.
The first step is to scaffold the project.
From the CLI run the following command
diagrid dev scaffold
This command produces the file dev-.yaml containing the app connection details for all the App IDs in the current Catalyst project. The dev config file has the following format:
project: <project-name> # Project that this file was generated from and connects to
apps: # List of App IDs in a project to run locally and/or create an app connection for
  - appId: <appid> # App ID name
    appPort: 0 # Optional: Port used by Catalyst to establish a local app connection to your code
    env: # App environment variables necessary for connecting to the Catalyst APIs
      DAPR_API_TOKEN: <appid-api-token>
      DAPR_APP_ID: <appid>
      DAPR_GRPC_ENDPOINT: <your-project-grpc-url>
      DAPR_HTTP_ENDPOINT: <your-project-http-url>
    workDir: <> # Work directory to run the start-up command in
    command: [] # Start-up command to run the application
You can read more here https://docs.diagrid.io/catalyst/how-to-guides/develop-locally#run-multiple-with-diagrid-dev-cli
Inside your requirements.txt, add these dependencies.
dapr==1.13.0
fastapi==0.109.1
grpcio==1.62.0
pydantic==2.4.2
requests==2.31.0
uvicorn==0.23.2
email-validator==2.1.1
Activate your python version environment using this command
For MacOS/Linux
source venv/bin/activate
For Windows
venv/Scripts/activate.bat
Then install the dependencies in the requirements.txt file.
pip install -r requirements.txt
Here's how my dev-<project-name>.yaml file looks like now.
Once successfully installed, run the diagrid dev start command.
project: MY-PROJECT-NAME
apps:
  - appId: user-service
    appPort: 5001
    env:
      DAPR_API_TOKEN: DIAGRID_TOKEN
      DAPR_APP_ID: user-service
      DAPR_CLIENT_TIMEOUT_SECONDS: 10
      DAPR_USER_DB: usersdb
      DAPR_GRPC_ENDPOINT: DIAGRID_GRPC_ENDPOINT
      DAPR_HTTP_ENDPOINT: DIAGRID_HTTP_ENDPOINT
    workDir: user-service
    command:
      - uvicorn
      - main:app
      - --port
      - "5001"
diagrdi dev start -f dev-<project-name>.yaml
This command starts all diagrid app ids in your project.
At this point, we only have the user-service app Id. We'll add more app ids as we progress through the workshop.
The following sections would highlight code fragments(NOT THE COMPLETE CODE) used in creating different endpoints.
Please access the complete code on the github directory.
You'll also be required to do a couple of exercises throughout this workshop session. Don't worry, the exercises will only involve stuff we've previously covered.
We're going to be using FastAPI as the web application framework to build this API.
The first endpoint we'll create is the createUserAccount endpoint.
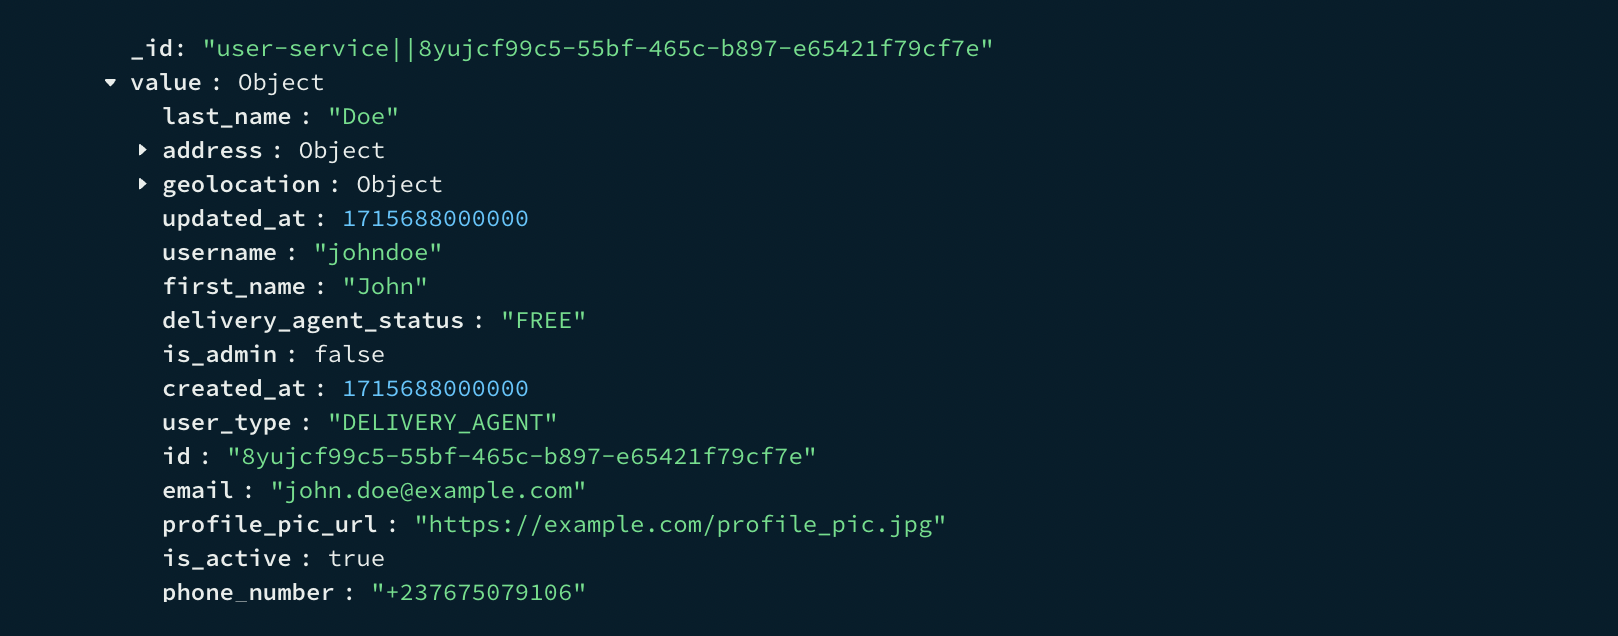
This endpoint takes in valid user inputs, saves them to the state(usersdb) and then published a delivery_agent_account_created event if the newly created account was for a DELIVERY AGENT.
We'll use pydantic for data validation.
Because our project is going to have many different services, we'll create each of these services within a separate folder.
Create a folder called user-service and move the main.py and requirements.txt file into it.
Create another folder called models within the user-service folder.
Create a python file called user_model.py inside the models. We'll define all our pydantic classes within this file.
Type the following code into this file.
class UserModel(BaseModel):
    id: str
    email: EmailStr
    username: str
    first_name: str
    last_name: str
    address: Optional[Address]
    profile_pic_url: Optional[str]
    delivery_agent_status: Optional[DELIVER_AGENT_STATUS]
    geolocation: Geolocation
    is_active: bool
    is_admin: bool
    phone_number: str
    user_type: UserType
    created_at: int
    updated_at: Optional[int]


class UserType(str, Enum):
    CUSTOMER = "CUSTOMER"
    ADMIN = "ADMIN"
    DELIVERY_AGENT = "DELIVERY_AGENT"


class DELIVER_AGENT_STATUS(str, Enum):
    FREE="FREE"
    OCCUPIED="OCCUPIED"

class Address(BaseModel):
    street: str
    city: str
    zip: int
    country: str


class Geolocation(BaseModel):
    latitude: float
    longitude: float
Inside the main.py file, define the POST method for creating the user account and sending the event.
@app.post('/v1.0/state/users')
def create_user_account(user_model: UserModel) -> UserModel:
    with DaprClient() as d:
        print(f"User={user_model.model_dump()}")
        try:
            #save user state
            d.save_state(store_name=user_db,
                         key=str(user_model.id),
                         value=user_model.model_dump_json(),
                         state_metadata={"contentType": "application/json"})

            # Only send event if created user is a delivery agent
            if user_model.user_type == UserType.DELIVERY_AGENT:
                d.publish_event(
                    pubsub_name=pubsub_name,
                    topic_name=delivery_agent_account_created_topic,
                    data=user_model.model_dump_json(),
                    data_content_type='application/json')
                return user_model
            else:
                return user_model

        except grpc.RpcError as err:
            print(f"Error={err.details()}")
            raise HTTPException(status_code=500, detail=err.details())
To save a state in the state store, we use dapr's save_state method, passing in the store name, key and value and then the state_metadata.
state_metadata={"contentType": "application/json"} ensures that state values are saved as json object and not strings which are default.
For event publishing, we'll use dapr's publish_event and pass in the required parameters.
But we haven't created a subscription yet. Remember, we created a pub/sub broker above called awssqs. We need to add a producer and consumer to that broker.
The producer is our user-service and the consumer is a notification-service which we haven't also created.

Create an app ID called notification-service. We did something similar above for the user-service. Remember you can also create app ids using commands from the CLI.
diagrid appid create notification-service
When you're done, from your CLI, we'll create a subscription with the command below
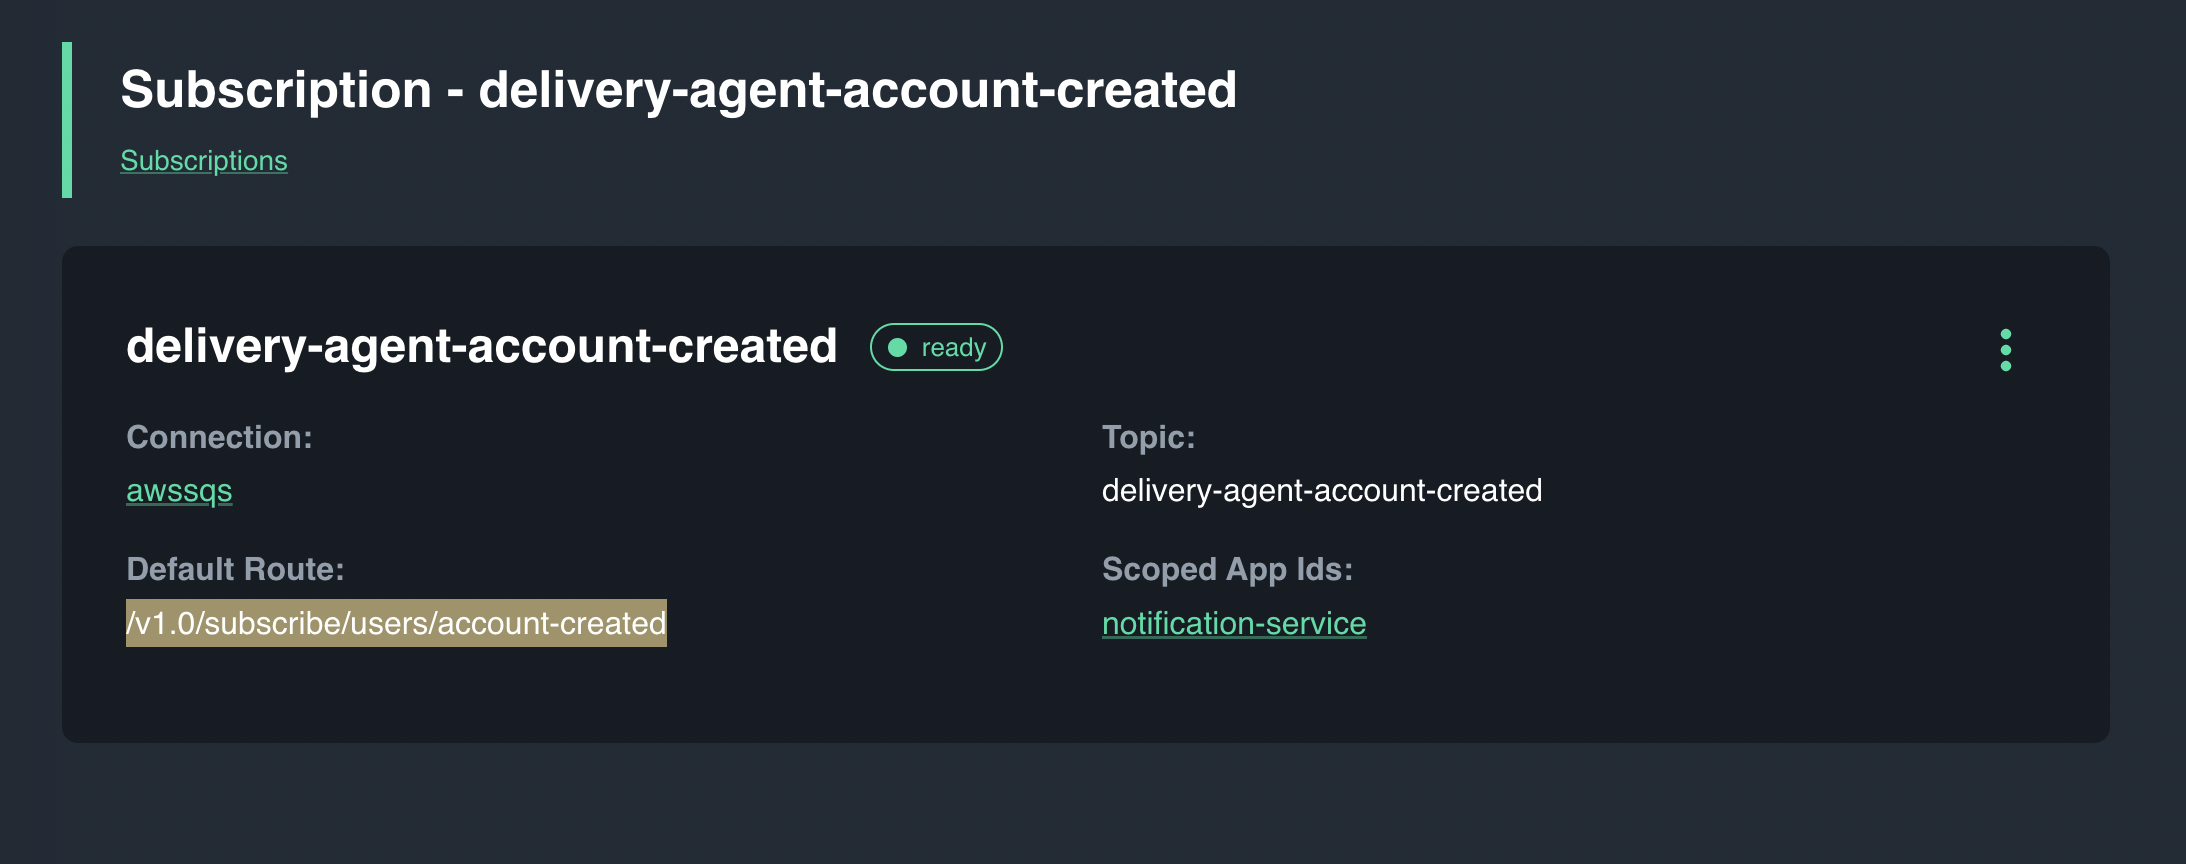
diagrid subscription create delivery-agent-account-created -c awssqs -s notification-service -t delivery-agent-account-created -r /v1.0/subscribe/users/account-created
- Topic name is
delivery-agent-account-created - Subscription name is
delivery-agent-account-created - Subscription service is
notification service - Subscription endpoint is
/v1.0/subscribe/users/account-created
Retrieves a user's account using a GET request and the user's id.
We'll use dapr's get_state method while passing in the state store name and item id to retrieve.
@app.get('/v1.0/state/users/{user_id}')
def get_user_account(user_id: str):
    with DaprClient() as d:
        try:
            # get user item state
            kv = d.get_state(user_db, user_id)
            user_account = UserModel(**json.loads(kv.data))

            return user_account.model_dump()
        except grpc.RpcError as err:
            print(f"Error={err.details()}")
raise HTTPException(status_code=500, detail=err.details())Deleting a user's account actually involves updating the is_active attribute in the user's model from True to False.
We won't be actually deleting user's details from the state.
@app.delete('/v1.0/state/users/{user_id}')
def delete_user_account(user_id: str):
    with DaprClient() as d:
        try:
            # retrieve user account
            kv = d.get_state(user_db, user_id)
            user_account = UserModel(**json.loads(kv.data))

            # update attribute
            user_account.is_active = False

            # save state
            d.save_state(store_name=user_db,
                         key=str(user_account.id),
                         value=user_account.model_dump_json(),
                         state_metadata={"contentType": "application/json"})

            return {"message": "User account deleted successfully"}

        except grpc.RpcError as err:
            print(f"Error={err.details()}")
raise HTTPException(status_code=500, detail=err.details())One of the use cases of this application is to be able to retrieve user's of a particular type. Say retrieve all CUSTOMERS OR DELIVERY AGENTS OR ADMINS.
This is a great use case for queries and thankfully, Dapr Queries support MONGODB state store.
Here's how our query looks like
   query_filter = json.dumps({
                "filter": {
                    "AND": [
                        {
                            "EQ": {"is_active": True}
                        },
                        {
                            "EQ": {"user_type": user_type}
                        }

                    ]
                },
                "sort": [
                    {
                        "key": "id",
                        "order": "DESC"
                    }
                ],
                "page": {
                    "limit": 10
                }
            })
First, we want to make sure we're only retrieving active users.
"EQ": {"is_active": True}
Then, we pass in the user type(e.g CUSTOMER).
"EQ": {"user_type": user_type}
We set the page limit to 10, because we need to retrieve results in batches of 10. If more than 10 records are available, the query returns with a token to get the next batch.
We'll pass in this query into the query_state method and get the output
 kv = d.query_state(

                store_name=user_db,
                query=query_filter

            )

            for item in kv.results:
                user_model = UserModel(**json.loads(item.value))
                users.append(user_model)
                print(f"users {user_model.model_dump()}")

return usersThis method will be invoked by the pickup-service which we haven't created yet. But we can talk about. In order for a delivery agent to be assigned a package, they must be FREE at that point in time.
Using Diagrid's Request/Reply API, we'll synchronously invoke an endpoint inside the user-service that'll search and return 1 delivery agent with current delivery status as FREE.
Let's define the query filter for this endpoint.
query_filter = json.dumps({
                "filter": {
                    "AND": [
                        {
                            "EQ": {"is_active": True}
                        },
                        {
                            "EQ": {"user_type": UserType.DELIVERY_AGENT}
                        },
                        {
                            "EQ": {"delivery_agent_status": DELIVER_AGENT_STATUS.FREE}
                        }

                    ]
                },
                "sort": [
                    {
                        "key": "id",
                        "order": "DESC"
                    }
                ],
                "page": {
                    "limit": 1
                }
            })
Firstly, we want to make sure the user is active, and is of type of DELIVERY_AGENT and has a Delivery_status as FREE.
All these conditions have to be true for this query to be successful.
Since we only need a single delivery person, we set the page limit to 1.
Using the query_state method
 kv = d.query_state(

                store_name=user_db,
                query=query_filter

            )


            for item in kv.results:
                user_model = UserModel(**json.loads(item.value))
                users.append(user_model)
                print(f"free delivery agent {user_model.model_dump()}")
Get the complete code for the user-service from the github repo, run the application and test each endpoint.
The next service we'll create is the package-service.
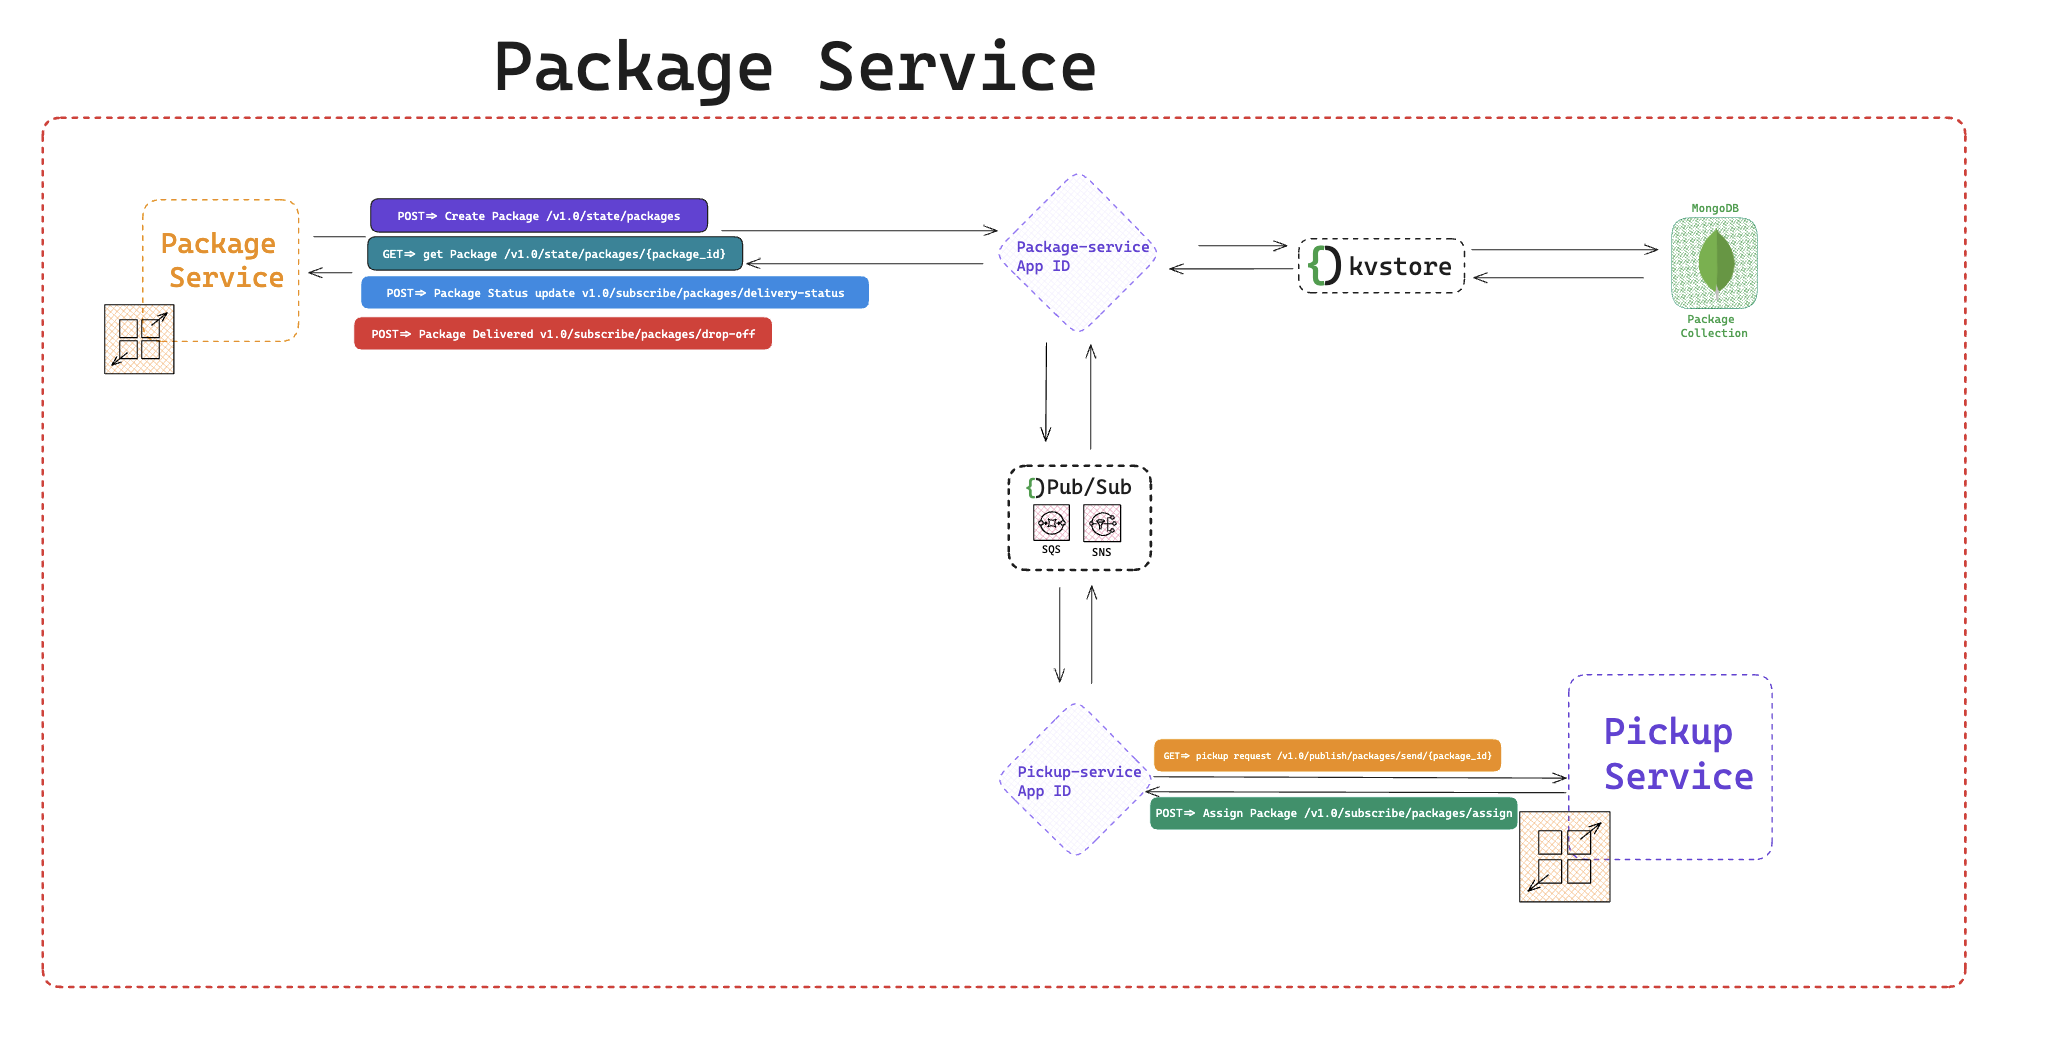
The Package Service is responsible for all package activities within the system such as
-
Creating a new package
-
Updating Package Status
-
Deleting a Package
-
Retrieving packages based on certain criteria, such as all packages per user or based on package status and a lot more.
-
Publishing package-pickup-requests events
-
Subscribing to package-drop-off events
-
Subscribing to package-status-update events
-
Subscribing to assign-package-request events
We'll start by creating an app ID called package-service. You can either use the Catalyst UI as we did above or run this CLI command.
diagrid appid create package-service
The next step is to create the package pickup request event. This event simply notifies subscribers of the fact that, a package needs to be picked up and assigned a delivery agent.
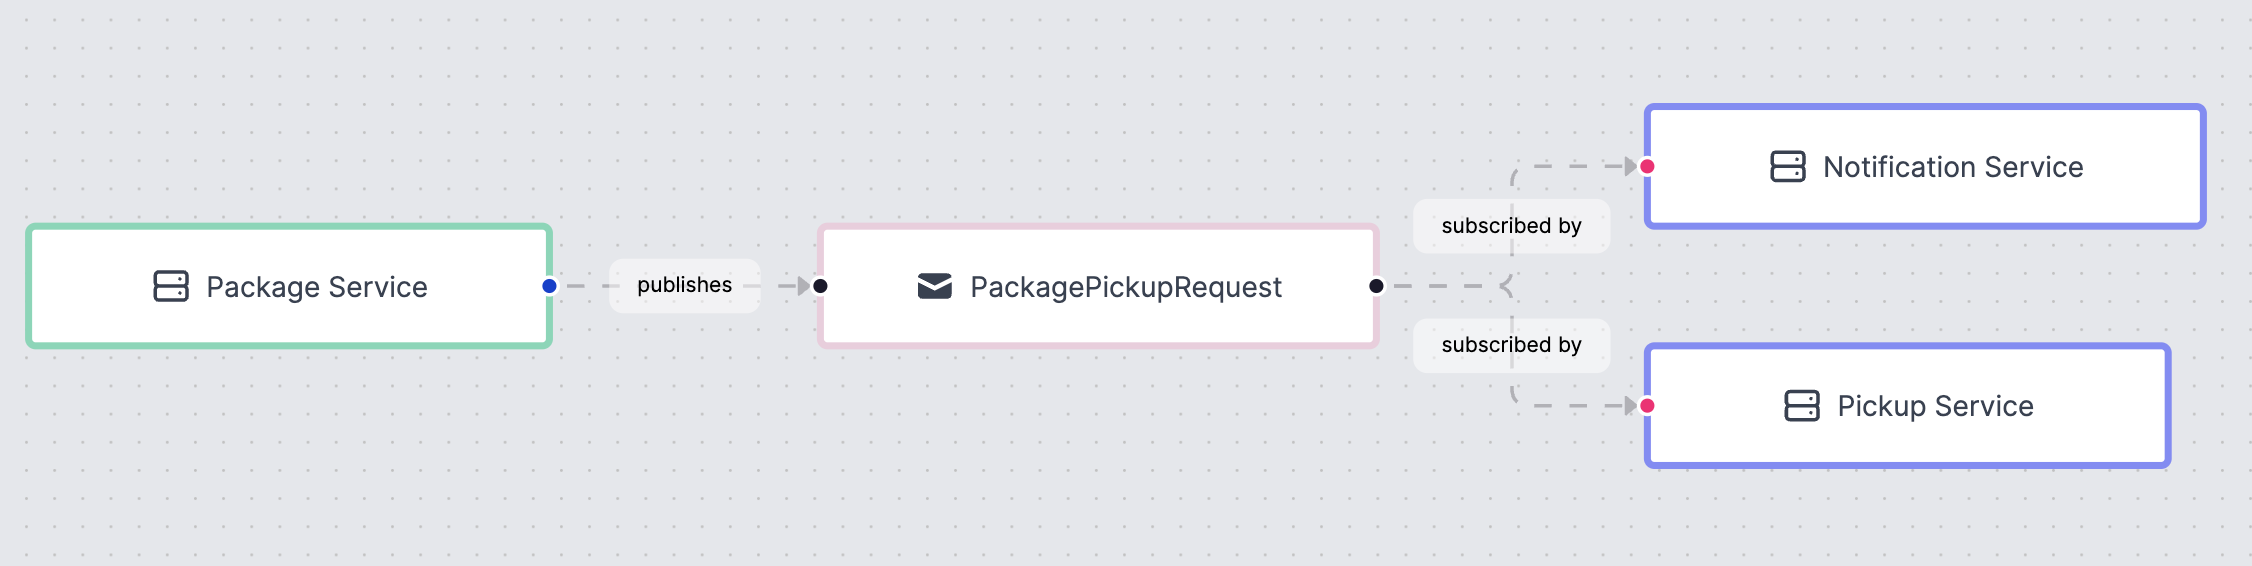
We'll look more into the consequence of this event, when we'll be talking about the pickup-service.
Run the following command to create package-pickup-event with attached subscribers that happen to be the notification-service and pickup-service.
Create those app ids, if you haven't already done so.
diagrid subscription create package-pickup-request -c awssqs -s notification-service,pickup-service -t package-pickup-request -r /v1.0/subscribe/packages/pickupNow, we have to add the package-service configuration into our dev-<project-name>.yaml file.
Currently, my dev-<project-name>.yaml file looks like this
project: kv-project-fbe8f200-4
apps:
  - appId: package-service
    appPort: 5002
    env:
      DAPR_API_TOKEN: <TOKEN>
      DAPR_APP_ID: package-service
      DAPR_PACKAGES_DB: packagesdb
      DAPR_PUB_SUB: awssqs
      DAPR_CLIENT_TIMEOUT_SECONDS: 10
      DAPR_PACKAGE_PICKUP_TOPIC_NAME: package-pickup-request
      DAPR_GRPC_ENDPOINT: <ENDPOINT>
      DAPR_HTTP_ENDPOINT: <ENDPOINT>
    workDir: package-service
    command:
      - uvicorn
      - main:app
      - --port
      - "5002"

  - appId: user-service
    appPort: 5001
    env:
      DAPR_API_TOKEN: <TOKEN>
      DAPR_APP_ID: user-service
      DAPR_CLIENT_TIMEOUT_SECONDS: 10
      DAPR_USER_DB: usersdb
      DAPR_PUB_SUB: awssqs
      DAPR_DELIVER_AGENT_ACCOUNT_CREATED_TOPIC_NAME: delivery-agent-account-created
      DAPR_GRPC_ENDPOINT: <ENDPOINT>
      DAPR_HTTP_ENDPOINT: <ENDPOINT>
    workDir: user-service
    command:
      - uvicorn
      - main:app
      - --port
      - "5001"
The package-service app is listening on port 5002. The user-service app was listening on port 5001.
Create another folder within your project and name it package-service. So now there's the user-service folder and a package-service folder in your project folder.
Within the package-service folder, create the models folder and package_model.py file within it .
This file contains the pydantic package model class with package fields.
Here's a code snippet of the contents of the package_model.py file.
class PackageModel(BaseModel):
    id: str
    packageName: str
    packageDescription: str
    pickupAddress: TransactionAddress
    deliveryAddress: TransactionAddress
    packageStatus: PackageStatus
    packageType: PackageType
    deliveryMode: PackageDeliveryMode
    senderId: str
    deliveryAgentId: Optional[str] = None
    createdAt: int
updatedAt: Optional[int] =NoneThis endpoint grabs package inputs and saves them to the packagesdb state.
@app.post('/v1.0/state/packages')
def create_package(package_model: PackageModel):
    with DaprClient() as d:
        print(f"package={package_model.model_dump()}")
        try:
            d.save_state(store_name=package_db,
                         key=str(package_model.id),
                         value=package_model.model_dump_json(),
                         state_metadata={"contentType": "application/json"})

            return package_model
        except grpc.RpcError as err:
            print(f"Error={err.details()}")
            raise HTTPException(status_code=500, detail=err.details())
In another variation of such an application, you might want to publish a package-created event and do something with the event. But for this workshop, we won't be doing do that.
To test your knowledge and understanding of everything we've covered so far, write endpoints for
- get package(
@app.get('/v1.0/state/packages/{package_id}')) - Get all user packages(
@app.get('/v1.0/state/packages/users/{user_id}')). For this endpoint, use a query withsenderIdequal touser_id - Get Packages by package status(
@app.get('/v1.0/state/packages/status/{package_status}'))
@app.get('/v1.0/publish/packages/send/{package_id}')
This endpoint is executed when a user(Customer) needs their package to be picked up by a delivery agent.
Inside this funciton, 3 things happen.
- Firstly, we get the package id and retrieve the entire package item
   kv = d.get_state(package_db, package_id)
package_model = PackageModel(**json.loads(kv.data))- Secondly, we update the package status from
PENDINGtoPICK_UP_REQUESTand then save.
  # update package status
            package_model.packageStatus = PackageStatus.PICK_UP_REQUEST

            d.save_state(store_name=package_db,
                         key=str(package_model.id),
                         value=package_model.model_dump_json(),
state_metadata={"contentType": "application/json"})- Finally, we publish a
package-pickup-requestevent.
            package_details = {
                "package_model": package_model.model_dump_json(),
                "event_type": "package-pickup-request"
            }

            d.publish_event(
                pubsub_name=pubsub_name,
                topic_name=topic_name,
                data=json.dumps(package_details),
                data_content_type='application/json',
            )
If you notice, we could easily use a workflow to orchestrate these activities.
Maybe you'll love to redo this endpoint as a workflow, for an exercise.
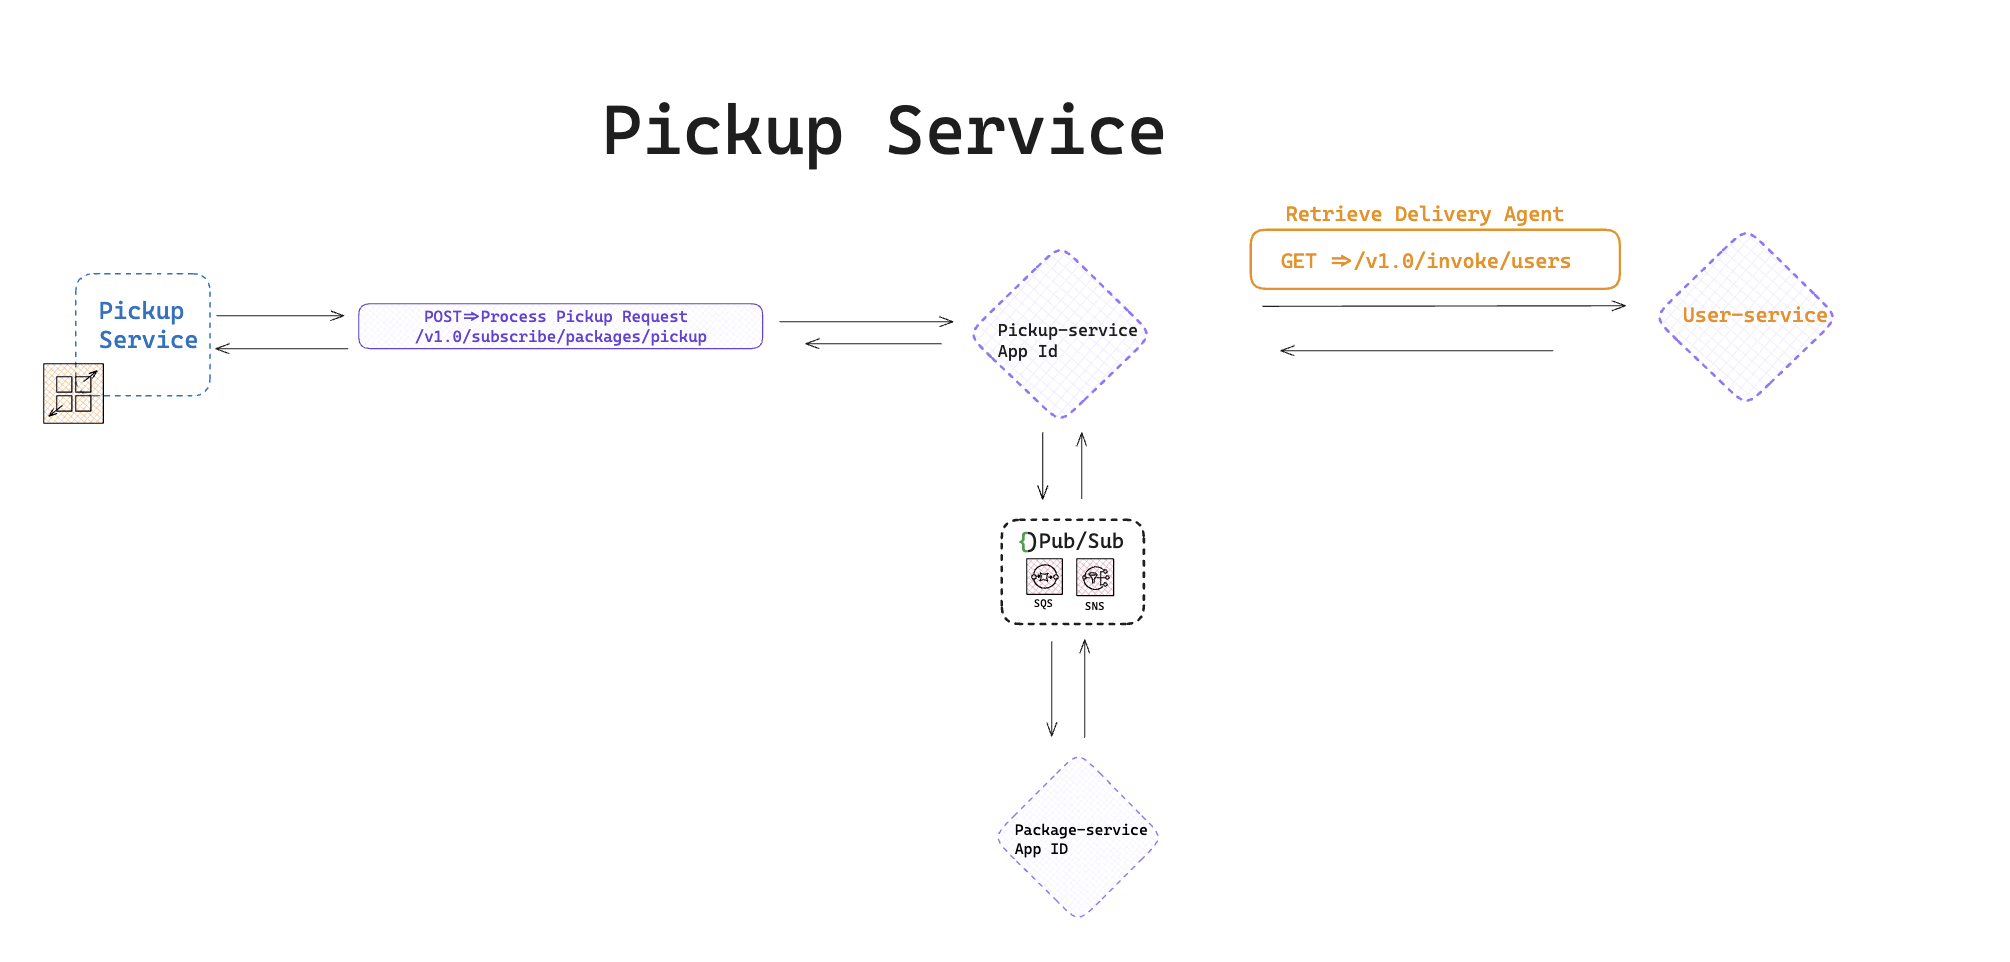
The next service is the pickup service. This service is invoked by the package-pickup-request event.
When it receives the package-pickup-request event, we synchronously invoke the get free delivery agent endpoint in the user-service using Catalysts Request/Response API.
When the results are returned, 2 fields of the package item get updated.
The delivery agent id and the package status.
The package status is set to ASSIGNED.
This record has to be persisted in the package state store. This functionality can't be done inside the pickup-service. We don't share state. So we send an event alongside the updated package payload back to the package service and it does the update.
Remember to create the pickup-service app id if you haven't already done that.
Create a new pickup-service folder in your local project and add the main.py and requirements.py alongside the dependencies.
@app.post('/v1.0/subscribe/packages/pickup')
async def pickup_package_event(event: CloudEvent):
    with DaprClient() as d:
        logging.info(f'Received event: %s:' % {event.model_dump_json()})
        logging.info(f'Received event: %s:' % {event.data['package_model']})

        package_model = json.loads(event.data['package_model'])

        # assign package to available delivery guy.
        headers = {'dapr-app-id': target_app_id, 'dapr-api-token': target_api_token,
                   'content-type': 'application/json'}
        try:
            result = requests.get(
                url='%s/v1.0/invoke/users' % base_url,
                headers=headers
            )

            if result.ok:
                logging.info('Invocation successful with status code: %s' %
                             result.status_code)
                print("result is %s" % result.json())
                driver_details = result.json()

                package_model['deliveryAgentId'] = driver_details[0]['id']
                package_model['packageStatus'] = "ASSIGNED"

                package_details = {
                    "package_model": json.dumps(package_model),
                    "event_type": "assignPackageRequest"
                }

                d.publish_event(
                    pubsub_name=pubsub_name,
                    topic_name=topic_name,
                    data=json.dumps(package_details),
                    data_content_type='application/json',
                )

                return result.json()

            else:
                logging.error(
                    'Error occurred while invoking App ID: %s' % result.reason)
                raise HTTPException(status_code=500, detail=result.reason)

        except grpc.RpcError as err:
            logging.error(f"ErrorCode={err.code()}")
            raise HTTPException(status_code=500, detail=err.details())
This service is responsible for handling the delivery aspect of the API.
Aspects such as
- Continued location updates as the package is being delivered.
- Package dropped off.
Assuming you've already created a delivery-service app id. And initialized the project within your IDE.
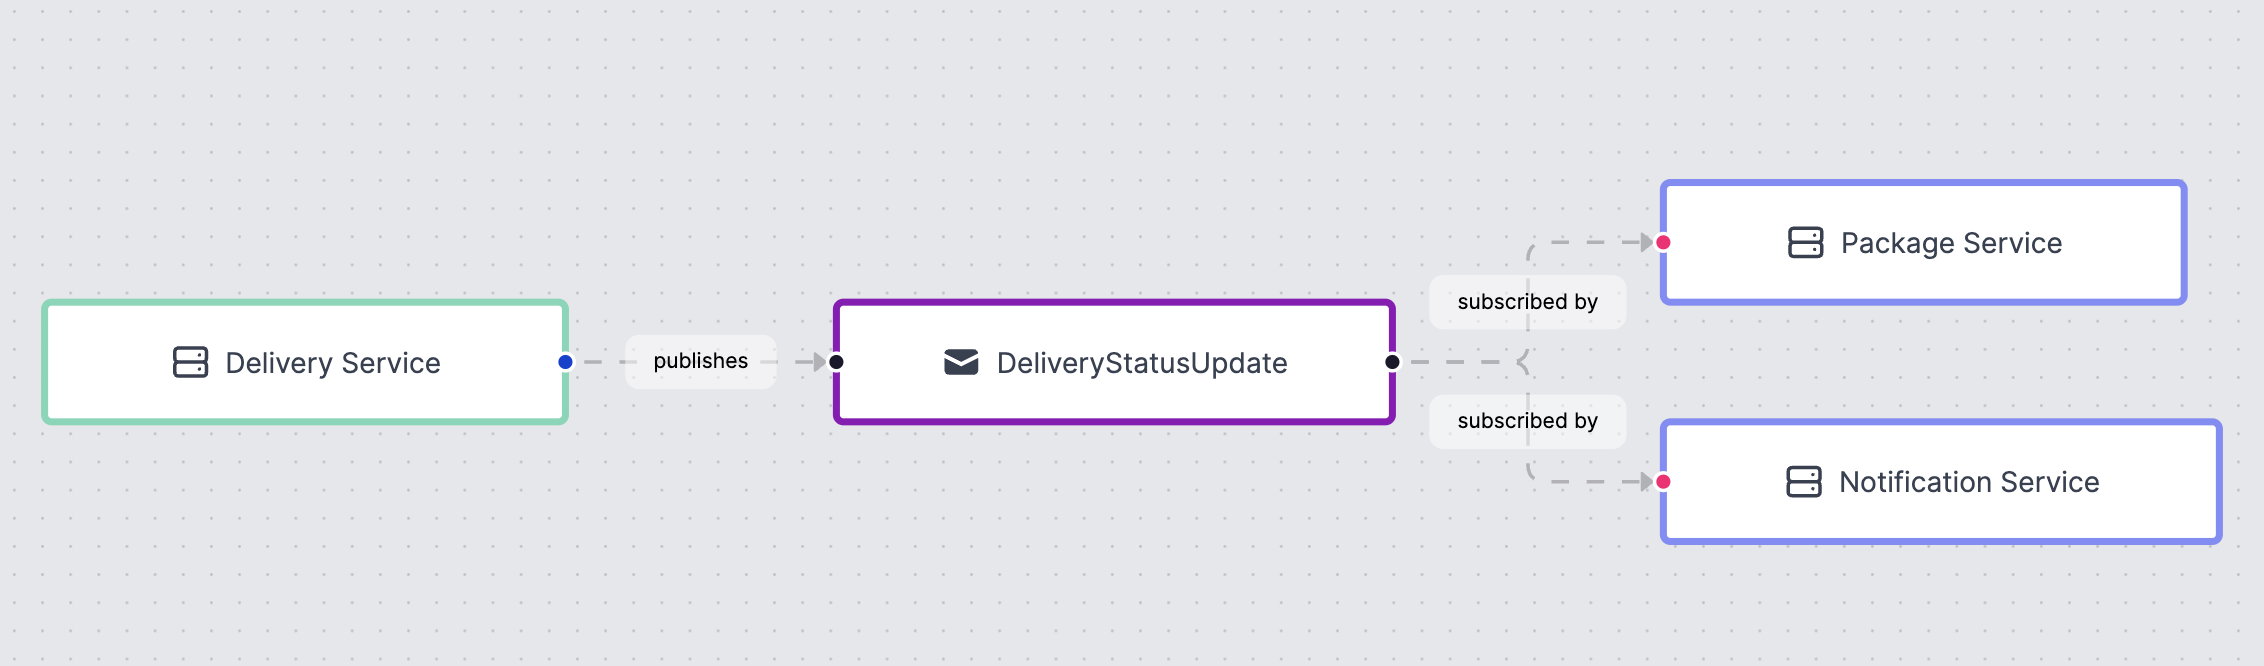
@app.post('/v1.0/publish/delivery-service/movement')
This is one of the most important endpoints in this api. It updates the location of the package as it's being delivered.
Using AWS AppSync's subscriptions we'll provide updates in realtime to the frontend application for a visual representation of the package's movement.
Also, an event(delivery_status_update) is sent each time the location is updated.
@app.post('/v1.0/publish/delivery-service/movement')
def package_movement_update(delivery_status_model: DeliveryStatusModel):
    with DaprClient() as d:
        logging.info(f'package id is:{delivery_status_model.packageId}')

        try:

            d.save_state(store_name=delivery_db,
                         key=delivery_status_model.packageId,
                         value=delivery_status_model.model_dump_json(),
                         state_metadata={"contentType": "application/json"})
            delivery_data = {
                "id": delivery_status_model.packageId
            }

            d.publish_event(
                pubsub_name=pubsub_name,
                topic_name=del_status_update_topic_name,
                data=json.dumps(delivery_data),
                data_content_type='application/json',
            )

            return delivery_status_model.model_dump()
        except grpc.RpcError as err:
            print(f"Error={err.details()}")
raise HTTPException(status_code=500, detail=err.details())After handing the package at it's destination, the delivery agent has to confirm package drop-off.
This involves updating both the delivery and package status.
For an exercise try doing this endpoint and comparing your answer with the result in the github repo.
The endpoint is (/v1.0/publish/delivery-service/drop-off).

Before proceeding, ensure you have a stripe account. Create one if you don't own one yet. We'll be needing the secret key sk_........for this section.
We'll implement payments using Dapr Workflows. They are durable, fault tolerant and support long running tasks, ideal for orchestrating activities within the payment service.
Speaking of activities, there are 3
-
Create Payment Intent: This activity sends a Stripe Payment intent to a customer, requesting them to approve a transaction. This would be the first activity within the payment service.
-
Send Notification: This activity is responsible for sending different types of events such as
- Timeout event
- Approved Event
- Cancelled Event to downstream services.
- Error Handler: This activity catches and prints the errors thrown by the workflow.
Get the complete code from the github repository and deploy. Each Service has it's own docker config file. So you can deploy independently.
For testing, i took the liberty to outline all the endpoints in a clean manner for easy identification.
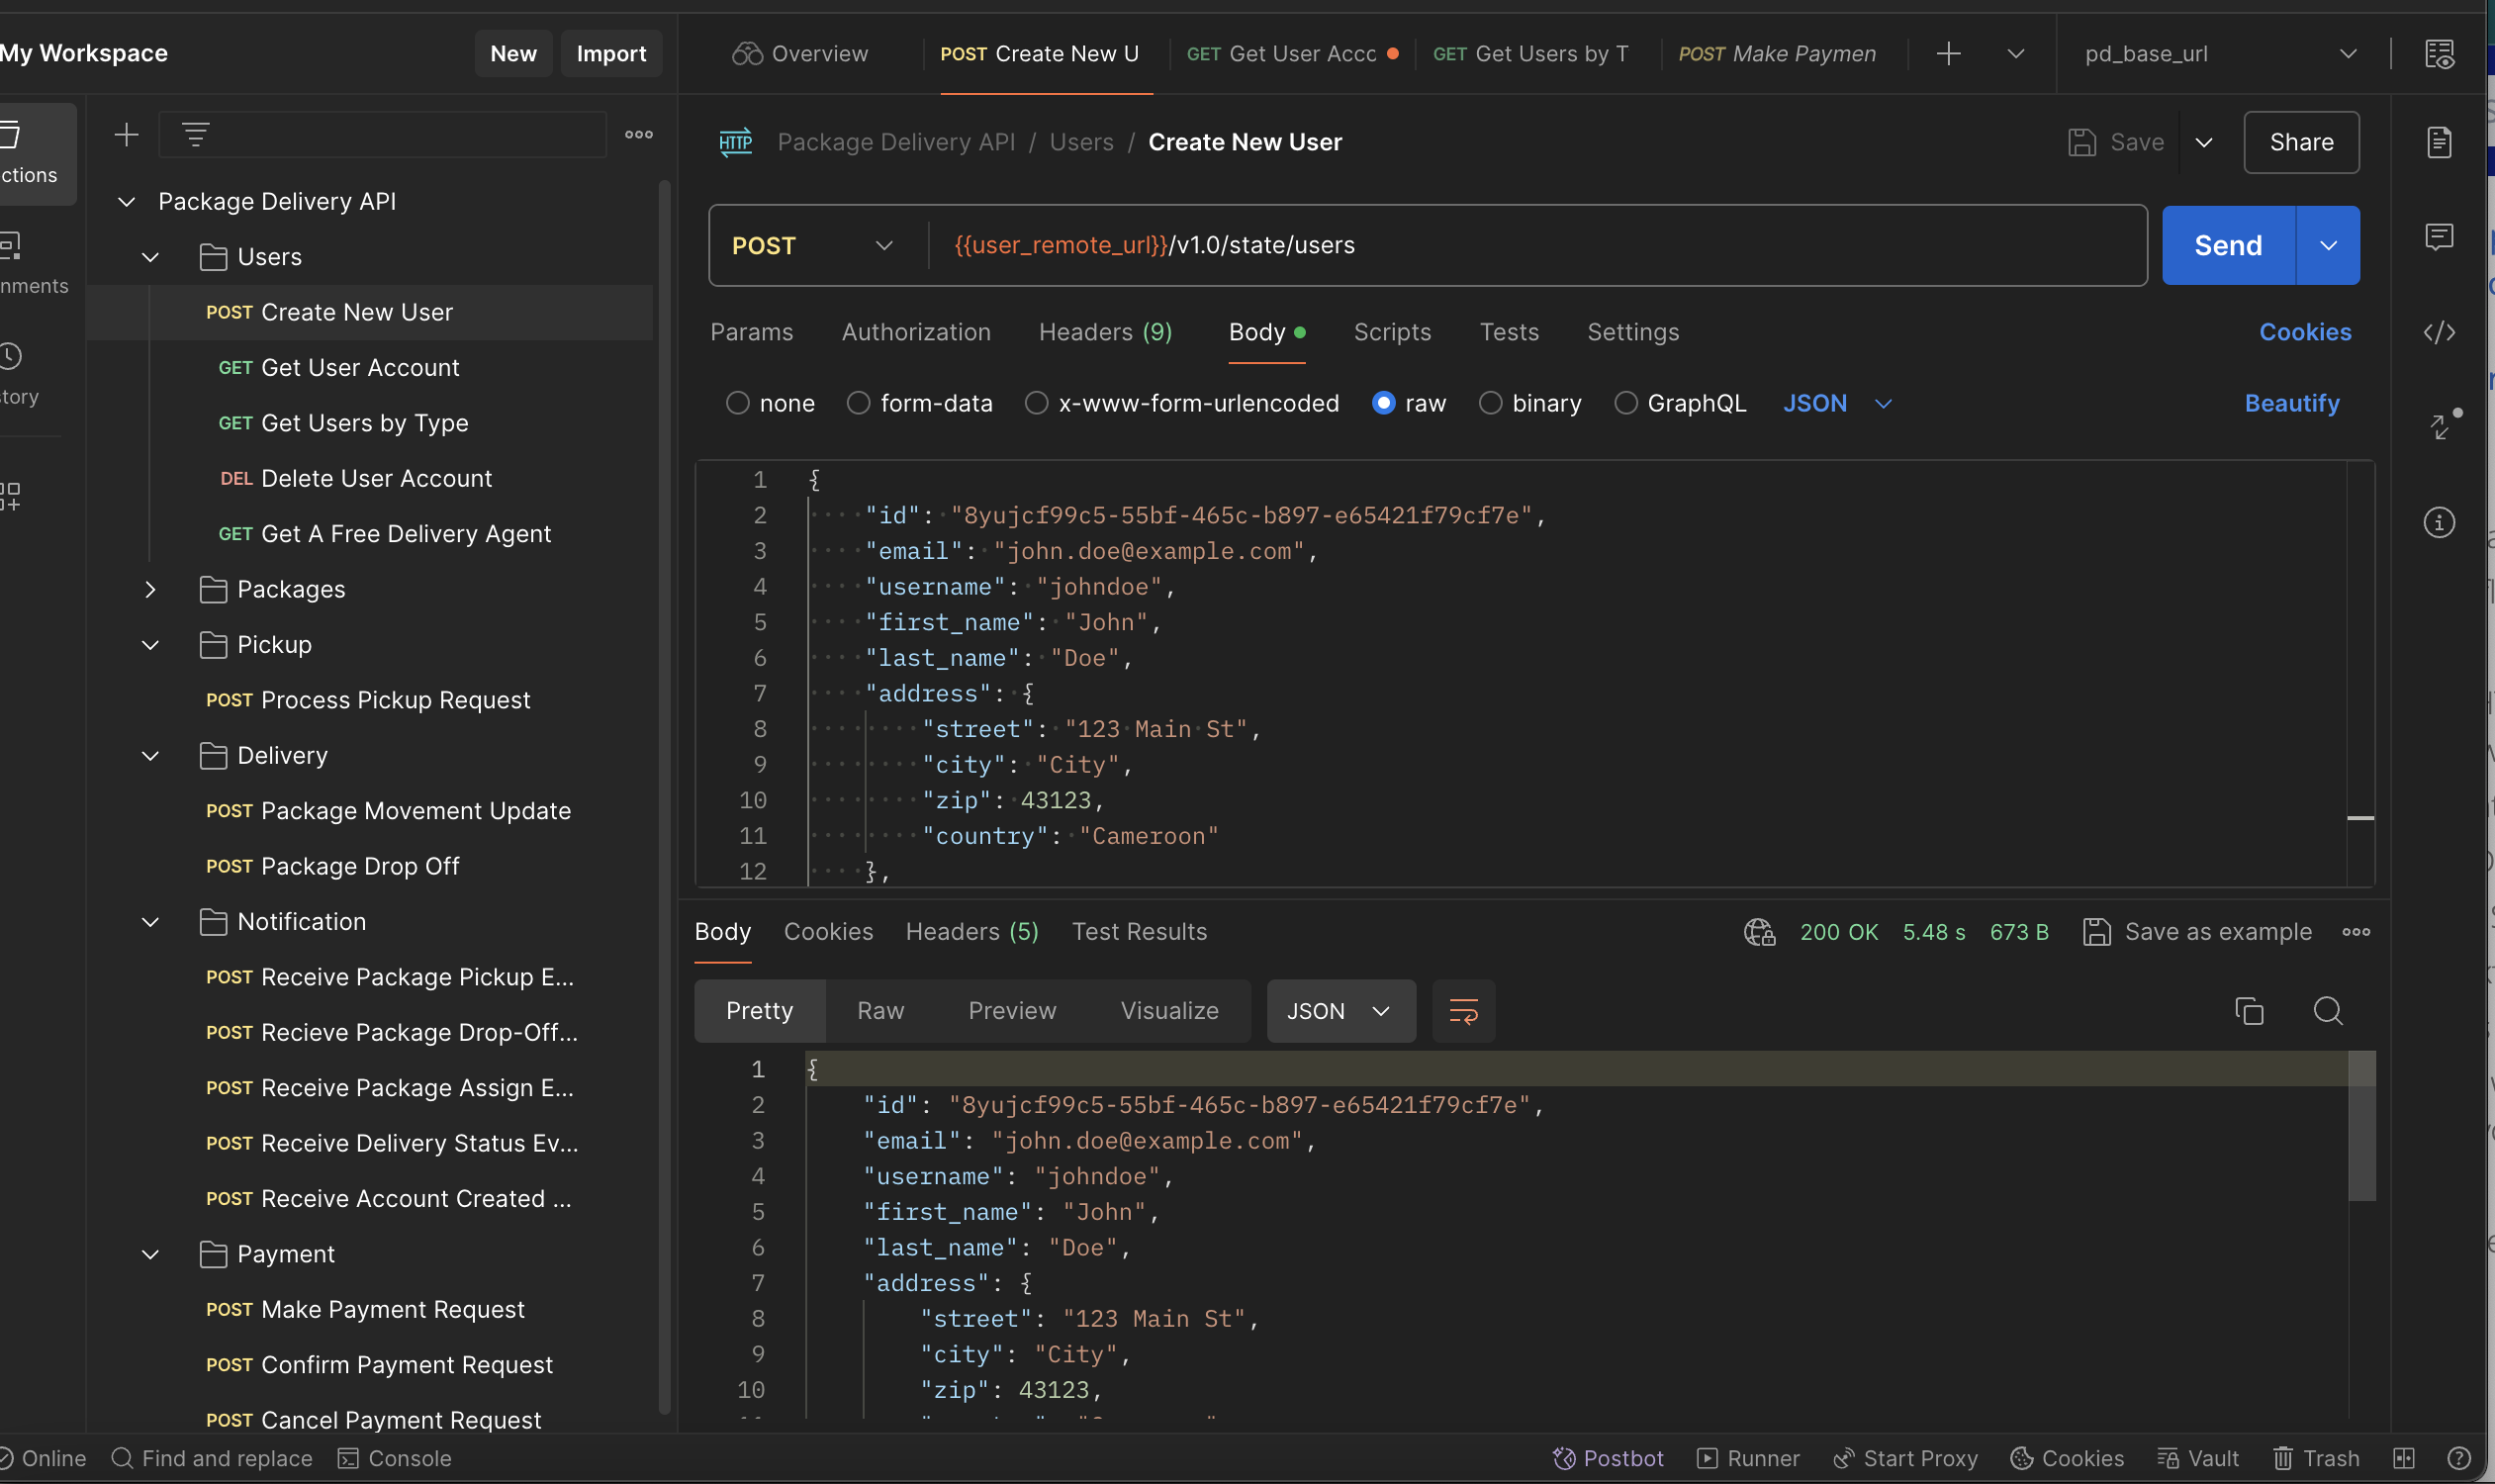
Access the endpoints using this link
POSTMAN PACKAGE DELIVERY MICROSERVICE API
Don't forget to set the environment variables

You can easily deploy and test the appsync application. All instructions are on the readme file in the github_repository
Here's the Graphql Endpoint
https://3clidexd65h2ri2ppl7d3jf6ii.appsync-api.us-east-2.amazonaws.com/graphql
You'll need to create an AWS Cognito User