Netatmo to InfluxDB logger. Written in Powershell, running in Docker.
This container is made to be able to run on Raspberry Pi 5 (Raspberry Pi OS) and have also been tested on amd64.
If you want to build the container yourself.
git clone git@github.com:turbosnute/ps-netatmo-influxdb.git
cd ps-netatmo-influxdb
docker build -t "ps-netatmo-influxdb" .
Run the official image of the container:
docker network create weather-net
docker run -d -p 8800:8800 -v psnetatmo:/config --name "ps-netatmo-influxdb" --network "weather-net" turbosnute/ps-netatmo-influxdb
or run your local image:
docker network create weather-net
docker run -d -p 8800:8800 -v psnetatmo:/config --name "ps-netatmo-influxdb" --network "weather-net" ps-netatmo-influxdb
This script utilizes the Netatmo API to access data. To authenticate with the API, you'll need to obtain a Client ID and Client Secret by following these steps:
-
Visit Netatmo Developer Website: Go to the Netatmo Developer portal and sign in.
-
Create an Application: Once logged in, navigate to the "My Apps" section and create a new application. Fill in the required details about your application.
-
Retrieve Client ID and Client Secret: After creating the application, you'll be provided with a Client ID and Client Secret.
If you don't already have an InfluxDB server, you can easily run one using Docker:
docker run -d --name=influxdb -p 8086:8086 --network "weather-net" -v influxdb-vol:/root/.influxdb2 influxdb:2.7.5
If you already have an InfluxDB container running, ensure it's accessible from the PS-Netatmo-InfluxDB container by joining it to the same network:
docker network connect "weather-net" influxdb
Once your InfluxDB server is up and running, you'll need to set up an organization, a bucket, and an API token with write and read access to the bucket.
The easiest way to do this is through the InfluxDB Web UI. Navigate to http://servername:8086
Copy the super user Token or create a new token with write and read access to the bucket.
-
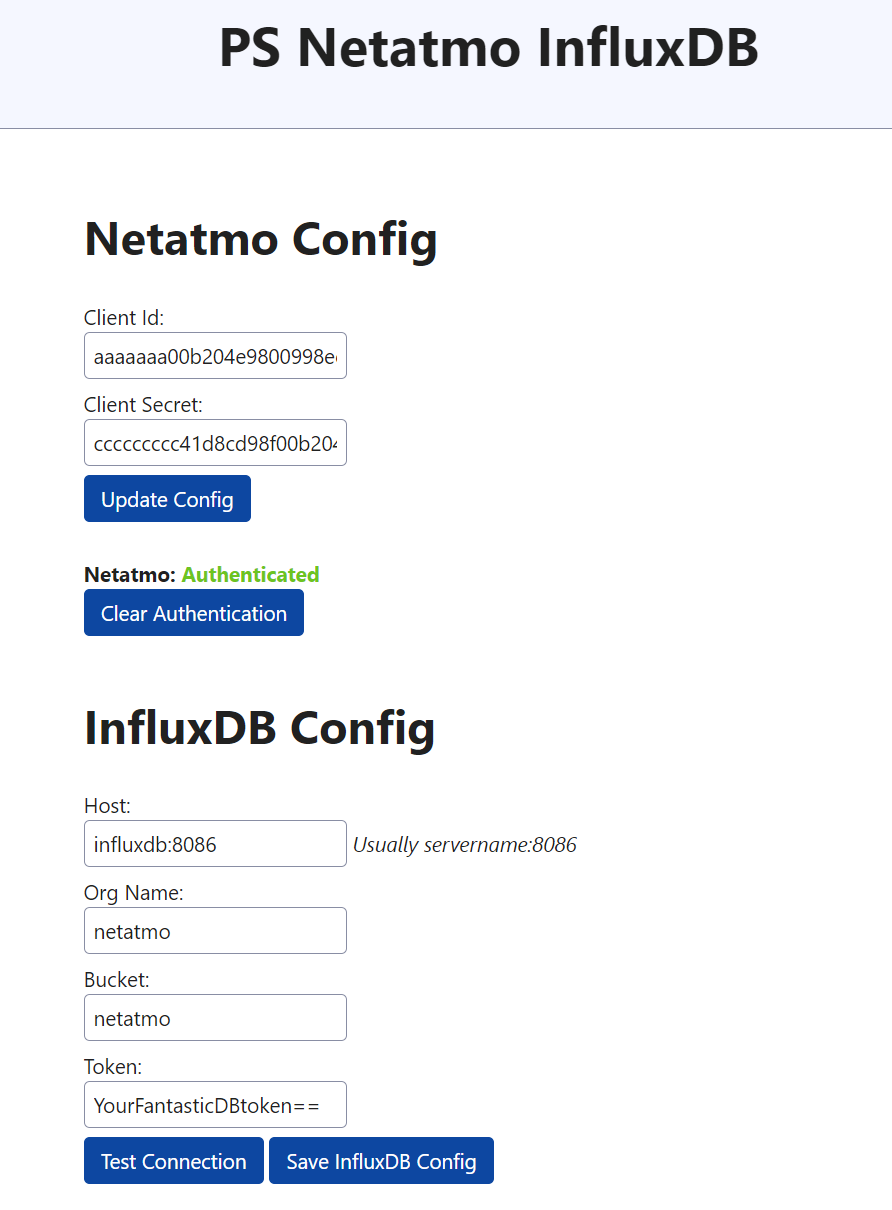
Access Configuration Page:
Navigate to
http://servername:8800in your web browser. Replaceservernamewith the hostname or IP address of the server where PS-Netatmo-InfluxDB is running. -
Enter Netatmo Client ID and Client Secret:
Enter your Netatmo client ID and client secret in the respective fields on the configuration page.
-
Authenticate with Netatmo API:
Click on the "Authenticate Netatmo" button and follow the sign-in procedure to authenticate with the Netatmo API.
-
Enter InfluxDB Settings: Enter your InfluxDB hostname, organization, bucket and token in the respective fields.
-
Test Connection:
Click on the "Test Connection" button to verify if the settings are valid. Ensure that the connection to InfluxDB is successful.
-
Save InfluxDB Config:
After successful validation of the settings, click on "Save InfluxDB Config" to save the configuration.
Once the configuration is complete, PS-Netatmo-InfluxDB will start logging data from your Netatmo weather station to your InfluxDB database. It may take up to 5 minutes for the logging to begin.
Contributions are welcome! Feel free to open issues or pull requests on GitHub to suggest improvements, report bugs, or add new features to PS-Netatmo-InfluxDB. Please keep in mind that I work on this project during my limited free time. Your understanding and patience are greatly appreciated.
I need help on the following:
- Make the Web UI look better - Yeah, webui is not my strength.
- Error handling - I feel like there should be a little more error handling and feedback to the user.