This is an open source and community supported tool. Support is provided on a best effort basis by project contributors.
SnowCLI is a command line interface for working with Snowflake. It lets you create, manage, update, and view apps running in Snowflake.
This is an open source project and contributions are welcome (though the project is maintained on a best-effort basis).
We plan to incorporate some patterns and features of this CLI into the Snowflake CLI (SnowSQL) in the future. We hope this project starts a conversation about what a delightful developer experience could look like, and we'd love your help in shaping that with us!
SnowCLI lets you locally run and debug Snowflake apps, and has the following benefits:
- Search, create, and upload python packages that may not be yet supported in Anaconda.
- Has support for Snowpark Python user defined functions and stored procedures, warehouses, and Streamlit apps.
- Define packages using
requirements.txt, with dependencies automatically added via integration with Anaconda at deploy time. - Use packages in
requirements.txtthat aren't yet in Anaconda and have them manually included in the application package deployed to Snowflake (only works with packages that don't rely on native libraries). - Update existing applications with code and dependencies automatically altered as needed.
- Deployment artifacts are automatically managed and uploaded to Snowflake stages.
SnowCLI has the following limitations:
- You must have the SnowSQL configuration file to authenticate to SnowCLI. See the Prerequisites for more details.
- To run Streamlit in Snowflake using SnowCLI, your Snowflake account must have access to the Streamlit private preview.
Requires Homebrew.
brew tap sfc-gh-jhollan/snowcli
brew install snowcli
snow --helpRequires Python >= 3.8
pip install snowflake-cli-labs
snow --helpRequires Python >= 3.10 and git
git clone https://github.com/snowflake-labs/snowcli
cd snowcli
# you can also do the below in an active virtual environment:
# python -m venv .venv
# source .venv/bin/activate
pip install -r requirements.txt
hatch build && pip install .
snow --version
You should now be able to run snow and get the CLI message.
Use SnowCLI to build a function or stored procedure, or create a streamlit if you have access to the Streamlit in Snowflake private preview.
You must add your credentials to connect to Snowflake before you can use SnowCLI.
SnowCLI uses the same configuration file as SnowSQL. If you don't have SnowSQL installed, download SnowSQL and install it. See Installing SnowSQL. You do not need to set up SnowSQL to use SnowCLI.
After installing SnowSQL, use the following SnowCLI command to add your Snowflake account credentials:
snow connection add
Provide a name for your connection, your account, username, and password for Snowflake.
If you do not want to install SnowSQL, you can add Snowflake account credentials manually:
-
In your home directory, make
.snowsqldirectory with aconfigfile:mkdir .snowsqlcd .snowsqltouch config -
Open the config file for editing:
vi config -
Add a new configuration for your Snowflake connection with SnowCLI. You must prefix the configuration with
connections..
For example, to add a Snowflake account myaccount for a user profile johndoe and a password of hunter2, add the following:
[connections.connection_name]
accountname = myaccount
username = jondoe
password = hunter2- Create a
.snowsqlfolder with aconfigfile at the following path:%USERPROFILE%\.snowsql\config - Add a new configuration for your Snowflake connection with SnowCLI. You must prefix the configuration with
connections..
You can use the Snowflake CLI to assist you in creating and uploading custom packages for Snowflake. This includes both full Python packages (and all needed dependencies) and Python packages that have native dependencies that are supported by Anaconda. All dependency evaluation is performed using pip on the machine the SnowCLI runs on and can create and help upload packages. Here's a flow to upload a custom package:
- Check to see if a package is supported:
snow package lookup <package-name>- NOTE: if you see a WARNING! message, it means the package has likely has native libraries that are NOT supported by the Anaconda Snowflake channel.
- Create a zip file of the package:
snow package create <package-name>- this creates a{package}.zipfile in the current directory that can be uploaded to a stage to used in imports to include the package. - Connect to snowflake
snow loginsnow configure
- Upload to a stage (I'll upload to a stage called
packagesin the database / schema configured in previous step):snow package upload -f <package-name>.zip -s packages --overwrite - You can now use the package in functions / procedures by adding an import to
@packages/<package-name>.zip.
It's worth noting that if you create and publish functions and procedures using the SnowCLI using the patterns below (snow function and snow procedure), SnowCLI will automatically bundle packages + code in a single zip that is created. But you can manage packages independently in stages as desired.
To build a function or a stored procedure using SnowCLI, do the following:
-
Navigate to an empty directory to create your function.
-
Run the command:
snow function initSnowCLI populates the directory with the files for a basic function. You can open
app.pyto see the files. -
Test the code by running the
app.pyscript:python app.pyYou see the message:
Hello World! -
Package the function:
snow function packageThis creates an
app.zipfile that has your files in it -
Log in to snowflake:
snow login -
Configure your first environment:
snow configure -
Create a function:
snow function create -
Try running the function:
snow function execute -f 'helloFunction()'You see Snowflake return the message: 'Hello World!'
After building your function, you can modify app.py, requirements.txt, or other files and follow a similar flow, or update a function by running the following:
snow function update -n <myfunction> -f <app.zip>
To create a Streamlit, do the following:
Note: Your account must have access to the Streamlit in Snowflake private preview to create a Streamlit.
-
Change to a directory with an existing Streamlit app, or create a directory for a new Streamlit app.
-
Log into Snowflake::
snow login -
Create an environment and select your database, schema, role, and warehouse:
snow configureThe environment name defaults to 'dev'.
-
Create a streamlit with a name that you specify:
snow streamlit create <name>If you don't specify a name, the file defaults to
streamlit_app.py. -
Deploy your app and open it in the browser:
snow streamlit deploy <name> -o
As at April 2023, you must provide a single file script to Streamlit, with an optional environment.yml file containing a list of Anaconda packages.
By adding the --use-packaging-workaround parameter during snow streamlit create and snow streamlit deploy, you can have your directory packaged into an app.zip file with PyPi packages.
A wrapper file will be generated as a Streamlit entrypoint, and it will download the app.zip from the stage, add it to the system path and import the original Streamlit script.
See Build a function.
When running snow procedure create or snow procedure update, you can choose to add the flag --install-coverage-wrapper. This will automatically capture code coverage information whenever your stored procedure is invoked.
For example, imagine an app.py like this:
import sys

def calculator(session,thing_to_do:str,first:float,second:float):
  if thing_to_do=='add':
    return first + second
  if thing_to_do=='subtract':
    return first - second
  if thing_to_do=='multiply':
    return first * second
  if thing_to_do=='divide':
    return other_stuff.divide_two_numbers(first,second)
  raise Exception(f"Unknown thing_to_do {thing_to_do}")
and other_stuff.py like this:
def divide_two_numbers(first,second):
    return first/second
After snow procedure package, we run:
snow procedure create -n calculator -h "app.calculator" -i "(thing_to_do string, first float, second float)" --return-type "numeric" --install-coverage-wrapper --replace-always
Then invoke it:
snow procedure execute -p "calculator('add',1,1)"
We can build a coverage report:
snow procedure coverage report -n "calculator" -i "(thing_to_do string, first float, second float)"
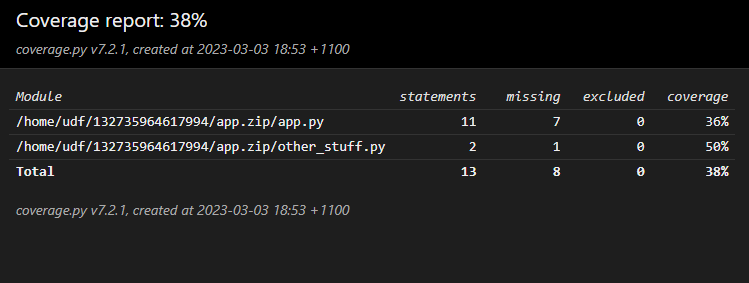
Under htmlcov/index.html we see a summary of the two files:
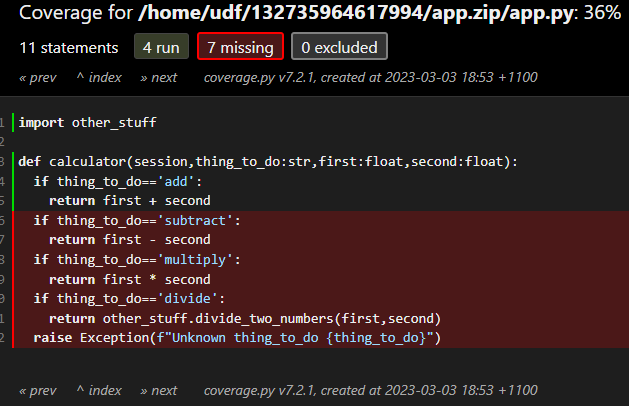
and drilling into app.py:
Then use a couple of other code paths:
snow procedure execute -p "calculator('multiply',3,4)"
snow procedure execute -p "calculator('divide',10,2)"
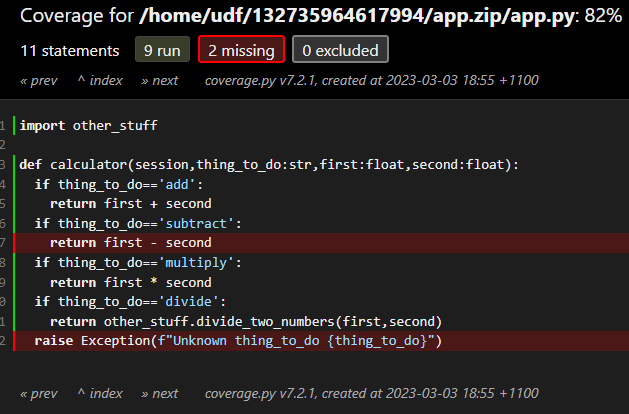
If we run the report again, we're now up to 85%:
With app.py showing a bit more green:
and other_stuff.py fully covered:
- Remember to
clearthe coverage data whenever you change the code or start a new test run. - Ensure that you don't enable code coverage in production, it adds a delay and a small amount of stage storage for each invocation.
- You can choose the output format by using the
--output-formatoption - You can write the coverage percentage value back into Snowflake as a procedure comment, by using the
--store-as-commentoption. This means that after your test suite completes, you can check coverage across a number of procedures with a query like so:
select COALESCE(COMMENT,0)::numeric(5,2) as COVERAGE, *
from information_schema.procedures
where COVERAGE < 75;
If interested in contributing, you will want to instanstiate the pre-commit logic to help with formatting and linting of commits. To do this, run the following in the snowcli cloned folder on your development machine:
pip install pre-commit
pre-commitHave a feature idea? Running into a bug? Want to contribute? We'd love to hear from you! Please open or review issues, open pull requests, or reach out to us on Twitter or LinkedIn @jeffhollan and @jroes.


