Tuya IoT Core SDK for Embedded C
Tuya IoT Core SDK is written in C and supports the Tuya-defined things data model, aiming to help developers to connect their proprietary hardware to the Tuya IoT Core. This SDK contains the implementation of essential IoT capabilities including IoT device activation, bidirectional data exchange between the cloud and devices, and OTA updates. It is independent of platforms and operating systems (OS), and it can run on a single-tasking operating system. If your devices support the TCP/IP protocol stack, you can develop with this SDK to connect your devices to the Tuya IoT Core.
Procedure
Step 1: Download the SDK
Download Tuya IoT Core SDK from GitHub.
The following describes the structure of the SDK directory:
certs: Private keys, device certificates, and server-side CA root certificates.docs: Development documentation.libraries: External dependencies including MQTT client, HTTP client, and Mbed TLS.interface: The SDK function API, which is required to port to your platform.include: SDK APIs.src: Source code.platform: Interface adaptation used for porting.utils: Common tools.examples: Routines.
Step 2: Configure device information
To get the platform authorization, you need to create a product on the Tuya IoT Development Platform. Add the obtained product and authorization information to your code to enable cloud connection.
-
Log in to the Tuya IoT Development Platform.
-
Click Create.
-
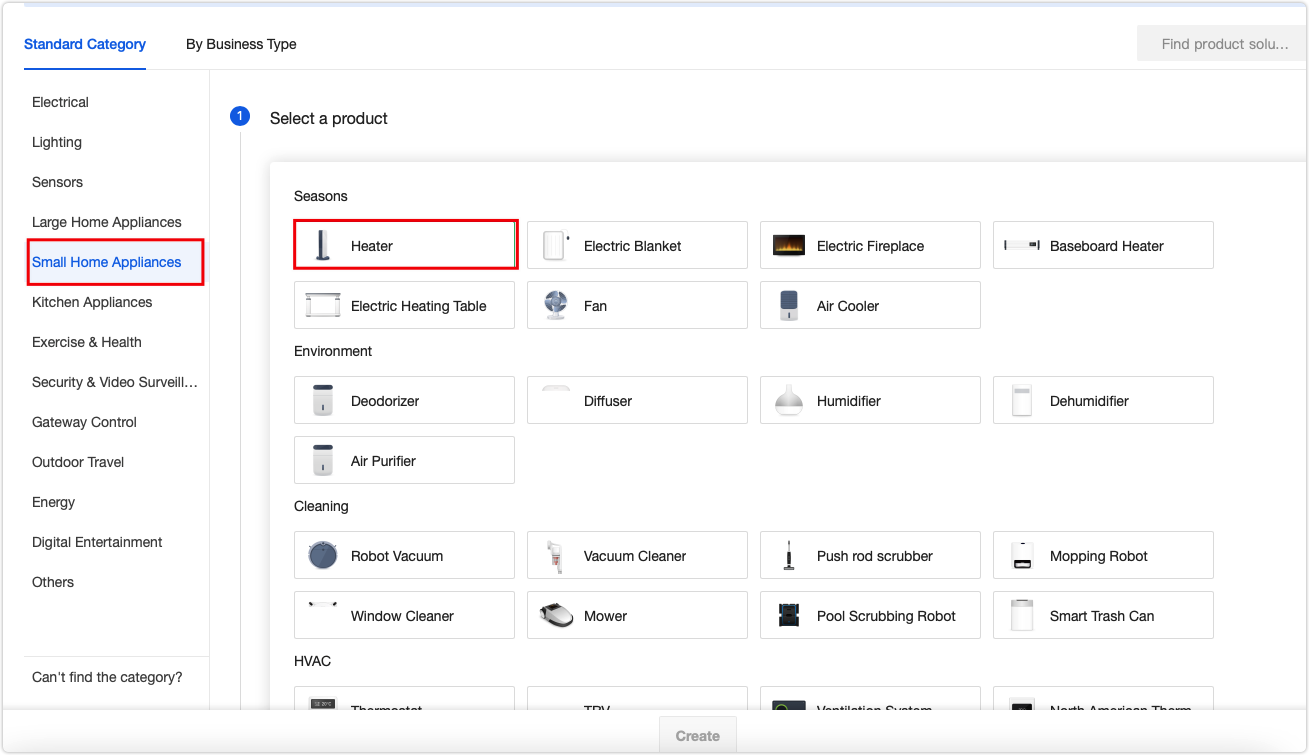
Select the required product category. Choose from the category list. For example, in the Standard Category tab, click Small Home Appliances > Heater.
-
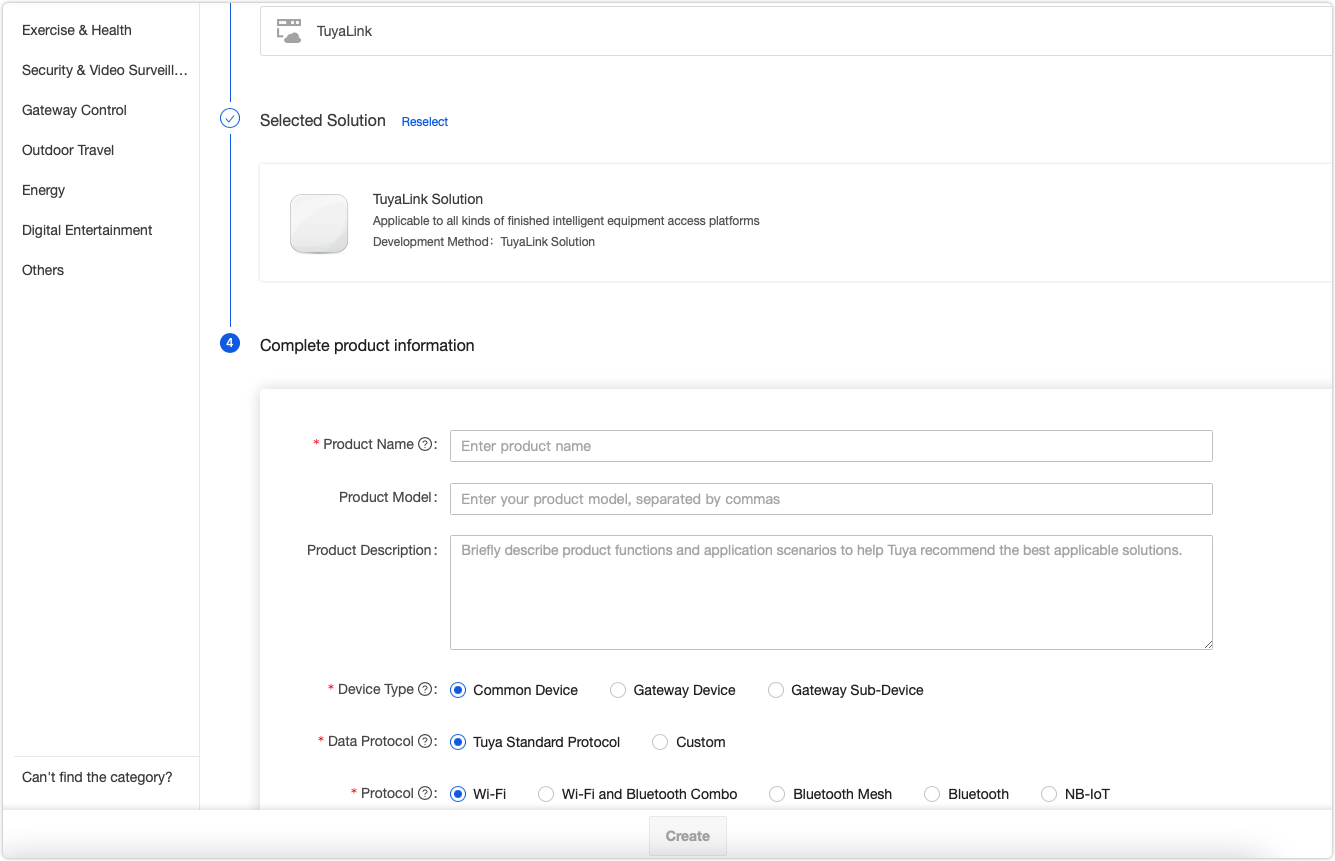
Select TuyaLink. Complete the required information and click Create.
-
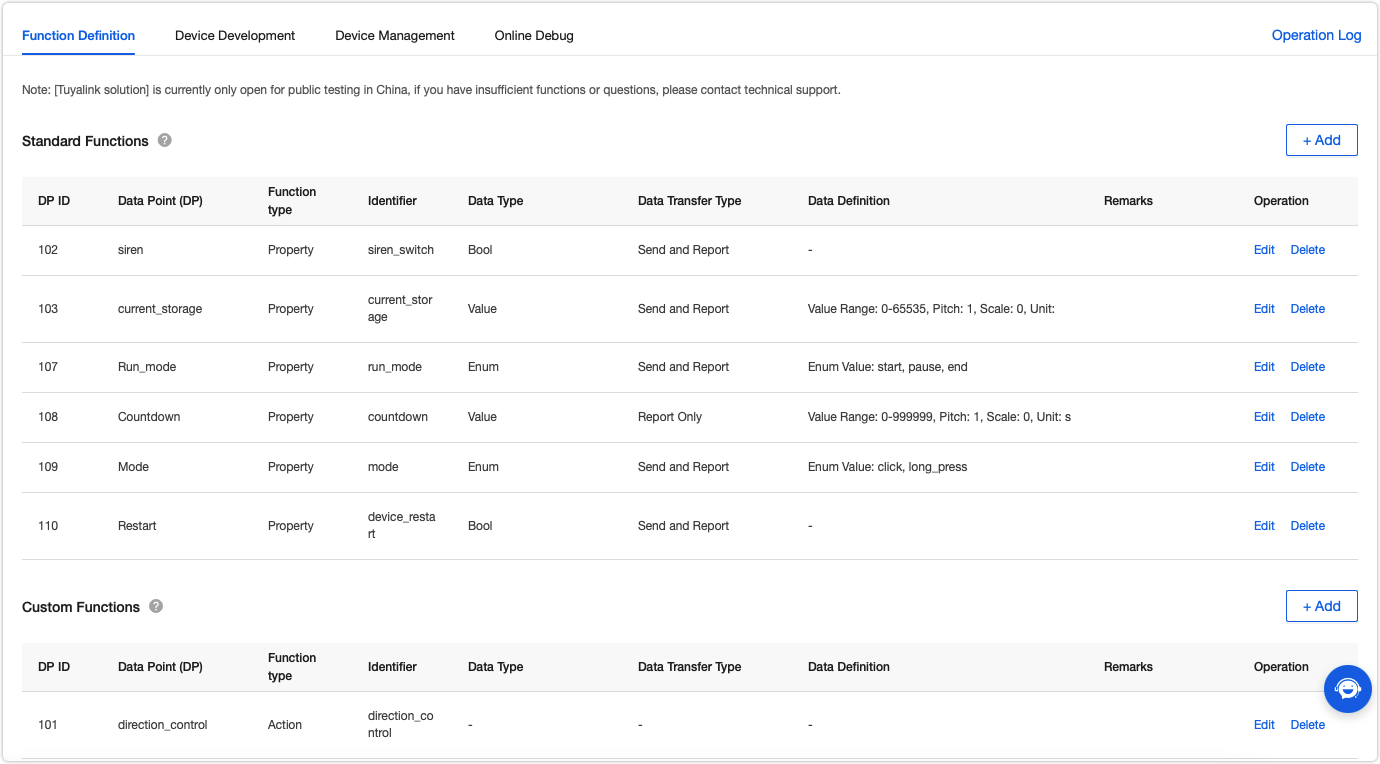
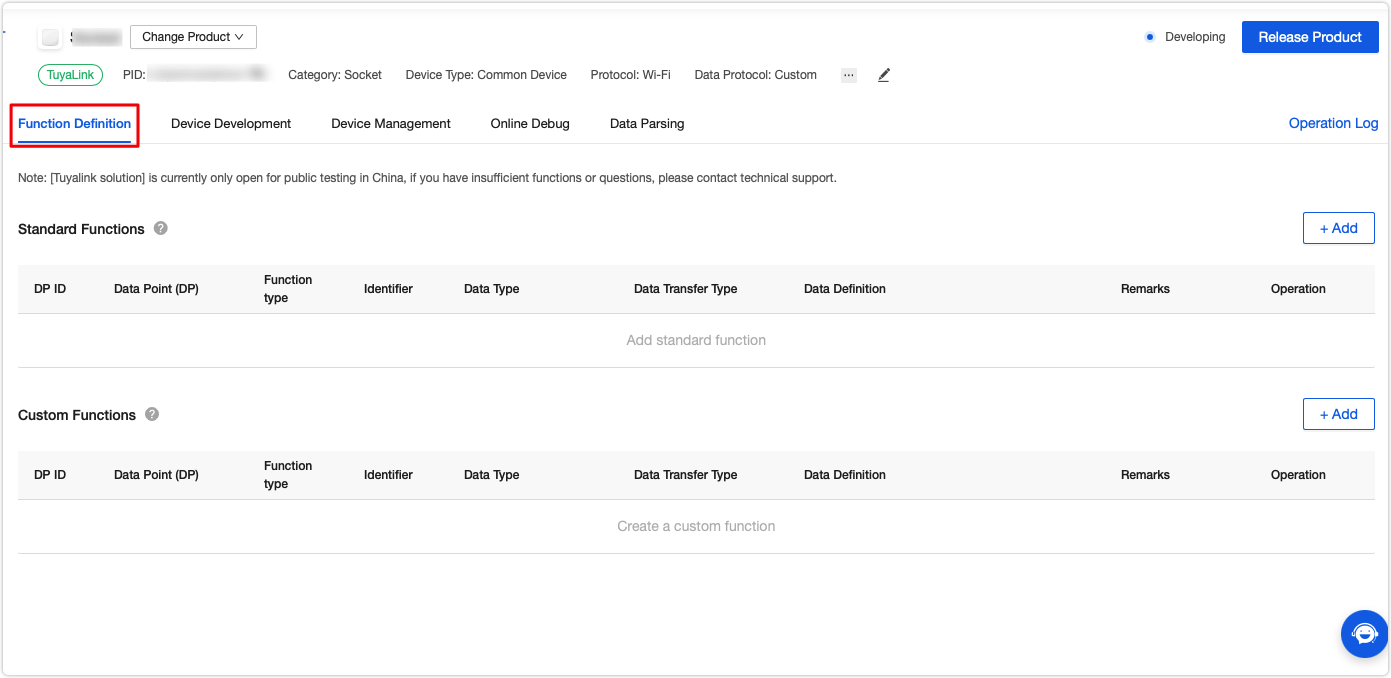
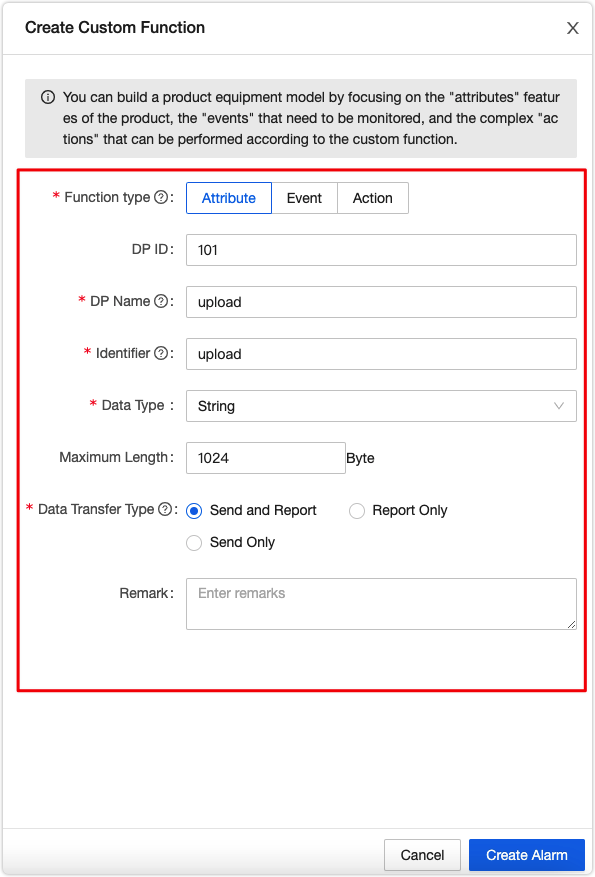
In Function Definition, click Add to add standard functions or create custom functions.
-
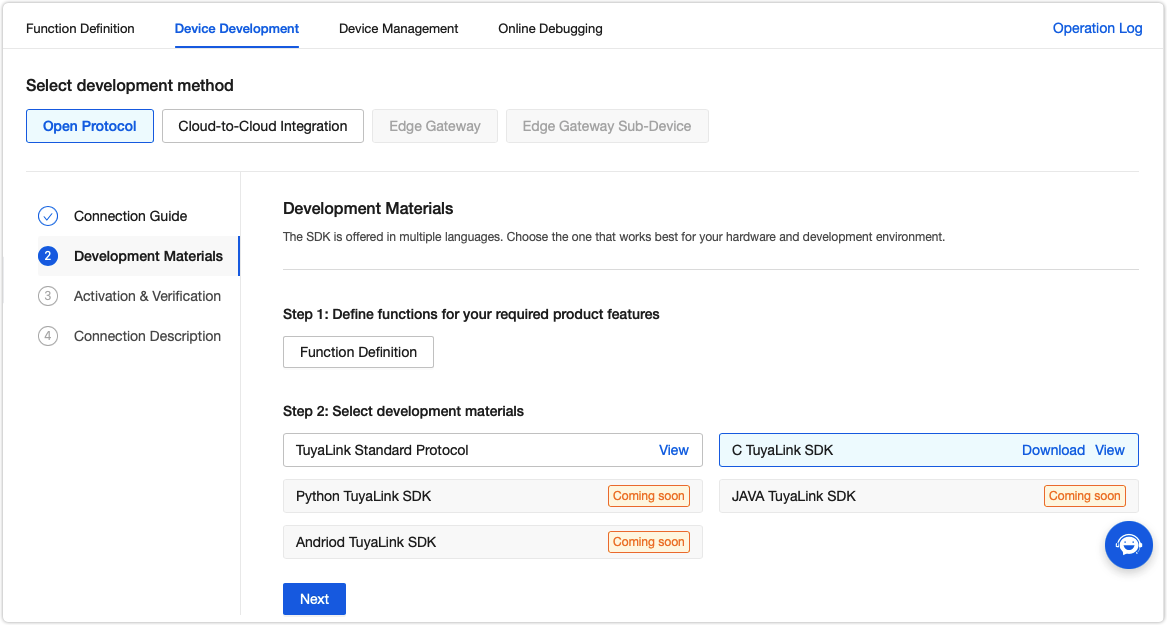
In Device Development, select and download the SDK and click Next.
-
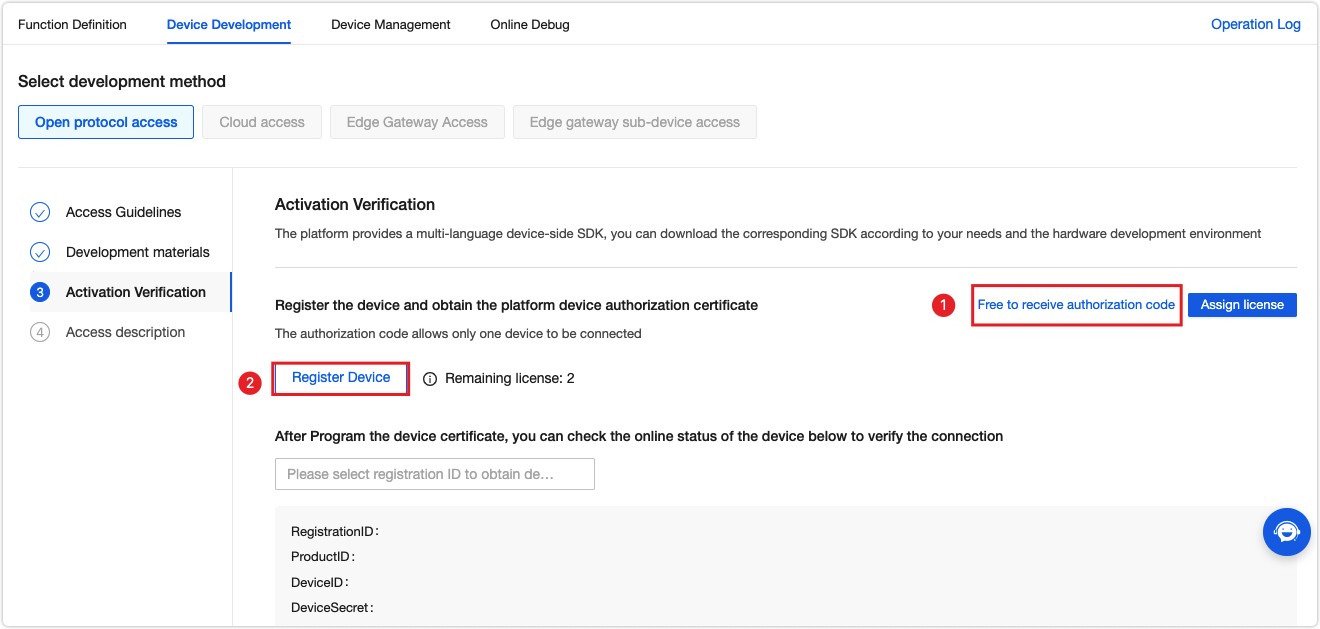
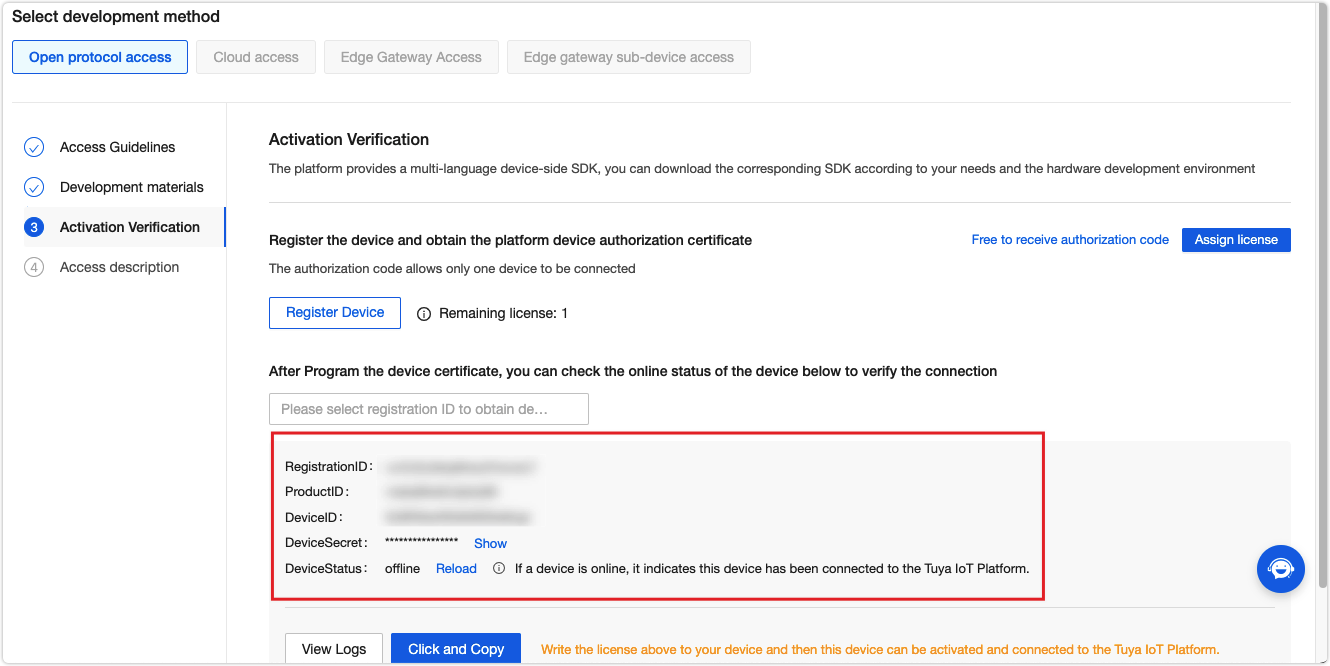
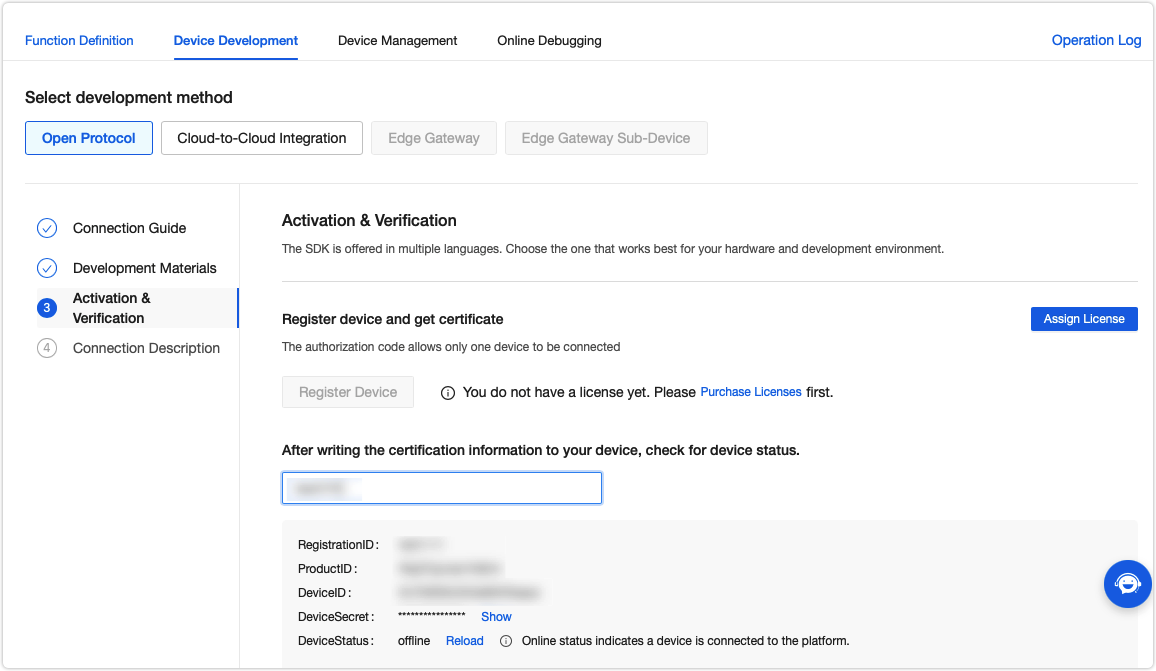
Tuya offers free licenses for debugging purposes. Click Get 2 Free Licenses to request the licenses. Then, register your device using the obtained license and the device information will be shown.
-
Add the device information to the
examples/subdevice_basic_demo/subdevice_basic_demo.cfile. Build and run the program. Then, your device can connect to the cloud. For more information about the build process, see the following Build and run the demo.const char productId[] = "rwosj58aaqjk****"; const char deviceId[] = "6c95875d0f5ba69607****"; const char deviceSecret[] = "*******************";


Step 3: Build and run the program in Ubuntu
This section uses Ubuntu as an example to show you how to build and run the program. The build processes also apply to Debian system.
-
Install
makeand other dependencies.sudo apt-get install make cmake -
Create a folder to save the build output.
mkdir build && cd build cmake .. make -
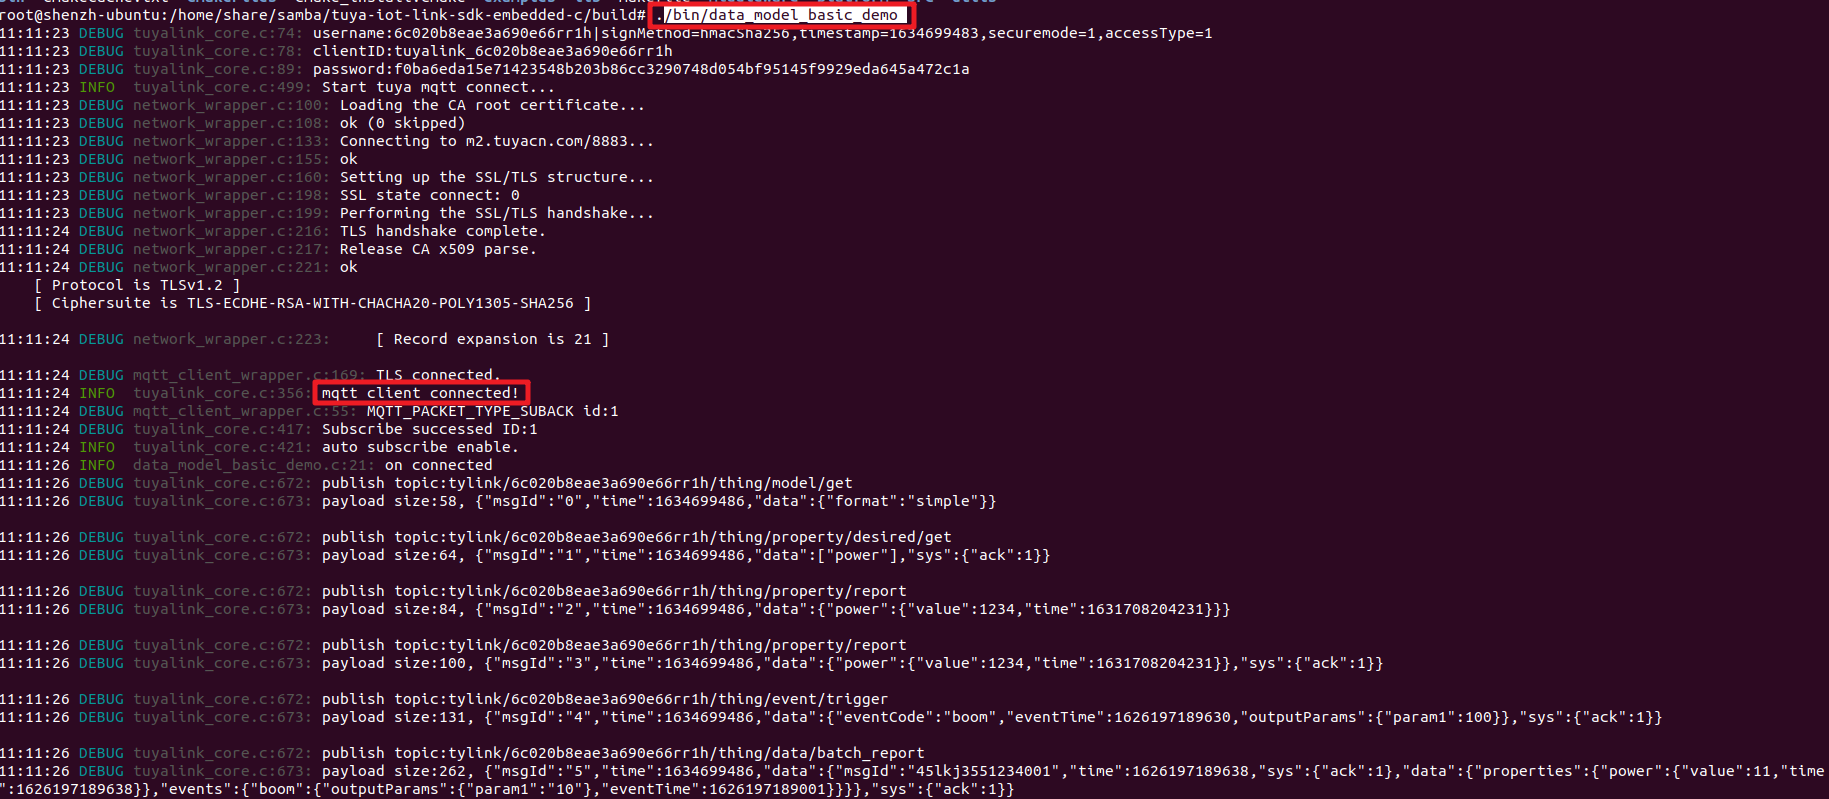
Run the demo. The SDK contains the basic sample code for communication, such as code for sub-device management.
./bin/subdevice_basic_demo -
View log files. If you see MQTT client connected, your device is successfully connected to the cloud.
Go back to the platform and refresh the Device Status. You will find it is Online.

Sample application
-
Instantiate and initialize a device object
tuya_iot_client_tto assign initial values, such as product ID (PID) and authorization information, for this object./* instantiate the client */ tuya_mqtt_context_t* client = &client_instance; /* initialize the client */ ret = tuya_mqtt_init(client, &(const tuya_mqtt_config_t) { .host = "m2.tuyacn.com", .port = 8883, .cacert = tuya_cacert_pem, .cacert_len = sizeof(tuya_cacert_pem), .device_id = deviceId, .device_secret = deviceSecret, .keepalive = 60, .timeout_ms = 2000, .on_connected = on_connected, .on_disconnect = on_disconnect, .on_messages = on_messages }); -
Define event callbacks in the application layer, used to receive the event notifications from the SDK, such as the data point (DP) data from the cloud or cloud connection status.
/* Tuya SDK event callback */ void on_messages(tuya_mqtt_context_t* context, void* user_data, const tuyalink_message_t* msg) { TY_LOGI("on message id:%s, type:%d, code:%d", msg->msgid, msg->type, msg->code); switch (msg->type) { case THING_TYPE_MODEL_RSP: TY_LOGI("Model data:%s", msg->data_string); break; case THING_TYPE_PROPERTY_SET: TY_LOGI("property set:%s", msg->data_string); break; case THING_TYPE_PROPERTY_REPORT_RSP: break; default: break; } printf("\\r\\n"); } -
Start TuyaOS SDK service.
ret = tuya_mqtt_connect(client); // TuyaOS SDK service tasks such as handling data and keepalive mechanism. -
Loop the following function to create threads for the underlying Link SDK client.
tuya_mqtt_loop(client);Example of reporting DP data to the cloud:
   /* data model test code */
tuyalink_thing_data_model_get(context, NULL);
tuyalink_thing_desired_get(context, NULL, "[\\"power\\"]");
tuyalink_thing_property_report(context, NULL, "{\\"power\\":{\\"value\\":1234,\\"time\\":1631708204231}}");
tuyalink_thing_property_report_with_ack(context, NULL, "{\\"power\\":{\\"value\\":1234,\\"time\\":1631708204231}}");
tuyalink_thing_event_trigger(context, NULL, "{\\"eventCode\\":\\"boom\\",\\"eventTime\\":1626197189630,\\"outputParams\\":{\\"param1\\":100}}");
tuyalink_thing_batch_report(context, "{\\"msgId\\":\\"45lkj3551234001\\",\\"time\\":1626197189638,\\"sys\\":{\\"ack\\":0},\\"data\\":{\\"properties\\":{\\"power\\":{\\"value\\":11,\\"time\\":1626197189638}},\\"events\\":{\\"boom\\":{\\"outputParams\\":{\\"param1\\":\\"10\\"},\\"eventTime\\":1626197189001}}}}");}
 /* subdevice test code */
tuyalink_subdevice_bind(context, "[{\\"productId\\":\\"jtwe4q9jrs0bbc8q\\",\\"nodeId\\":\\"123456\\",\\"clientId\\":\\"123455asdf\\"}]");
tuyalink_subdevice_bind_login(context, "[\\"6c17c5ba952143f592b8g1\\",\\"6c41626e5cea758aees0ik\\"]");
tuyalink_subdevice_bind_logout(context, "[\\"6c17c5ba952143f592b8g1\\"]");
tuyalink_subdevice_topo_add(context, "[{\\"productId\\":\\"jtwe4q9jrs0bbc8q\\",\\"deviceId\\":\\"6c17c5ba952143f592b8g1\\",\\"sign\\":\\"366508ed895644e70a3006bdef2dbe77ef73e18a\\",\\"signMethod\\":\\"hmacSha1\\",\\"timestamp\\":\\"1636989480\\"}]");
tuyalink_subdevice_topo_delete(context,"[\\"6c41626e5cea758aees0ik\\"]");
tuyalink_subdevice_topo_get(context);
Code debugging
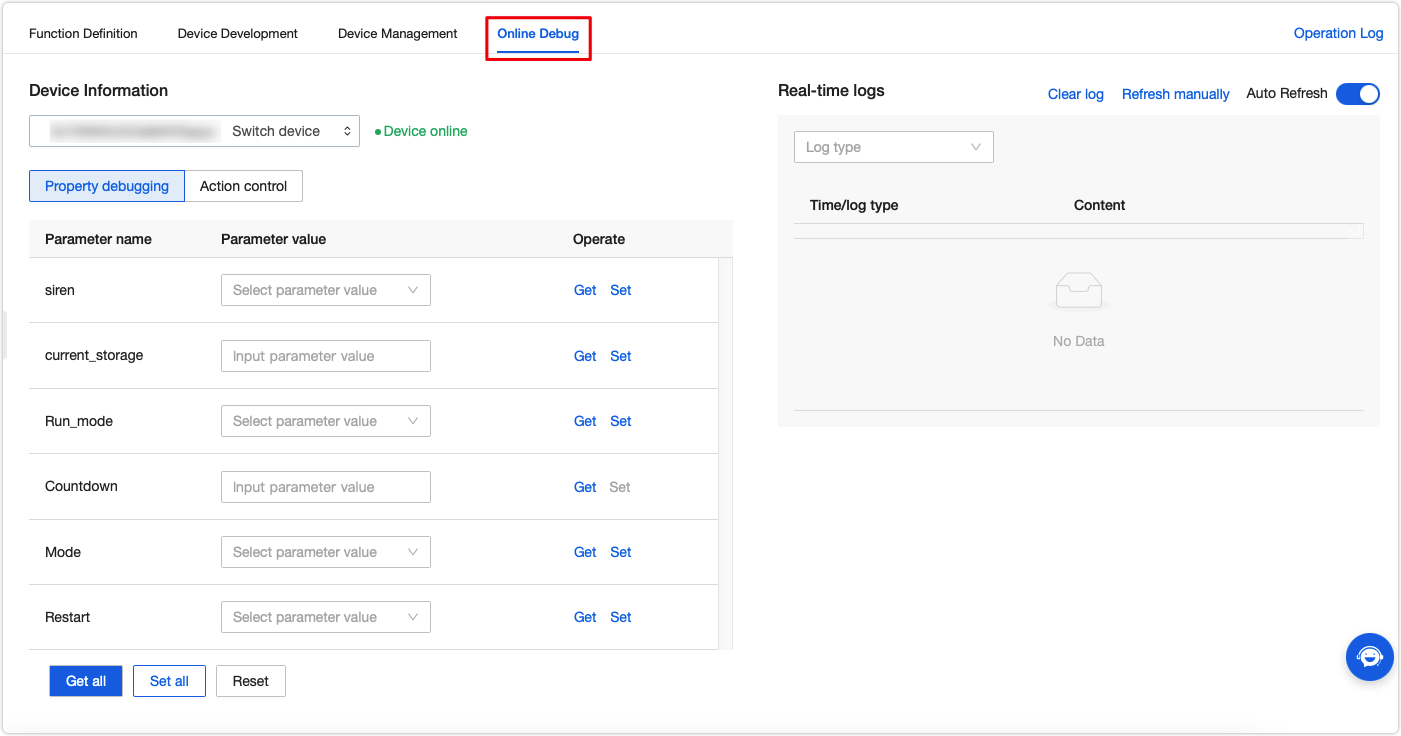
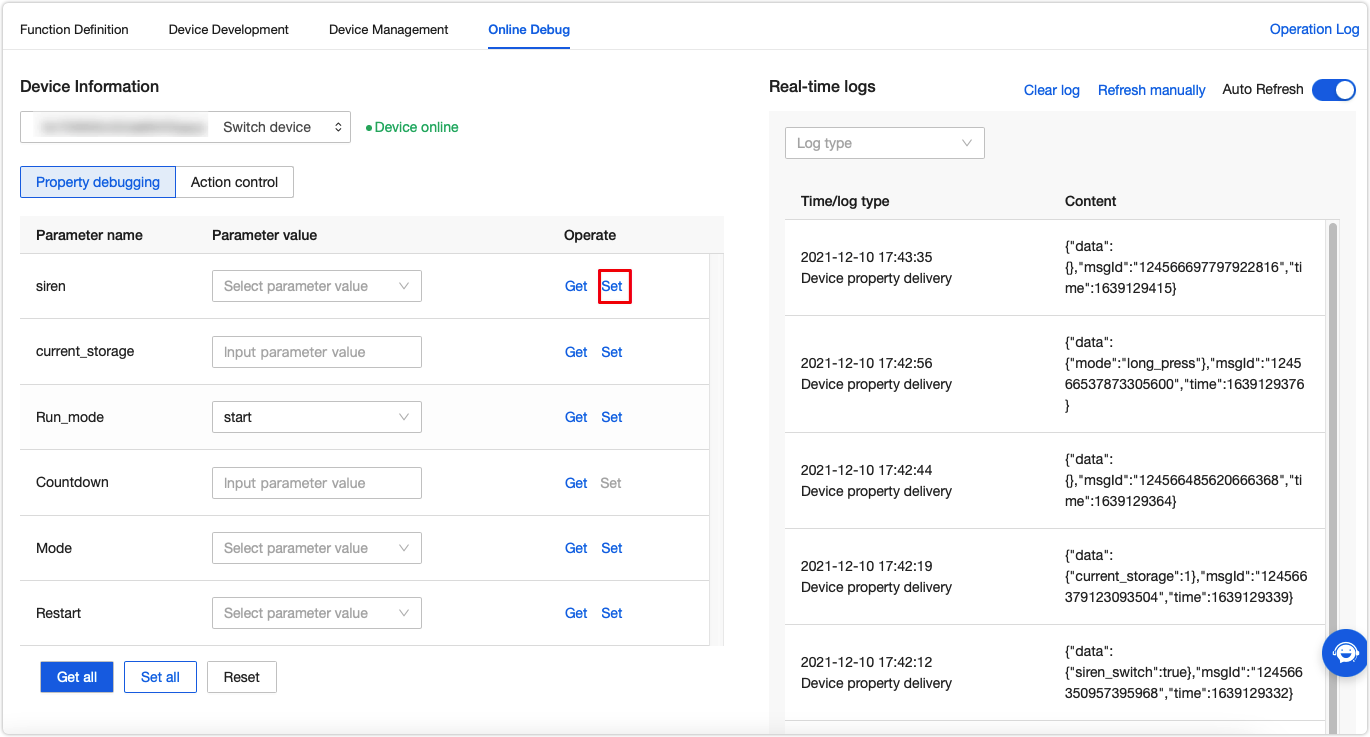
When a device is connected to the MQTT server and goes online, you can start debugging code online.
-
Click the Online Debug tab and select a device. Enter the DeviceId of the online device to show the collection of the defined data points (DPs).
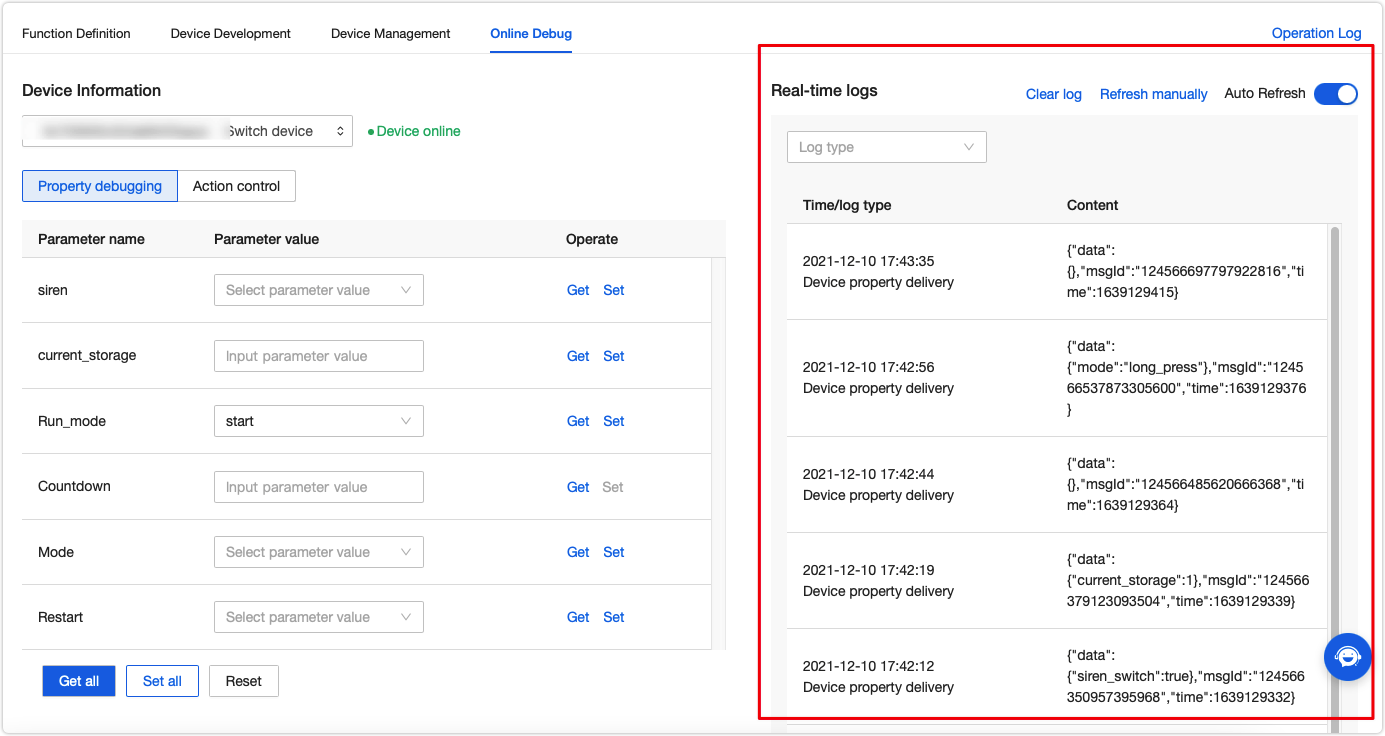
-
The right screen shows the device logs in real time.
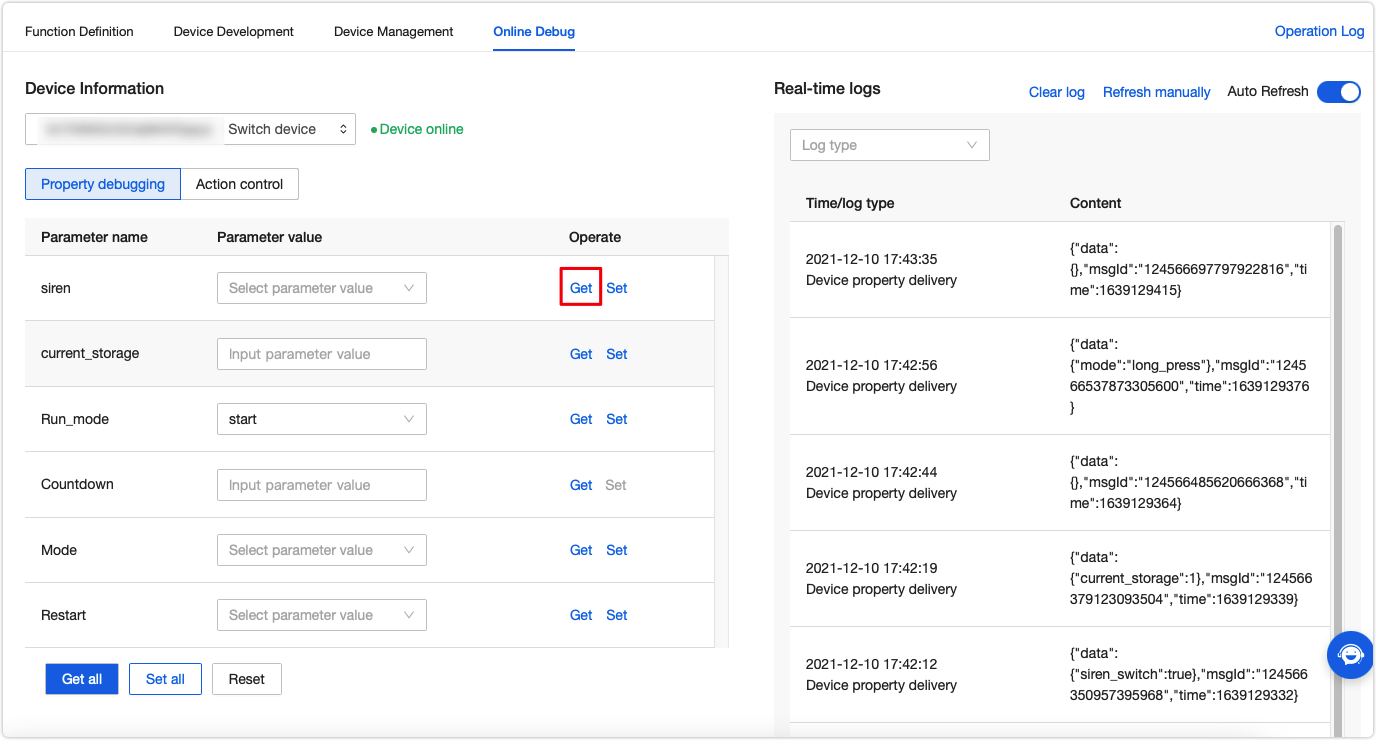
-
You can click Get to request the current device data.
-
You can click Set to change the property value. The payload data will be displayed in the log on the right screen. You can also view the payload in the local log file.