APPS40: Consolidating Infrastructure with Azure Kubernetes Service
Session Abstract
Kubernetes is the open source container orchestration system that supercharges applications with scaling and reliability and unlocks advanced features, like A/B testing, Blue/Green deployments, canary builds, and dead-simple rollbacks.
In this session, you’ll see how Tailwind Traders took a containerized application and deployed it to Azure Kubernetes Service (AKS). You’ll walk away with a deep understanding of major Kubernetes concepts and how to put it all to use with industry standard tooling.
Table of Content
| Resources | Links |
|---|---|
| PowerPoint | - Presentation |
| Videos | - Dry Run Rehearsal - Microsoft Ignite Orlando Recording |
| Demos | - Demo 1 - Scale Demo - Demo 2 - Network policy - Demo 3 - Availability Zones |
Regions this code will work with
- East US 2
- North Europe
- Southeast Asia
- West Europe
- West US 2
In order to deploy this template, you need an Azure Service Principal. If needed, use the az ad sp create-for-rbac command to create the service principal. See az ad sp create-for-rbac for more information.

Provider registration
The Tailwind Traders application uses many Azure services. In some cases, if a service has not yet been used in your subscription, a provider registration may be needed. The following commands will ensure your subscription is capable of running the Tailwind Traders application.
az provider register --namespace Microsoft.OperationalInsights
az provider register --namespace Microsoft.Network
az provider register --namespace Microsoft.DocumentDB
az provider register --namespace Microsoft.DBforPostgreSQL
az provider register --namespace Microsoft.OperationsManagement
az provider register --namespace Microsoft.ContainerService
az provider register --namespace Microsoft.Sql
az provider register --namespace Microsoft.ContainerRegistry
az provider register --namespace Microsoft.insights
az feature register --name AvailabilityZonePreview --namespace Microsoft.ContainerService
az feature register --name AKSAzureStandardLoadBalancer --namespace Microsoft.ContainerService
az feature register --name VMSSPreview --namespace Microsoft.ContainerService
Then refresh you account with
az provider register --namespace Microsoft.ContainerService
You will also need kubectl version 1.14.6
Connect to deployment
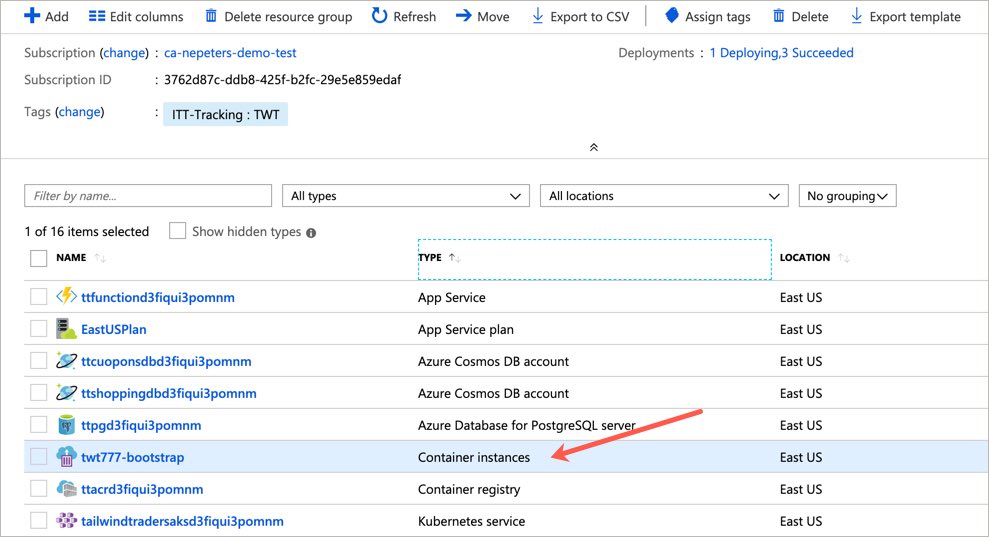
To validate that the deployment has completed, select the Azure Container Instance.
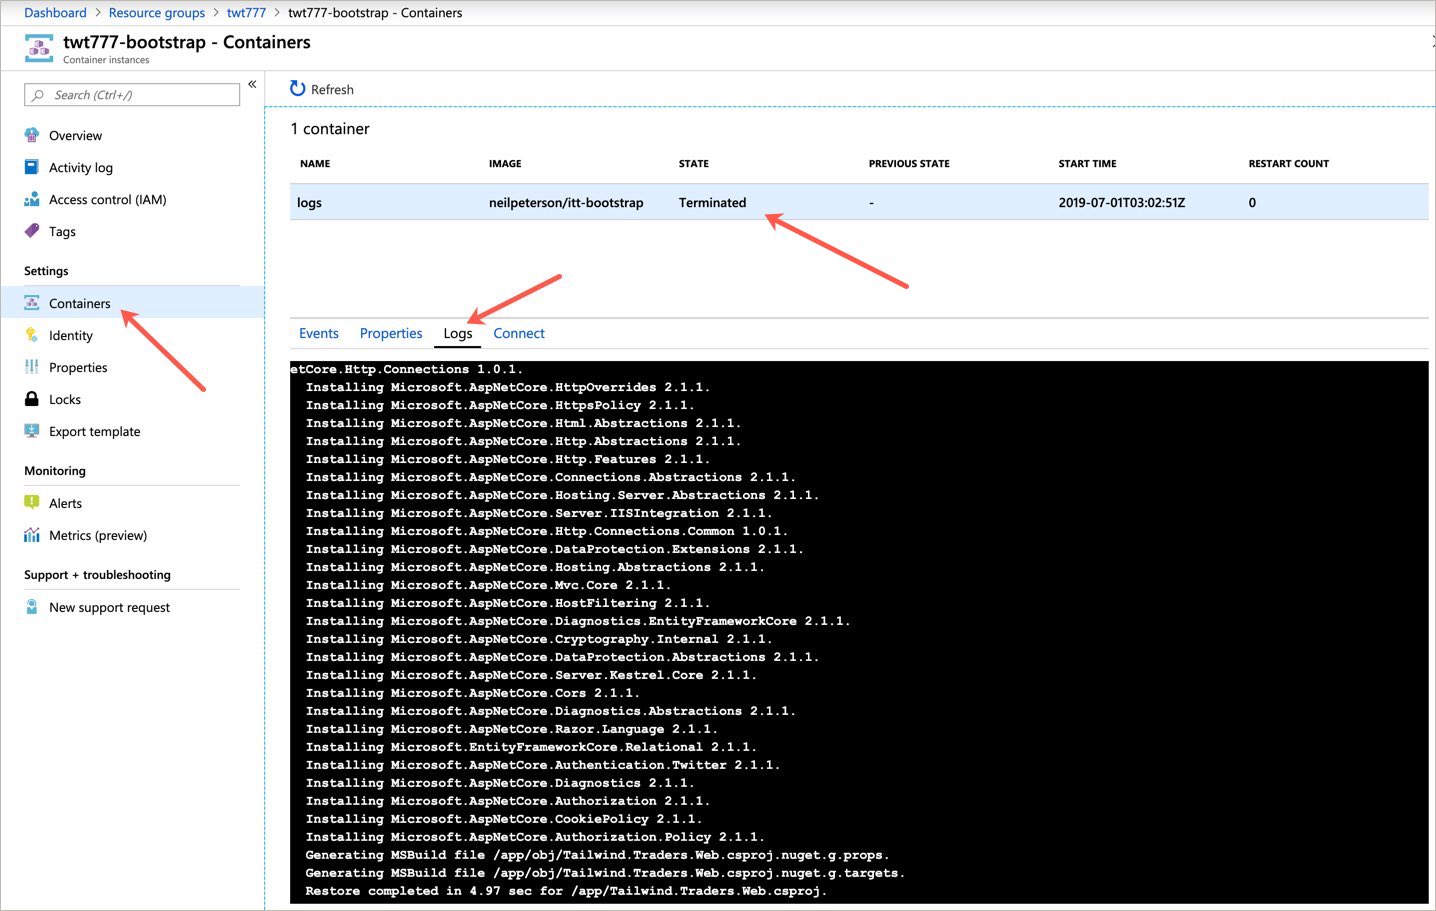
Select Containers. Once the container state has changed from Running to Terminated, the deployment automation has completed.
Scroll to the bottom of the logs to retrieve both the application URL and the command needed to connect to the Kubernetes cluster.
Running scale demo
💡 You must have completed the deployment before attempting to do the demo.
To run the scaling demo you need to add the publisher
cat <<EOF | kubectl apply -f -
apiVersion: batch/v1
kind: Job
metadata:
  name: rabbitmq-publish
spec:
  template:
    spec:
      containers:
      - name: rabbitmq-client
        image: jeffhollan/rabbitmq-client:dev
        imagePullPolicy: Always
        command: ["send",  "amqp://user:PASSWORD@rabbitmq.default.svc.cluster.local:5672", "300"]
      restartPolicy: Never
  backoffLimit: 4
EOF
In two new terminals you need to have the following commands running to watch the results.
kubectl get hpa -w
In the image above you can see that the application is scaling using the metrics from the horizontal pod autoscaler
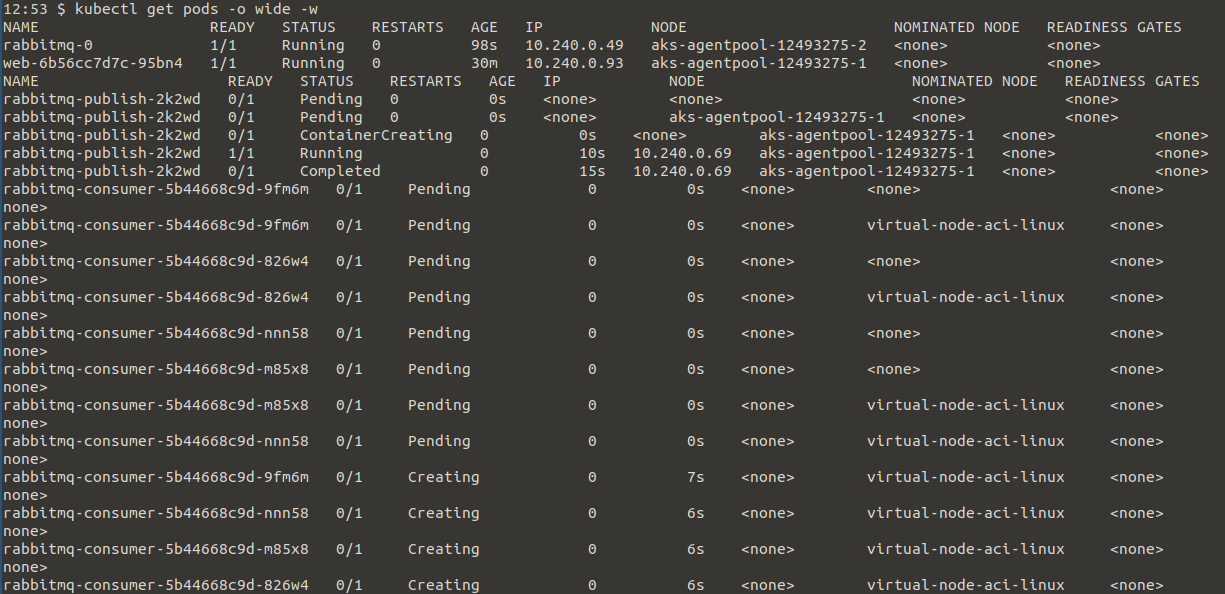
kubectl get pods -o wide -w
In the image above you can see that we are scaling the pods to virtual node on ACI dynamically.
To cleanup the scaling demo use the following
cat <<EOF | kubectl delete -f -
apiVersion: batch/v1
kind: Job
metadata:
  name: rabbitmq-publish
spec:
  template:
    spec:
      containers:
      - name: rabbitmq-client
        image: jeffhollan/rabbitmq-client:dev
        imagePullPolicy: Always
        command: ["send",  "amqp://user:PASSWORD@rabbitmq.default.svc.cluster.local:5672", "300"]
      restartPolicy: Never
  backoffLimit: 4
EOF
Network policy
💡 You must have completed the deployment before attempting to do the demo.
For the networking policy demo we will need to open two terminals. The first we will pretend to be a rouge service in the default namespace. The second we will apply the network policy.
In the first terminal issue the following commands
kubectl run --rm -it --image=alpine network-policy --generator=run-pod/v1
Once you have the shell inside the cluster issue
wget http://stock.twt
Now exit this terminal with exit.
This will show that we are able to hit backend services in twt from any namespace as the network by default is flat. Now in the second terminal we need to apply a network policy that will not allow any traffic from outside the twt namespace to hit it.
cat <<EOF | kubectl apply -f -
kind: NetworkPolicy
apiVersion: networking.k8s.io/v1
metadata:
  name: twt-policy
  namespace: twt
spec:
  podSelector: {}
  ingress:
  - from:
    - namespaceSelector:
        matchLabels:
          purpose: prod-app
      podSelector:
        matchLabels:
          role: twt-app
EOF
now in the first terminal enter
kubectl run --rm -it --image=alpine network-policy --generator=run-pod/v1
Once you have the shell enter
wget --timeout=2 http://stock.twt
The connection should be blocked. Exit the terminal with exit
Now cleanup
cat <<EOF | kubectl delete -f -
kind: NetworkPolicy
apiVersion: networking.k8s.io/v1
metadata:
  name: twt-policy
  namespace: twt
spec:
  podSelector: {}
  ingress:
  - from:
    - namespaceSelector:
        matchLabels:
          purpose: prod-app
      podSelector:
        matchLabels:
          role: twt-ap
EOF
Availability zones
💡 You must have completed the deployment before attempting to do the demo.
This is set up by the deployment.json To test this is set up correctly use the following command
kubectl describe nodes | grep -e "Name:" -e "failure-domain.beta.kubernetes.io/zone"
The output should look like
Name:               aks-agentpool-12493275-vmss000000
                    failure-domain.beta.kubernetes.io/zone=southeastasia-1
Name:               aks-agentpool-12493275-vmss000001
                    failure-domain.beta.kubernetes.io/zone=southeastasia-2
Name:               aks-agentpool-12493275-vmss000002
                    failure-domain.beta.kubernetes.io/zone=southeastasia-3
Name:               virtual-node-aci-linux
Delete your deployment
To delete the deployment run the following:
az group delete -n < your resource group> -y
How To Use
Welcome, Presenter!
We're glad you are here and look forward to your delivery of this amazing content. As an experienced presenter, we know you know HOW to present so this guide will focus on WHAT you need to present. It will provide you a full run-through of the presentation created by the presentation design team.
Along with the video of the presentation, this document will link to all the assets you need to successfully present including PowerPoint slides and demo instructions & code.
- Read document in its entirety.
- Watch the video presentation
- Ask questions of the Lead Presenter
Assets in Train-The-Trainer kit
- This guide
- PowerPoint presentation
- Full-length recording of presentation
- Full-length recording of presentation - Director Cut
- Demo Instructions
Become a Trained Presenter
To become a trained presenter, contact scalablecontent@microsoft.com. In your email please include:
- Complete name:
- The code of this presentation: apps40
- Link (ex: unlisted YouTube video) to a video of you presenting (~10 minutes).
It doesn't need to be this content, the important is to show your presenter skills
A mentor will get back to you with the information on the process.
Trained Presenters
Thanks goes to these wonderful people (emoji key):
 Scott Coulton 📢 📖 |


