Here's a bunch of settings for the various tools I use. I also have a number of blog posts and videos related to my dev environment. There's also this documentation to help you get everything installed and configured.
- View screenshots of the current set up along with previous set ups
- Quickly get set up with these dotfiles
- Debian (native or WSL)
- Ubuntu LTS (native or WSL)
- macOS
- Extra WSL 1 and WSL 2 steps
- FAQ
- About the author
Since my dotfiles are constantly evolving and I tend to reference them in videos, blog posts and various social media posts I thought it would be a good idea to include a screenshot of each theme I used and how to switch to it.
The theme used in the screenshot below is Vim One.

Like Gruvbox, it has really good syntax highlighting support for the technologies I work with on a regular basis and it supports both a dark and light variant.
I never used Atom Dark before, so it still looks fresh to me.
I still think Gruvbox is great. Truthfully after almost 18 months of using it I started to get bored. I have nothing against Gruvbox and if you like its colors then it's a solid pick.
When it comes to One Dark, I'm really enjoying the blue tint to things. There's also very good contrast on most things. The only exception to that are comments but I think I can get used to that. They are not obnoxiously dim.
The theme used in the screenshot below is Gruvbox.
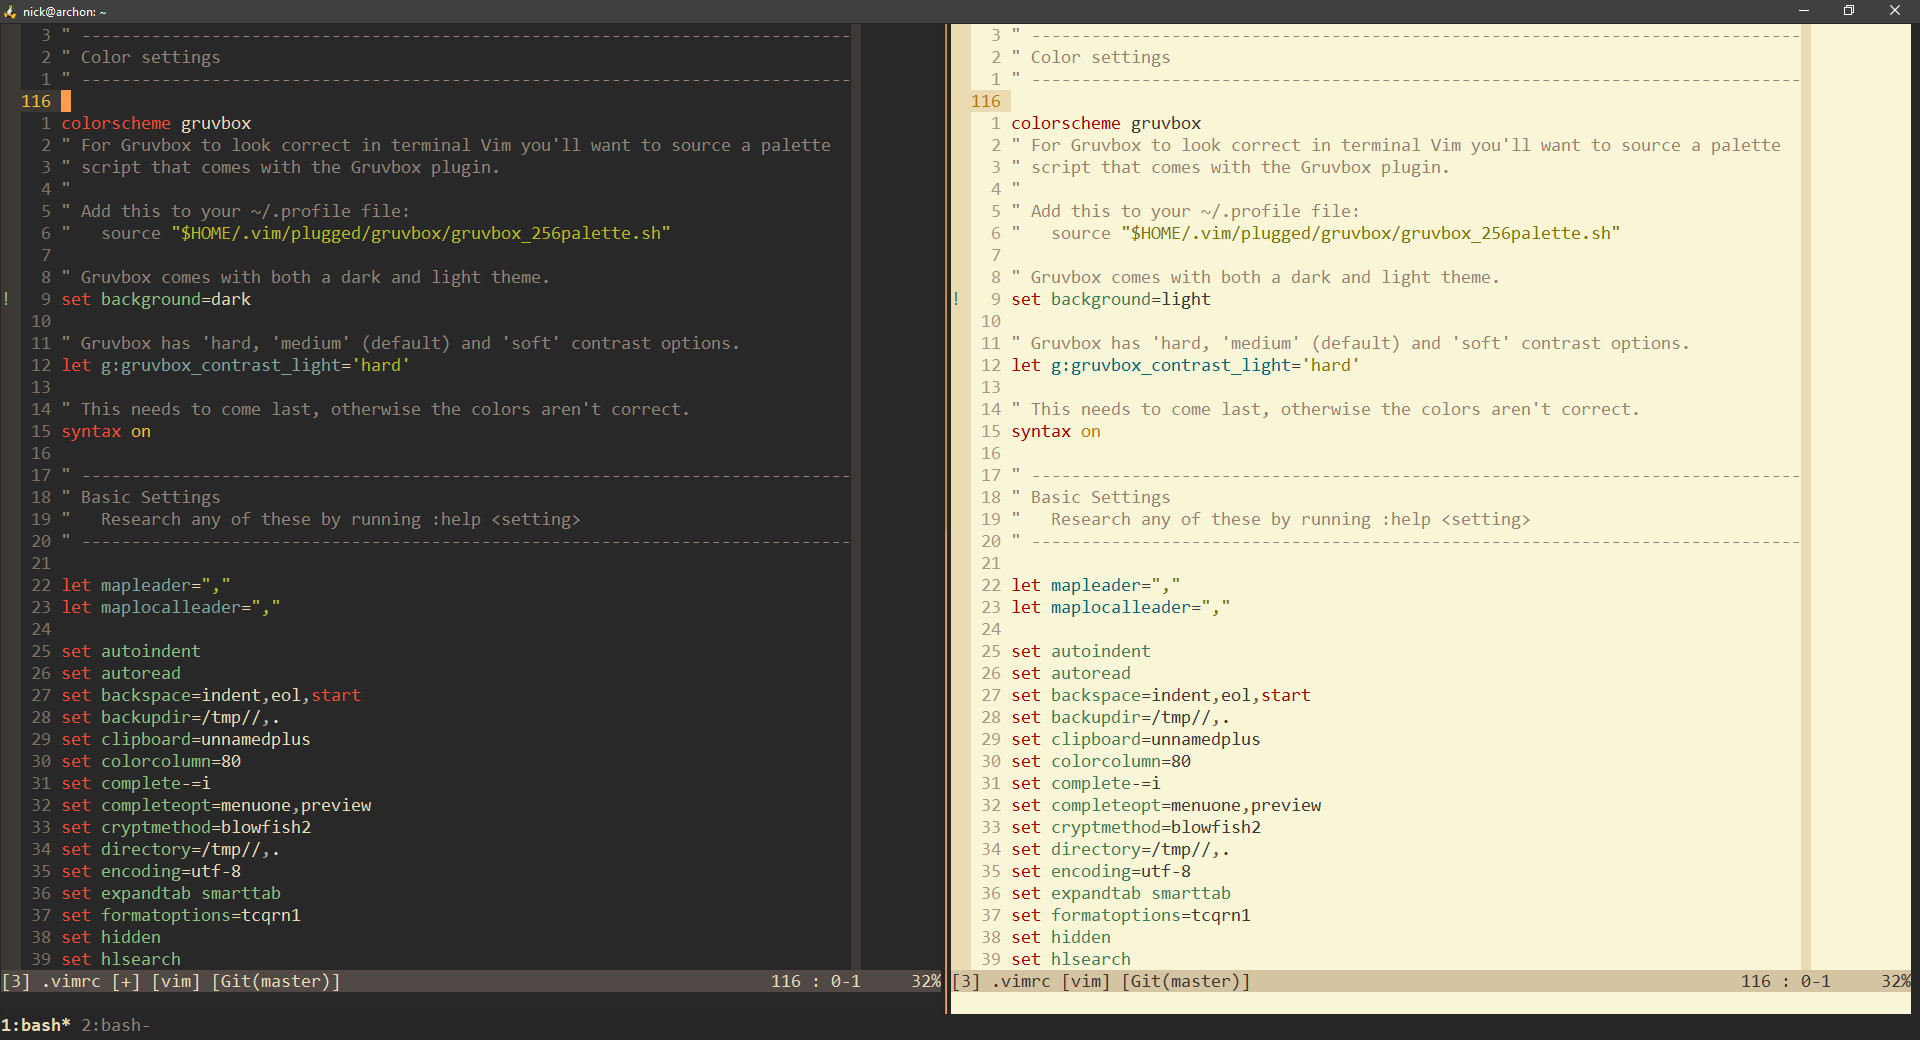
If you want to use this theme instead of the current theme:
- Edit your
.vimrcfile to make these changes:
" Gruvbox theme.
Plug 'gruvbox-community/gruvbox'

" Set the color scheme to use Gruvbox.
colorscheme gruvbox- Edit your
.tmux.conffile to use these color settings:
set -g status-style fg=colour244
set -g pane-active-border-style fg=colour250

set-window-option -g window-status-current-style fg=colour223
- Change your terminal's theme (this will depend on which terminal you use)
It has excellent syntax highlighting support for a bunch of popular programming languages. It also has top notch support for both dark and light variants.
The contrast is very good in both variants which is important to me because I record video tutorials. It also makes it easy on my eyes to pick out different characters when programming and writing all day.
Lastly, I was a big fan of the Quake video game and its colors remind of Quake's color palette in the dark variant.
I'm going to try my best to provide beginning to end installation instructions for Debian, Ubuntu (native or WSL) along with macOS. Fortunately setting up most of these tools will be the same on any OS since they're not OS specific.
My set up targets tmux 3.0+ and Vim 8.1+. As long as you can meet those requirements you'll be good to go.
If you're on Debian Buster, you'll want to enable backports for tmux before
installing anything. Once you do that then you can proceed to the Ubuntu 20.04
LTS installation steps below.
Any version after Buster should be good to go without any backports.
In order to get Vim 8.1+ you'll want to use the PPA below.
# Run this before moving on.
sudo add-apt-repository ppa:jonathonf/vim
As for tmux you'll need to compile it from source to get 3.0+. If you Google around for things like "get latest tmux for Ubuntu 18.04", you'll find tutorials. I've even seen some for Ubuntu 16.04. Just make sure you compile tmux 3.0+.
If you do end up compiling tmux from source, then make sure to remove tmux from the list of packages below. Speaking of which, once you've done the above then you can proceed to the Ubuntu 20.04 LTS installation steps below.
It's smooth sailing if you're using 20.04 LTS or newer.
sudo apt-get update && sudo apt-get install -y \
  curl \
  git \
  gnupg \
  htop \
  jq \
  pass \
  pwgen \
  python3-pip \
  ripgrep \
  rsync \
  shellcheck \
  tmux \
  unzip \
  vim-gtk
The GTK version of Vim is to get +clipboard support, we'll still run terminal
vim from the command line.
If you're not using Debian or Ubuntu that's ok. You can change the apt
commands above to use your distro's package manager instead. Just be mindful of
making sure you get tmux 3.0+ and Vim 8.1+.
I don't use a Mac but I've tracked down most of these packages in brew. Feel free to open a PR if there's a better way to install them. I haven't tested this personally but the tmux and Vim versions are good to go based on Homebrew's docs.
brew install \
  curl \
  git \
  gnupg \
  htop \
  jq \
  pass \
  pwgen \
  python \
  ripgrep \
  rsync \
  shellcheck \
  tmux \
  unzip \
vimI would make an effort to read the comments for each command before copy / pasting them into a terminal just so you know what's getting installed. You may want to modify some of these things based on which tools you want.
# Clone down this dotfiles repo to your home directory. Feel free to place
# this anywhere you want, but remember where you've cloned things to.
git clone https://github.com/nickjj/dotfiles ~/dotfiles

# Create symlinks to various dotfiles. If you didn't clone it to ~/dotfiles
# then adjust the ln -s symlink source (left side) to where you cloned it.
#
# NOTE: The last one is WSL 1 / 2 specific. Don't do it on native Linux / macOS.
mkdir -p ~/.local/bin && mkdir -p ~/.vim/spell \
  && ln -s ~/dotfiles/.aliases ~/.aliases \
  && ln -s ~/dotfiles/.bashrc ~/.bashrc \
  && ln -s ~/dotfiles/.gemrc ~/.gemrc \
  && ln -s ~/dotfiles/.gitconfig ~/.gitconfig \
  && ln -s ~/dotfiles/.profile ~/.profile \
  && ln -s ~/dotfiles/.tmux.conf ~/.tmux.conf \
  && ln -s ~/dotfiles/.vimrc ~/.vimrc \
  && ln -s ~/dotfiles/.vim/spell/en.utf-8.add ~/.vim/spell/en.utf-8.add \
  && ln -s ~/dotfiles/.local/bin/toggle-dark-mode ~/.local/bin/toggle-dark-mode \
  && sudo ln -s ~/dotfiles/etc/wsl.conf /etc/wsl.conf

# Create your own personal ~/.gitconfig.user file. After copying the file,
# you should edit it to have your name and email address so git can use it.
cp ~/dotfiles/.gitconfig.user ~/.gitconfig.user

# Install Plug (Vim plugin manager).
curl -fLo ~/.vim/autoload/plug.vim --create-dirs \
  https://raw.githubusercontent.com/junegunn/vim-plug/master/plug.vim

# Install TPM (Tmux plugin manager).
git clone https://github.com/tmux-plugins/tpm ~/.tmux/plugins/tpm

# Install FZF (fuzzy finder on the terminal and used by a Vim plugin).
git clone --depth 1 https://github.com/junegunn/fzf.git ~/.fzf && ~/.fzf/install

# Install ASDF (version manager which I use for non-Dockerized apps).
git clone https://github.com/asdf-vm/asdf.git ~/.asdf --branch v0.7.8

# Install Node through ASDF. Even if you don't use Node / Webpack / etc., there
# is one Vim plugin (Markdown Preview) that requires Node and Yarn.
asdf plugin-add nodejs https://github.com/asdf-vm/asdf-nodejs.git
bash ~/.asdf/plugins/nodejs/bin/import-release-team-keyring
asdf install nodejs 12.18.3
asdf global nodejs 12.18.3

# Install Yarn.
npm install --global yarn

# Install system dependencies for Ruby on Debian / Ubuntu.
#
# Not using Debian or Ubuntu? Here's alternatives for macOS and other Linux distros:
#   https://github.com/rbenv/ruby-build/wiki#suggested-build-environment
sudo apt-get install -y autoconf bison build-essential libssl-dev libyaml-dev \
  libreadline6-dev zlib1g-dev libncurses5-dev libffi-dev libgdbm6 libgdbm-dev libdb-dev

# Install Ruby through ASDF.
asdf plugin-add ruby https://github.com/asdf-vm/asdf-ruby.git
asdf install ruby 2.7.1
asdf global ruby 2.7.1

# Install Ansible.
pip3 install --user ansible

# Install AWS CLI v2.
curl "https://awscli.amazonaws.com/awscli-exe-linux-x86_64.zip" -o "awscliv2.zip" \
  && unzip awscliv2.zip && sudo ./aws/install && rm awscliv2.zip

# Install Terraform.
curl "https://releases.hashicorp.com/terraform/0.13.2/terraform_0.13.2_linux_amd64.zip" -o "terraform.zip" \
  && unzip terraform.zip && chmod +x terraform \
&& mv terraform ~/.local/bin && rm terraform.zip# Open Vim and install the configured plugins. You would type in the
# :PlugInstall command from within Vim and then hit enter to issue the command.
vim .
:PlugInstall
# Start a tmux session and install the configured plugins. You would type in
# ` followed by I (capital i) to issue the command.
tmux
`I# Sanity check to see if you can run some of the tools we installed.
ruby --version
node --version
ansible --version
aws --version
terraform --version
# Check to make sure git is configured with your name, email and custom settings.
git config --list
# If you're using Docker Desktop with WSL 2, these should be accessible too.
docker info
docker-compose --versionBefore you start customizing certain config files, take a look at the personalization question in the FAQ.
In addition to the Linux side of things, there's a few config files that I have in various directories of this dotfiles repo. These have long Windows paths.
It would be expected that you copy those over to your system while replacing
"Nick" with your Windows user name if you want to use those things, such as my
Microsoft Terminal settings.json file and others. Some of the paths may
also contain unique IDs too, so adjust them as needed on your end.
Some of these configs expect that you have certain programs or tools installed on Windows. The tools I use blog post has a complete list of those tools so you can pick the ones you want to install.
Pay very close attention to the c/Users/Nick/.wslconfig file because it has
values in there that you will very likely want to change before using it.
This commit
message
goes into the details.
Also, you should reboot to activate your /etc/wsl.conf file (symlinked
earlier). That will be necessary if you want to access your mounted drives at
/c or /d instead of /mnt/c or /mnt/d.
Chances are you'll want to personalize some of these files, such as various Vim
settings. Since this is a git repo you can always do a git pull to get the
most up to date copy of these dotfiles, but then you may find yourself
clobbering over your own personal changes.
Since we're using git here, we have a few reasonable options.
For example, from within this dotfiles git repo you can run git checkout -b personalized and now you are free to make whatever changes that you want on
your custom branch. When it comes time to pull down future updates you can run
a git pull origin master and then git rebase master to integrate any
updates into your branch.
Another option is to fork this repo and use that, then periodically pull and merge updates. It's really up to you.
It primarily comes down to either VcXsrv not running or a firewall tool blocking access to VcXsrv and it takes a bit of time for the connection to time out.
You can verify this by starting Vim with vim -X instead of vim. This
will prevent Vim from connecting to an X server. This also means clipboard
sharing to your system clipboard won't work, but it's good for a test.
Vim will try to connect to that X server by default because DISPLAY is
exported in the .bashrc file. Installing and configuring VcXsrv as per these
dotfiles will fix that issue.
If it still persists, it might be a software firewall issue. You can open TCP port 6000 and also restrict access to it from only WSL 2. This will depend on which tool you're using to configure that but that should do the trick.
I'm a self taught developer and have been freelancing for the last ~20 years. You can read about everything I've learned along the way on my site at https://nickjanetakis.com. There's hundreds of blog posts and a couple of video courses on web development and deployment topics. I also have a podcast where I talk to folks about running web apps in production.