This repository contains a Golang API server. You'll secure these APIs with Auth0 to practice making secure API calls from a client application.
Install the project dependencies:
go mod downloadCreate the env.yaml file at the root of the project and populate it with the values of auth0-audience and
auth0-domain parameters as in the following example.
auth0-audience: my_auth0_api_audience
auth0-domain: my_auth0_tenant_domain
The following sections further details the steps to identify the values for these variables within your setup.
-
Open the APIs section of the Auth0 Dashboard.
-
Click on the Create API button.
-
Provide a Name value such as Hello World API Server.
-
Set its Identifier to
https://api.example.comor any other value of your liking. -
Leave the signing algorithm as
RS256as it's the best option from a security standpoint. -
Click on the Create button.
View "Register APIs" document for more details.
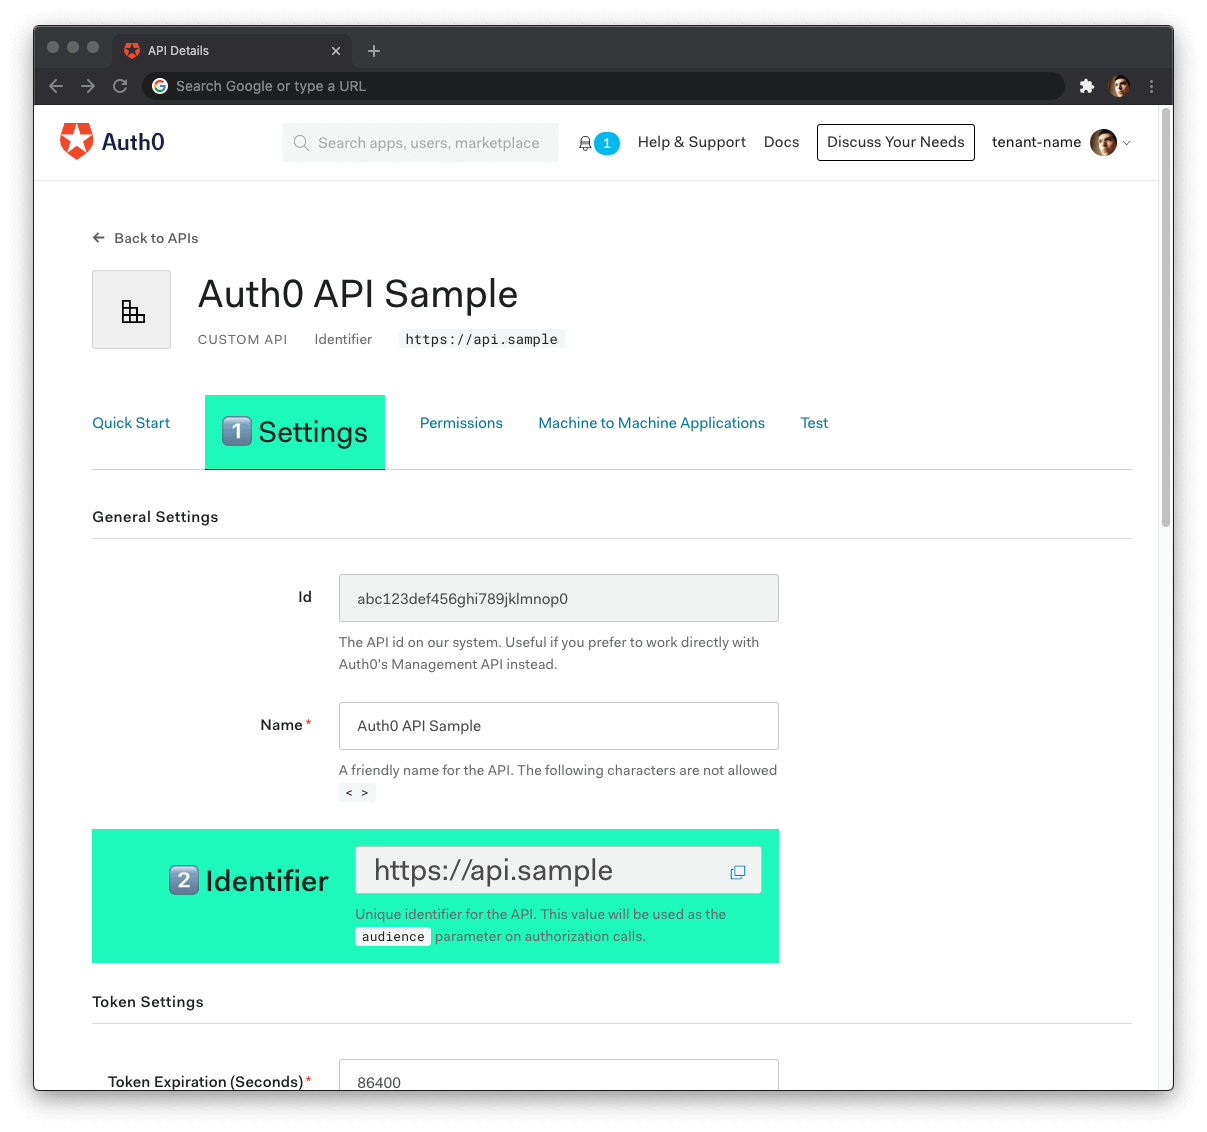
Head back to your Auth0 API page, and follow these steps to get the Auth0 Audience:
-
Click on the "Settings" tab.
-
Locate the "Identifier" field and copy its value.
-
Paste the Auth0 domain value as the value of
auth0-audienceinenv.yaml.
Now, follow these steps to get the Auth0 Domain value:
-
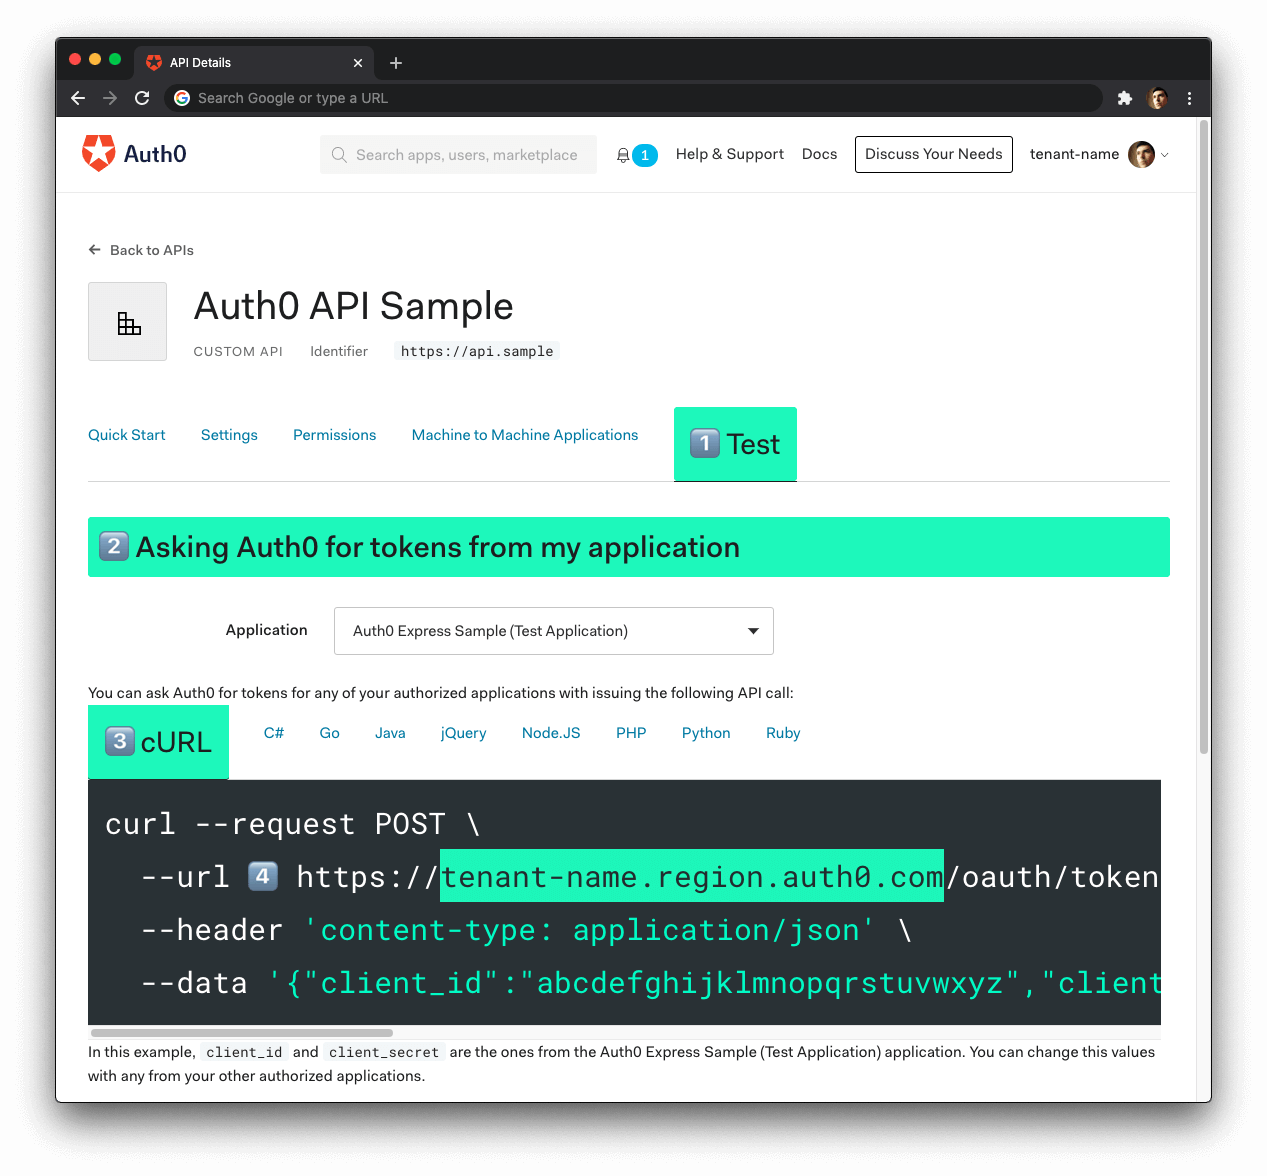
Click on the "Test" tab.
-
Locate the section called "Asking Auth0 for tokens from my application".
-
Click on the cURL tab to show a mock
POSTrequest. -
Locate your Auth0 domain, which is part of the
--urlparameter value:tenant-name.region.auth0.com. -
Paste the Auth0 domain value as the value of
auth0-domaininenv.yaml.
Tips to get the Auth0 Domain
-
The Auth0 Domain is the substring between the protocol,
https://and the path/oauth/token. -
The Auth0 Domain follows this pattern:
tenant-name.region.auth0.com. -
The
regionsubdomain (au,us, oreu) is optional. Some Auth0 Domains don't have it.
Run the API server by using any of the following commands. Please replace my_auth0_api_audience
and my_auth0_api_domain values appropriate as per your setup using instructions above.
# with a populated env.yaml present in current directory
go run .

# Alternatively, if env.yaml is not present, you can also pass values using CLI parameters
go run . -a my_auth0_api_audience -d my_auth0_api_domain

# OR, you can pass values using shell variables on CLI
AUTH0_AUDIENCE=my_auth0_api_audience AUTH0_DOMAIN=my_auth0_api_domain go run .

# OR, you may also expose the values as environment variable upfront
export AUTH0_AUDIENCE=my_auth0_api_audience
export AUTH0_DOMAIN=my_auth0_api_domain
go run .
In case the auth0 audience and domain values are present at multiple sources, the following precedence order is used
to determine effective values:
-
CLI parameters values has the highest precedence
-
Shell/Environment variables takes the next precedence
-
Values from
env.yamlhas the lowest precedence
You can get an access token from the Auth0 Dashboard to test making a secure call to your protected API endpoints.
Head back to your Auth0 API page and click on the "Test" tab.
Locate the section called "Sending the token to the API".
Click on the cURL tab of the code box.
Copy the sample cURL command:
curl --request GET \
  --url http://path_to_your_api/ \
  --header 'authorization: Bearer really-long-string-which-is-test-your-access-token'
Replace the value of http://path_to_your_api/ with your protected API endpoint path (you can find all the available
API endpoints in the next section) and execute the command. You should receive back a successful response from the
server.
You can try out any of our full stack demos to see the client-server Auth0 workflow in action using your preferred front-end and back-end technologies.
The /admin endpoint requires the access token to contain the read:admin-messages permission. The best way to
simulate this client-server secured request is to use any of the Hello World client demo apps to log in as a user that
has that permission.
Use following steps to create a user with read:admin-messages permission.
-
Head back to your Auth0 API page, click on "Settings" tab. Toggle "Enable RBAC" and "Add Permissions in the Access Token" to enabled state. Click "Save" at bottom of this page.
-
Click "Permissions" tab on your Auth0 API page. Add a new permission with
Scopeasread:admin-messages, use anyDescriptionof your choice. -
Create an
adminrole from the Auth0 dashboard, under "User Management" -
Go to "Permissions" tab of the
adminrole and click "Add Permissions". Select your API from the dropdown and add theread:admin-messagespermission to the role. -
Assign the
adminrole to any existing user. You can also create a new user and assignadminrole to the new user instead.
GET /api/messages/publicStatus: 200 OK{
"message": "The API doesn't require an access token to share this message."
}You need to protect this endpoint using Auth0.
GET /api/messages/protectedStatus: 200 OK{
"message": "The API successfully validated your access token."
}You need to protect this endpoint using Auth0 and Role-Based Access Control (RBAC).
GET /api/messages/adminStatus: 200 OK{
"message": "The API successfully recognized you as an admin."
}