


Monitorize all the hardware sensors of your PC using Java
Scanning sensors data...
Found CPU component Intel Core i7-3770
Sensors:
Temp CPU Core #1: 46.0 C
Temp CPU Core #2: 43.0 C
Temp CPU Core #3: 45.0 C
Temp CPU Core #4: 45.0 C
Temp CPU Package: 46.0 C
Found GPU component AMD Radeon HD 7470
Sensors:
Temp GPU Core: 53.0 C
Found disk component ST250DM000-1BD141
Sensors:
Temp Temperature: 34.0 C
Scanning sensors data...
Found CPU component ISA adapter
Sensors:
Temp Core 0: 75.0 C
Temp Core 2: 76.0 C
Found GPU component PCI adapter
Sensors:
Temp temp1: 62.0 C
Found disk component Virtual device
Sensors:
Temp temp1: 67.0 C
Temp temp2: 67.0 C
IMPORTANT NOTE: if you are getting 0.0 as temperature value, try to launch as Administrator
To install jSensors you can add the dependecy to your software project management tool: http://mvnrepository.com/artifact/com.profesorfalken/jSensors/2.2.1
For example, for Maven you have just to add to your pom.xml:
 <dependency>
      <groupId>com.profesorfalken</groupId>
      <artifactId>jSensors</artifactId>
      <version>2.2.1</version>
 </dependency>
In order to retrieve sensors data, it is only necessary to call the method components().
It will retrieve a list of hardware components: CPUs, GPUs, Disks...
    Components components = JSensors.get.components();

    List<Cpu> cpus = components.cpus;
    if (cpus != null) {
        for (final Cpu cpu : cpus) {
            System.out.println("Found CPU component: " + cpu.name);
            if (cpu.sensors != null) {
              System.out.println("Sensors: ");

              //Print temperatures
              List<Temperature> temps = cpu.sensors.temperatures;
              for (final Temperature temp : temps) {
                  System.out.println(temp.name + ": " + temp.value + " C");
              }

              //Print fan speed
              List<Fan> fans = cpu.sensors.fans;
              for (final Fan fan : fans) {
                  System.out.println(fan.name + ": " + fan.value + " RPM");
              }
            }
        }
    }
Same for other hardware components as GPU or Disks.
First of all, download the JAR file containing all dependencies: https://github.com/profesorfalken/profesorfalken.github.io/raw/master/files/jSensors-2.2-jar-with-dependencies.jar
Execute jSensors and get all sensors data:
java -jar jsensors-2.2.1-jar-with-dependencies.jar
This will generate a console output.
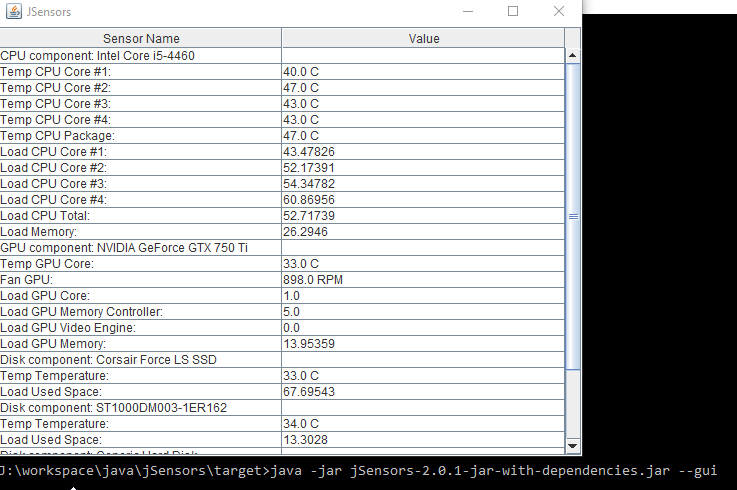
It is also possible to show a simple gui with all the sensors data:
java -jar jsensors-2.2.1-jar-with-dependencies.jar --gui
Result:
In order to change jSensors configuration you can either:
You only have to create in your classpaht a file with the name jsensors.properties.
For the moment the only modificable parameters (and its default values) are:
# Test mode
# REAL: test on real hardware
# STUB: use simulated/hardcoded results to test
testMode=REAL
# Stub Content
# string value of the simulated results
stubContent=""
# Debug mode
# If activated it logs in console all retrieved details
debugMode=false
When performing a request we can easily override config elements:
    Map<String, String> overriddenConfig = new HashMap<String, String>();
    overriddenConfig.put("debugMode", "true");

    [...]
    Components components = JSensors.get.config(overriddenConfig).components();