	 ██╗      ██████╗ ██╗     ██████╗ ██╗████████╗███████╗
	 ██║     ██╔═══██╗██║     ██╔══██╗██║╚══██╔══╝██╔════╝
	 ██║     ██║   ██║██║     ██████╔╝██║   ██║   ███████╗
	 ██║     ██║   ██║██║     ██╔══██╗██║   ██║   ╚════██║
	 ███████╗╚██████╔╝███████╗██████╔╝██║   ██║   ███████║
	 ╚══════╝ ╚═════╝ ╚══════╝╚═════╝ ╚═╝   ╚═╝   ╚══════╝
Table of Contents
About The Project
LOLBITS is a C# reverse shell that uses Microsoft's Background Intelligent Transfer Service (BITS) to communicate with the Command and Control backend. The Command and Control backend is hidden behind an apparently harmless flask web application and it's only accesible when the HTTP requests received by the app contain a valid authentication header.
LOLBITS is composed of 3 main elements:
- The C# agent that is in charge of executing the commands in the compromised host, sending back the output to the C&C server once the process is done.
- The flask web application that acts as a dispatcher. This element is the one that allows to hide the C&C infrastructure behind a harmless website at the same time that supplies the new commands to the agent when an authenticated request is received.
- The C&C console, used to control the agent.
In order to deny proxies content inspection, all the relevant content sent between the agent and the C&C server is encrypted using RC4 with a preshared secret key. A high level diagram of the infrastructure behaviour would be as it's shown in the following diagram:
To avoid that the Blue Team could reproduce some of the old requests and discover the C&C infrastructure, each authentication header is generated randomly and is valid only for one single cycle (a cycle is composed of a POST request followed by a GET request). Old authentication headers will be ignored and the harmless website will be displayed for those requests.
Acknowledgements
Some of this tool features have being implemented reusing code from the CyberVaca's amazing project Salsa Tools, so a big shout-out to him! Here you can find him:
Getting Started
Prerequisites
For the C&C infrastructure is required a Windows Server 2012 or above with python 3.4+ and the following python dependencies:
- Colorama
pip install colorama- Flask
pip install flaskThe C# agent has been successfully tested on Windows Server 2016, Windows Server 2019, Windows 8.1 and Windows 10. To compile it it's required:
- Visual Studio 2017 or above.
- .NET Framework 4.5 or above.
Setup
1.- Clone this repository on your C&C server
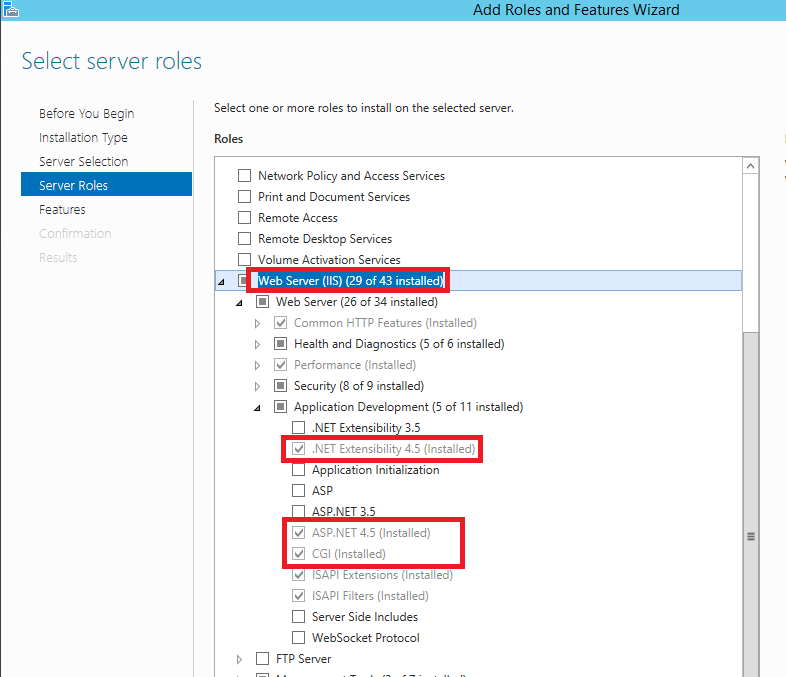
git clone https://github.com/Kudaes/LOLBITS.git2.- Install Web Server (IIS) through Windows Server Manager. Make sure to install CGI, ASP.NET and .NET Extensibility roles.
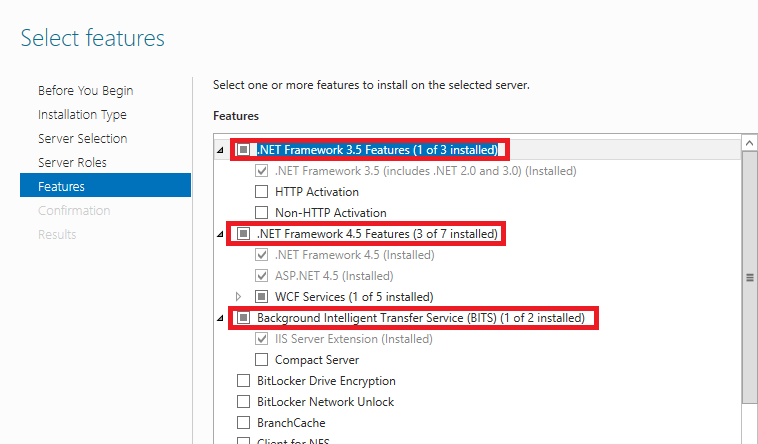
Also install .NET Framework and BITS features for IIS.
3.- Install wfastcgi and configure Fast CGI settings in IIS. This is required since our web application is written in Python. For this step to be done I followed up this amazing tutorial, and I recommend you to do the same. Come back to this README when you have completed the tutorial's steps 1 and 2.
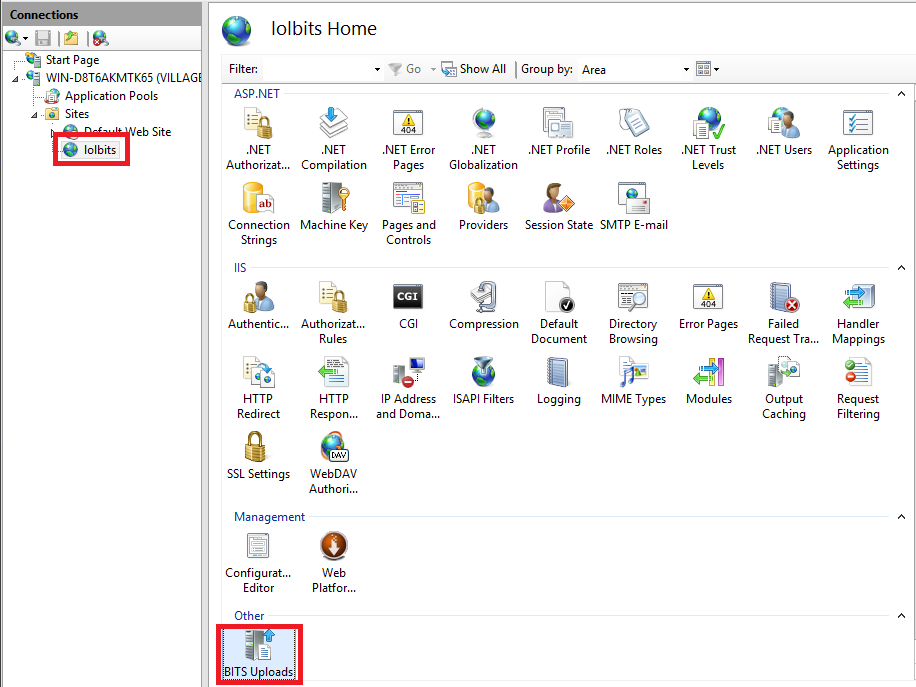
4.- Stop the Default website and create a new one using Internet Information Services Manager. Enable BITS uploads for this new website.
5.- Move the content of the C&C folder of this repository to the physical directory where the new website is deployed. Let's say that you have created the new website pointing to your directory C:\inetpub\wwwroot\bits, then this should be that directory tree:
C:\inetpub\wwwroot\bits
	    |__ /config
	         |-- auth.txt
	    |__ /files
	         |-- abcde1234
	         |-- default
	    |__ /lolbins
	         |-- base64decode.py
	         |-- base64encode.py
	         |-- a lot of other .py files
	    |__ /templates
	    	 |-- index.html
	    |__ /static
	    |__ /payloads
	    |__ -- decrypt.py
	    |__ -- encrypt.py
	    |__ -- myapp.py
	    |__ -- web.config
I recommend to grant full access rights to Everyone for the website directory (C:\inetpub\wwwroot\bits in the example) in order to avoid all kind of access
denied errors. At the end this is just a C&C server...
6.- Edit the web.config file. In this file you have to modify two settings:
scriptProcessorproperty for the web handler. For that, go back to the IIS Manager, click on the IIS server's root and select FastCGI Settings (you should have configured this when following the tutorial referenced on the step 3). The value of thescriptProcessorproperty should be "Full Path|Arguments".
Acording with the previous image, my scriptProcessor property should have the value "c:\python3.4\python.exe|c:\python3.4\lib\site-packages\wfastcgi.py".
- PYTHONPATH, that should point to your website directory, in this case it would be "C:\inetpub\wwwroot\bits".
7.- Modify the initial setup constants.
- Select the password to use as preshared key. Set its value in:
- Program.cs ->
Passwordvariable. - myapp.py ->
Passwordvariable. - lawlbin.py ->
passwordvariable.
- Program.cs ->
- Set in the c# agent the url where the flask application is listening.
- Program.cs ->
Urlvariable.
- Program.cs ->
- In myapp.py, set the value of the variables
AuthPath,ReadPathandPayloadspointing to the correponding folders in the website directory. - In lawlbin.py (lolbins folder) set the corresponding values for the variables
baseReadPathandbaseWritePathacording with your website directory tree.
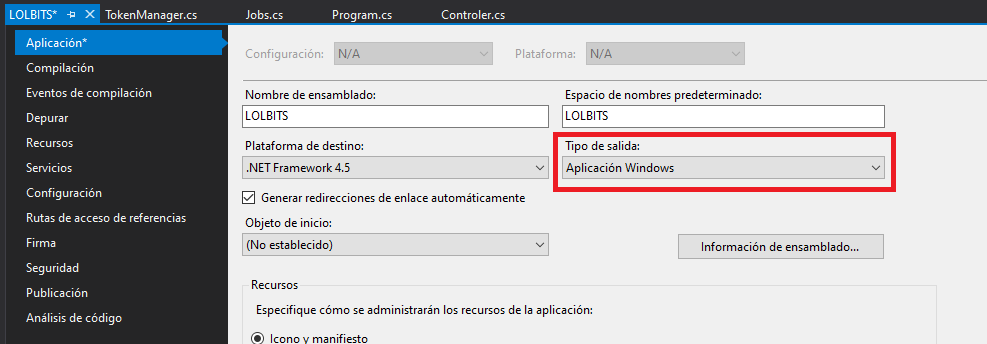
8.- Compile the agent and execute it in the compromised host. The compilation will generate an exe and an external dependency (Newtonsoft.Json.dll). You can generate a single exe using ILMerge or just send both files. To avoid DEBUG output, compile the project as a Windows Application.
Usage
To obtain the reverse shell just type in python lawlbin.py on a cmd of the C&C server and execute the C# agent on the compromised host.
Since this project borns from the ashes of a previous and failed project, some of the old features have been kept. The old project was a shell where all the available commands would be executed using exclusively Living of The Land Binaries. Thats where the LOL of LOLBITS comes from, and thats why the following features run using exclusively LOLBINS (this could help to bypass AWS and some EDR filters):
- download: Download a file from a Webdav to the compromised host.
- copy: Copy a file from a local path to another local path.
- base64encode: Use base64 encoding over the content of a local file.
- base64decode: Decode a base64 encoded file.
- compile: Compile .cs files into exe or dll.
- execute: Execute different types of files (bat, exe, xml, js, vbs, hta among others). In maintenance!! Broken ATM!!
- downexec: Download a file from a webdav and execute it. In maintenance!! Broken ATM!!
Despite this features could be interesting in some environments (hmm downloading remote files without using Powershell? I like it!) I kept them just to reuse part of the old code for the C&C console. Below is a list with some features that im sure will be more usefull in a regular situation:
- inject: Download from the C&C a shellcode (.bin) or dll (.NET assembly) file and execute it in memory. With this command the payload never touches disk unencrypted, avoiding AV detection. Shellcode injection is only implemented for 64 bits procesess. The shellcode injection can be executed on both own and remote process.
- psh: Generate a remote Powershell version 2 shell. This shell has to be handled by additional sofware like netcat (just run nc -lvp ).
- send: To send a file from your C&C to the compromised host just use this option. The sent file will be store in disk, so be carefull.
- getsystem: Attempt to obtain System privileges using named pipes impersonation. High integrity process required.
- impersonate: Attempt to steal an access token from other process in order to "become" another user.
- runas: Use valid credentials to modify your security context and log in as other (local or domain) user.
- rev2self: Remove security context changes performed by getsystem, impersonate or runas.
- exfiltrate: Send a file from the compromised host to your C&C.
To get usage tips just type in help or <somecommand> help. In the future more features will be implemented, so stay tuned!
Contributing
This is my first time programming in C#, therefore Im pretty sure this code could be improved a lot. Any contributions you make will be greatly appreciated.
- Fork the Project
- Create your Feature Branch (
git checkout -b feature/AmazingFeature) - Commit your Changes (
git commit -m 'Add some AmazingFeature') - Push to the Branch (
git push origin feature/AmazingFeature) - Open a Pull Request
License
Distributed under the GNU License. See LICENSE for more information.


