[arXiv:2112.02889 - Joint Learning of Localized Representations from Medical Images and Reports]
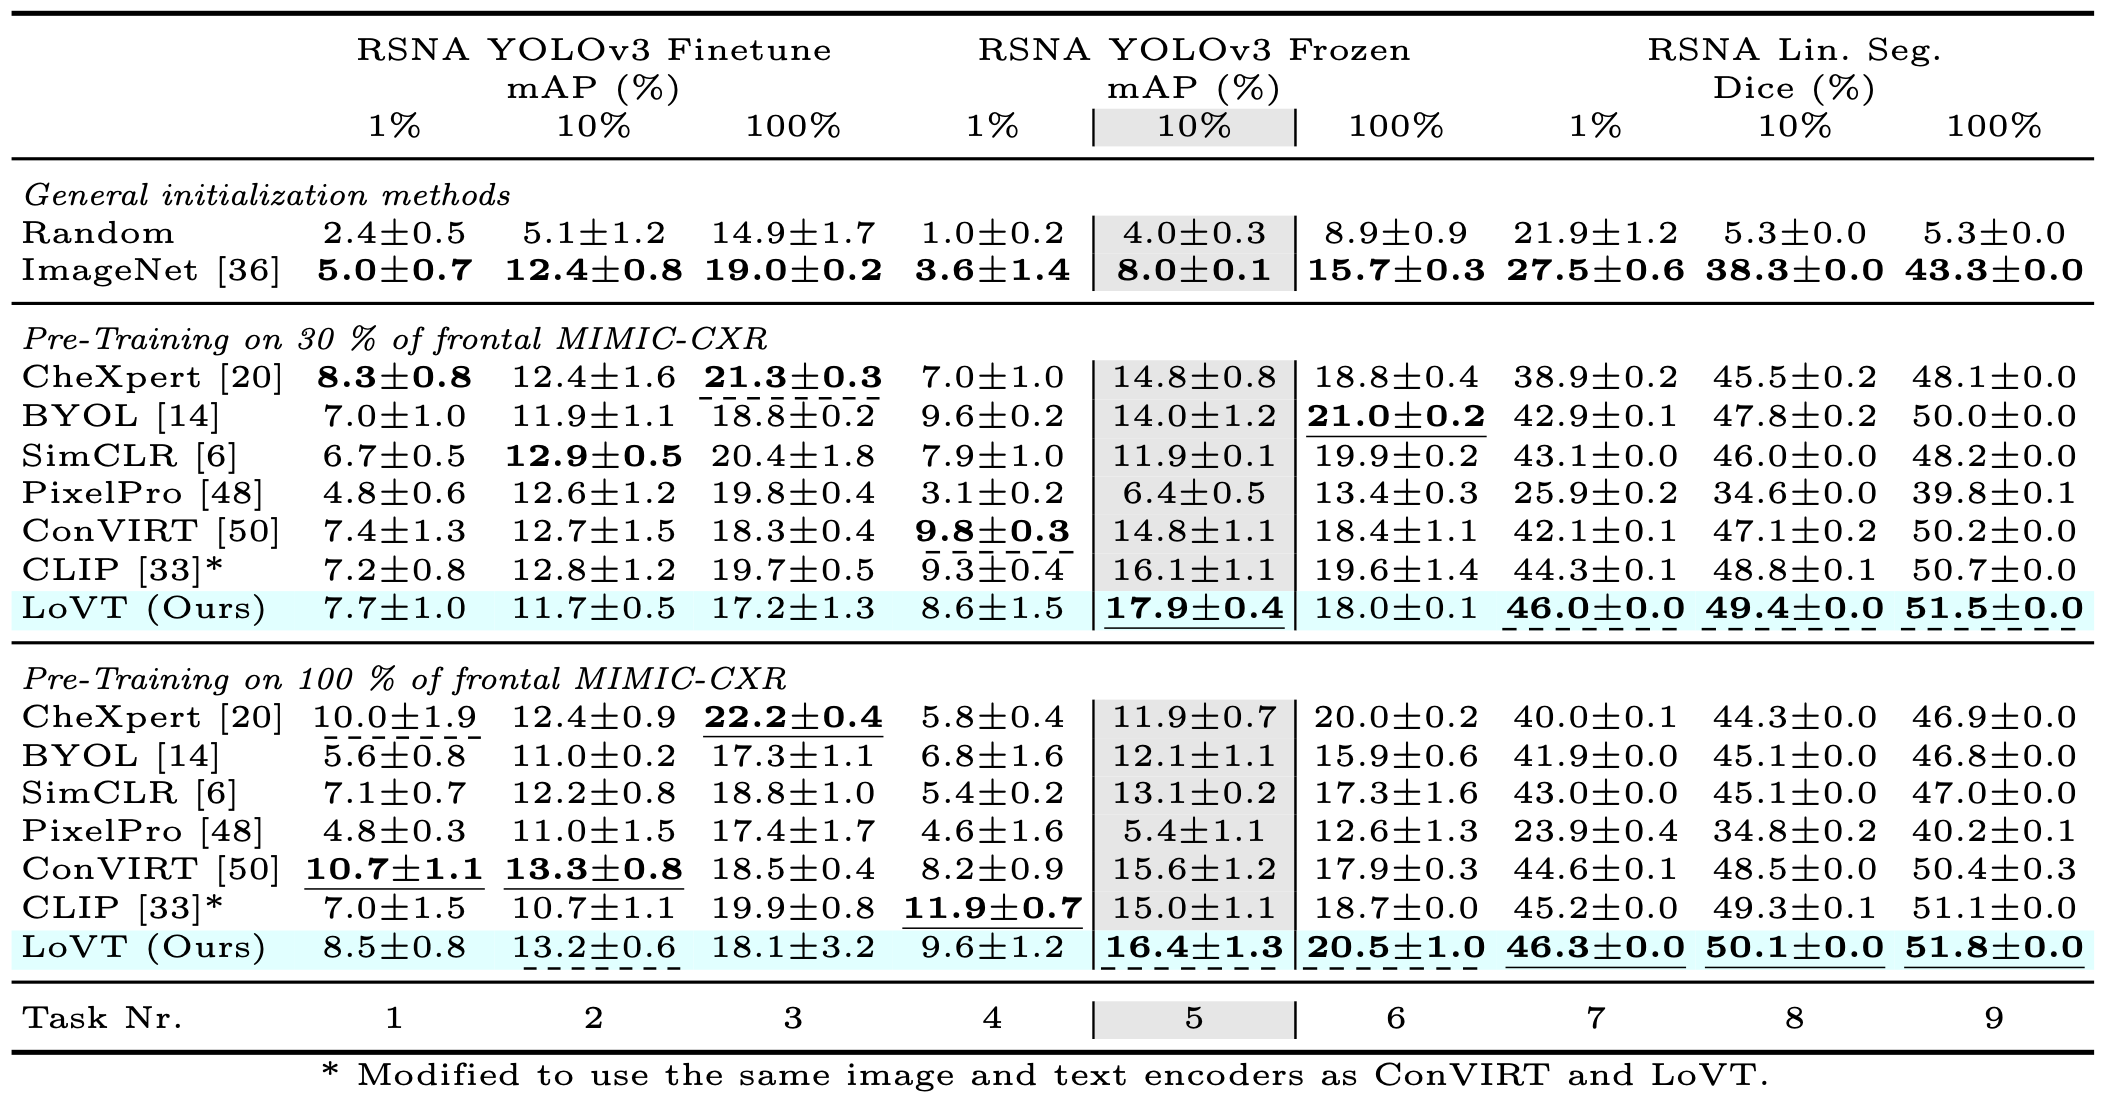
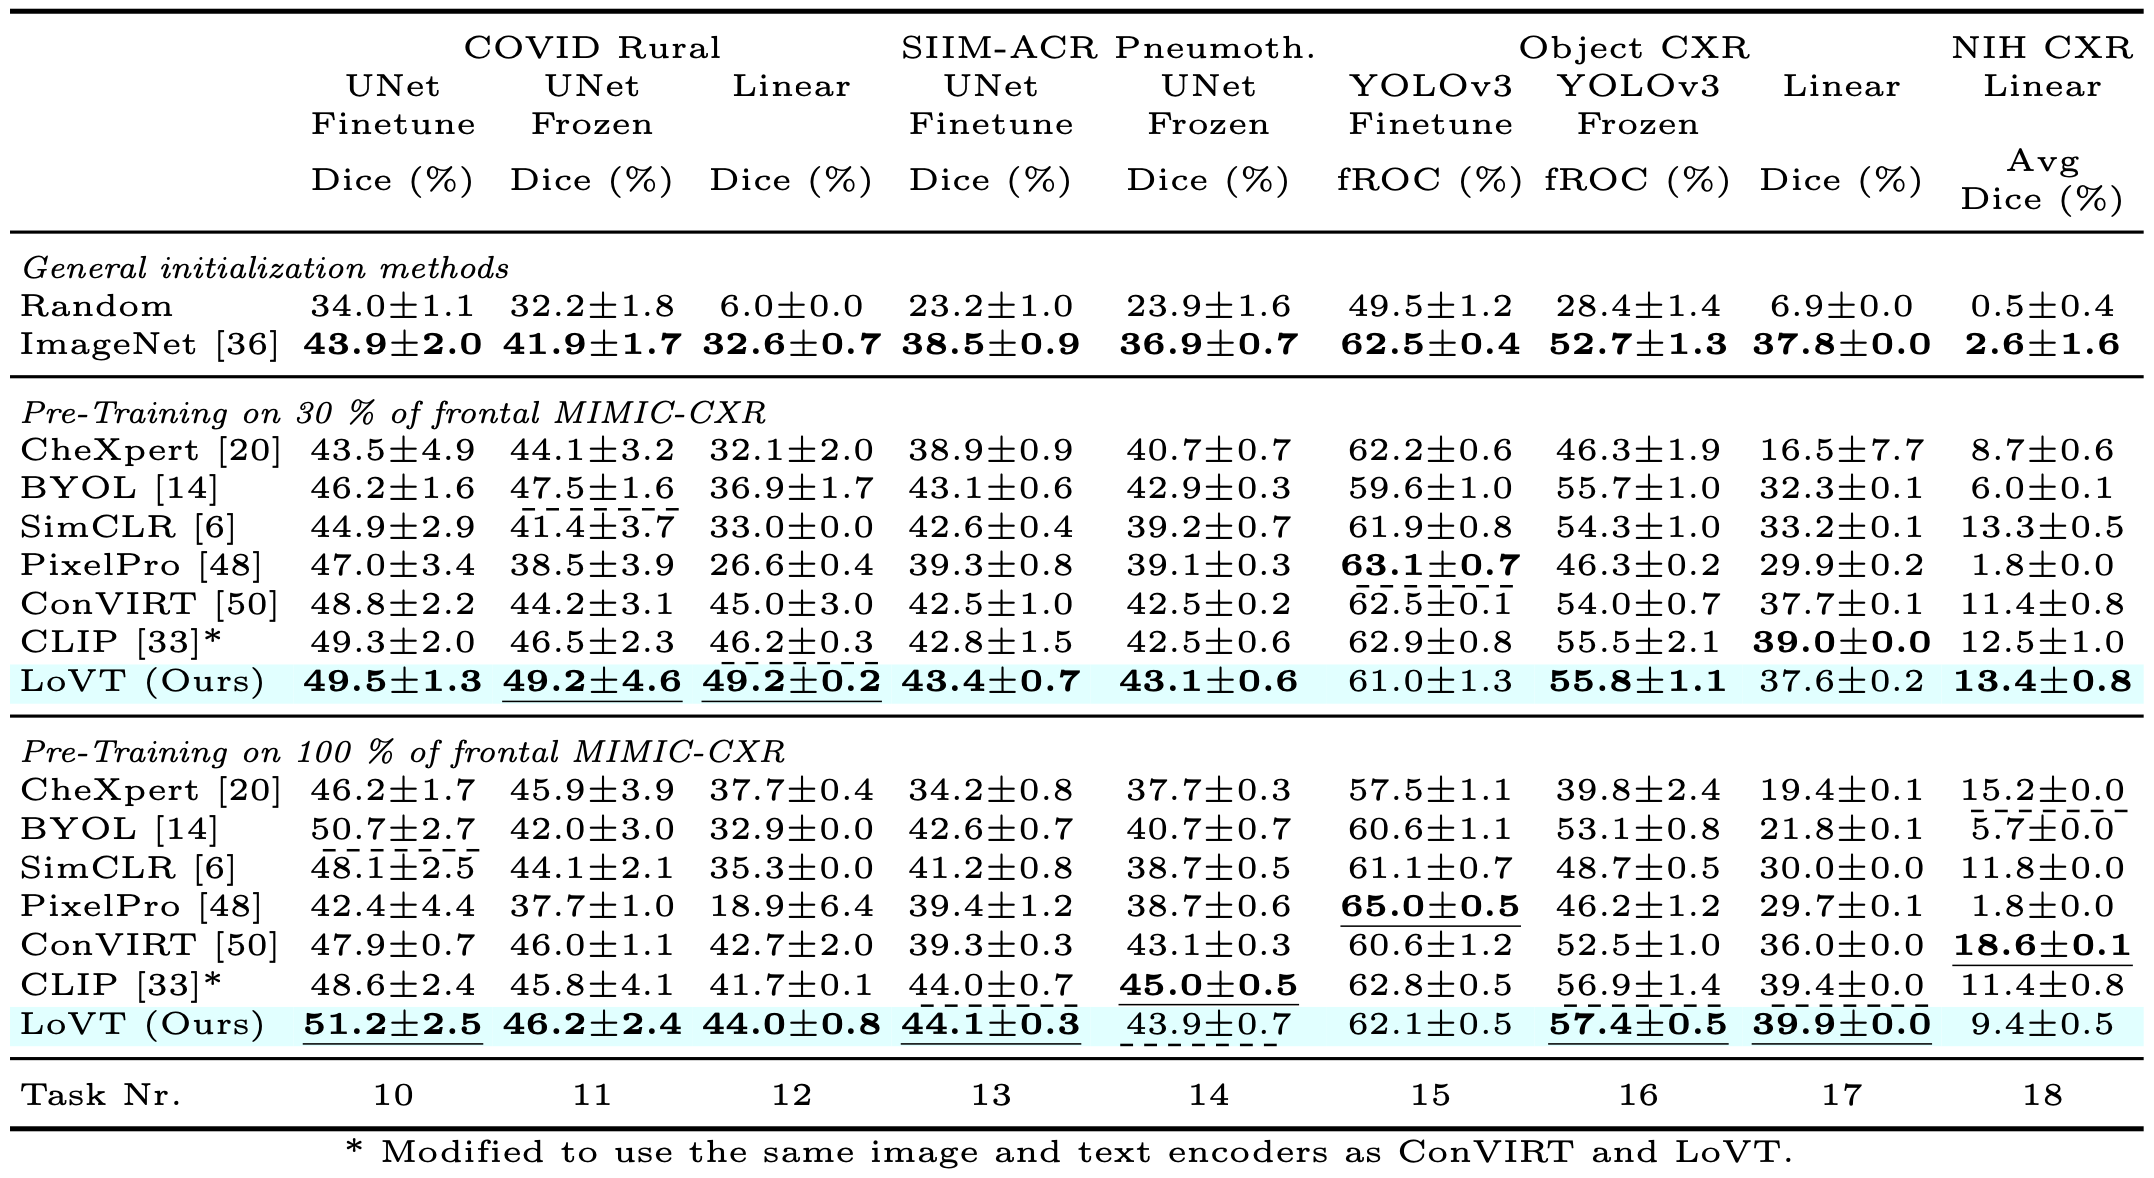
Contrastive learning has proven effective for pre-training im- age models on unlabeled data with promising results for tasks such as medical image classification. Using paired text (like radiological reports) during pre-training improves the results even further. Still, most existing methods target image classification downstream tasks and may not be optimal for localized tasks like semantic segmentation or object detection. We therefore propose Localized representation learning from Vision and Text (LoVT), to our best knowledge, the first text-supervised pre-training method that targets localized medical imaging tasks. Our method combines instance-level image-report contrastive learning with local contrastive learning on image region and report sentence representations. We evaluate LoVT and commonly used pre-training methods on a evaluation framework of 18 localized tasks on chest X-rays from five public datasets. LoVT performs best on 10 of the 18 studied tasks making it the preferred method of choice for localized tasks.
See sections Pre-Training and Evaluation (in this README) for details on how the shown results can be reproduced.
-
Prepare the conda environment:
conda env create -f environment.yaml
-
Setup wandb and model paths
- Create a folder where you store datasets, we will refer to this folder as
<path_to_datasets> - Create a folder where you store models, we will refer to this folder as
<models base path> - Make sure you have an account at https://wandb.ai/
- Update the file
configs/user_config.yamland setmodels.base_pathto<models base path>andwandb.userto your wandb user-name (You can also updatewandb.projectif you like).
- Create a folder where you store datasets, we will refer to this folder as
-
Note: all temporary training data and logging will be stored at
logs(a subfolder within this project). This folder can get very large, so make sure to clean up this folder after running jobs.
-
Download the MIMIC-CXR-JPG dataset from
https://physionet.org/content/mimic-cxr-jpg/2.0.0/into the folder<path_to_datasets>/MIMIC-CXR -
Download all files of the MIMIC-CXR dataset except the DICOM files (i.e. except the folder
files) fromhttps://physionet.org/content/mimic-cxr/2.0.0/into the folder<path_to_datasets>/MIMIC-CXR -
Preprocess the dataset by calling
python src/data/datasets/mimic_cxr/mimic_cxr_dataset.py create <path_to_datasets>/MIMIC-CXR --config mimic-cxr_ap-pa -
Create the image-listing (required for the image-only baselines) by calling
python src/data/datasets/mimic_cxr/mimic_cxr_dataset.py create_image_list --path <path_to_datasets>/MIMIC-CXR/mimic-cxr_ap-pa_dataset -
Update the paths in the config files:
configs/dataset/mimic-cxr_ap-pa_find-impr.yamlconfigs/dataset/mimic-cxr_ap-pa_find-impr_03.yamlconfigs/dataset/mimic-cxr-img_ap-pa_find-impr.yamlconfigs/dataset/mimic-cxr-img_ap-pa_find-impr_03.yaml
-
Download and extract the RSNA Pneumonia Detection dataset from
https://www.kaggle.com/c/rsna-pneumonia-detection-challenge/into the folder<path_to_datasets>/RSNA-Pneunomia-Detection -
Preprocess the dataset by calling
python src/data/datasets/rsna_pneunomia_detection/rsna_pneunomia_detection_dataset.py <path_to_datasets>/RSNA-Pneunomia-Detection -
For reproducability copy the files
train.csv,validation.csv,test.csv, anddataset_statistics.jsonfromdatasets/RSNA-Pneumonia-Detectionto<path_to_datasets>/RSNA-Pneunomia-Detection(overwrite the existing files) -
Update the paths in the config files:
configs/dataset/rsna.yamlconfigs/dataset/rsna_01.yamlconfigs/dataset/rsna_001.yamlconfigs/dataset/rsna_seg.yamlconfigs/dataset/rsna_seg_01.yamlconfigs/dataset/rsna_seg_001.yaml
-
Download and extract the COVID Rural dataset from
https://github.com/haimingt/opacity_segmentation_covid_chest_X_rayinto the folder<path_to_datasets>/Opacity-Segmentation-COVID. This folder should now contain the subfolder<path_to_datasets>/Opacity-Segmentation-COVID/opacity_segmentation_covid_chest_X_ray-master/covid_rural_annot -
Preprocess the dataset by calling
python src/data/datasets/COVID_rural/covid_rural_dataset.py <path_to_datasets>/Opacity-Segmentation-COVID/opacity_segmentation_covid_chest_X_ray-master/covid_rural_annot -
For reproducability copy the files
train.csv,validation.csv,test.csv, anddataset_statistics.jsonfromdatasets/Opacity-Segmentation-COVID/opacity_segmentation_covid_chest_X_ray-master/covid_rural_annotto<path_to_datasets>/Opacity-Segmentation-COVID/opacity_segmentation_covid_chest_X_ray-master/covid_rural_annot(overwrite the existing files) -
Update the paths in the config file:
configs/dataset/covid_rural.yaml
-
Download and extract the SIIM Pneumothorax Segmentation dataset from
https://www.kaggle.com/seesee/siim-train-test/into the folder<path_to_datasets>/siim-acr-pneumothorax-segmentation -
Preprocess the dataset by calling
python src/data/datasets/siim_acr_pneumothorax/siim_acr_pneumothorax.py <path_to_datasets>/siim-acr-pneumothorax-segmentation -
For reproducability copy the files
train.csv,validation.csv,test.csv, anddataset_statistics.jsonfromdatasets/siim-acr-pneumothorax-segmentationto<path_to_datasets>/siim-acr-pneumothorax-segmentation(overwrite the existing files) -
Update the paths in the config file:
configs/siim_pneumothorax.yaml
-
Download the Object CXR dataset from
https://jfhealthcare.github.io/object-CXR/into the folder<path_to_datasets>/object-CXR/input. An alternative mirror of the dataset can be found athttps://academictorrents.com/details/fdc91f11d7010f7259a05403fc9d00079a09f5d5 -
Extract
<path_to_datasets>/object-CXR/input/train.zipand<path_to_datasets>/object-CXR/input/dev.zip -
Preprocess the dataset by calling
python src/data/datasets/object_cxr/object_cxr_dataset.py <path_to_datasets>/object-CXR -
For reproducability copy the files
train.csv,validation.csv,test.csv, anddataset_statistics.jsonfromdatasets/object-CXRto<path_to_datasets>/object-CXR(overwrite the existing files) -
Update the paths in the config files:
configs/object-cxr.yamlconfigs/object-cxr_seg.yaml
-
Download the NIH CXR Pathology Detection dataset from
https://nihcc.app.box.com/v/ChestXray-NIHCC/into the folder<path_to_datasets>/NIH_CXR_pathology_detection -
Preprocess the dataset by calling
python src/data/datasets/nih_cxr/nih_cxr_dataset.py <path_to_datasets>/NIH_CXR_pathology_detection -
For reproducability copy the files
train.csv,validation.csv,test.csv, anddataset_statistics.jsonfromdatasets/NIH_CXR_pathology_detectionto<path_to_datasets>/NIH_CXR_pathology_detection(overwrite the existing files) -
Update the paths in the config files:
configs/nih-cxr.yamlconfigs/nih-cxr_seg.yaml
To train the LoVT model (on 100% of the data) with the same setting as in our paper call:
python src/scripts/run_training.py +experiment=LoVT_100
To train it on 30% of the data call:
python src/scripts/run_training.py +experiment=LoVT_30
To change hyperparameters prepare or update a yaml experiment config in the folder configs/experiment.
The experiment can the be run using python src/scripts/run_training.py +experiment=<name_of_you_config_without_yaml_ending>.
The configs for our ablation study can be found in configs/experiment/ablation.
For details on how to define experiments see existing yaml-files as reference and the Hydra documentation (https://hydra.cc/)
as the Hydra library is used to load configs.
The model details of an experiment are defined within pretrain_model: of the experiment config and are based on src/models/pretraining/pretraining_utils.py BiModalModelConfig.
For the scan encoder config see the configs in configs/scan_encoder and src/models/image/scan_encoder.py ScanEncoderConfig.
For the report encoder config see the configs in configs/report_encoder and src/models/text/report_encoder.py ReportEncoderConfig.
For the objective configs see the configs in configs/objective and
src/models/objectives/global_alignment.py GlobalNceLossConfig, src/models/objectives/local_alignment.py LocalIntraSampleContrastiveLossConfig
To train supervised CheXpert on 100% of the MIMIC-CXR data with the same setting as in our paper call:
python src/baselines/supervised_baseline.py +baseline@model_config=chexpert_100 name=chexpert_100
To train supervised CheXpert on 30% of the MIMIC-CXR data with the same setting as in our paper call:
python src/baselines/supervised_baseline.py +baseline@model_config=chexpert_30 name=chexpert_30
To train BYOL on 100% of the data with the same setting as in our paper call:
python src/baselines/byol_baseline.py +baseline@model_config=byol_100 name=byol_100
To train BYOL on 30% of the data with the same setting as in our paper call:
python src/baselines/byol_baseline.py +baseline@model_config=byol_30 name=byol_30
To train SimCLR on 100% of the data with the same setting as in our paper call:
python src/baselines/simclr_baseline.py +baseline@model_config=simclr_100 name=simclr_100
To train SimCLR on 30% of the data with the same setting as in our paper call:
python src/baselines/simclr_baseline.py +baseline@model_config=simclr_30 name=simclr_30
To train PixelPro on 100% of the data with the same setting as in our paper call:
python src/baselines/byol_baseline.py +baseline@model_config=pixelpro_100 name=pixelpro_100
To train PixelPro on 30% of the data with the same setting as in our paper call:
python src/baselines/byol_baseline.py +baseline@model_config=pixelpro_30 name=pixelpro_30
Note that using src/baselines/byol_baseline.py is not a typo but both use a similar framework which is why both share the same training file.
ConVIRT is pre-trained using our LoVT code but with a different experiment config. To train the ConVIRT model on 100% of the data with the same setting as in our paper call:
python src/scripts/run_training.py +experiment=ConVIRT_100
To train it on 30% of the data call:
python src/scripts/run_training.py +experiment=ConVIRT_30
CLIP is pre-trained using our LoVT code but with a different experiment config. To train the CLIP model on 100% of the data with the same setting as in our paper call:
python src/scripts/run_training.py +experiment=CLIP_100
To train it on 30% of the data call:
python src/scripts/run_training.py +experiment=CLIP_30
To evaluate LoVT, CLIP, ConVIRT, or models created by another experiment config use:
python src/analysis/evaluation_job.py evaluate_downstream <model name>
This evaluates the model on the RSNA YOLOv3 Frozen 10% task and can therefore be used during hyperparameter tuning.
The is the name of the model as specified in the name field of an experiment config, e.g. LoVT_100.
The model to evaluate has to be located in the folder <models base path>/pretraining/<model name> where <model base path> is specified in the user config.
It is stored there automatically when running pre-training.
The model is evaluated with five runs and the results can be found in results/generated/downstream_rsna_frozen_10.csv
(the wandb run ids are stored in the file results/runs.csv).
To evaluate a model on other evaluation tasks use:
python src/analysis/evaluation_job.py evaluate_downstream --evaluate_extended --no-evaluate_basic <model name>
This includes automatic tuning of the downstream learning rates and averaging over five runs.
The results can be found in the files in results/generated/ (the wandb run ids are stored in the file results/runs.csv).
To evaluate a model on all (basic and extended tasks) use:
python src/analysis/evaluation_job.py evaluate_downstream --evaluate_extended <model name>
All other baselines can also be evaluated by directly evaluating the pre-trained image encoder (i.e. ResNet). Therefore use the following for basic evaluations (i.e. RSNA YOLOv3 Frozen 10%):
python src/analysis/evaluation_job.py evaluate_baseline_downstream <baseline model name>
and for the other tasks:
python src/analysis/evaluation_job.py evaluate_baseline_downstream --evaluate_extended --no-evaluate_basic <baseline model name>
The baseline model to evaluate has to be located in the folder <models base path>/baselines/<baseline model name> where <model base path> is specified in the user config.
Within this folder the ResNet weights (of the torchvision ResNet class) have to be located at <models base path>/baselines/<baseline model name>/checkoints/backbone_weights.pt.
It is stored there automatically when pre-training baselines with the scripts in src/baselines.
The results can be found in the files in results/generated/ (the wandb run ids are stored in the file results/runs.csv).
To evaluate a random initialized ResNet use
python src/analysis/evaluation_job.py evaluate_baseline_downstream --evaluate_extended random
To evaluate a ImageNet initialized ResNet use
python src/analysis/evaluation_job.py evaluate_baseline_downstream --evaluate_extended ImageNet
To analyze the embeddings (e.g. std) of a model (like LoVT or an ablation) use
python src/analysis/evaluation_job.py analyze --gpu 0 --export <model name>
The results are stored in the wandb run and can be found in the file results/generated/analysis-test.csv
To create plots for a model (like LoVT or an ablation) use
python src/analysis/evaluation_job.py plot --gpu 0 --data_plots --downstream_plots --export <model name>
The plots are stored in the model folder, i.e. in <models base path>/pretraining/<model name>/plots.
Intermediate values are stored in model subfolders predictions and cached and can be deleted afterwards.
To create plots of multiple models, e.g. to compare downstream results or embedding properties (std, alignment, ...)
specify the runs to be plotted in results/runs_paper.csv and run the following:
python src/analysis/evaluation_job.py plot_shared --category <category to plot>
This includes all runs in results/runs_paper.csv with the specified category and stores the plots at results/generated.
In results/runs_paper.csv the name must match the model name and paper_name will be used in the legends, baseline should be set to true for baseline models,
has_local and has_global should be set accordingly to whether the model uses local or global losses, and order specifies the order in which the models are shown in plots.

