In this walk-through, we are going to write JavaScript to auto-generate a table of contents for an article based on the headings in the HTML document. Along the way we’ll be learning and using several vital DOM methods.
We will be working with a modified version of the ZooKeep assignment description. The source HTML that we’re working with is in index.html.
“index.html” already contains a script element loading toc.js. The code examples below should be added to “toc.js” to auto-generate our table of contents.
Use document.querySelectorAll to find all the headings in the article
except for the h1 (i.e. h2, h3, h4, h5, h6).
var headings = document.querySelectorAll("h2, h3, h4, h5, h6");
Just to ensure that our code is working as expected so far, use console.log
to display headings in the browser’s console.
console.log(headings);
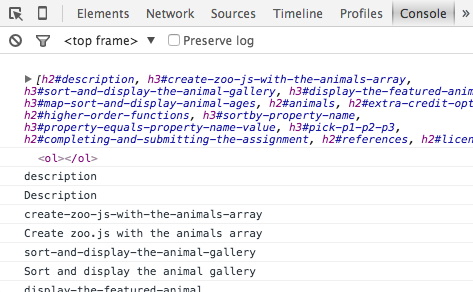
At this point, if you haven’t already, open “index.html” in a browser. Activate the Developer Tools and the Console. Refresh the page and make sure the NodeList of heading elements is logged to the console. You should see something like this, though the exact output varies by browser:
Our table of contents will be an ordered list of links to the individual sections of our document. The user will be able to click on these links to jump directly to specific sections.
Use document.createElement to create a new ol element that will
hold the table of contents list.
var tocList = document.createElement('ol');
Again, to ensure that our code is functioning correctly, log tocList to the
console.
console.log(tocList);
Loop through the headings using a for loop and build a list of links to
the different sections of the document. The final HTML for the table of contents
list will look something like the following:
<ol>
  <li>
    <a href="#description" rel="internal">Description</a>
  </li>
  <li>
    <a href="#create-zoo-js-with-the-animals-array" rel="internal">Create zoo.js with the animals array</a>
  </li>
  <li>
    <a href="#sort-and-display-the-animal-gallery" rel="internal">Sort and display the animal gallery</a>
  </li>
  <li>
    <a href="#display-the-featured-animal" rel="internal">Display the featured animal</a>
  </li>
  ...
</ol>
To generate the content above, we will use the id attribute from the
headings to generate the fragment identifier for the href attribute on the
a elements, and use the heading text for the a element’s content.
Just so we are certain that we have access to the necessary information, let’s
start by creating a for loop that just logs the id and
textContent properties for each heading in our headings list.
for(var i = 0, len = headings.length; i < len; i++) {
    var heading = headings[i];

    console.log(heading.id);
    console.log(heading.textContent);
}
At this point, save “toc.js” and load “index.html” in the browser. Refresh the page and ensure that the correct information is being logged to the console. It should look something like the following:
Now that we know we have access to the id and textContent of the headings,
it’s short work to build the list item and anchor elements for each of the
headings. For each of the headings, create a li (list item) element and
an a (anchor) element. Set the href, rel, and
textContent properties of the anchor, then use node.appendChild
to add the anchor element to the list item, then add the list item to the
tocList ordered list element.
for(var i = 0; i < headings.length; i++) {
    var heading = headings[i];

    // console.log(heading.id);
    // console.log(heading.textContent);

    // Create the `li` and `a` elements
    var li = document.createElement('li');
    var a = document.createElement('a');

    // console.log(a);
    // console.log(li);

    // Set the necessary properties on the `a` element
    a.href = '#' + heading.id;
    a.textContent = heading.textContent;
    a.rel = 'internal';

    // Append the `a` element to the `li`
    li.appendChild(a);

    // console.log(li);

    // Append the `li` to the `tocList` (an `ol` element)
    tocList.appendChild(li);
}
Just to be certain that our table of contents list is looking okay, let's log it to the console.
console.log(tocList);
In index.html line 17 you’ll see that we have a nav element
element with the id “table-of-contents”. This element is a placeholder for the
table of contents list that we are building.
Use document.querySelector to find the element with the id
“table-of-contents”. Store this in a variable called toc.
var toc = document.querySelector('#table-of-contents');
To be certain that we found the correct element, log toc to the console.
console.log(toc);
All that’s necessary now is to add tocList to toc by using appendChild.
toc.appendChild(tocList);
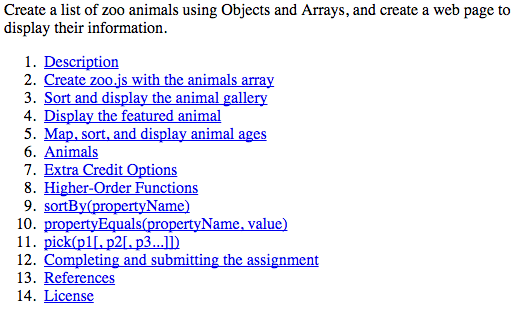
Take a look at “index.html” in a browser now, and you see the table of contents list right below the introductory paragraph. Woot!!
It would be helpful if we had a heading for the table of contents list. Use
document.createElement to generate an h2 element with the text
“Table of Contents”.
var tocHeading = document.createElement('h2');
tocHeading.textContent = 'Table of Contents';
To be certain that our heading is correct, log it to the console.
console.log(tocHeading);
Now, use node.insertBefore to add the heading to the toc placeholder
before the ol containing the list of internal links.
toc.insertBefore(tocHeading, tocList);
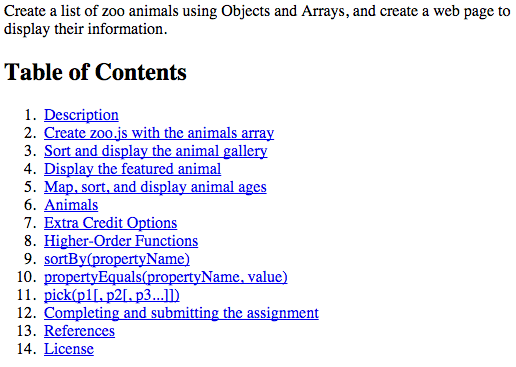
Take a look at “index.html” in a browser. Your table of contents list should look fantastic.
It would be a nice enhancement to allow the user to click on the Table of Contents heading to collapse or expand the list.
Use addEventListener to listen for ‘click’ events on the table of
contents heading. In the listener callback function, use the classList
property on tocList to toggle the ‘collapsed’ class name.
tocHeading.addEventListener('click', function(){
    console.log('Heading clicked!');
    tocList.classList.toggle('collapsed');
    console.log(tocList);
}, false);
Currently we are only adding and removing a class name, which doesn’t have any visible affect on the table of contents list. We can view the console or use Inspect Element to see that the class attribute is being changed, but we don’t have the necessary CSS rules to actually collapse the table of contents list when the heading is clicked.
In style.css, add a rule which sets the display
property to none for elements that have the ‘collapsed’ class name.
.collapsed {
    display: none;
}
Now take a look at “index.html” in the browser, and things should be much more exciting.
Wooot!!! We just made an auto-generated collapsible table of contents for our article! That’s pretty awesome.
Currently our table of contents list is flat: h2 headings are on the same level
as h3s. In a true outline, h3 elements that follow an h2 are considered
children of the h2 elements and should be nested one level deeper.
Update the for loop that generates the list items so greater heading levels
are appropriately nested. Your ending HTML structure should look something like
the following:
<ol>
  <li>
    <a href="#description" rel="internal">Description</a>
    <ol>
      <li>
        <a href="#create-zoo-js-with-the-animals-array" rel="internal">Create zoo.js with the animals array</a>
      </li>
      <li>
        <a href="#sort-and-display-the-animal-gallery" rel="internal">Sort and display the animal gallery</a>
      </li>
      <li>
        <a href="#display-the-featured-animal" rel="internal">Display the featured animal</a>
      </li>
      <li>
        <a href="#map-sort-and-display-animal-ages" rel="internal">Map, sort, and display animal ages</a>
      </li>
    </ol>
  <li>
    <a href="#animals" rel="internal">Animals</a>
  </li>
  ...
</ol>
The code necessary for this is left as an exercise for you.
It’s currently not possible to tell that the Table of Contents heading is clickable to collapse or expand the list. Make the necessary changes to “styles.css” and the heading’s ‘click’ listener to make the collapse/expand functionality more obvious.
Currently we are creating a lot of variables (headings, toc, tocList,
tocHeading, i, heading, a, li). All of these variables are attached
to the global scope by default. That’s bad.
In “toc.js”, declare a new function (called autoToC or something similar) and
put all of the code from “toc.js” into the body of the function. Then at the end
of the file, call the autoToC function. Your final code might look something
like this:
function autoToC() {
    // Find the heading elements
    var headings = document.querySelectorAll("h2, h3, h4, h5, h6");
    console.log(headings);

    // Create an ordered list
    var tocList = document.createElement('ol');
    console.log(tocList);

    // Loop through the headings
    for (var i = 0; i < headings.length; i++) {
        var heading = headings[i];
        // ... (trimmed)
    }
    // ...
}

autoToC();
Note: it’s actually more helpful if the “toc.js” file doesn’t call itself directly, but instead just defines the function. It would probably be most helpful if the
autoToC()function created and returned thenavelement. This would give the caller complete control over where the table of contents is placed in the document. For instance “index.html” could use it like so:
<script>
    var description = document.querySelector('#description');
    description.parentNode.insertBefore(autoToC(), description);
</script>
Consider making the changes necessary for this, but it is not required.
-
To begin, fork this repository.
-
Create a new Cloud9 workspace from your new repository.
-
Alternatively, you may clone your new repository to your computer by running:
git clone https://github.com/YOUR_GITHUB_USERNAME/table-of-contents
-
-
After cloning (in Cloud9 or on your computer), check out the “gh-pages” branch by running:
git checkout gh-pages -
Modify the files and commit changes to complete your solution.
-
Run
node testto verify that all tests pass. -
Push/sync the changes up to GitHub. Your assignment will now be visible at http://YOUR_GITHUB_USERNAME.github.io/table-of-contents/.
-
Create a pull request on the original repository to turn in the assignment.
You are also welcome commit, push, and create a pull request before you’ve
completed your solution. You can ask questions or request feedback there in your
pull request. Just mention @barberboy in your comments to get my attention.
document.querySelector(selector)document.querySelectorAll(selector)document.createElement(tagName)node.appendChild(childNode)node.insertBefore(newNode, reference)eventTarget.addEventListener(event, listener, useCapture)console.log(message)forloopolelementlielementaelementnavelementh2elementhrefattributerelattributeidpropertytextContentpropertyclassListpropertyclassList.toggle(className)methoddisplaycss property
![▶ [h2#description, h3#create-zoo-js-with-the-animals-array, ...]](https://raw.githubusercontent.com/unioncollege-webtech/table-of-contents/gh-pages/./resources/console-log-headings.png)


