Flutter Plugin to login via Facebook.
Easily add Facebook login feature in your application. User profile information included.
Facebook SDK version, used in plugin:
- iOS 9.0 and higher.
- Android 4.1 and newer (SDK 16).
To use this plugin:
- add
flutter_login_facebookas a dependency in your pubspec.yaml file; - setup android;
- setup ios;
- additional Facebook app setup;
- use plugin in application.
See Facebook Login documentation for full information.
Also you can read the article on Medium with detailed instructions.
Go to Facebook Login for Android - Quickstart page.
You need to complete Step 1: Select an App or Create a New App.
Skip Step 2 (Download the Facebook App) and Step 3 (Integrate the Facebook SDK).
Complete Step 4: Edit Your Resources and Manifest
- Add values to
/android/app/src/main/res/values/strings.xml(create file if it doesn't exist) - Add a
meta-dataelement and activities toandroid/app/src/main/AndroidManifest.xml, sectionapplication:
    <meta-data android:name="com.facebook.sdk.ApplicationId"
        android:value="@string/facebook_app_id"/>

    <activity android:name="com.facebook.FacebookActivity"
        android:configChanges=
                "keyboard|keyboardHidden|screenLayout|screenSize|orientation"
        android:label="@string/app_name" />
    <activity
        android:name="com.facebook.CustomTabActivity"
        android:exported="true">
        <intent-filter>
            <action android:name="android.intent.action.VIEW" />
            <category android:name="android.intent.category.DEFAULT" />
            <category android:name="android.intent.category.BROWSABLE" />
            <data android:scheme="@string/fb_login_protocol_scheme" />
        </intent-filter>
    </activity>
See full AndroidManifest.xml in example.
Complete Step 5: Associate Your Package Name and Default Class with Your App.
- Set
Package Name- your package name for Android application (attributepackageinAndroidManifest.xml). - Set
Default Activity Class Name- your main activity class (with package). By default it would becom.yourcompany.yourapp.MainActivity. - Click "Save".
Complete Step 6: Provide the Development and Release Key Hashes for Your App.
- Generate Development and Release keys as described in the documentation. Note: if your application uses Google Play App Signing than you should get certificate SHA-1 fingerprint from Google Play Console and convert it to base64
echo "{sha1key}" | xxd -r -p | openssl base64
- Add generated keys in
Key Hashes. - Click "Save".
In the next Step 7 Enable Single Sign On for Your App you can enable Single Sing On if you want to.
And that's it for Android.
Go to Facebook Login for iOS - Quickstart.
You need to complete Step 1: Select an App or Create a New App. If you've created an app during an Android setup than use it.
Skip Step 2 (Set up Your Development Environment) and Step 3 (Integrate the Facebook SDK).
Complete Step 3: Register and Configure Your App with Facebook.
- Add your Bundle Identifier - set
Bundle ID(you can find it in Xcode: Runner - Target Runner - General, sectionIdentity, fieldBundle Identifier) and click "Save". - Enable Single Sign-On for Your App if you need it and click "Save".
Complete Step 4: Configure Your Project.
Configure Info.plist (ios/Runner/Info.plist):
- In Xcode right-click on
Info.plist, and chooseOpen As Source Code. - Copy and paste the following XML snippet into the body of your file (
<dict>...</dict>), replacing[APP_ID]with Facebook application id and[APP_NAME]with Facebook application name (you can copy prepared values from Step 4 in Facebook Quickstart).
<key>CFBundleURLTypes</key>
<array>
  <dict>
  <key>CFBundleURLSchemes</key>
  <array>
    <string>fb[APP_ID]</string>
  </array>
  </dict>
</array>
<key>FacebookAppID</key>
<string>[APP_ID]</string>
<key>FacebookDisplayName</key>
<string>[APP_NAME]</string>- Also add to
Info.plistbody (<dict>...</dict>):
<key>LSApplicationQueriesSchemes</key>
<array>
  <string>fbapi</string>
  <string>fbapi20130214</string>
  <string>fbapi20130410</string>
  <string>fbapi20130702</string>
  <string>fbapi20131010</string>
  <string>fbapi20131219</string>
  <string>fbapi20140410</string>
  <string>fbapi20140116</string>
  <string>fbapi20150313</string>
  <string>fbapi20150629</string>
  <string>fbapi20160328</string>
  <string>fbauth</string>
  <string>fb-messenger-share-api</string>
  <string>fbauth2</string>
  <string>fbshareextension</string>
</array>
See full Info.plist in example.
CFBundleURLTypes or LSApplicationQueriesSchemes keys in your Info.plist. If you have, you should merge their values, instead of adding a duplicate key.
Skip Step 5 (Connect Your App Delegate) and all the rest.
And that's it for iOS.
Go to My App on Facebook and select your application.
You should add the App Icon (in Settings -> Basic) to let users see your application icon instead of the default icon when they attempt to log in.
In Setting -> Basic -> iOS fill up field "iPhone Store ID" ("iPad Store ID").
You may want to change some other settings. For example Display Name, Contact Email, Category, etc.
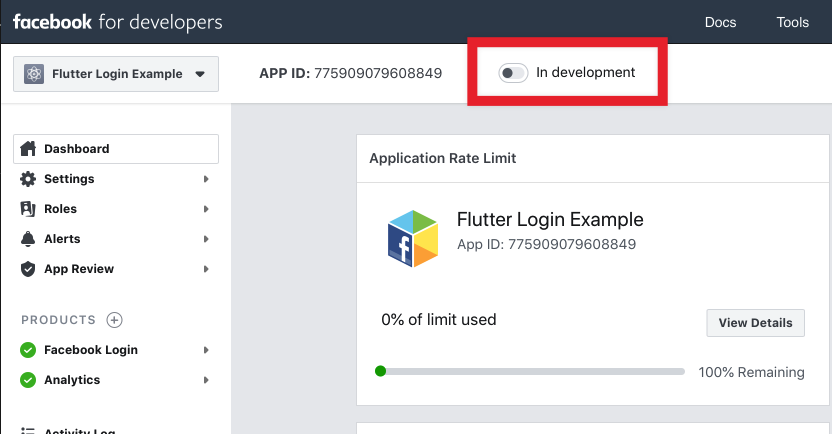
By default, your application has the status "In development".
You should enable application before log in feature goes public.
Facebook will show a warning if your application is not fully set up. For example, you may need to provide a Privacy Policy. You can use your Privacy Policy from Google Play/App Store.
You can:
- log in via Facebook;
- get access token;
- get user profile;
- get user profile image url;
- get user email (if has permissions);
- check if logged in;
- log out.
Sample code:
import 'package:flutter_login_facebook/flutter_login_facebook.dart';

// Create an instance of FacebookLogin
final fb = FacebookLogin();

// Log in
final res = await fb.logIn(permissions: [
  FacebookPermission.publicProfile,
  FacebookPermission.email,
]);

// Check result status
switch (res.status) {
  case FacebookLoginStatus.Success:
    // Logged in

    // Send this access token to server for validation and auth
    final accessToken = res.accessToken;
    // Send access token to server for validation and auth
    final FacebookAccessToken accessToken = res.accessToken;
    print('Access token: ${accessToken.token}');

    // Get profile data
    final profile = await fb.getUserProfile();
    print('Hello, ${profile.name}! You ID: ${profile.userId}');

    // Get user profile image url
    final imageUrl = await plugin.getProfileImageUrl(width: 100);
    print('Your profile image: $imageUrl');

    // Get email (since we request email permission)
    final email = await fb.getUserEmail();
    // But user can decline permission
    if (email != null)
      print('And your email is $email');

    break;
  case FacebookLoginStatus.Cancel:
    // User cancel log in
    break;
  case FacebookLoginStatus.Error:
    // Log in failed
    print('Error while log in: ${res.error}');
    break;
}

