This project is a "To Do" single-page application. It is meant to be extensible after creation to meet your team's requirements.

This project is composed of 2 main components:
- the Backend that exposes a REST CRUD API to manage ToDo items
- the Frontend that exposes a Web Interface interacting with the REST API
The ToDo backend is deployed as a RESTful API using AWS Serverless technologies:
- AWS API Gateway to provide the REST interface to the persistence layer
- Amazon DynamoDB for list persistence
- AWS Lambda provides the glue between the two.
The AWS Cloud Development Kit (CDK) provides the infrastructure-as-code used to deploy to a live AWS environment. You can find all of the above under the '/backend' folder in the CodeCatalyst repository.
The code in the backend folder includes unit test cases that can be run using your development environment. All code artifacts in the backend folder can be extended to meet your needs.
Deployment instructions can be found in the backend/README.md file.
The frontend application is based on ReactJS 17 and TypeScript. The user interface uses CloudScape components and stylesheets.
The frontend is built and deployed using AWS CDK. The deployment includes Amazon S3+CloudFront
The build pipeline runs unit and integration tests on the frontend and backend, and produces testing reports. Failed tests will stop the artifacts from publishing. Front end code is compiled and optimized for production deployment. The Amazon CloudFront content delivery network is used to pull both the frontend and backend together under a single logical internet-accessible domain under the AWS account that is connected. Amazon Cloudfront provides HTTPS support for the domain as well as forward caching for the front-end.
Deployment instruction can be found in the frontend/README.md file.
The following resources have been generated and initial revisions can be modified
- CodeCatalyst workflows defined in
.codecatalyst/workflows/ - Backend business logic under
/backend/lambda - Backend unit/e2e test cases under
/backend/test - Backend CDK stack definitions under
/backend/binand/backend/lib - Frontend project under
/frontend - Frontend IaC under
/frontend/cdk
This project will deploy the following AWS resources after being successfully created. The deployment status can be viewed in the project's workflow:
- Amazon DynamoDB table
- Amazon Lambda functions to handle backend transactions
- Amazon API Gateway REST API
- Amazon S3 bucket for storing compiled frontend artifacts
- A single Amazon CloudFront distribution with origins for Frontend and Backend (
/api)
To follow along with this hands-on project, you will need:
-
Have an AWS Account where the application will be deployed. This project will be within AWS Free Tier. If you don't have an AWS account you can follow the instructions and create a new one.
-
Have an AWS Builder ID for signing into CodeCatalyst. If you don't have an AWS Builder ID, you can create it during the sign-up process for CodeCatalyst. Please review the Setting up CodeCatalyst process to learn more.
If you are setting up AWS Builder ID and CodeCatalyst for the first time, please follow the instructions in the section below.
2.1. Open the CodeCatalyst console
2.2. Click Get started for free.
2.3. Provide your personal email address and complete the steps to sign up.

2.4. Once AWS Builder is created, sign in to CodeCatalyst.
2.5. Provide Alias, Space name, and AWS account ID. Click Verify in the AWS console.
2.6. Once the AWS account is verified, Click Create space.

- Create an IAM role with the required permissions for CodeCatalyst. For more information about the role and role policy, see Creating a CodeCatalyst service role or follow the section below.
3.1. Open AWS CodeCatalyst Console and select your space on the left pane.
3.2 Click Add IAM role.

-
Choose the first option Create CodeCatalyst development administrator role in IAM, then Click Create development role.
-
Alternatively, you can select an existing IAM role by selecting Add an existing IAM role from the add IAM role options. The IAM role needs to contain the CodeCatalyst trust policy, as well as the following permissions:
{
    "Version": "2012-10-17",
    "Statement": [
        {
            "Effect": "Allow",
            "Action": [
                "cloudformation:*",
                "ssm:*",
                "s3:*",
                "iam:PassRole",
                "iam:GetRole",
                "iam:CreateRole",
                "iam:AttachRolePolicy",
                "iam:PutRolePolicy"
            ],
            "Resource": "*"
        }
    ]
}
The IAM roles also require the Amazon CodeCatalyst service principals codecatalyst.amazonaws.com and codecatalyst-runner.amazonaws.com.
Required IAM role trust policy:
{
    "Version": "2012-10-17",
    "Statement": [
        {
            "Sid": "",
            "Effect": "Allow",
            "Principal": {
                "Service": [
                    "codecatalyst.amazonaws.com",
                    "codecatalyst-runner.amazonaws.com"
                ]
            },
            "Action": "sts:AssumeRole"
        }
    ]
}
We are done with prerequisites and ready to start building!
- In the CodeCatalyst console, navigate to the space where you want to create a project and click Create project button at the top.
- Keep selection Start with a blueprint and choose To Do web application. You can use search functionality to search blueprints by name. Click Next.
- Enter the Project Name: todoapp-demo, under CDK Role choose the IAM role you created in the Prerequisites section.
- Expand Frontend Options and Backend Options and select Python in both sections. Click Create Project.

Also we should update the name of stackname for the backend and frontend stacks. This will help us to identify the stacks in the AWS CloudFormation console.
-
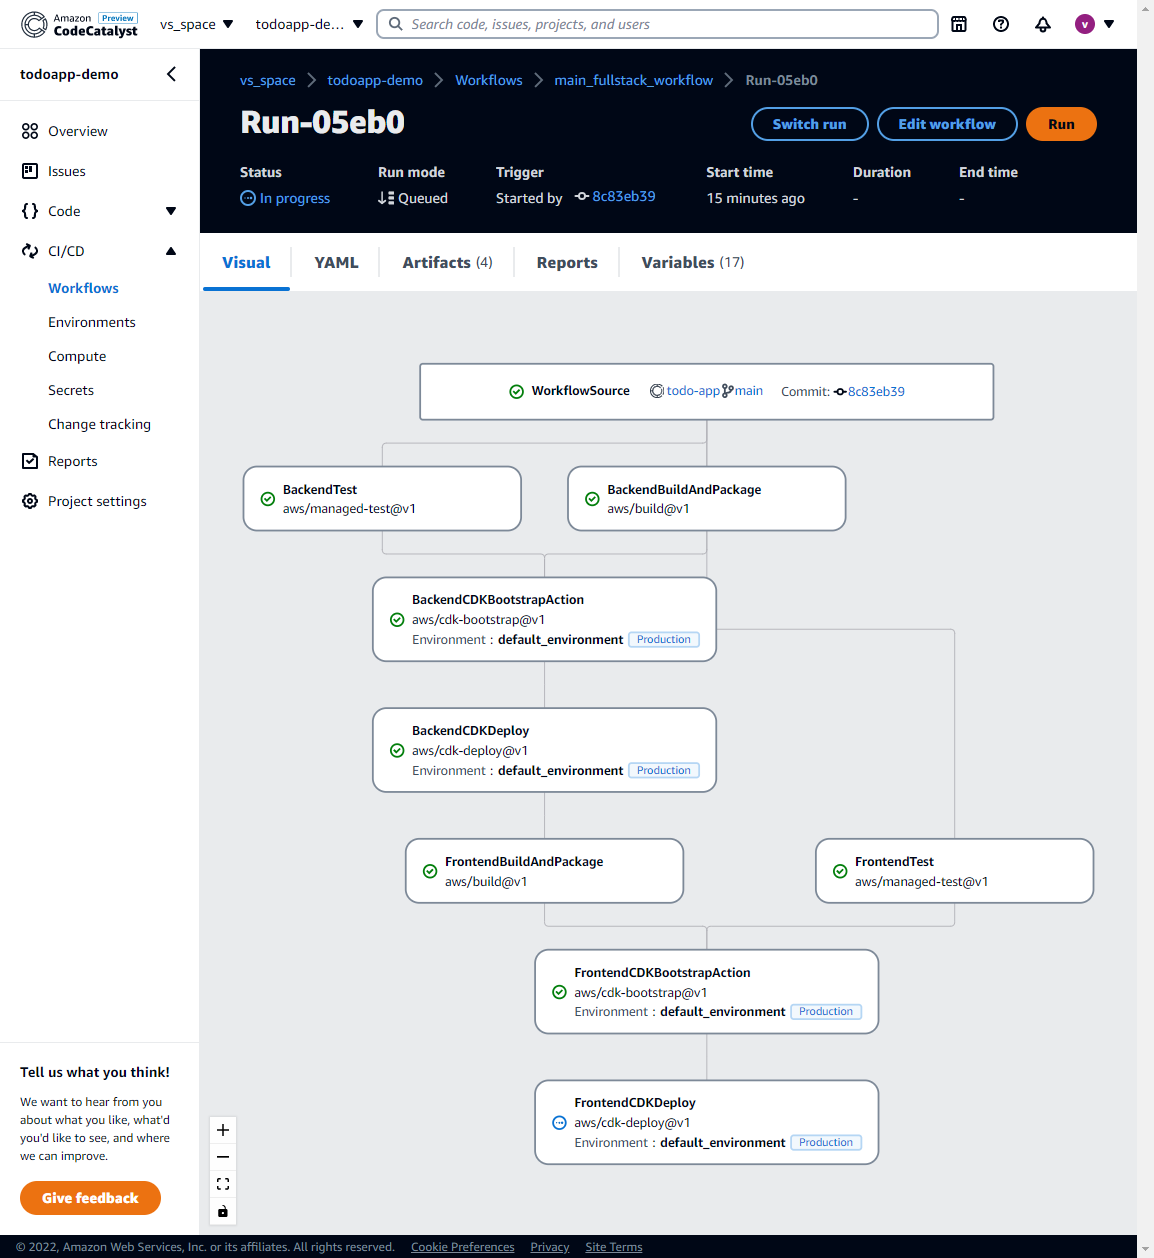
In the navigation pane, expand CI/CD and click Workflows.
-
Under Recent runs, click on the run you initiated. It will take approximately 20 minutes to complete. You see green check marks next to each Action indicating completion. In the meantime, you can explore CI/CD definition in YAML.
-
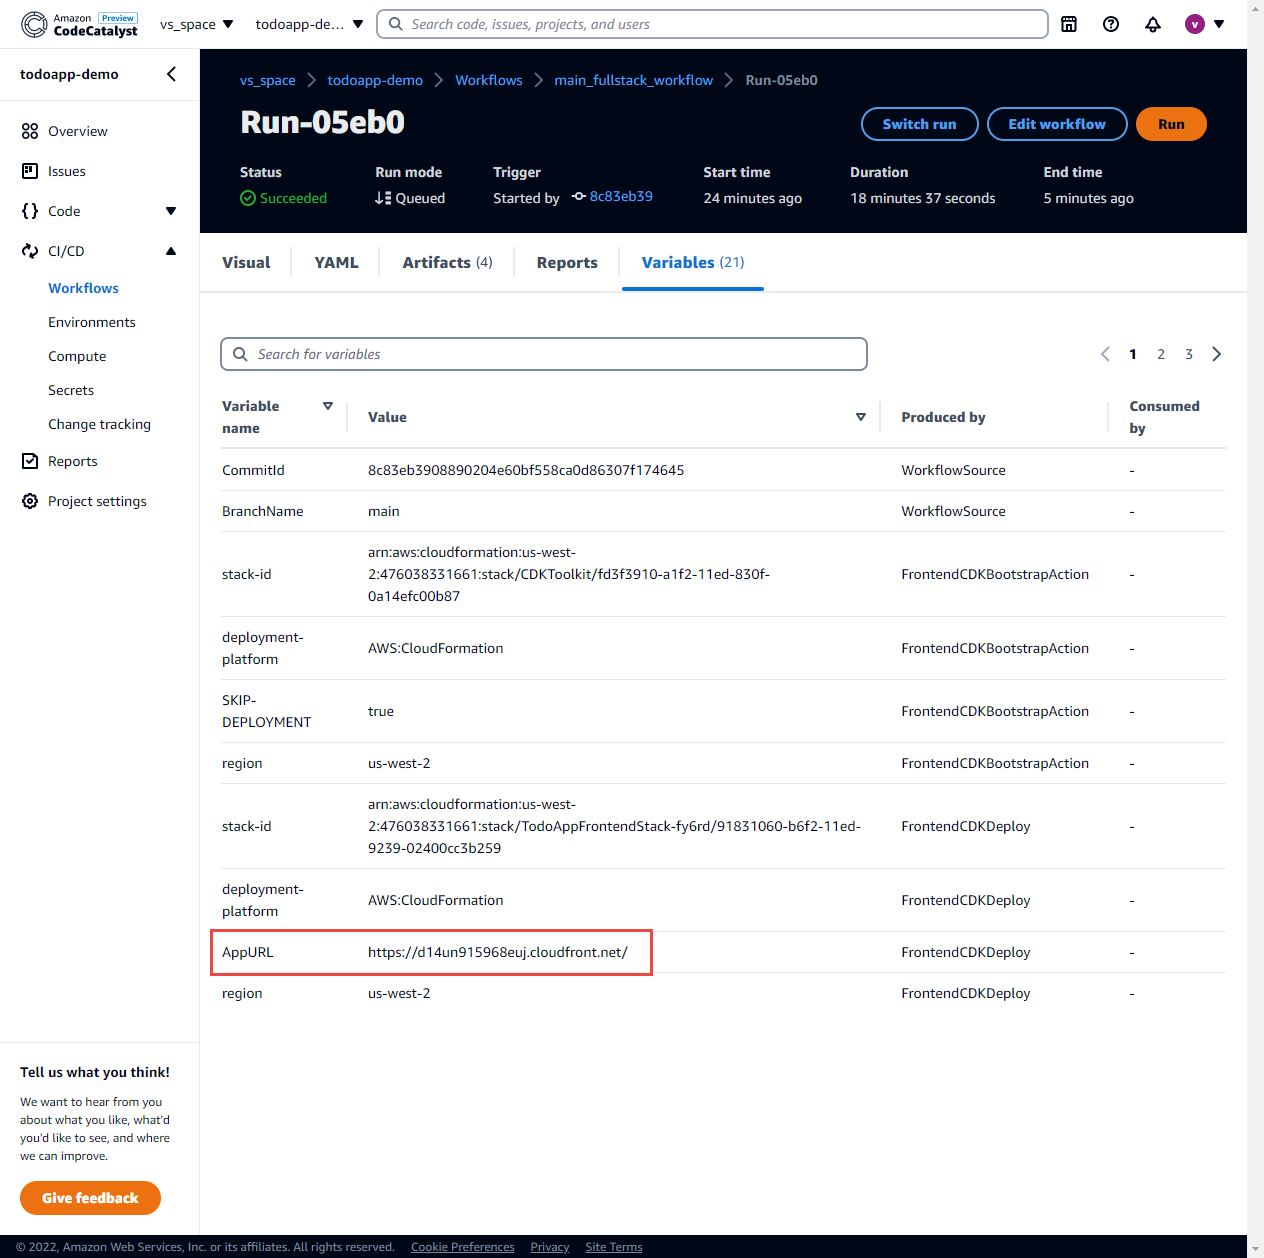
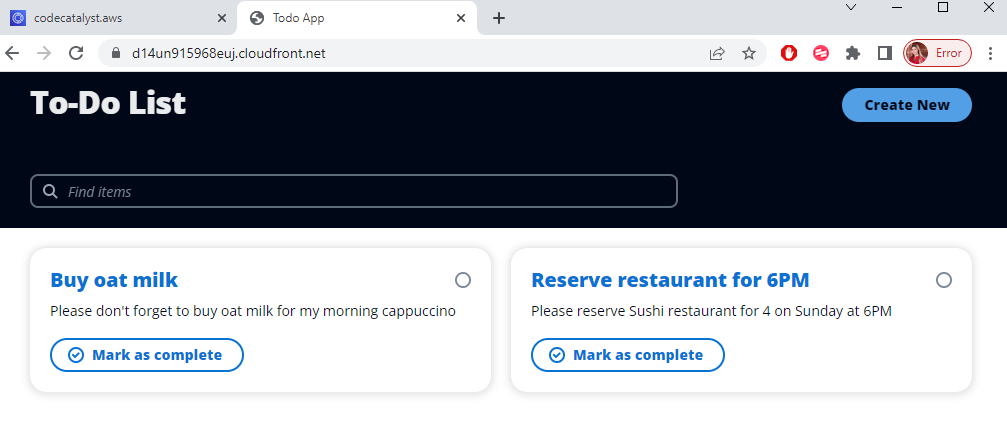
Once your application is deployed, go to Variables Tab and copy AppURL. Try to add items.
-
Add a few items and validate that your application is working.
-
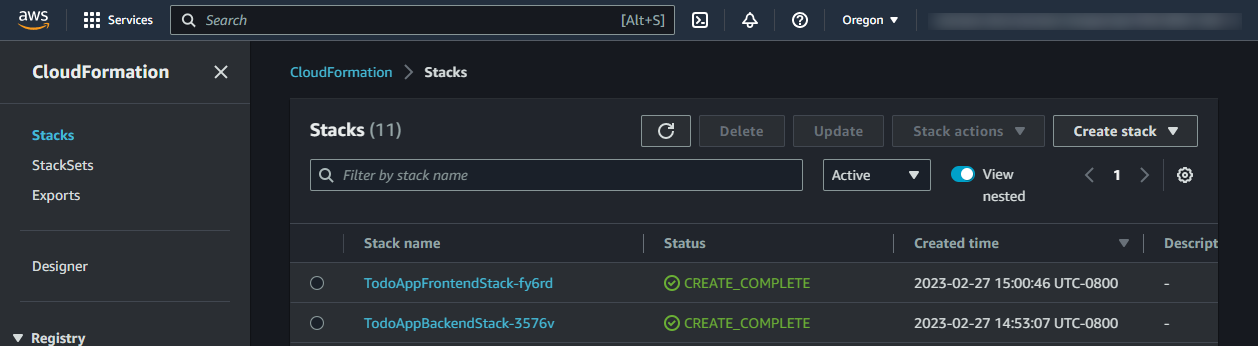
Open AWS CloudFormation and review the resources that we created for your application.
-
You can drill down to all the resources by selecting a stack.
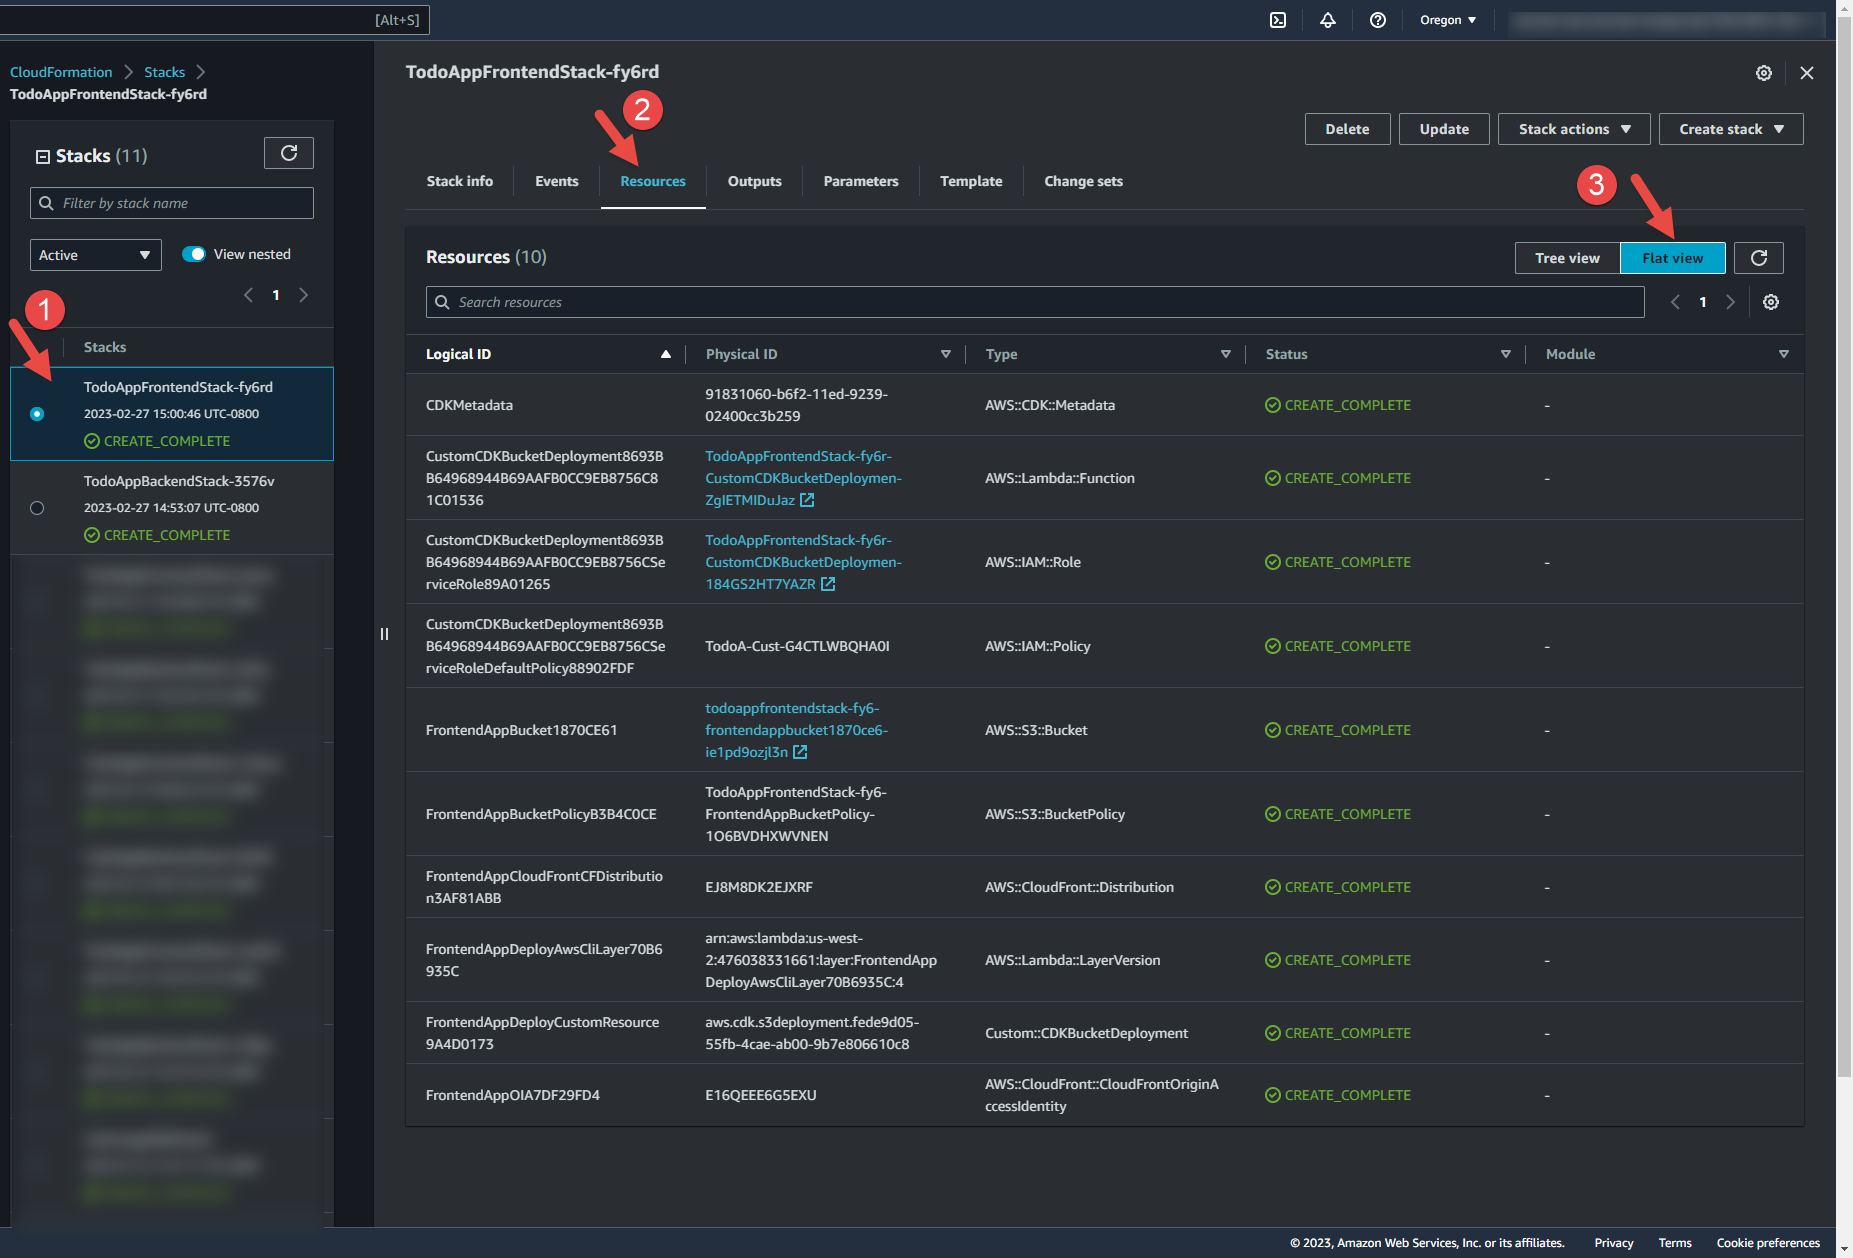


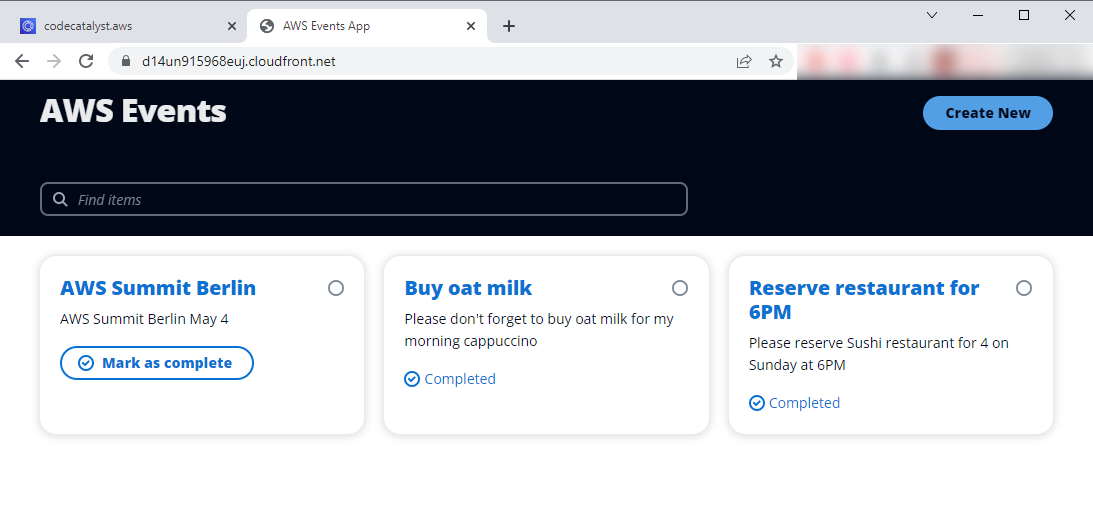
Let's make a change from the "To-Do App" to the "AWS Events App".
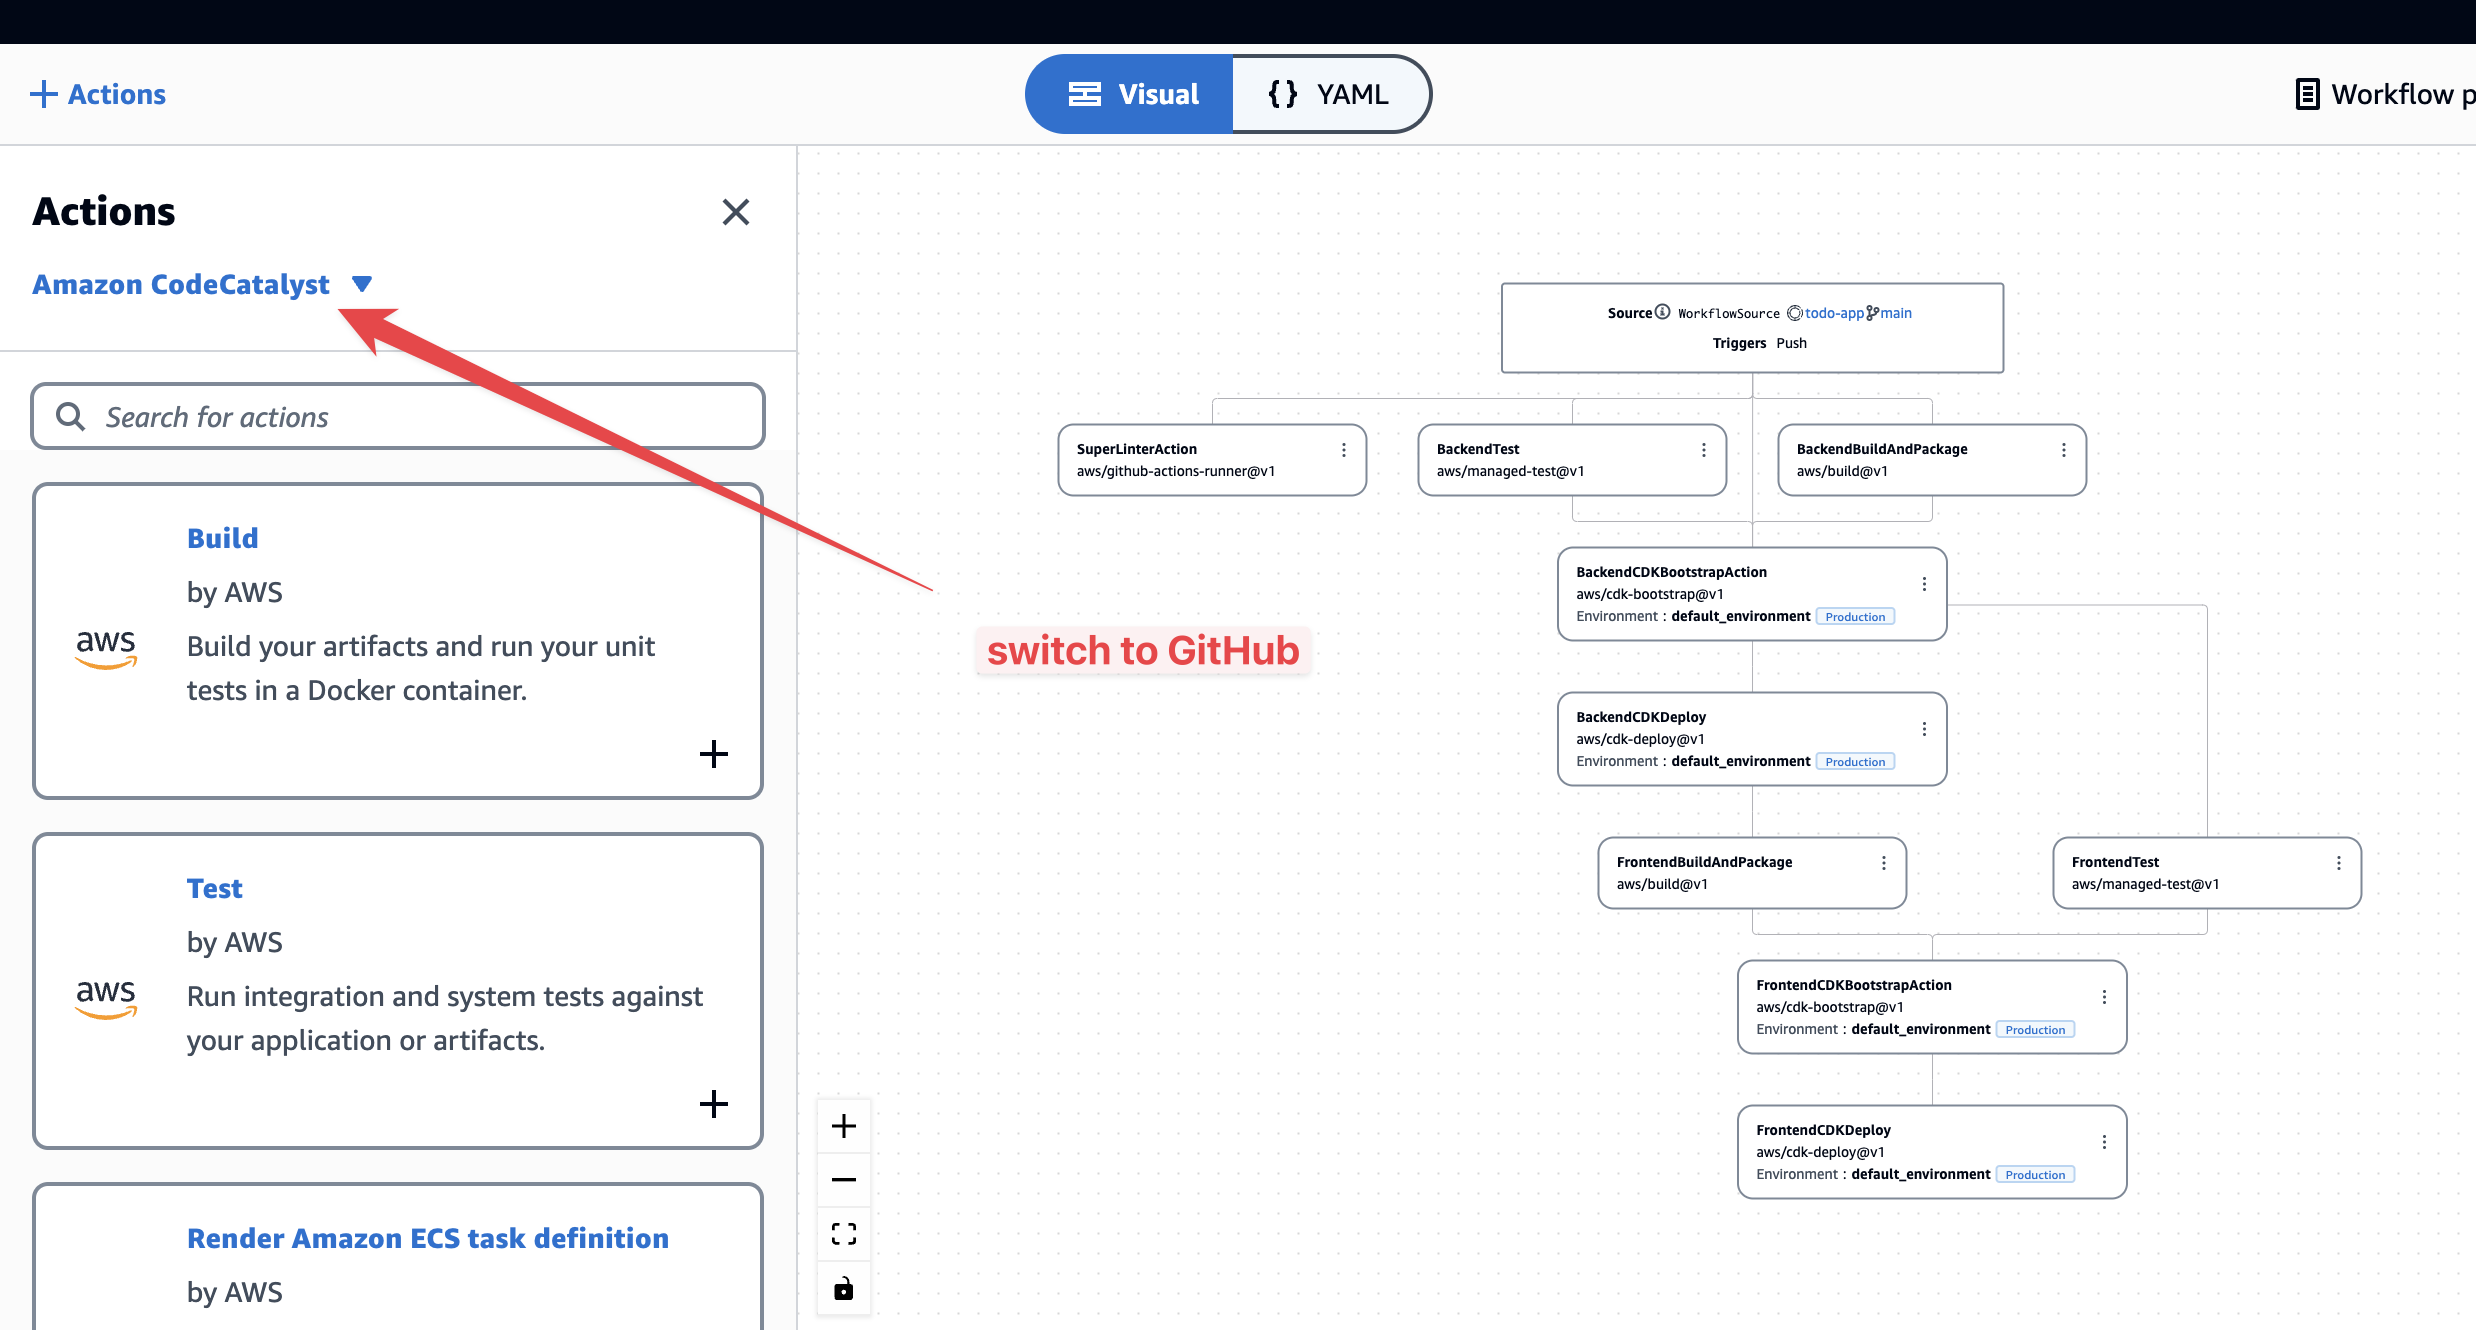
You can use a GitHub Action alongside native CodeCatalyst actions in a CodeCatalyst workflow. You will be able to add any GitHub action from the Marketplace. Let's add Super-Linter GitHub Action to our application.
-
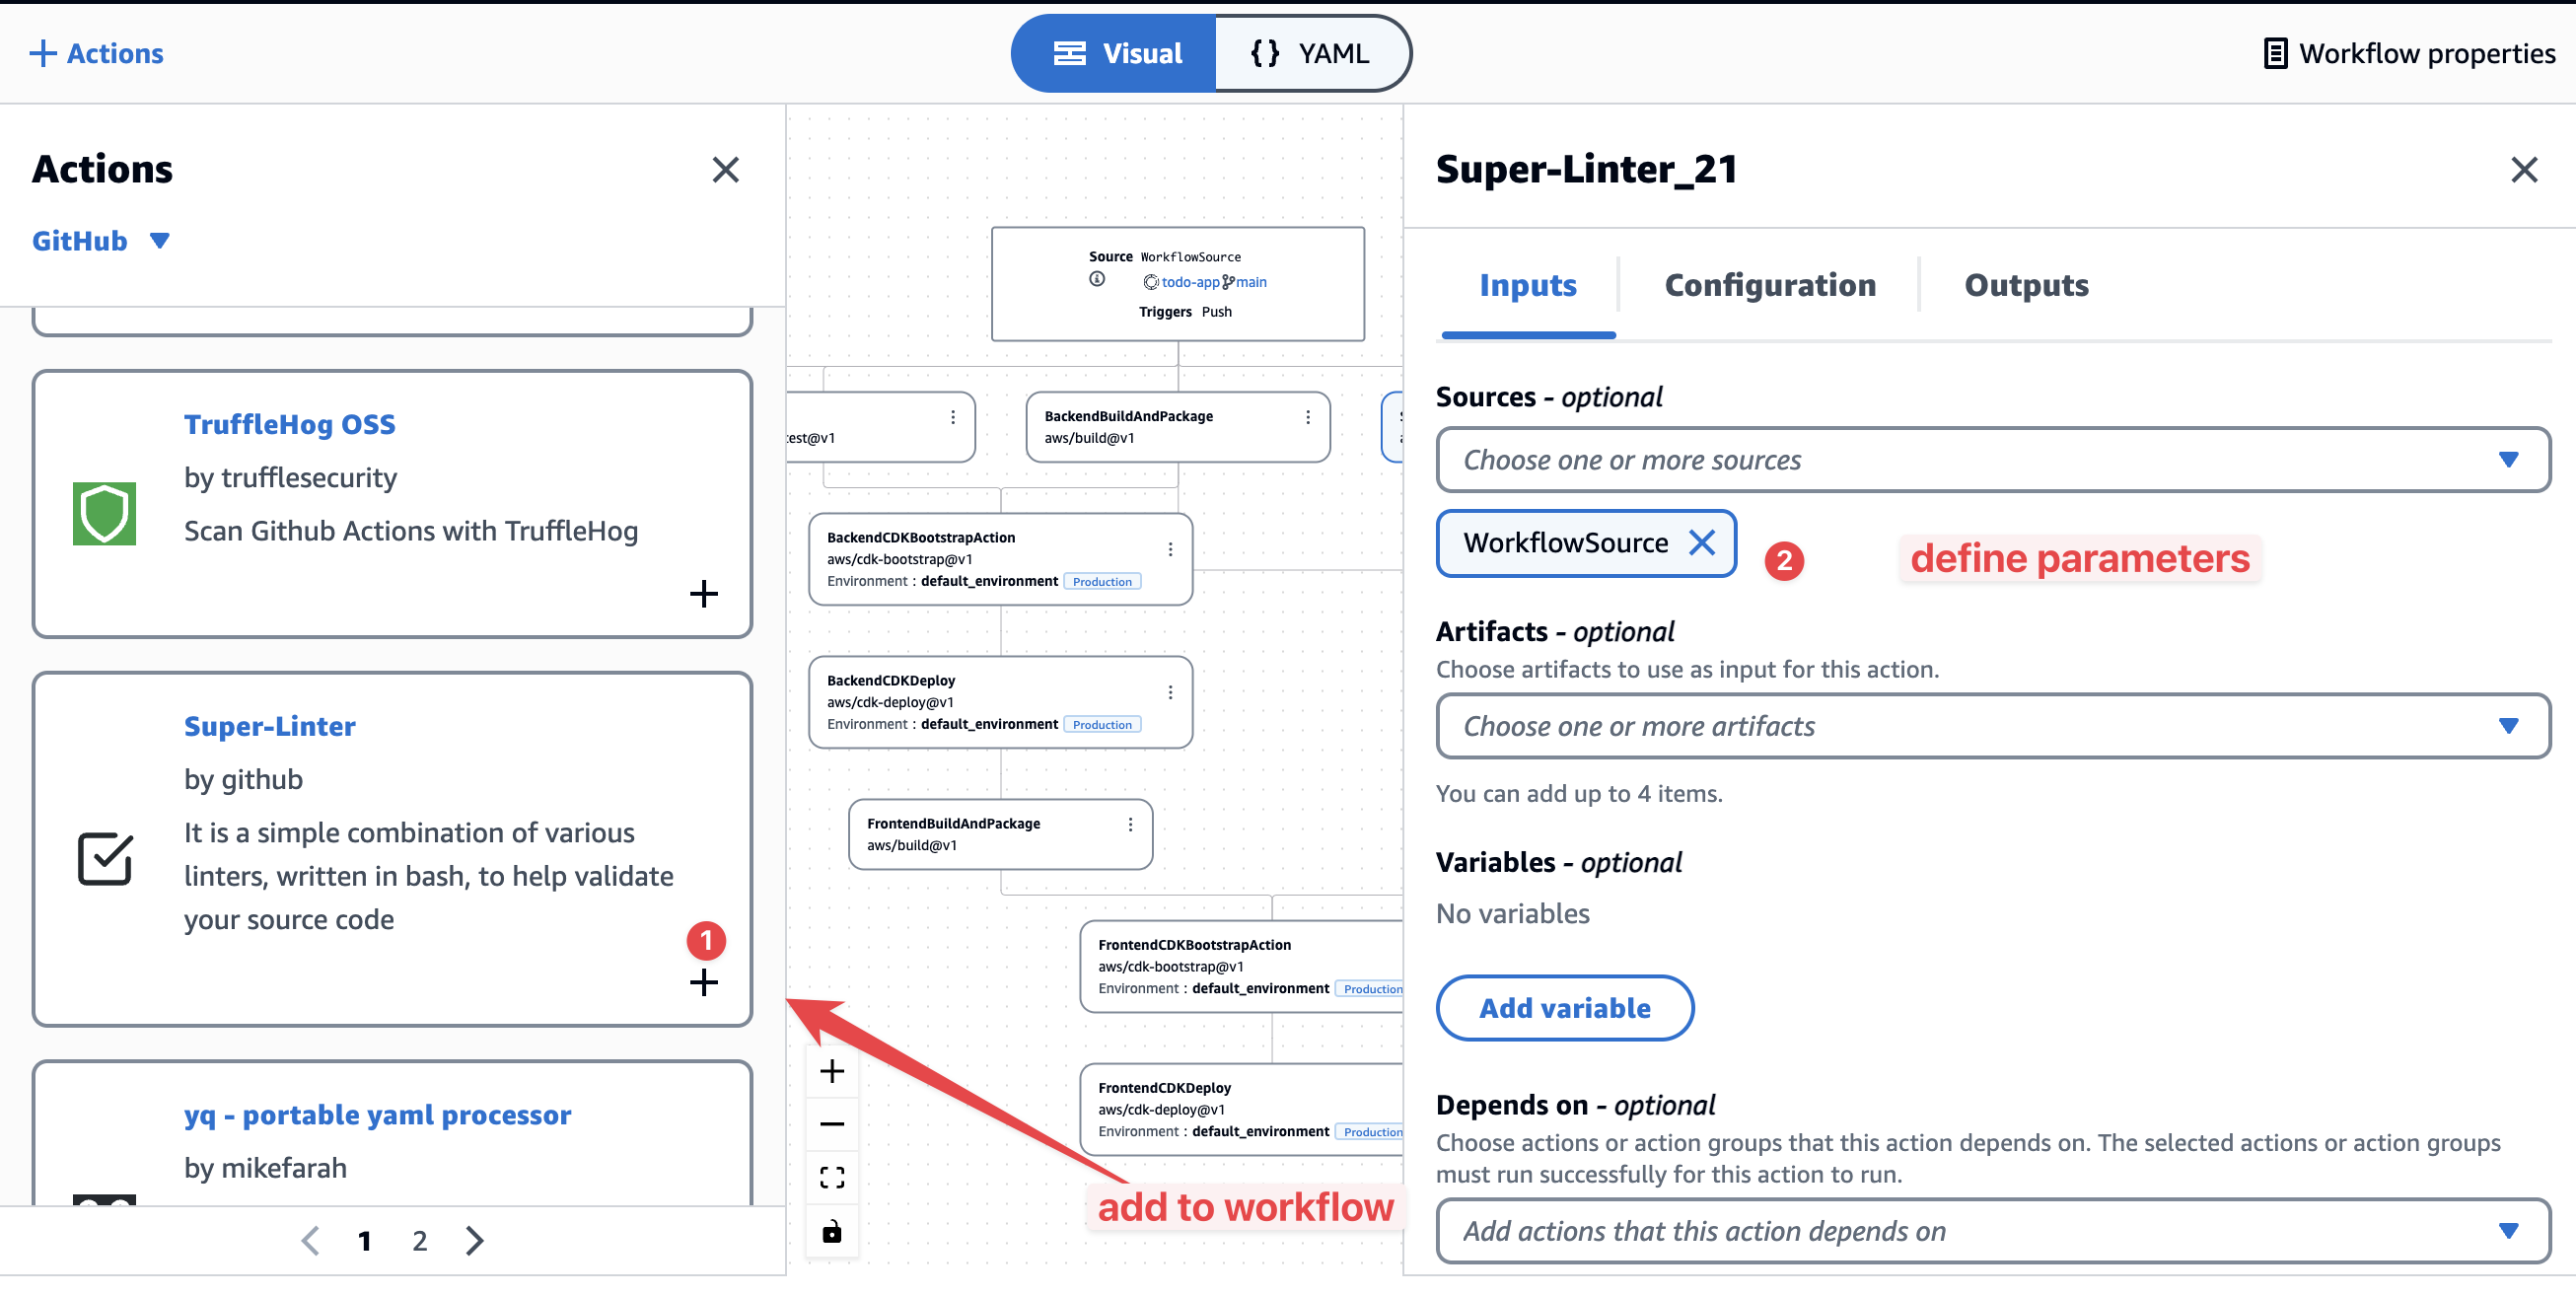
In the navigation pane, expand CI/CD and choose Workflows. Select your workflow and click Edit button at the top.
-
The linter can be added in YAML or Visual Mode. Visual mode:
-
Let's do the same but use YAML. Edit workflow and add the block:


  SuperLinterAction:
    Identifier: aws/github-actions-runner@v1
    Inputs:
      Sources:
        - WorkflowSource
    Configuration:
      Steps:
        - name: Lint Code Base
          uses: github/super-linter@v4.10.1
          env:
            VALIDATE_ALL_CODEBASE: "false"
            VALIDATE_MARKDOWN: "false"
            DEFAULT_BRANCH: main
- This time you will see that linter is green and our build has been successfully completed.

- Optional step: Invite a team member. In the navigation pane, choose Project settings, then select Members Tab. Click Invite button. Enter email address in the popup and click Invite.
- In the navigation pane, choose Issues. Click Create issue. Provide required information and click Create issue.

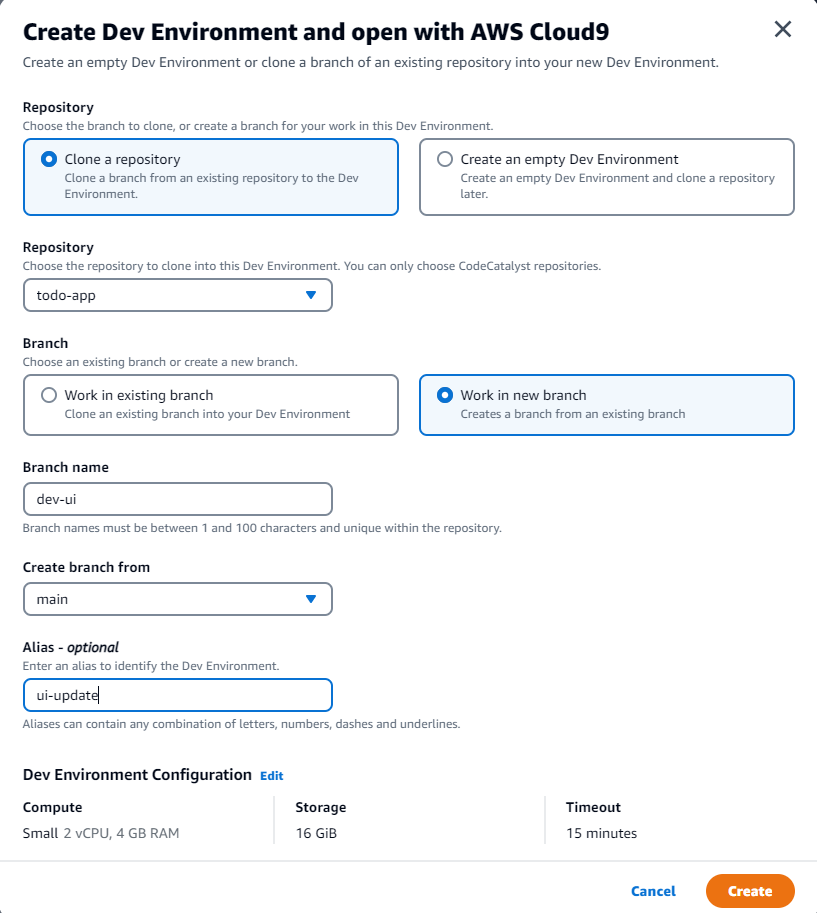
- Now let's address this issue. In the navigation pane, choose Code, then select Dev Environments. Click Create Dev Environment.
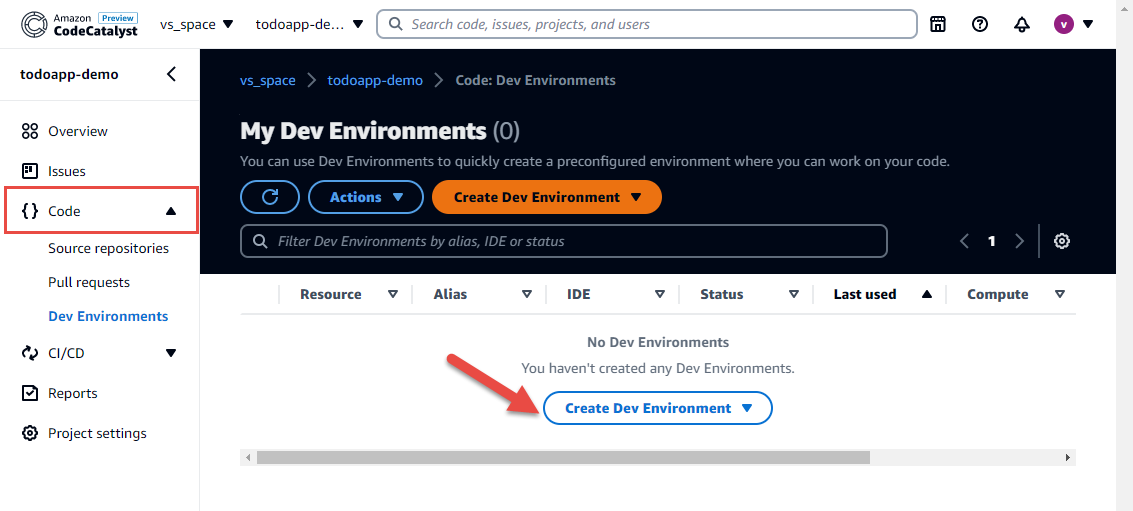
- Select AWS Cloud9 (in browser). Complete all the fields as on the screenshot below and click Create.
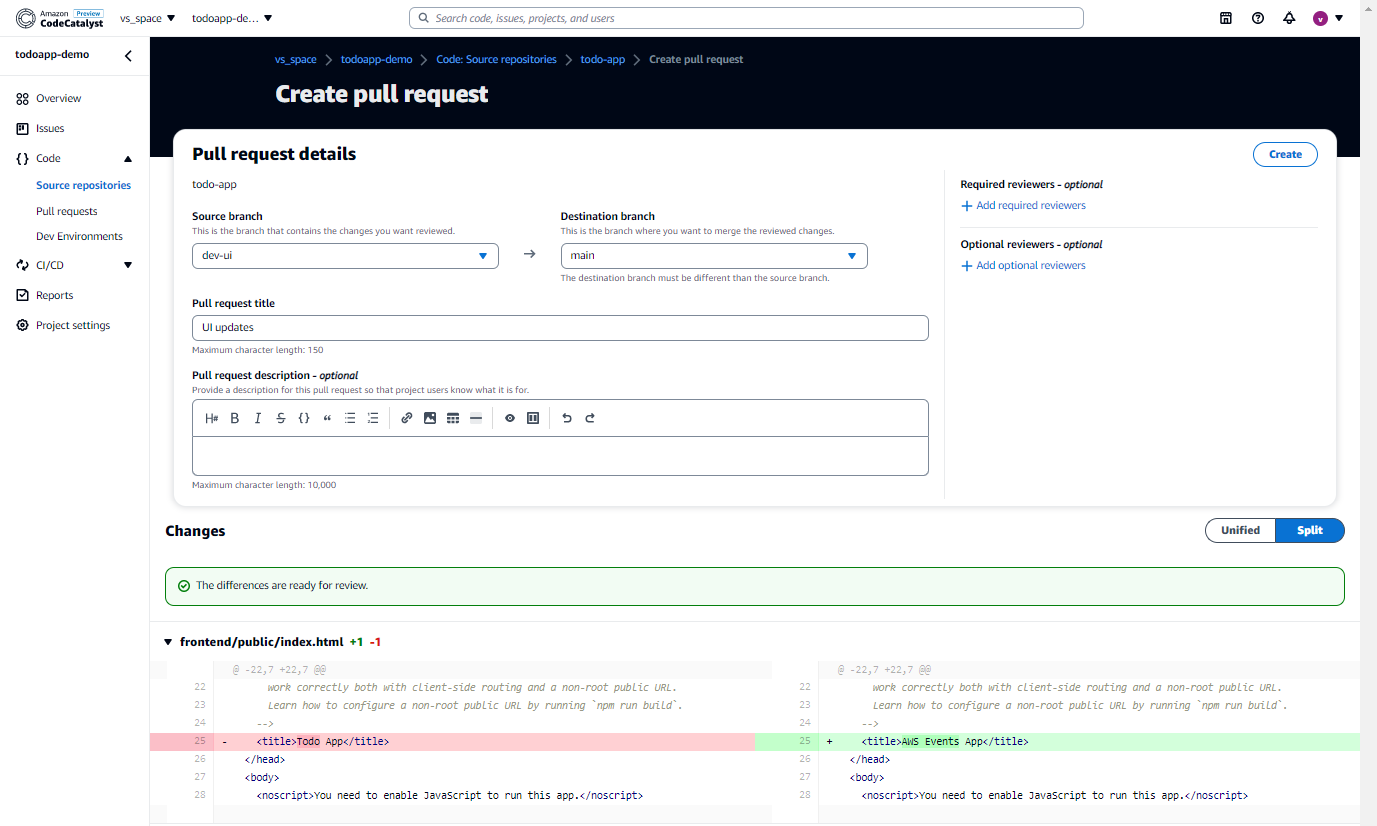
- In your Cloud9 IDE, expand frontend folder and update App.tsx file and make 2 updates change 1) "To-Do List" to "AWS Events" and 2) "Add To-Do Item" to "Add a new event".
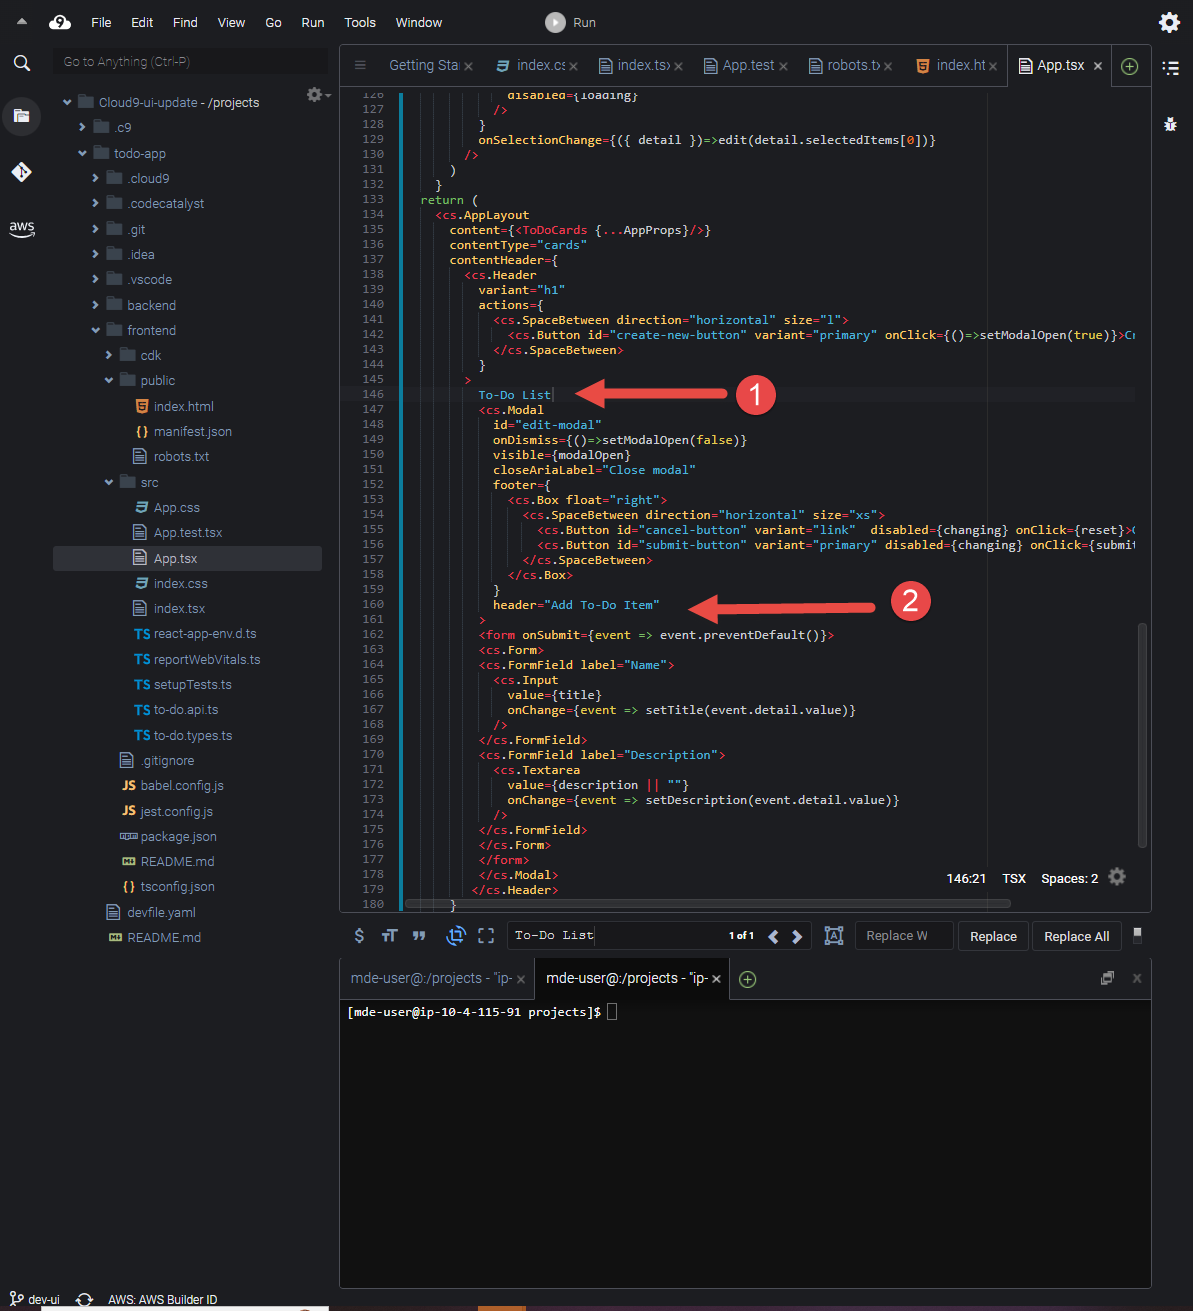
- Update file *index.html" to and replace "To-Do App" with "AWS Events App".

- Save changes. Click Commit, Push.
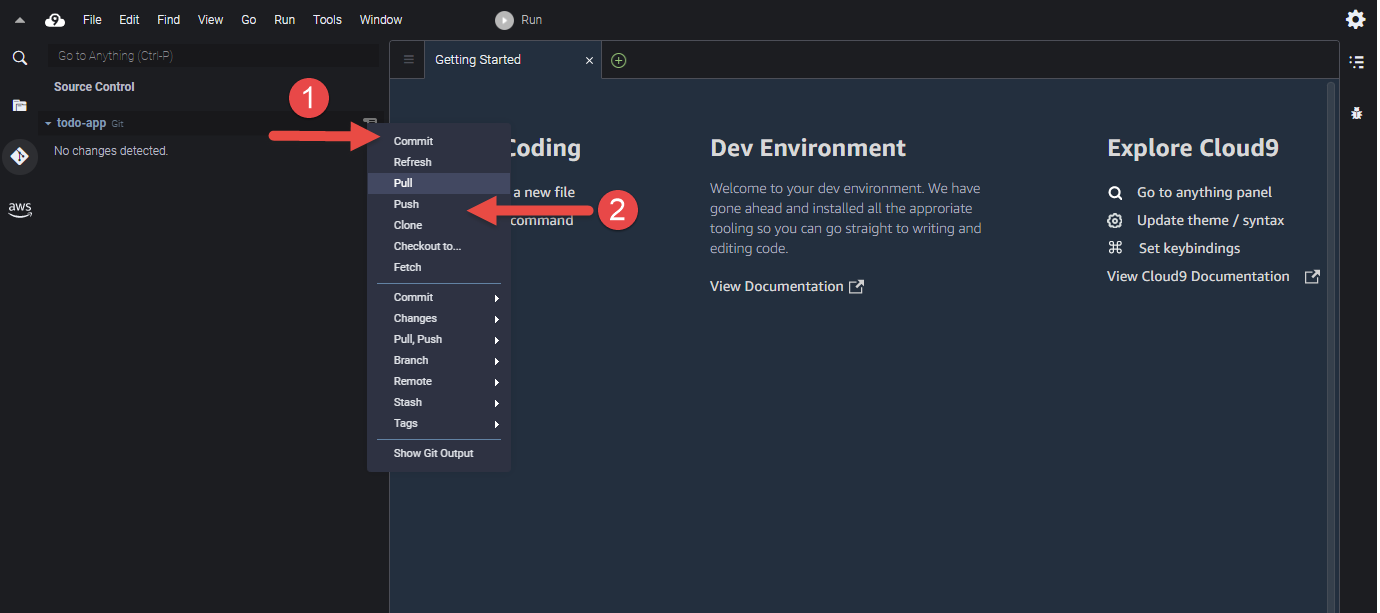
- In the navigation pane, choose Source Repositaties. Review recent commits. Click Actions and select Create pull request.
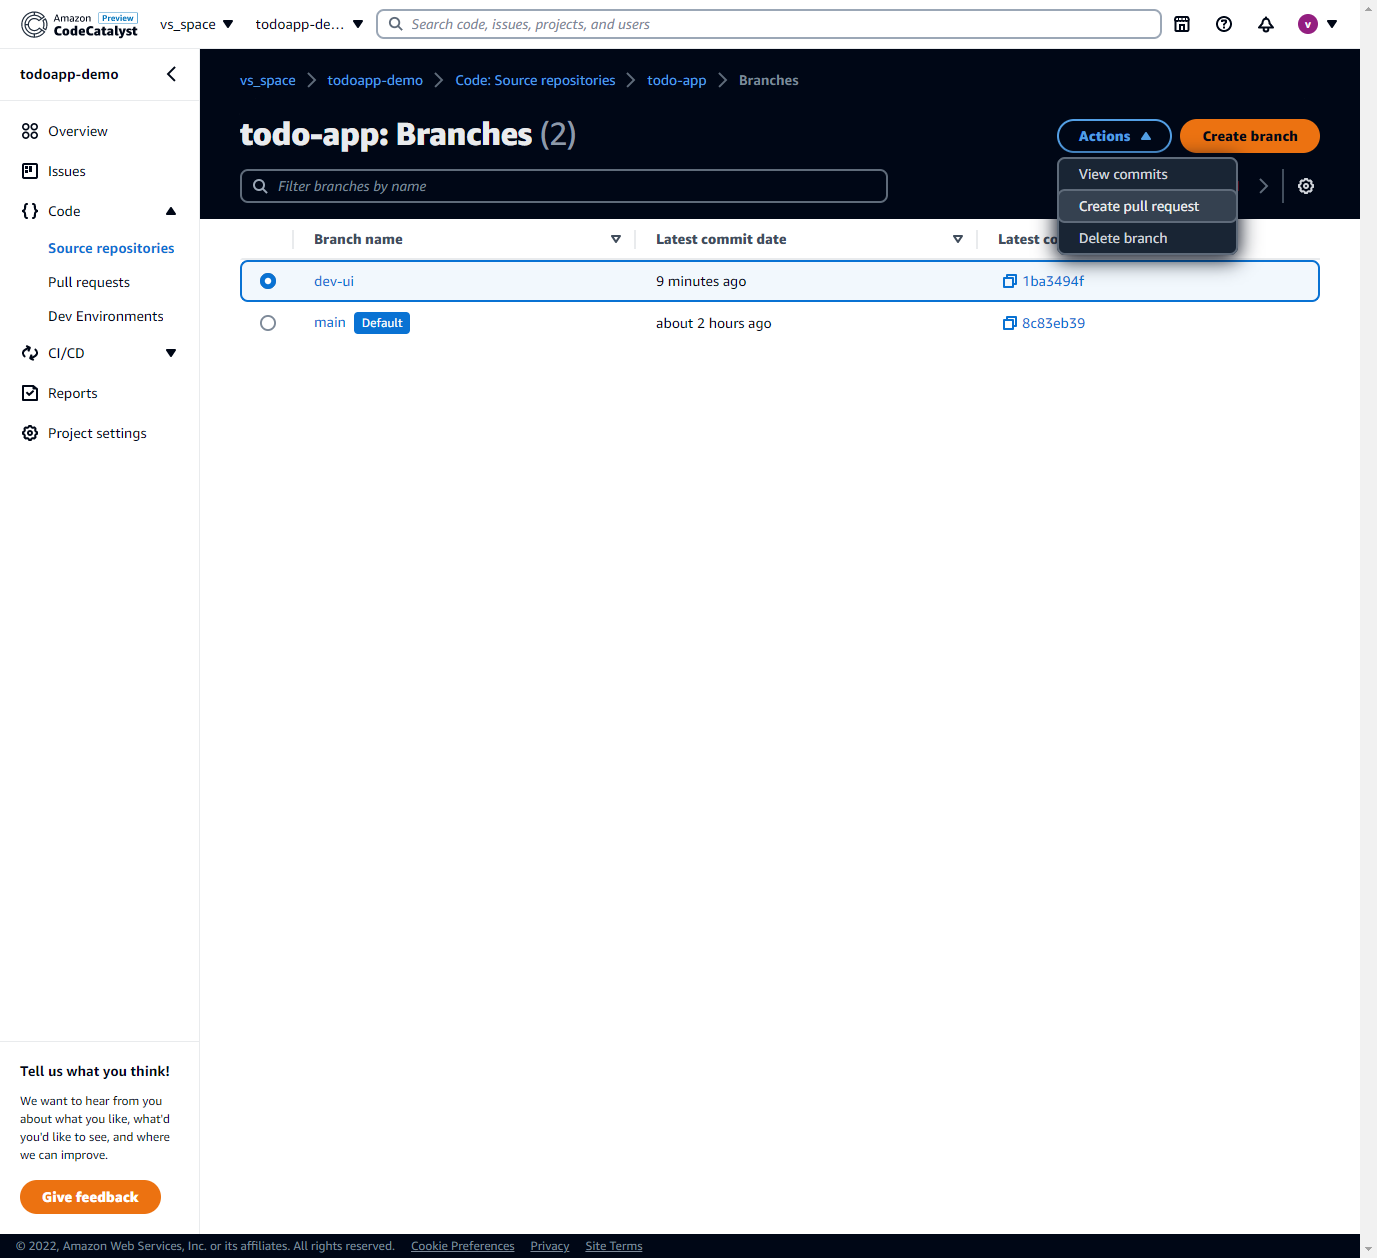
- In the navigation pane, choose Pull requests. Review changes. Select main as Destination branch and click Create at the bottom.
- Click Merge button at the top. Keep default options and click Merge.
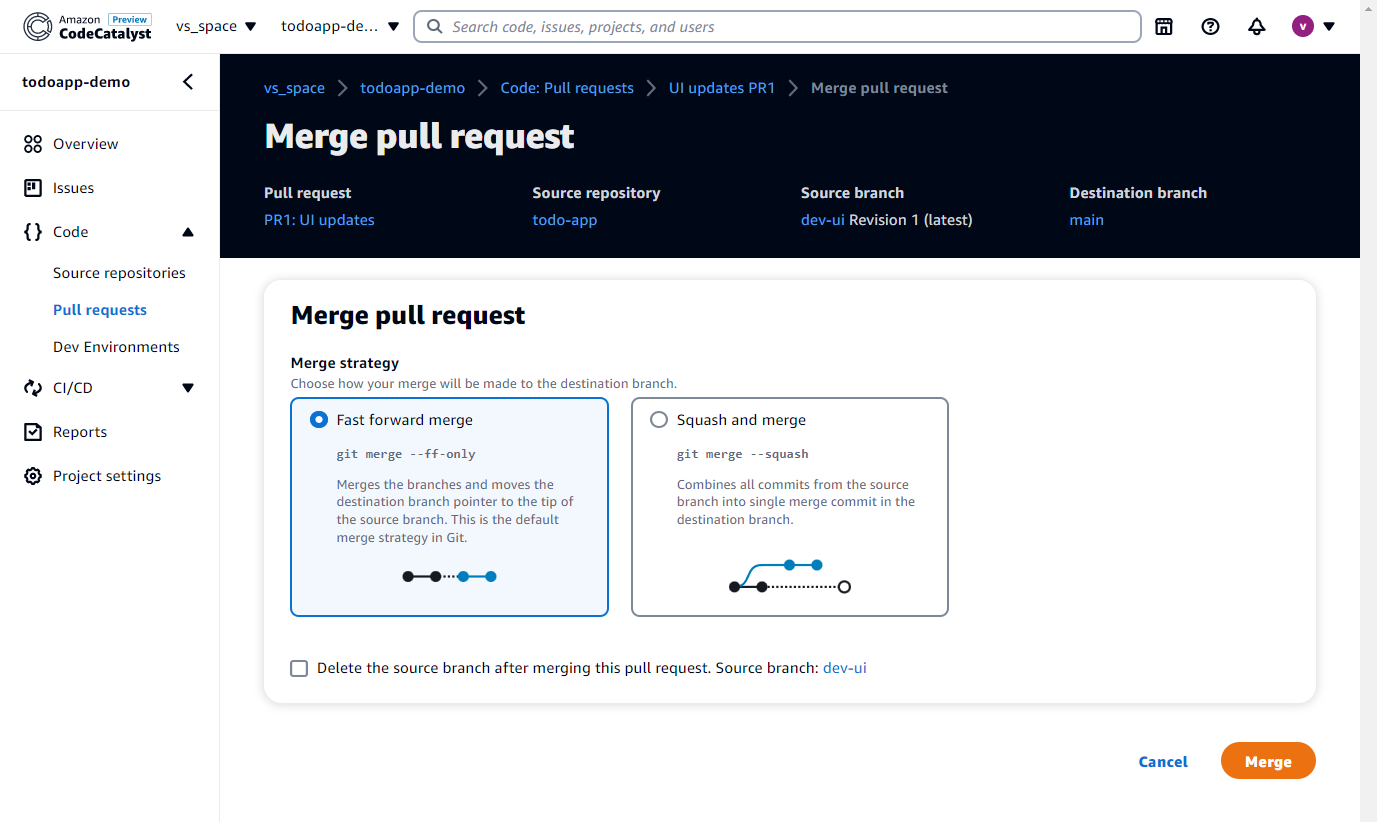
- Validate that once Merge is initiated with main, CI/CD workflow starts running.
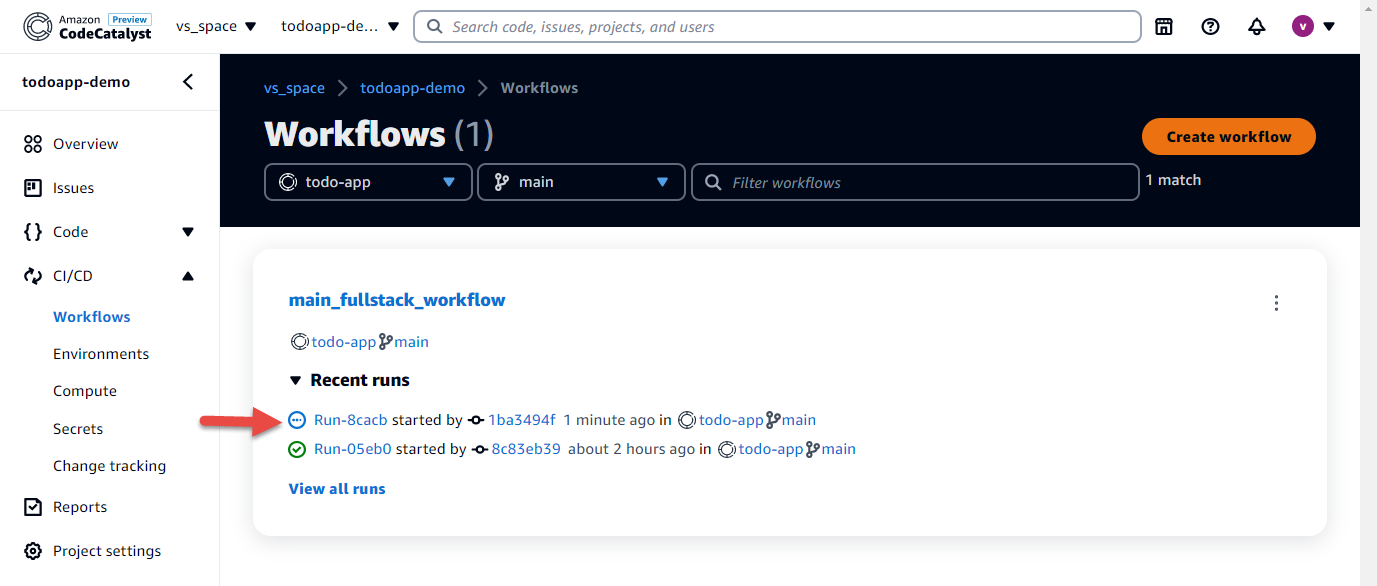
- Check changes in the To-Do App.


CodeCatalyst offers the following compute types:
- Amazon EC2
- AWS Lambda
By default, workflow actions use the
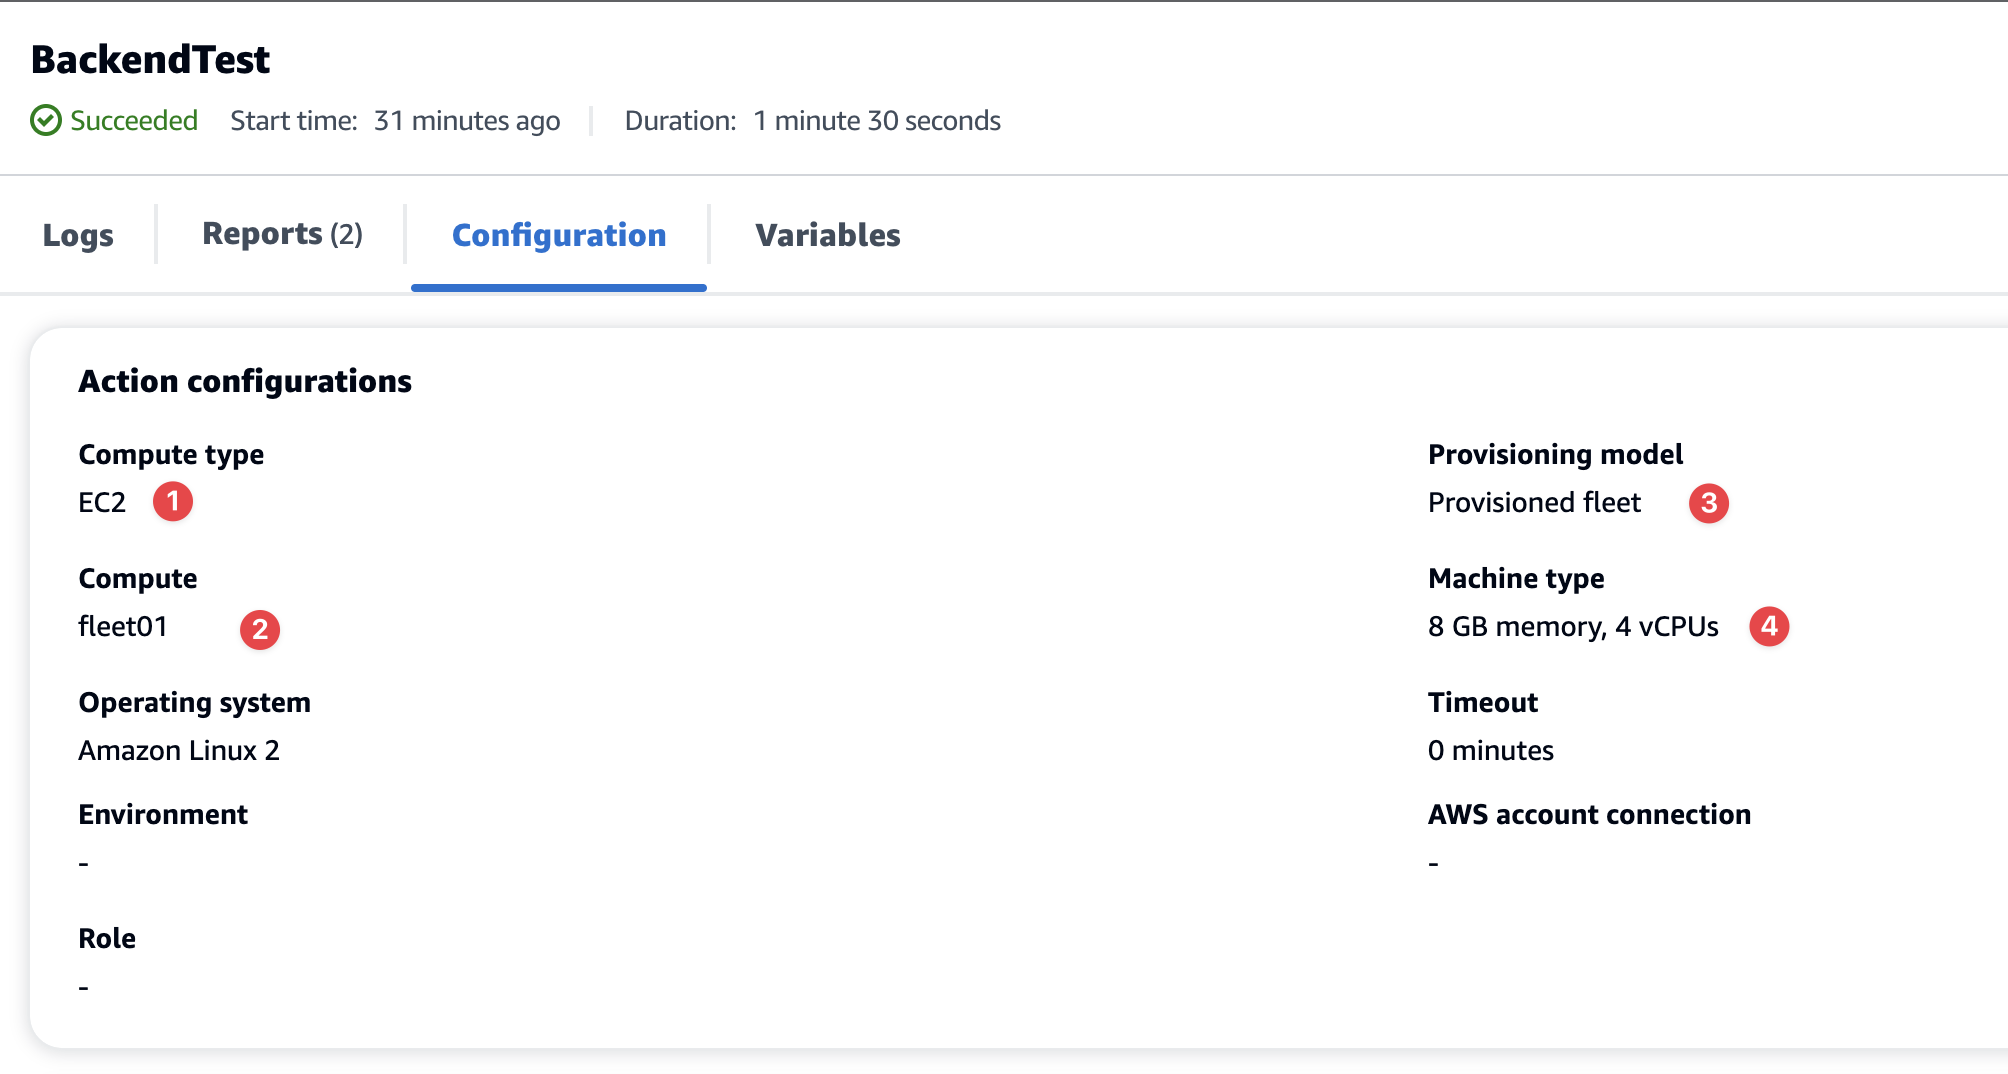
Linux.x86-64.Largeon-demand fleet with an Amazon EC2 compute type. Let's add provisioned fleet compute and assing it for our workflows.
- In the navigation pane, expand CI/CD area and choose Compute. Click Create provisioned fleet.
 2. Define the name of the provisioned fleet, operating system, machine type, capacity and scaling mode. Click Create.
 3. As soon as the fleet's status will be in
 Active mode, we can use it in our workflows.
 4. In the navigation pane, expand CI/CD and choose Workflows. Select your workflow and click Edit button at the top. Compute can be defined on top level, we will update the the workflow to use the provisioned compute for all actions.
5. After Triggers section, let's add the block.
Compute:
  Type: EC2
  Fleet: fleet01
6. Validate workflow and click Commit. The workflow will automatically run and use the trigger PUSH
- Wait for the workflow to complete run using the new compute.

If we decide to download third-party dependencies from private NPM, we will need to authorize it. Let's add a username as a secret.
-
In the navigation pane, expand CI/CD and choose Secrets, and create a new secret.

-
Name is npmUsername value is
TestUser01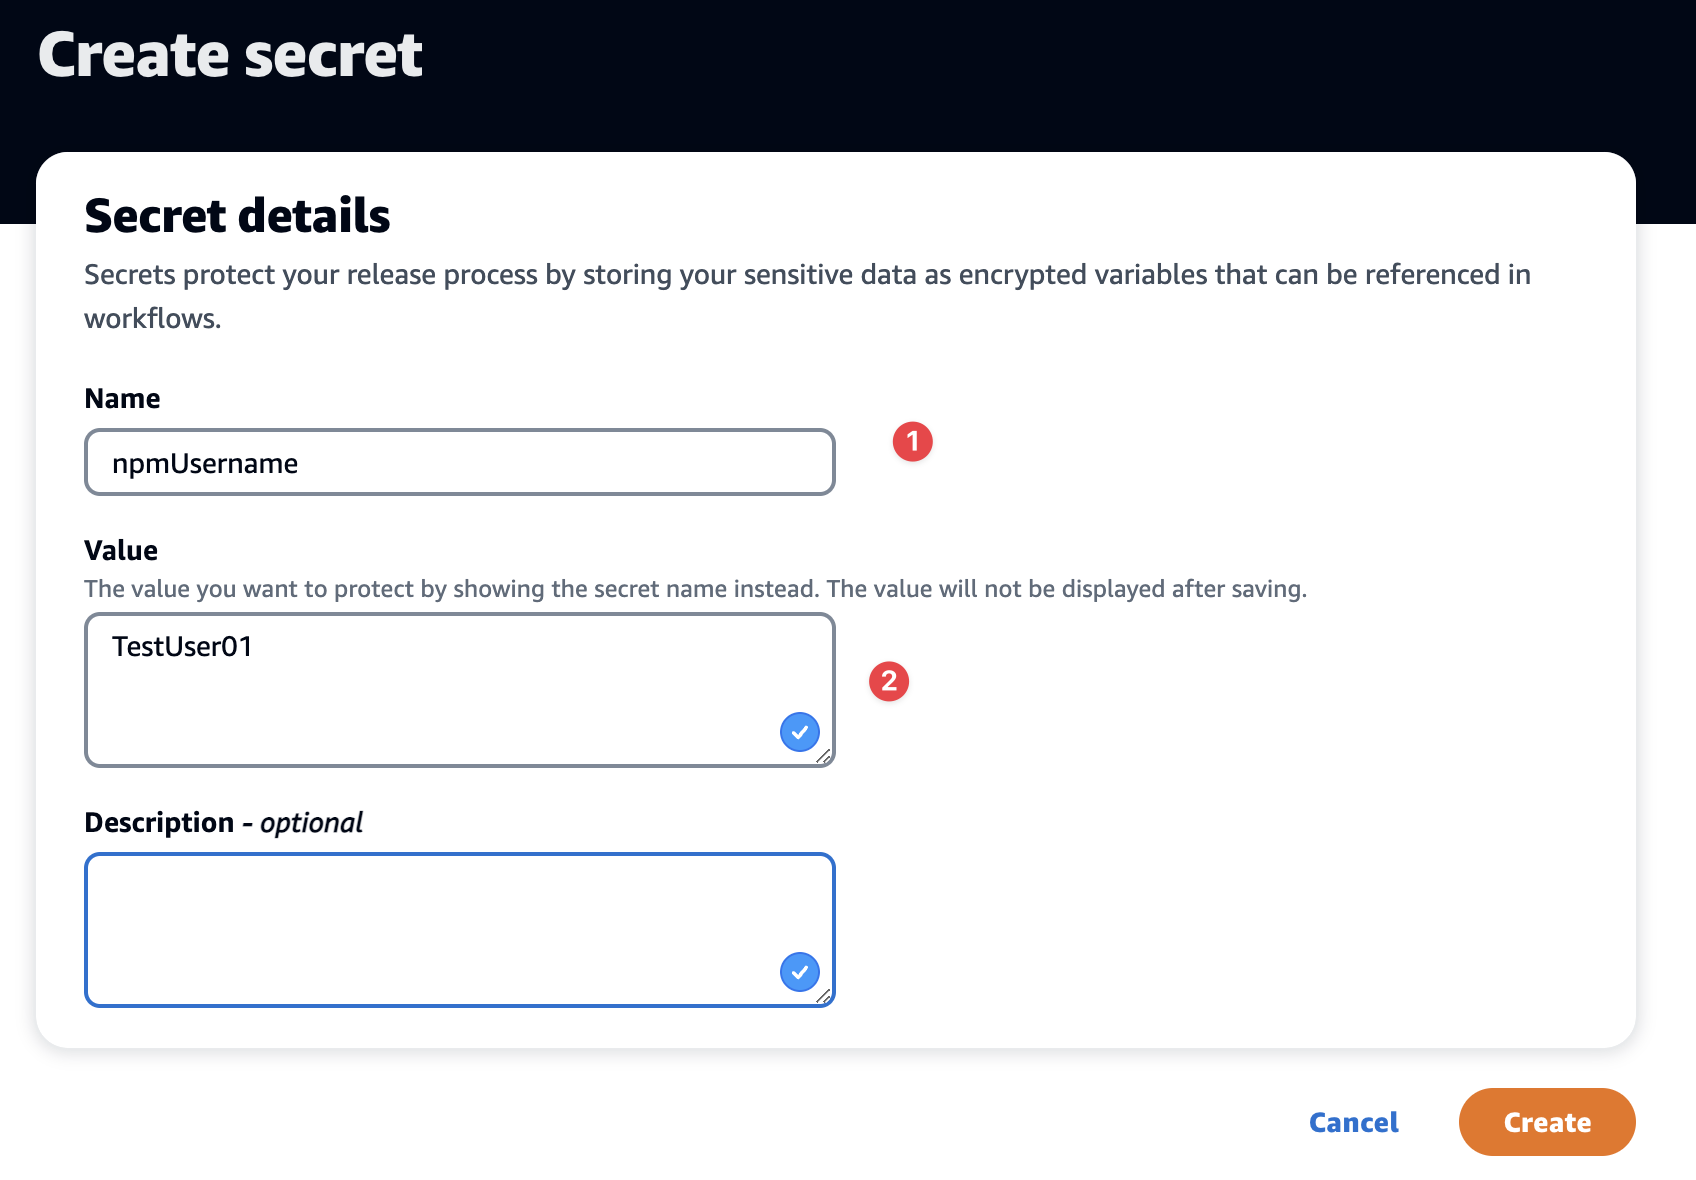
-
We can see our secret, and now the secret is ready to use on the workflow, to use the secret we should use the reference ID of the secret:
${Secrets.npmUsername}


- To test our secret, we will add a variable to the FrontendBuildAndPackage action. You can add variables using Visual Configuration or YAML.
  FrontendBuildAndPackage:
    Identifier: aws/build@v1
    DependsOn:
      - BackendCDKDeploy
    Inputs:
      Variables:                         # added
        - Name: NPMUSER                  # added
          Value: ${Secrets.npmUsername}  # added
      Sources:
        - WorkflowSource
    Outputs:
      Artifacts:
        - Name: frontend
          Files:
            - "**/*"
    Configuration:
      Steps:
        - Run: cd frontend
        - Run: echo $NPMUSER             # added
        - Run: npm install
- Validate and Commit changes. Wait for the workflow to Complete a run until you see Status Succeeded.
- Go back to the workflow, select Visual view, and click
FrontendBuildAndPackage. On the right pane, you will see Logs, expandecho $NPMUSSER

- The secret will be hidden.

CodeCatalyst detects changes that require deployment for our application and initiates the deployment process. The process is executed using a "deploy action," which outlines the deployment details such as the target destination, the deployment method, and the implementation of a blue/green scheme, among other things. Currently, CodeCatalyst natively supports three deployment destinations: AWS CloudFormation stack, Amazon ECS, and AWS CDK. This provides several advantages, including versioning, traceability, rollbacks, monitoring, and integration with other CodeCatalyst features. Nevertheless, we have the flexibility to deploy our application using alternative deploy actions such as build, GitHub actions, AWS CodeDeploy, AWS CodeBuild, etc.
We will make a change in our application and validate change tracking:
- In the navigation pane, expand CI/CD and choose Change tracking.

-
Some changes did not affect our application. They marked as No deployment found. For those changes, the deployment process was skipped.
-
Click View details on the recently updated and deployed workflow. Please review the information about Tests and Code Cverage.

- Click on one of the tests and review the details.

We were able to view the high-level test results. We can access each test report or code coverage report individually on the Reports Tab. CodeCatalyst supports the majority of test formats and code coverage. It allows using Software Composition Analysis (SCA) tools to analyze the application components and identify potential security vulnerabilities.
- In the navigation pane, choose Reports.

- Click on the Name of a report to see details.

- You can see code coverage if you click on the file clover.xml.

We will create a new environment and deploy our application to it. To do it first of all we need to create a new environment in CodeCatalyst.
-
In the navigation pane, expand CI/CD and choose Environments. And update the default environment, switch Environment type to non-production environment.
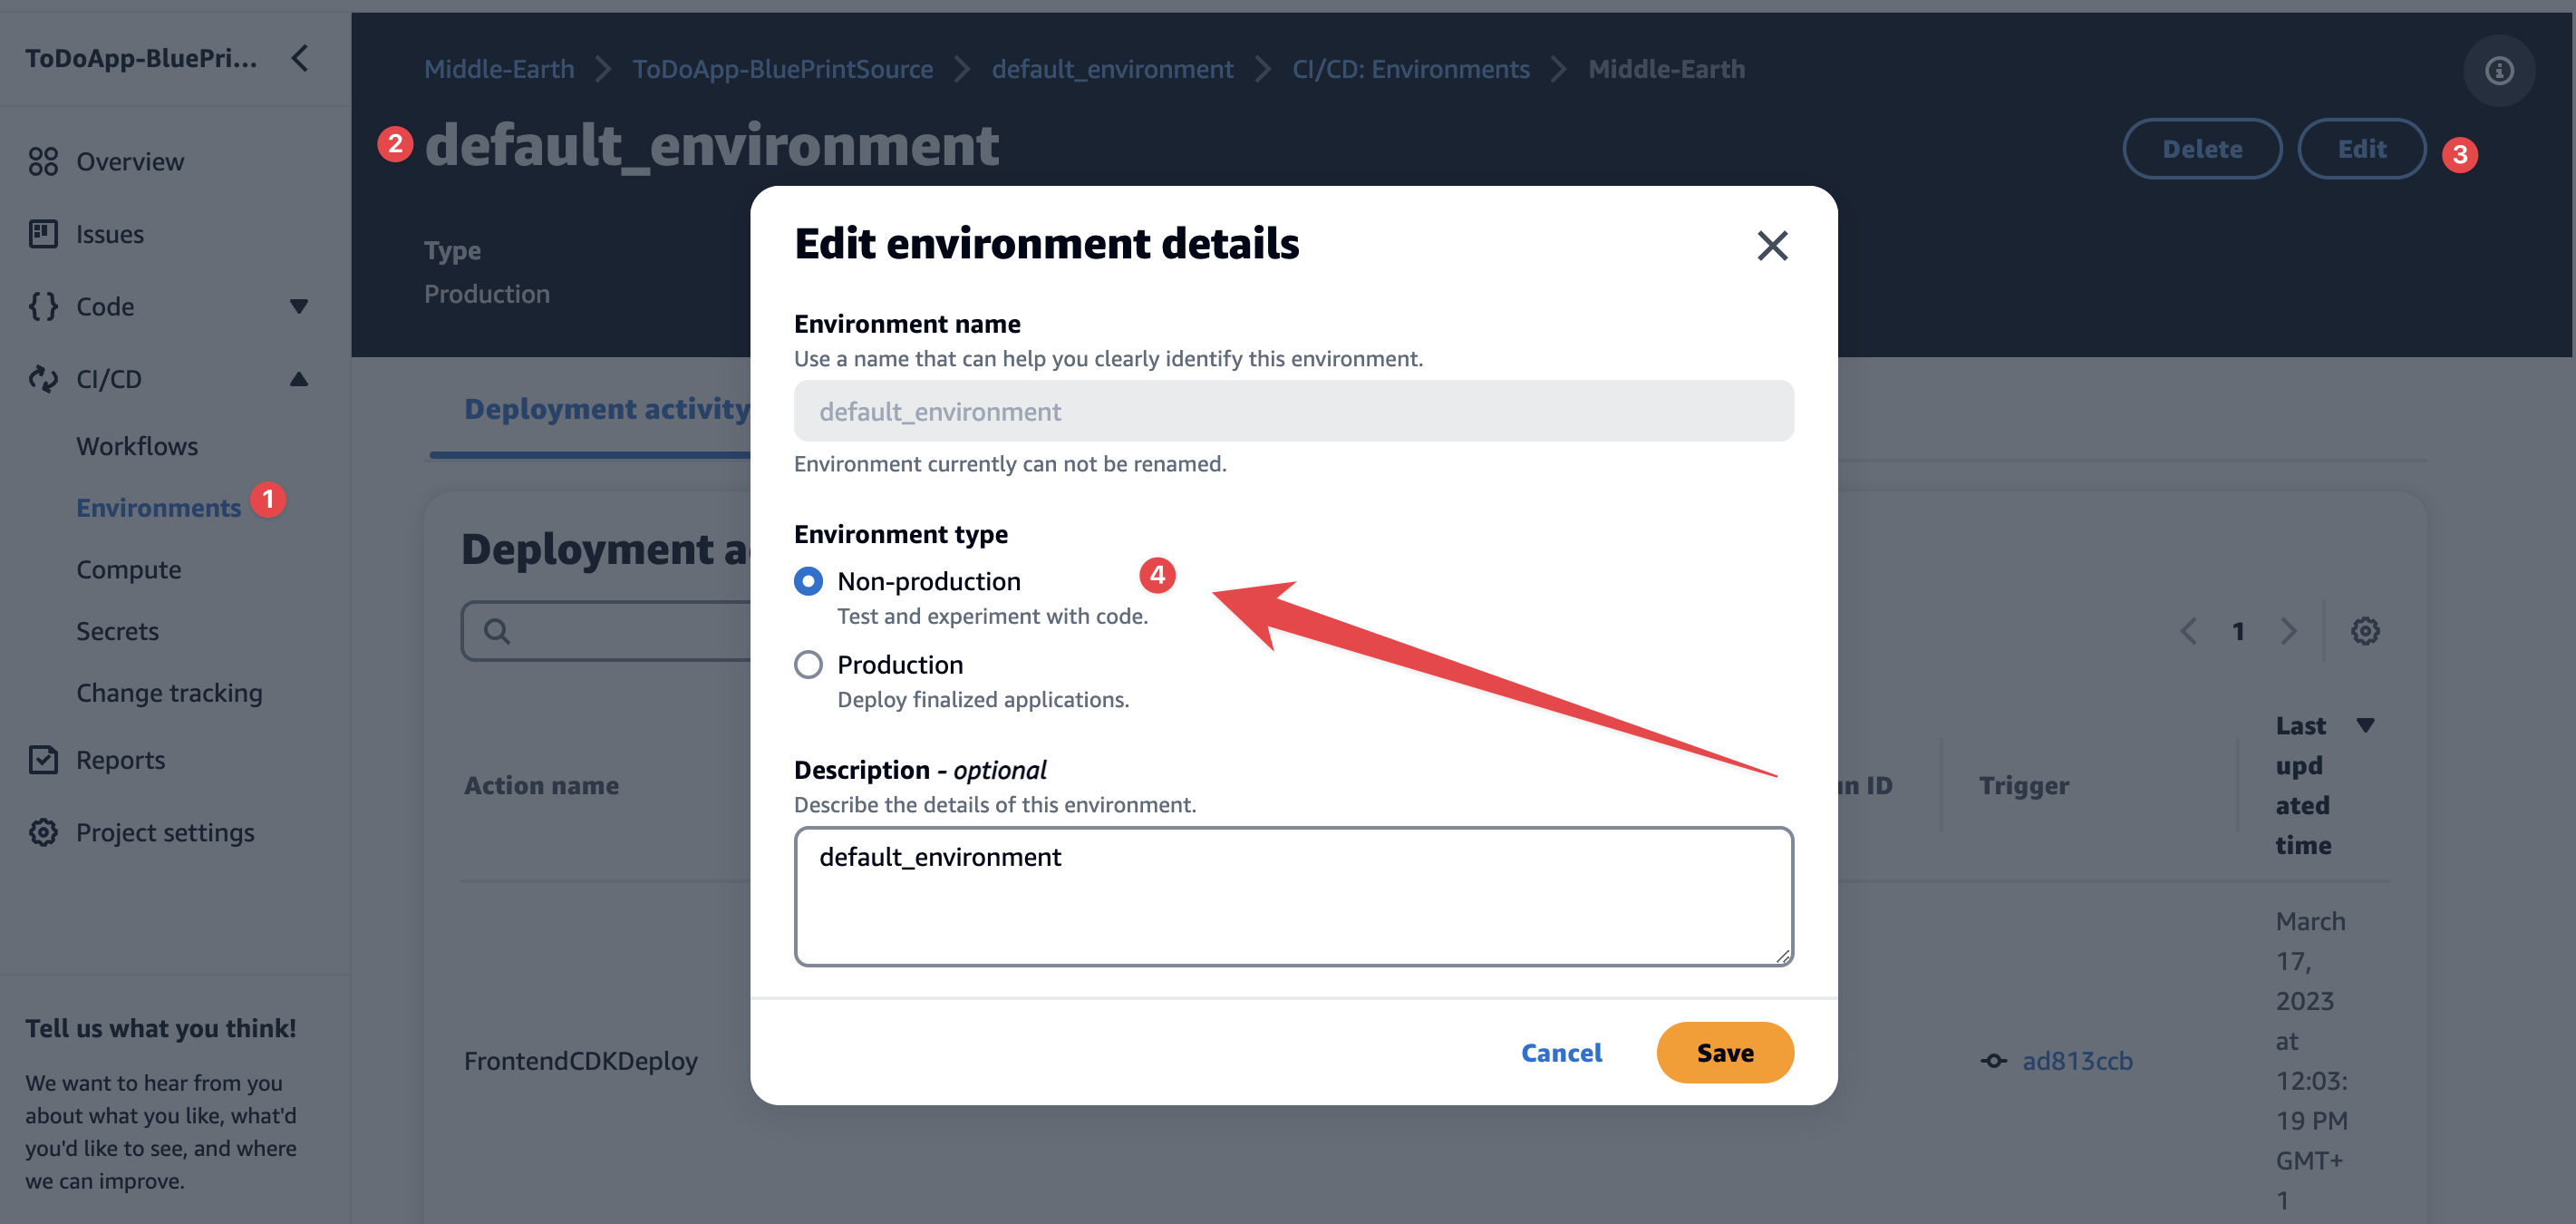
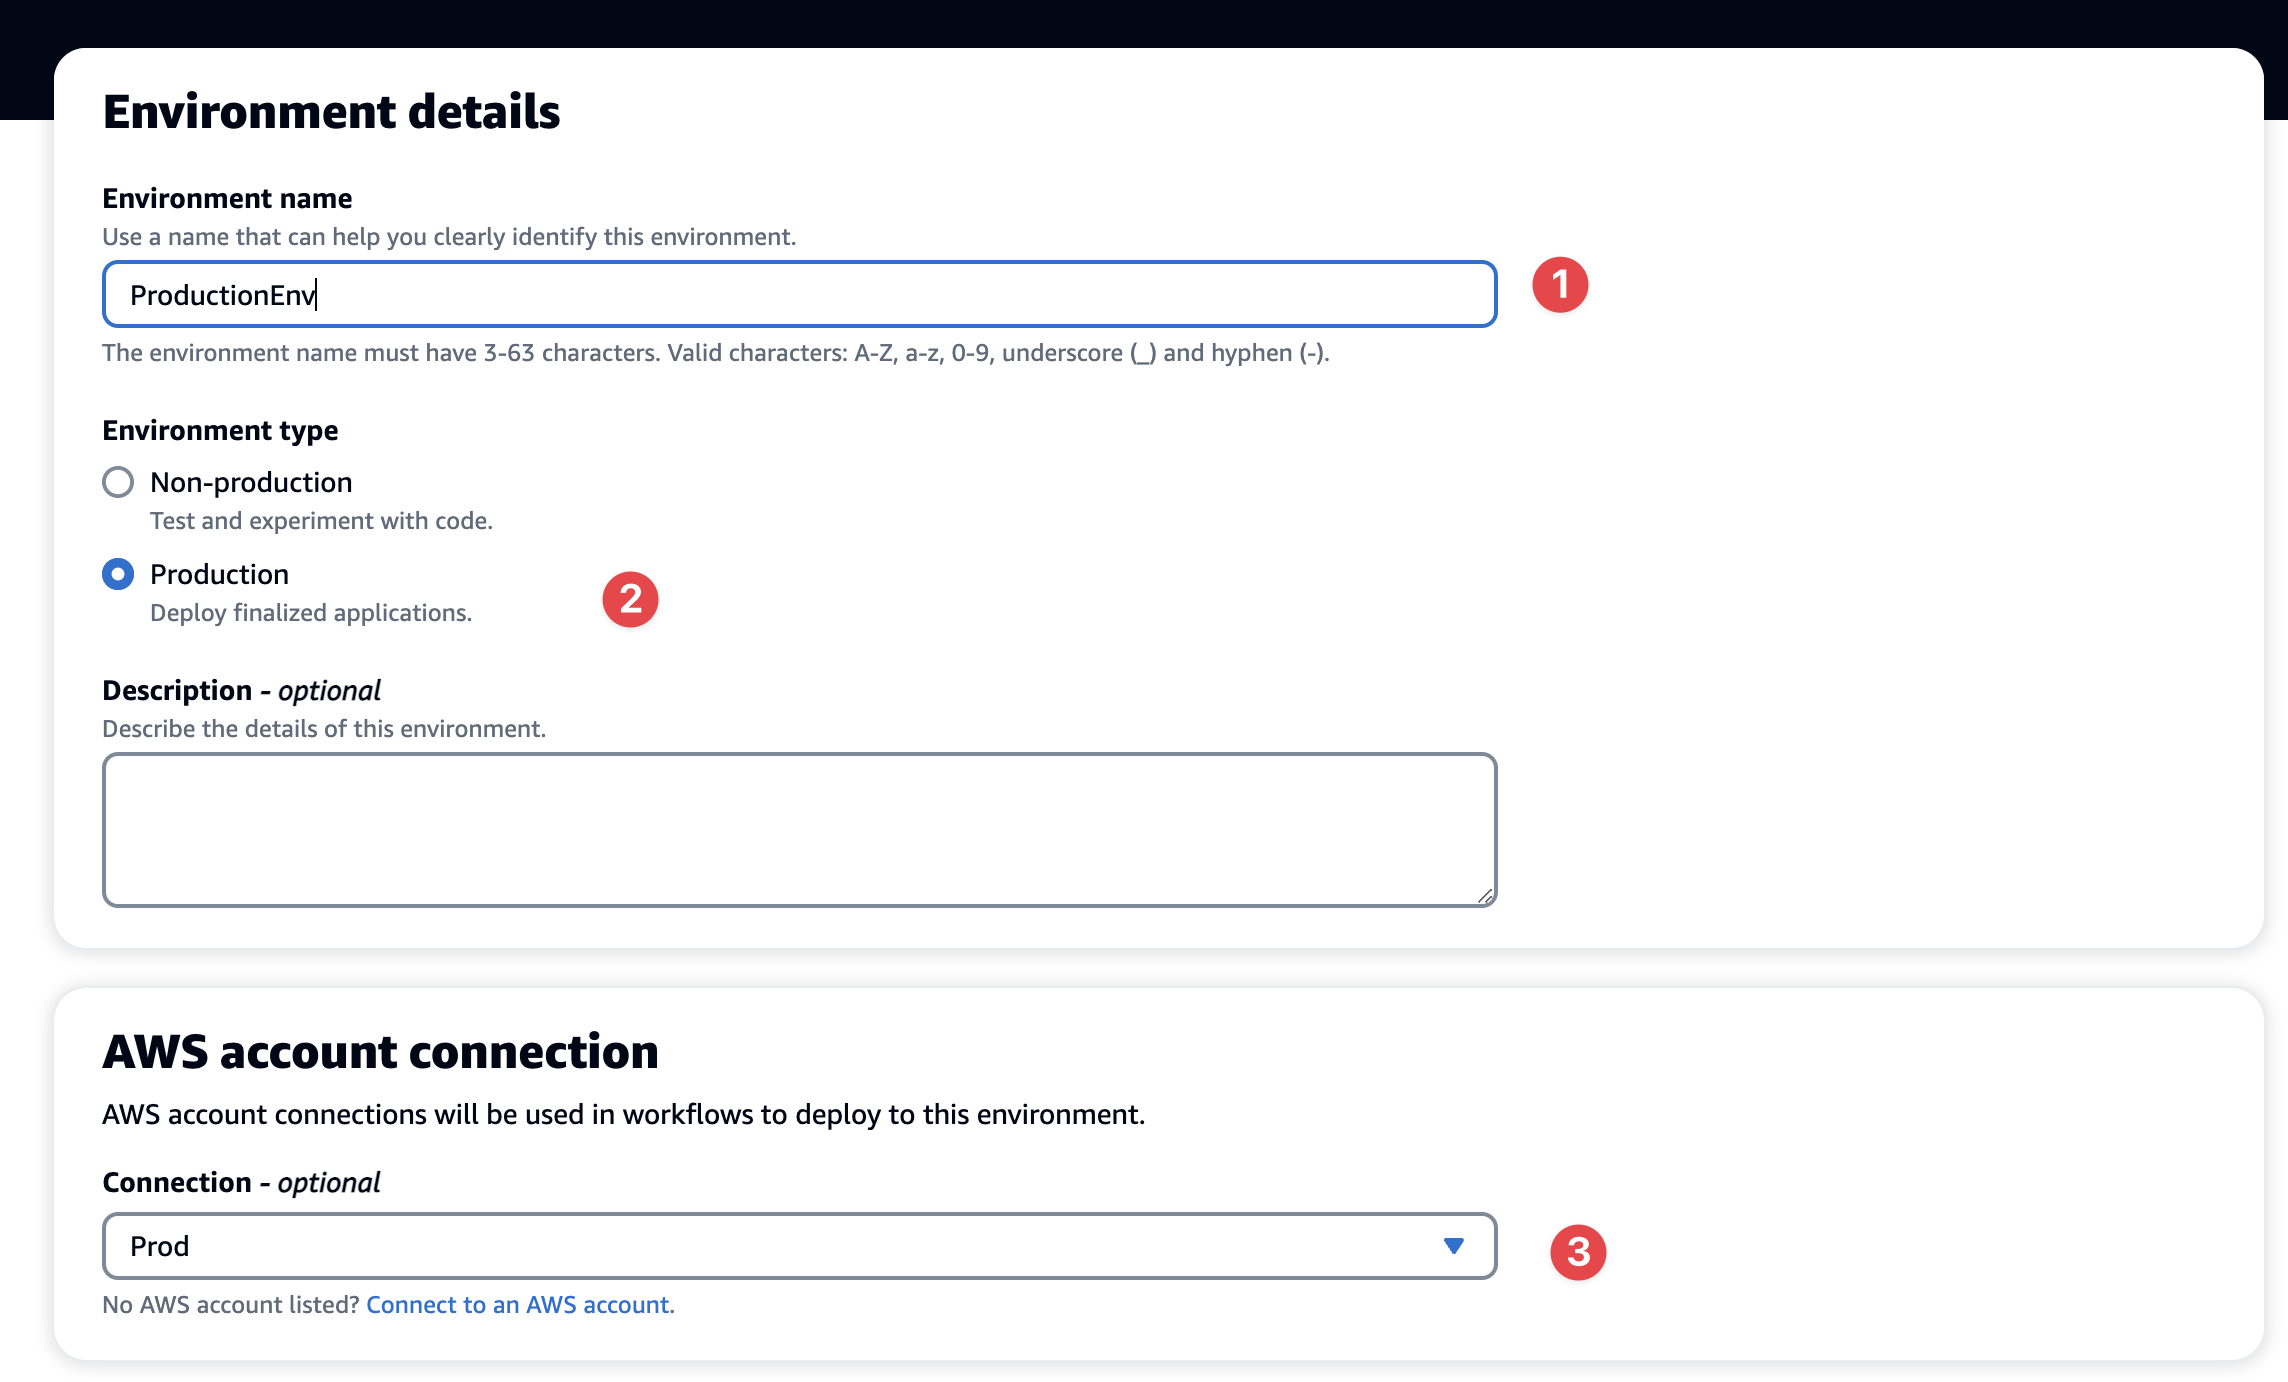
-
Create new environment, name of the environment is ProductionEnv and switch Environment type to production environment.
-
Update workflow, add
BackendCDKBootstrapActionProdandBackendCDKDeployProdsteps for backend deployment to prod. AddFrontendCDKBootstrapActionProdandFrontendCDKDeployProdsteps for frontend deployment to prod.


BackendCDKBootstrapActionProd
  BackendCDKBootstrapActionProd:
    Identifier: aws/cdk-bootstrap@v1
    Inputs:
      Artifacts:
        - backend
    DependsOn:
      - BackendTest
      - BackendBuildAndPackage
    Configuration:
      Region: us-west-2
    Environment:
      Connections:
        - Role: CodeCatalystPreviewDevelopmentAdministrator-jh5pt4 # Update the role name
          Name: Prod
      Name: ProductionEnv
BackendCDKDeployProd
  BackendCDKDeployProd:
    Identifier: aws/cdk-deploy@v1
    Inputs:
      Artifacts:
        - backend
    DependsOn:
      - BackendCDKBootstrapActionProd
    Configuration:
      StackName: TodoAppBackendStack-s8ass
      CdkRootPath: backend/
      Region: us-west-2
      Context: '{"stack_name": "TodoAppBackendStack-s8ass"}'
    Environment:
      Name: ProductionEnv
      Connections:
        - Name: Prod
          Role: CodeCatalystPreviewDevelopmentAdministrator-jh5pt4 # Update the role name
FrontendCDKBootstrapActionProd
  FrontendCDKBootstrapActionProd:
    Identifier: aws/cdk-bootstrap@v1
    Inputs:
      Artifacts:
        - frontend
    DependsOn:
      - FrontendBuildAndPackage
      - FrontendTest
    Configuration:
      Region: us-west-2
    Environment:
      Connections:
        - Role: CodeCatalystPreviewDevelopmentAdministrator-jh5pt4
          Name: Prod
      Name: ProductionEnv
FrontendCDKDeployProd
  FrontendCDKDeployProd:
    Identifier: aws/cdk-deploy@v1
    Inputs:
      Artifacts:
        - frontend
    DependsOn:
      - FrontendCDKBootstrapActionProd
    Configuration:
      StackName: TodoAppFrontendStack-qe7rl
      Region: us-west-2
      Context: '{"stack_name": "TodoAppFrontendStack-qe7rl", "api_domain":
        "${BackendCDKDeploy.ApiDomain}", "api_stage":
        "${BackendCDKDeploy.ApiStage}"}'
      CdkRootPath: frontend/cdk
    Environment:
      Connections:
        - Role: CodeCatalystPreviewDevelopmentAdministrator-jh5pt4
          Name: Prod
      Name: ProductionEnv
Make sure that you selected the right StackName and Role for production environment. As soon as we commit our chages to the repository, CodeCatalyst will detect the changes and start the deployment process. After the deployment is completed, we can access our application in the production environment.
-
Let's status of new create
ProductionEnvEnvironment. In the navigation pane, expand CI/CD and choose Environments. And click on the name of the environment.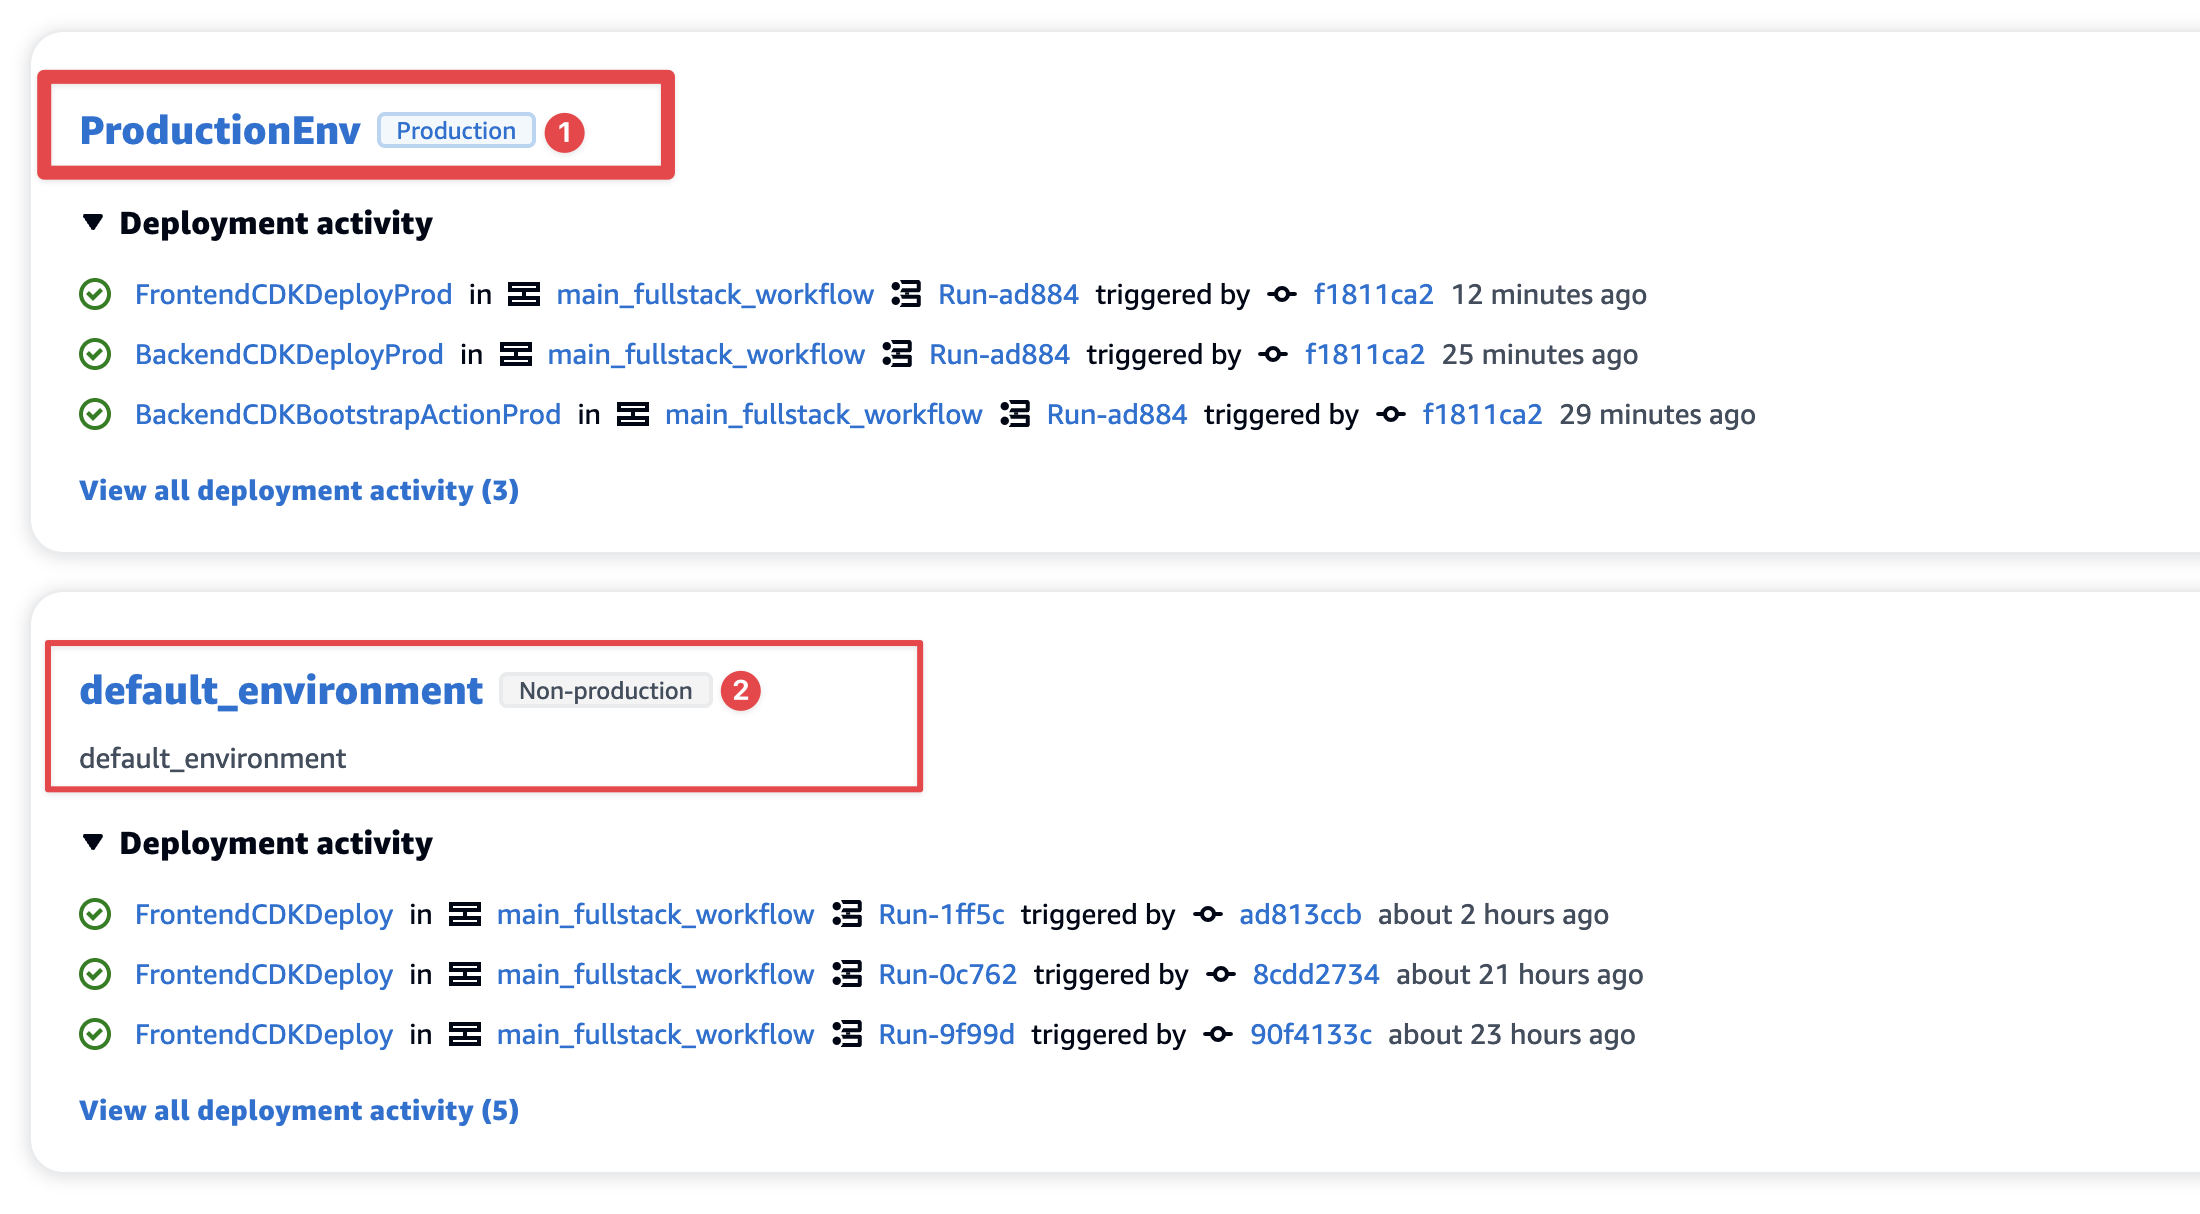
-
Let's find URL for the production env. In the navigation pane, expand CI/CD and choose Workflows, and the last run, switch to the Variables tab, in search field type
FrontendCDKDeployProd.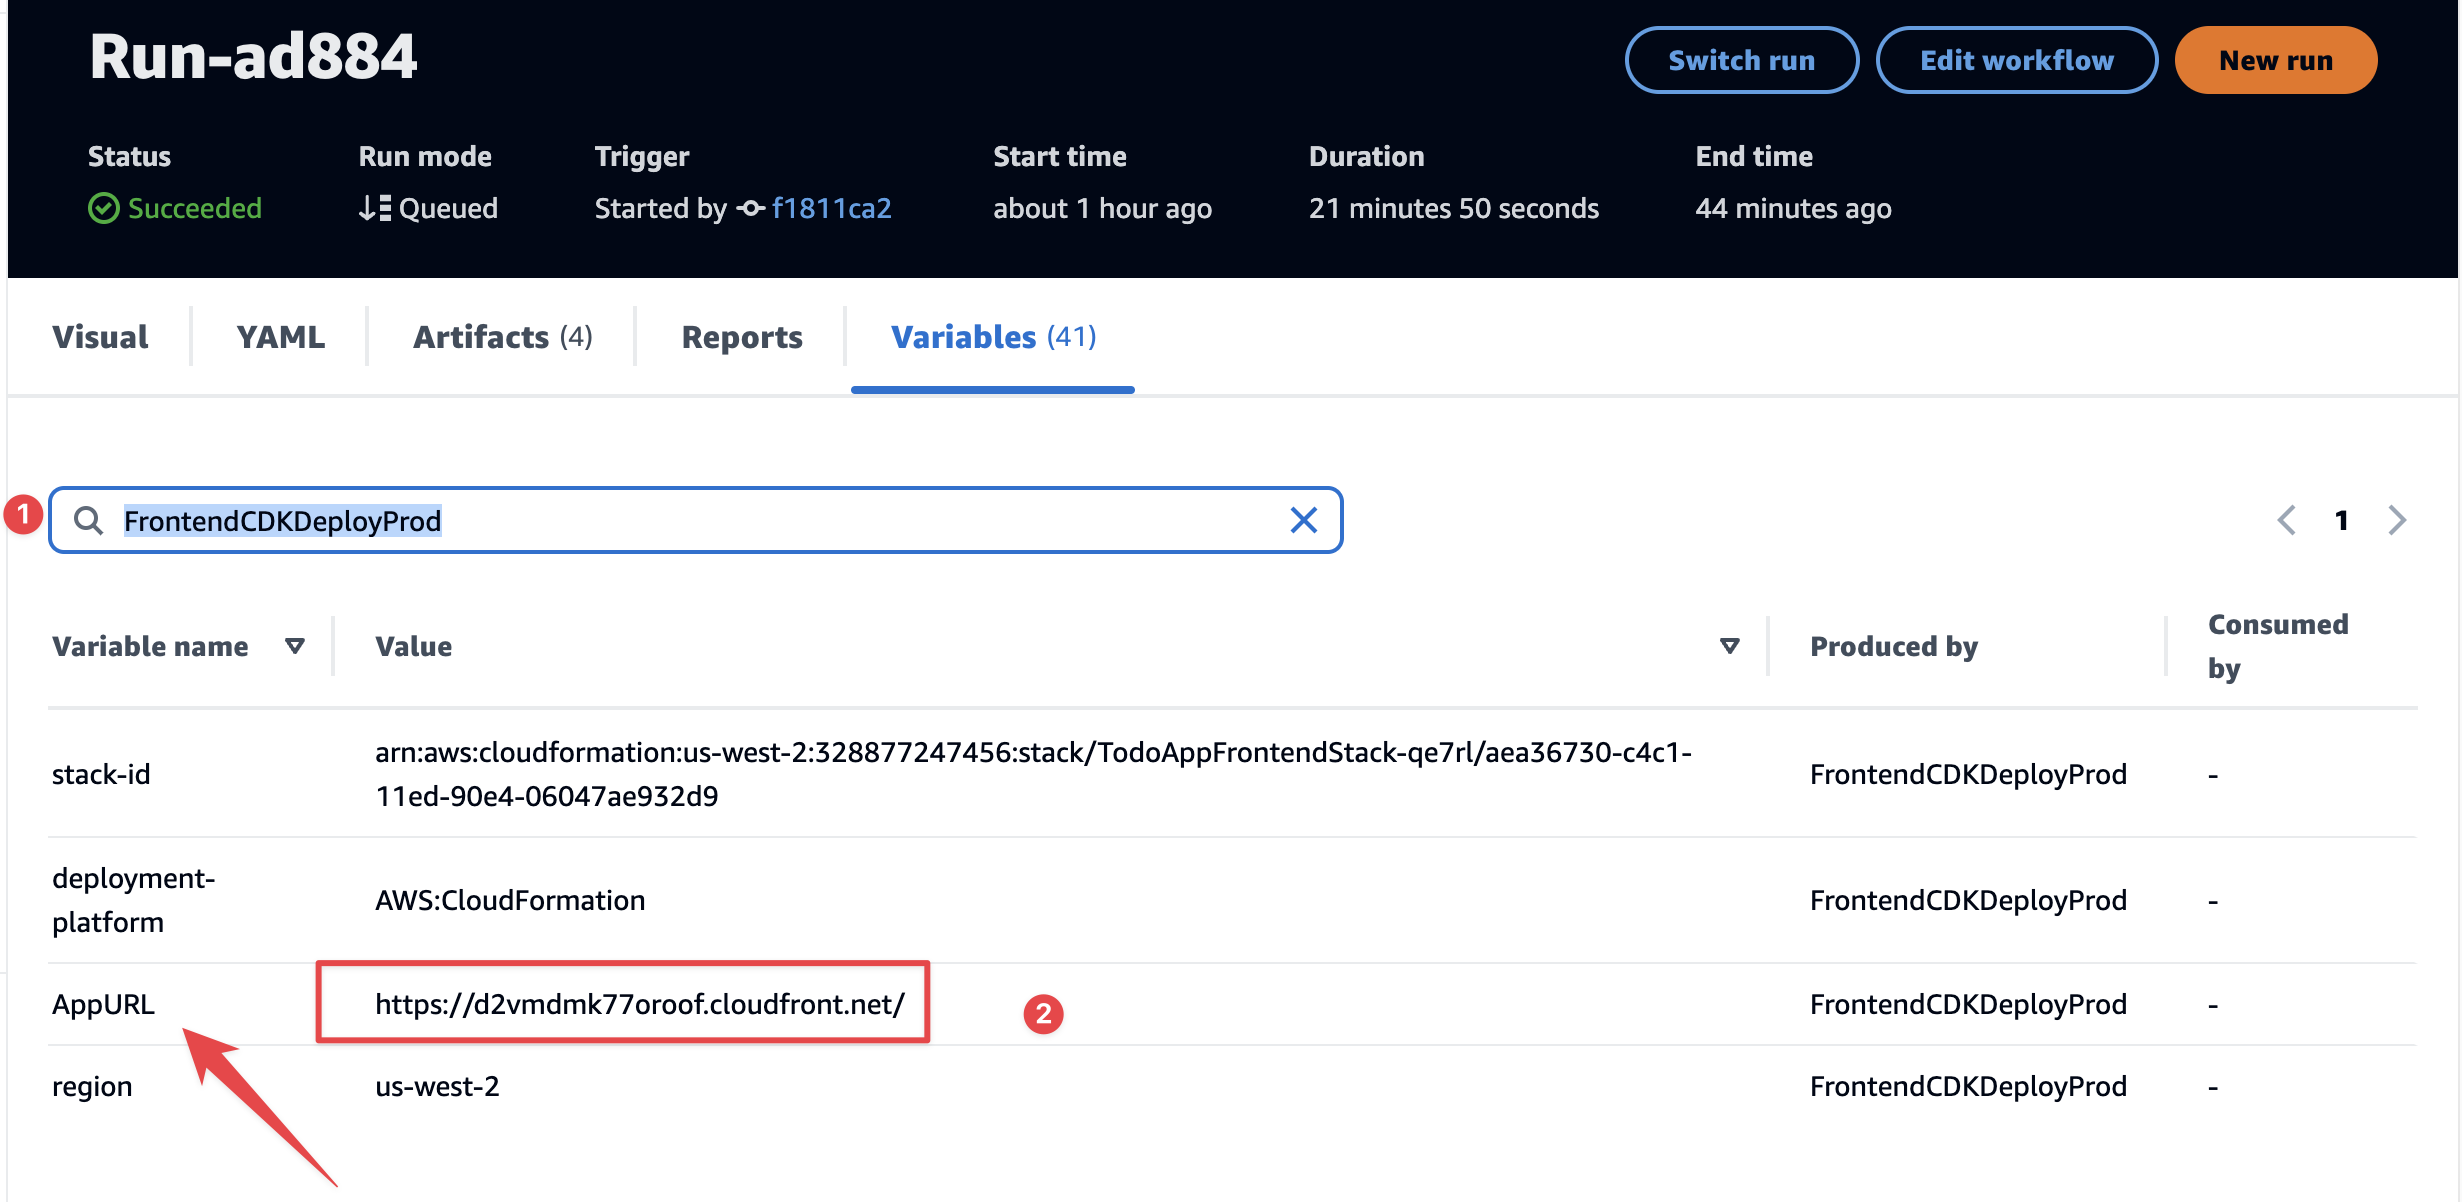


We are at the final stage of CI/CD operations - Monitoring. We can do two types of monitoring:
- Monitoring of CI/CD operations. We can monitor API calls for CodeCatalysts actions. These API operations are managed by AWS CloudTrail. You can read more in CodeCatalyst Documentation
- Application performance monitoring focused on monitoring and analyzing applications and the infrastructure that hosts them. Amazon CloudWatch Metrics and Amazon CloudWatch Logs are used for observability by default.
Let's configure an application monitoring dashboard:
-
Examine API activities in the dashboard. Sign in to the API Gateway console at https://console.aws.amazon.com/apigateway.
-
Choose the name of the API. Under the selected API, choose Dashboard.
-
To display a summary of API activity over time, for Stage, choose the desired stage. Use From and To to enter the date range.

-
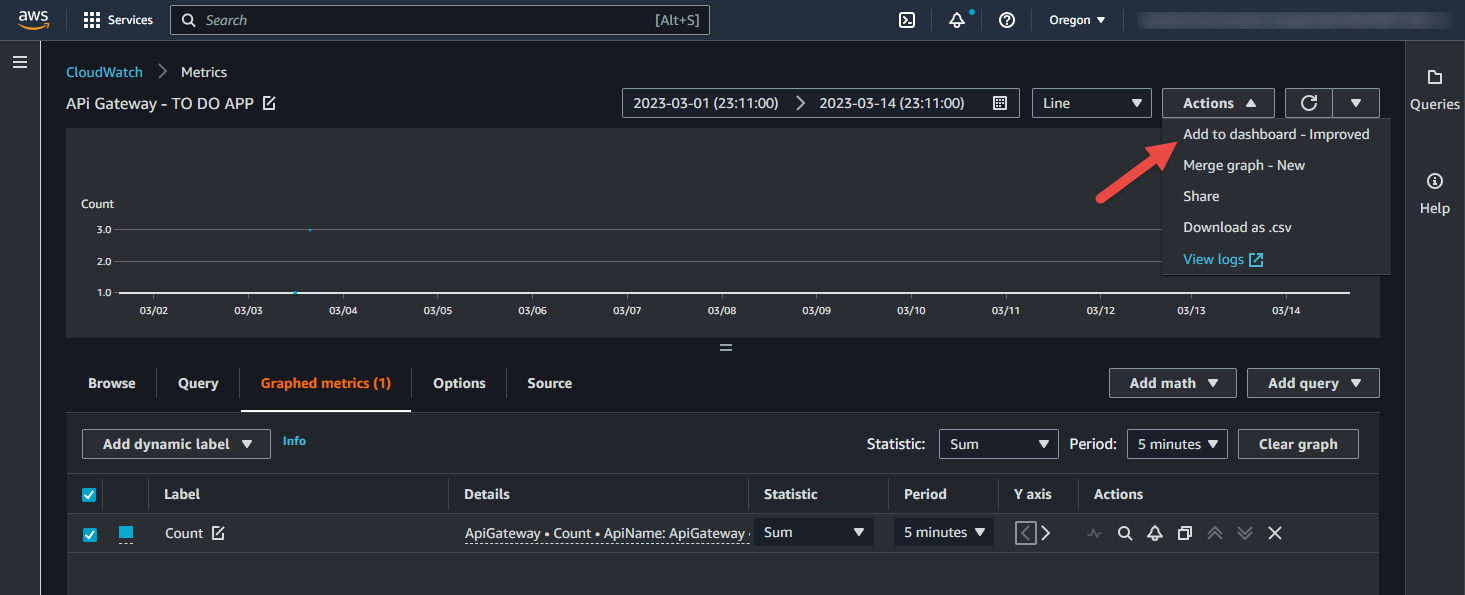
Click on API Calls, and the metric will open in Amazon CloudWatch.
-
Click Actions and choose Add to dashboard.
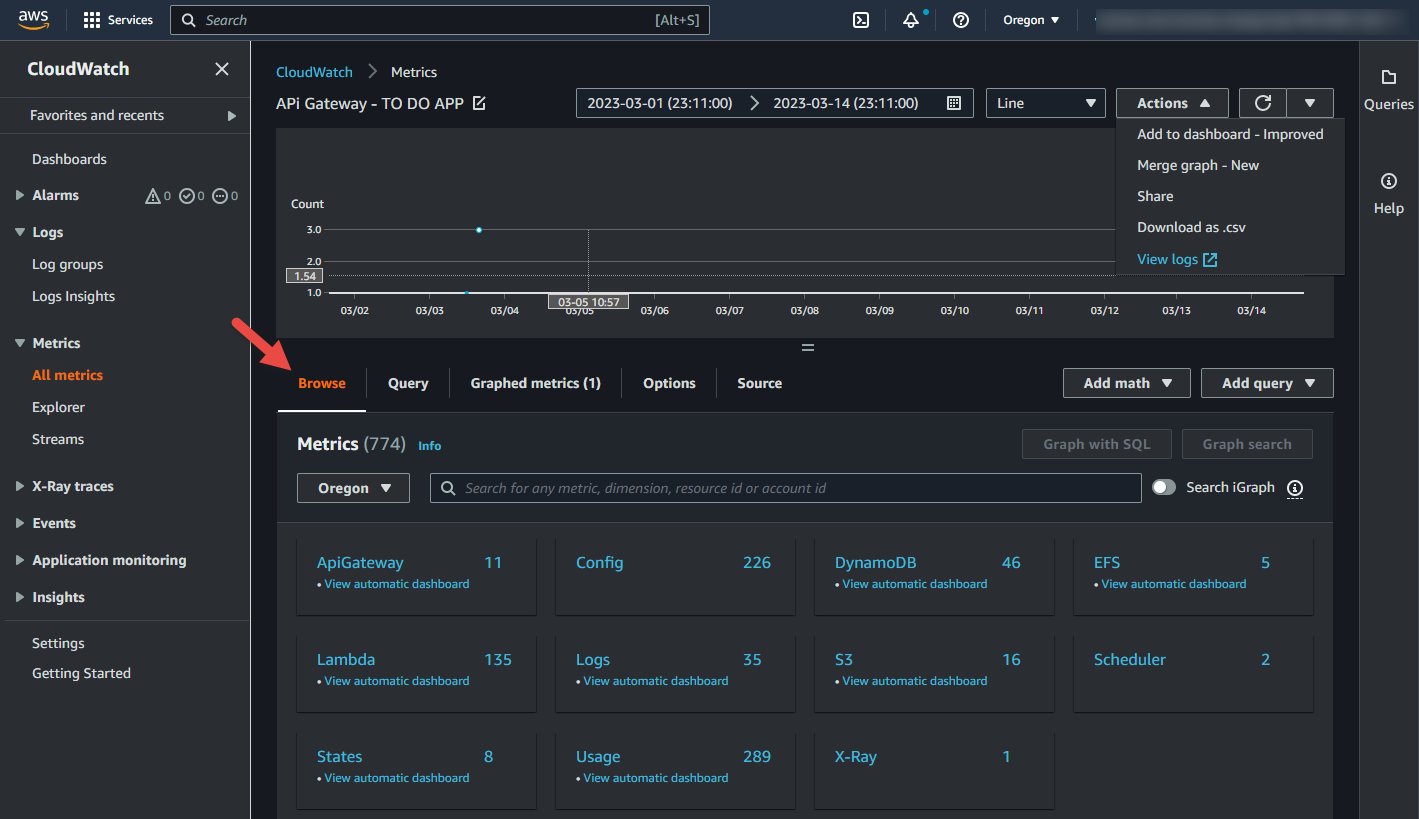
-
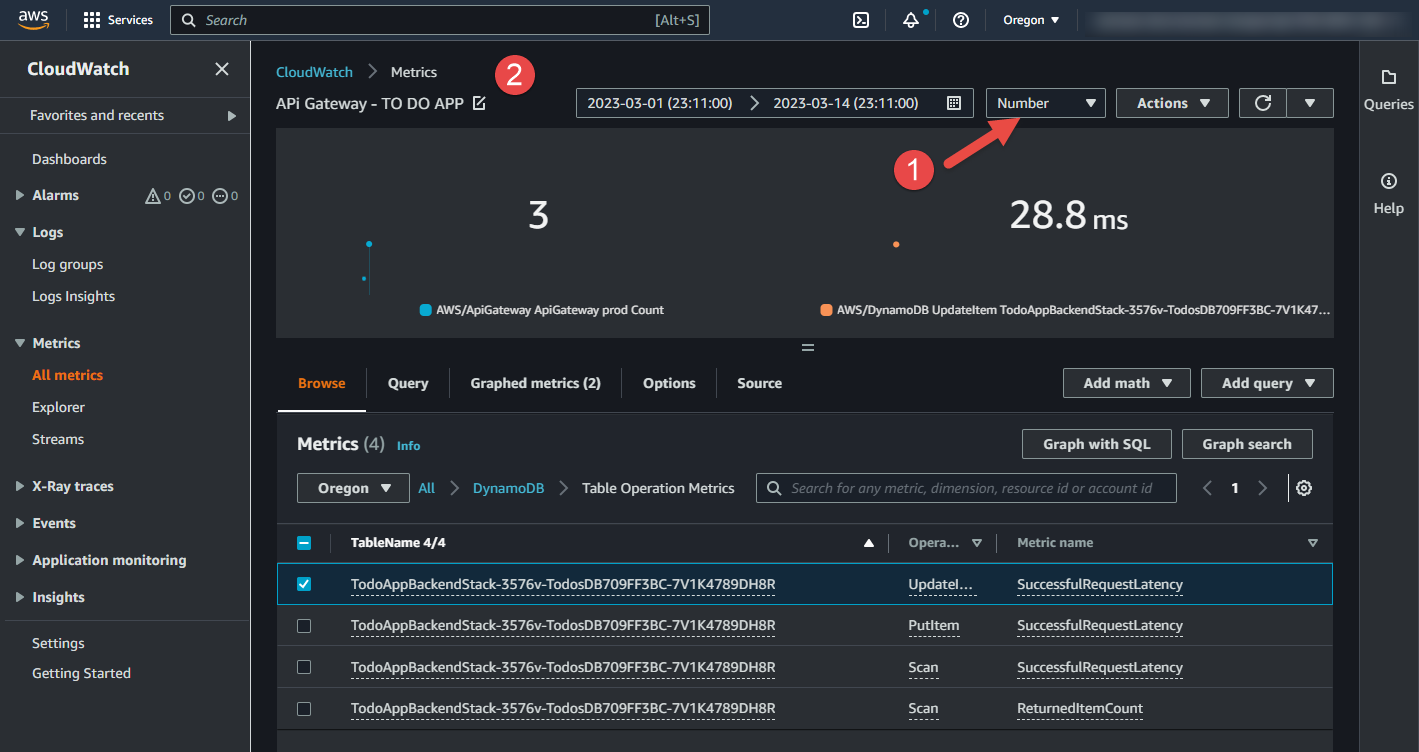
Click on Browse Tab and add additional metrics that you would like to monitor.
-
Try different visualization types and save your graph.


-
Clean CodeCatalyst project by going to Project settings and click Delete project. In the popup window type "delete" and click Delete Project.

-
Clean up deployed infrastructure:
2.1 Sign in to the AWS Management Console with the same account that you added to your space, and then choose AWS CloudFormation. You will see "TodoAppFrontendStack" and "TodoAppBackendStack". Select first the first one, and click "Delete". Repete with the second stack.
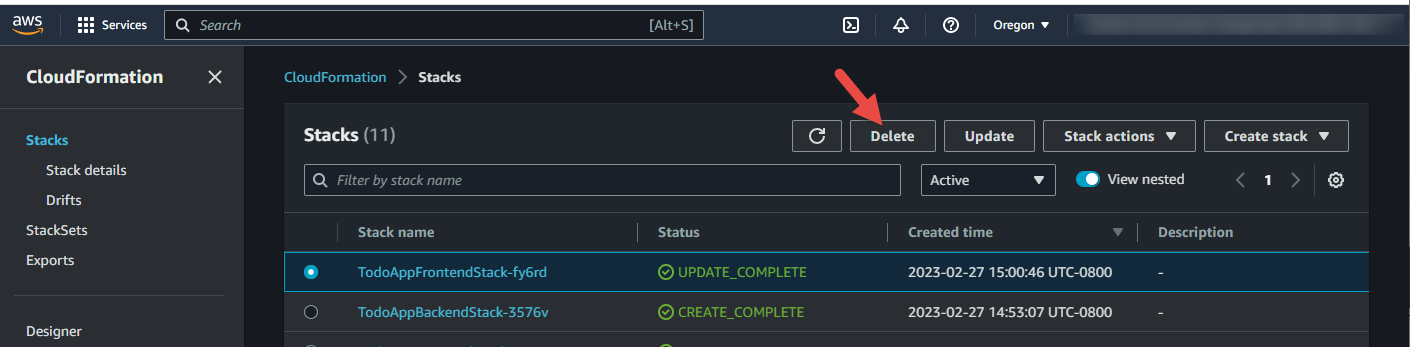
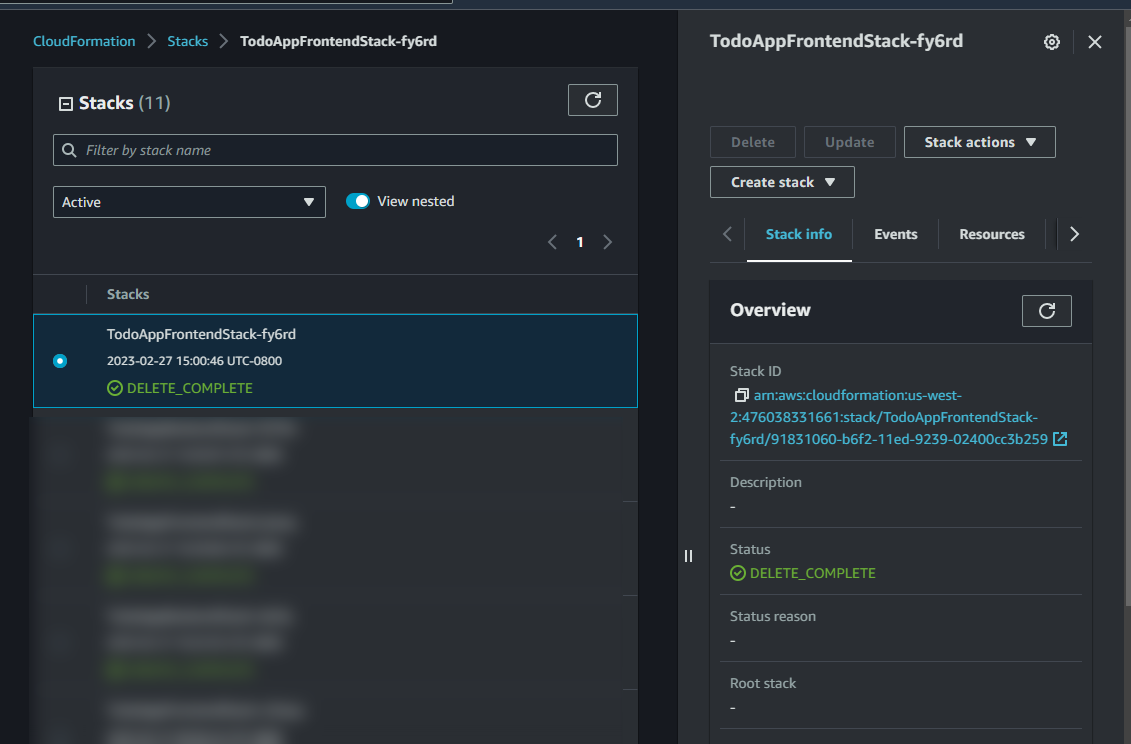
2.2 Validate that stacks have been successfully deleted.


This project leverages AWS CDK and therfore can be easily extended by updating AWS CDK code.
See the Amazon CodeCatalyst User Guide for additional information on using the features and resources of Amazon CodeCatalyst.