The infrastructure of this project consists mainly of:
- A containerized third-party application
- A GKE cluster running the application
- A load balancer to serve the application
- A single Cloud SQL instance providing the database to the application
- A CI/CD pipeline to test and assure the activity of each component
So, the logical route would be:
- Upload and store the third-party application in Container Registry, so we can version control the application both directly from the pipeline and the GCP console. The application will be built as a container by the workflow and uploaded with tags tracing the commit.
- The main pipeline is triggered each time the repo recieves a push, but further actions such as
terraform applyandkubectl rolloutwill have to wait for manual action in the repo. This is useful to prevent additional costs, or even any cost at all. - Deploy a GKE cluster with the service connected to the application, with external application load balancer configured. All of the cluster configuration will be stored in Terraform.
- Deploy the desired database via Terraform and provide the connection means to the application pods.
- Create an service account with needed permissions granted and use to process everything at once.
Before deploying with Terraform, we need to make slight manual changes in the project first. But I've made sure you have the right commands to do it from Cloud Shell without even breaking a sweat. You can copy and paste everything.
  # Export the variables to Cloud Shell environment
  # [!] REMEMBER TO EDIT THE FIRST VALUES TO MATCH TERRAFORM
  export PROJECT_ID=[[PROJECT_ID]] # Need input | No defaults
  export SELECTED_REGION=[[DEFAULT_REGION]] # Need input | Defaults to us-central1
  export SELECTED_LOCATION=[[DEFAULT_LOCATION]] # Need input | Defaults to US
  export SERVICE_ACCOUNT_NAME="tf-service-account"
  export SERVICE_ACCOUNT_EMAIL="${SERVICE_ACCOUNT_NAME}@${PROJECT_ID}.iam.gserviceaccount.com"
  export BUCKET_NAME="tf-source-data"

  gcloud config set project $PROJECT_ID

  # STEP 1: Create a service account
  gcloud iam service-accounts create $SERVICE_ACCOUNT_NAME \
    --description="Service account used by Terraform to plan/deploy infrastructure" \
    --display-name=$SERVICE_ACCOUNT_NAME

  # STEP 2: Grant the service account the necessary permissions
  gcloud iam service-accounts add-iam-policy-binding $SERVICE_ACCOUNT_EMAIL \
    --member=$SERVICE_ACCOUNT_EMAIL \
    --role="roles/editor"

  gcloud iam service-accounts add-iam-policy-binding $SERVICE_ACCOUNT_EMAIL \
    --member="$SERVICE_ACCOUNT_EMAIL.iam.gserviceaccount.com" \
    --role="roles/iam.serviceAccountUser"

  gcloud iam service-accounts add-iam-policy-binding $SERVICE_ACCOUNT_EMAIL \
    --member=$SERVICE_ACCOUNT_EMAIL \
    --role="roles/iam.serviceAccountTokenCreator"

  # STEP 3: Create the bucket that serves as the backend for Terraform
  gcloud storage buckets create gs://$BUCKET_NAME \
    --project=${PROJECT_ID} \
    --location=${SELECTED_LOCATION} \
    --default-storage-class="STANDARD" \
    --uniform-bucket-level-access

  # Grant bucket-level access to the Service Account
  gcloud storage buckets add-iam-policy-binding gs://$BUCKET_NAME \
    --member=$SERVICE_ACCOUNT_EMAIL \
    --role="roles/storage.objectAdmin"

  # STEP 4 (OPTIONAL): Activate the needed APIs manually
  # In case you're having trouble during deployment due to APIs not activating from Terraform, execute this:
  gcloud services enable "compute.googleapis.com"
  gcloud services enable "artifactregistry.googleapis.com"
  gcloud services enable "cloudresourcemanager.googleapis.com"
  gcloud services enable "containerregistry.googleapis.com"
  gcloud services enable "container.googleapis.com"
  gcloud services enable "iam.googleapis.com"
  gcloud services enable "sqladmin.googleapis.com"
After these steps, your cloud environment is ready! Terraform will do the rest.
To make sure terraform knows what to do, we need to populate our variables, so I left 'template.tfvars' to facilitate the process. Open the file, modify the values with their respective types, and then rename the file to 'terraform.tfvars'. Later, upload the data from this '.tfvars' into a github secret called TF_VARS
  PROJECT_ID = [string]
  SELECTED_REGION = [string]
  TF_SERVICE_ACCOUNT_ID = [string]
  DB_INSTANCE_TIER = [string]
  DB_HIGH_AVAILABILITY = [bool]
  [...]
Warning
'.tfvars' files can store sensible data, so make sure to follow these steps carefully and never push the variables to public, otherwise your repository isn't safe anymore and it's best to make it private.
To test our pipeline, a simple push to branch will trigger a series of tests. The credentials of the service account is supposed to be stored as a secret in the repo, loaded with GitHub Actions. Locally, you can add the credentials of the service account as an environment variable. I left the commands below to help you with that:
  # | POWERSHELL
  $env:GOOGLE_APPLICATION_CREDENTIALS=(Get-Item credentials.json).FullName

  # | BASH
  export GOOGLE_APPLICATION_CREDENTIALS=$(realpath ./credentials.json)
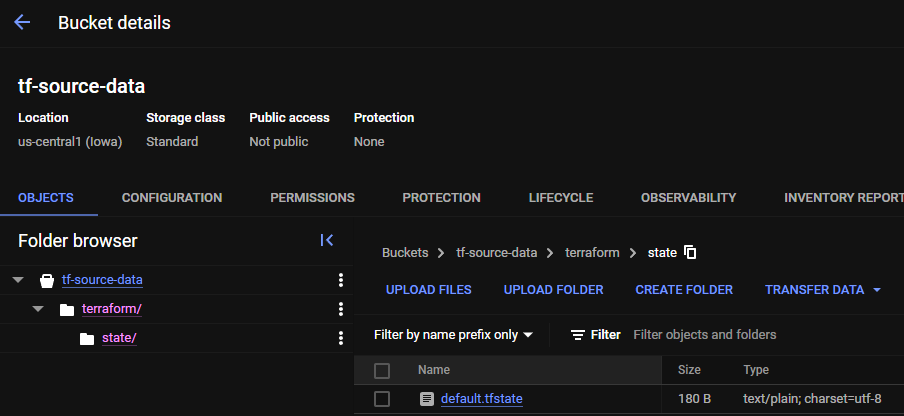
After a terraform plan, even locally, we expect to see .tfstate loaded on the backend. This is to prevent resource duplication errors, multiple infrastructures, data loss, and so on. Also, having a backend makes sure we can destroy infrastructure that was applied in the pipeline itself! Make sure to check the GCS bucket we've created earlier and see an structure similar to this:
If all parts of the deploy are ready, we just have to commit and push to the repository to start the pipeline. All else besides infrastructure is to be dealt in the 'pipeline.yml' file. As the deploy action is part of a production environment, the 'terraform apply' action will be safely waiting for approval, so you don't waste resources while testing this setup. The deploy secion can take ~15 min to finish, so be patient.
The name Ilion refers to the city of Troy, which had both names historically referenced between Ancient Greece and the Hittite Empire, the latter naming the place Wilios/Wilusa. The reason is simply because I was reading about the history of Troy, just out of curiosity, during the development of this project.
