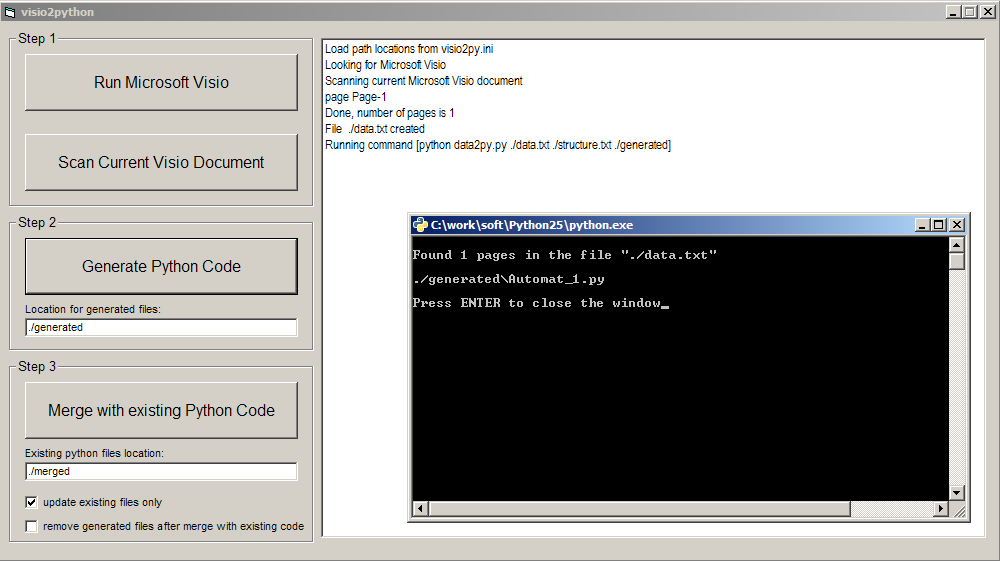
I would like here to tell you about another way to write programs. Certainly nothing fundamentally new in science, I will not open. But I created a small utility called visio2python that really helps me during development of the BitDust project, so it might be usefull for other developers.
The tool visio2python generates Python code from graphical diagrams created in Microsoft Visio. So you can "draw" your idea, press the button, execute automatically generated Python code and see how it works. Less code, more visualisation, fast development, more stability.
The key aspect here is the use of finite state machines to describe behaviour of your program. This approach also known as Automata-Based Programming. My professor Anatoly Abramovich Shalyto gave me that knowledge - those wonderful days when I was studying at university. Great Thanks to Him!.
Anatoly Abramovich Shalyto is a Russian scientist, doctor of sciences, professor, awarded by Russian State Government in 2008 for achievements in education, developer of technology for Automata-based programming named "Switch-technology", initiator of Open Project Documentation Initiative and of "Save the best in the universities of Russia".
Let's see how it looks on the picture. On the picture below you see a transition graph of state machine for
this sample program
taken from the article above,
I draw it using this Microsoft Visio stancil.
Here is:
- three states: BEFORE, INSIDE and AFTER,
- one event: input-char,
- three condition methods: isNewLine(), isSpace() and isAnyChar(),
- one action method: doPutChar().
Using visio2python I generate Python code for this drawing.
It was written in the file ./generated/Automat_1.py, here is the file contents:
from automat import Automat

_Automat1 = None
def A(event=None, arg=None):
    global _Automat1
    if _Automat1 is None:
        # set automat name and starting state here
        _Automat1 = Automat1('Automat_1', 'BEFORE')
    if event is not None:
        _Automat1.automat(event, arg)
    return _Automat1

class Automat1(Automat):

    # EVENTS:
    # input-char

    def A(self, event, arg):
        #---BEFORE---
        if self.state is 'BEFORE':
            if event == 'input-char' and self.isNewLine(arg) :
                self.doPutChar(arg)
            elif event == 'input-char' and self.isAnyChar(arg) :
                self.state = 'INSIDE'
                self.doPutChar(arg)
            elif event == 'input-char' and self.isSpace(arg) :
                pass
        #---INSIDE---
        elif self.state is 'INSIDE':
            if event == 'input-char' and self.isSpace(arg) :
                self.state = 'AFTER'
            elif event == 'input-char' and self.isAnyChar(arg) :
                self.doPutChar(arg)
            elif event == 'input-char' and self.isNewLine(arg) :
                self.state = 'BEFORE'
                self.doPutChar(arg)
        #---AFTER---
        elif self.state is 'AFTER':
            if event == 'input-char' and self.isNewLine(arg) :
                self.state = 'BEFORE'
                self.doPutChar(arg)
            elif event == 'input-char' and ( self.isAnyChar(arg) or self.isSpace(arg) ) :
                pass

    def isAnyChar(self, arg):
        pass

    def isSpace(self, arg):
        pass

    def isNewLine(self, arg):
        pass

    def doPutChar(self, arg):
        pass
This is an automatically generated code, a template to create a complete program.
Class Automat1 is a sub class of base class
automat.Automat which runs the state machine.
Method A(event, arg) and global variable _Automat1 is a
singletone pattern
to have only one instance of the state machine.
Let's say to call this state machine from outside you use:
Automat_1.A('some-event', some_arguments)
If you need to start many copies of same automat - remove this method and variable definition and use it like any other class:
a1 = Automat_1.Automat1('first', 'BEFORE') # call constructor
a1.automat('some-event', some_arguments)      # fire event in the automat
a2 = Automat_1.Automat1('second', 'BEFORE')
a2.automat('some-event', some_arguments)
Let's write a code for conditions, actions and reading/writing loop. Here's the complete working code, which is identical to the example in the article.
from automat import Automat

class Automat1(Automat):

    # EVENTS:
    # input-char

    def A(self, event, arg):
        #---BEFORE---
        if self.state is 'BEFORE':
            if event == 'input-char' and self.isNewLine(arg) :
                self.doPutChar(arg)
            elif event == 'input-char' and self.isAnyChar(arg) :
                self.state = 'INSIDE'
                self.doPutChar(arg)
            elif event == 'input-char' and self.isSpace(arg) :
                pass
        #---INSIDE---
        elif self.state is 'INSIDE':
            if event == 'input-char' and self.isSpace(arg) :
                self.state = 'AFTER'
            elif event == 'input-char' and self.isAnyChar(arg) :
                self.doPutChar(arg)
            elif event == 'input-char' and self.isNewLine(arg) :
                self.state = 'BEFORE'
                self.doPutChar(arg)
        #---AFTER---
        elif self.state is 'AFTER':
            if event == 'input-char' and self.isNewLine(arg) :
                self.state = 'BEFORE'
                self.doPutChar(arg)
            elif event == 'input-char' and ( self.isAnyChar(arg) or self.isSpace(arg) ) :
                pass

    def isAnyChar(self, arg):
        return arg != '\n' and arg != ' '

    def isSpace(self, arg):
        return arg == ' '

    def isNewLine(self, arg):
        return arg == '\n'

    def doPutChar(self, arg):
        sys.stdout.write(arg)

def main():
    import sys
    a1 = Automat1('a1', 'BEFORE', 1, open('log.txt', 'w', 1))
    while True:
        c = sys.stdin.read(1)
        if c == '':
            break
        a1.automat('input-char', c)

if __name__ == '__main__':
    main()
You see how simple is to write conditions and actions methods. No chance to make a mistake.
Take the file automat.py, place it in the same folder and run the code to test it.
C:\work\visio2python>python Automat_1.py
abcd efgh 1234
abcd
  Test Test Test
Test
LONG_line_with_no_spaces
LONG_line_with_no_spaces
 1 2 3 4 5
1
^C
You see the program works fine, it prints the first word from the input line and skip leading spaces.
I know, this is very simple example but I just want to show you how to use visio2python here.
Let me describe the expressions syntax and diagram rules.
- states are placed in the round boxes and written with CAPITAL laters,
- events are red,
- condition are green, starts with 'is' and ends with '()' to looks like a Python methods,
- actions are blue, starts with 'do' and ends with '()',
- actions are separated from conditions with single underline,
- and, or and not operators may be used to construct complex conditions,
- you can also use expressions like Z in [ x , y ] or Z not in [ x , y ].
- you can combine conditional expressions with parentheses - '(' and ')' ,
- to separate actions use a semicolon - ';',
- variables can be used in conditions and actions like indexA>=4 or counterB+=1,
- you can check another state machine's state with expression like this automat2().state is STATE_01,
- event "state changed" from another automat can be catched using expression like this automat2.state is STATE_02,
- you can fire event in another state machine like this automat2(event01),
- use stancil called LABEL to set automat name ( use only lower letters and '_', finished with '()' ), or set page name in the dialog File->Page Setup->Page properties in Microsoft Visio.
I tried to make the expressions syntax as close as possible to Python language.
Even more useful usage of the class automat.Automat you can found in
Twisted applications.
Typically, you have a lot of calls to reactor.callLater(seconds, callable) method,
and it breaks the application logic into many pieces all around the code.
Calling reactor.callLater(delay1, B) from A()
and reactor.callLater(delay2, A) from B() is
fairly typical situation.
What exactly happens at a certain time and how to understand the current situation become quite difficult sometimes. To all this is added the use of a set of variables which control the program behavior and debugging in such situations takes a lot of time and nerves.
In the class automat.Automat you can use a timer event and pass it into conditions.
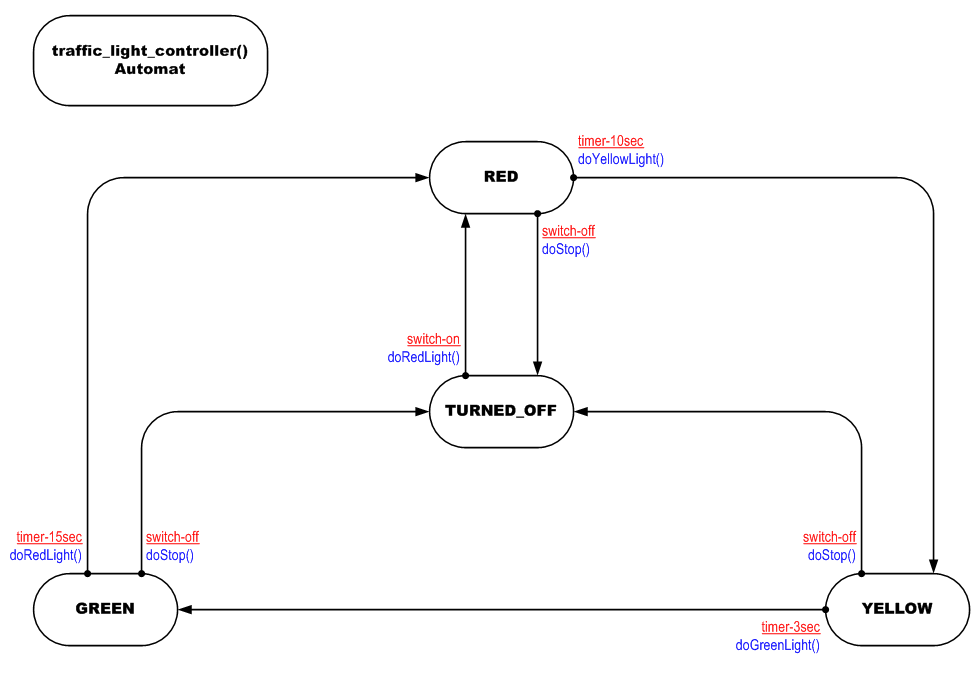
Let's see another sample that simulates a traffic light. Here is a state machine:
And working code:
from automat import Automat

_TrafficLightController = None
def A(event=None, arg=None):
    global _TrafficLightController
    if _TrafficLightController is None:
        # set automat name and starting state here
        _TrafficLightController = TrafficLightController('traffic_light_controller', 'TURNED_OFF')
    if event is not None:
        _TrafficLightController.automat(event, arg)
    return _TrafficLightController

# traffic_light_controller() Automat
class TrafficLightController(Automat):

    # EVENTS:
    # switch-off
    # switch-on
    # timer-10sec
    # timer-15sec
    # timer-3sec

    timers = {
        'timer-3sec': (3, ['YELLOW']),
        'timer-10sec': (10, ['RED']),
        'timer-15sec': (15, ['GREEN']),
        }

    def A(self, event, arg):
        #---TURNED_OFF---
        if self.state is 'TURNED_OFF':
            if event == 'switch-on' :
                self.state = 'RED'
                self.doRedLight(arg)
        #---RED---
        elif self.state is 'RED':
            if event == 'switch-off' :
                self.state = 'TURNED_OFF'
                self.doStop(arg)
            elif event == 'timer-10sec' :
                self.state = 'YELLOW'
                self.doYellowLight(arg)
        #---YELLOW---
        elif self.state is 'YELLOW':
            if event == 'switch-off' :
                self.state = 'TURNED_OFF'
                self.doStop(arg)
            elif event == 'timer-3sec' :
                self.state = 'GREEN'
                self.doGreenLight(arg)
        #---GREEN---
        elif self.state is 'GREEN':
            if event == 'timer-15sec' :
                self.state = 'RED'
                self.doRedLight(arg)
            elif event == 'switch-off' :
                self.state = 'TURNED_OFF'
                self.doStop(arg)

    def doRedLight(self, arg):
        print time.asctime(), 'red'

    def doGreenLight(self, arg):
        print time.asctime(), 'green'

    def doYellowLight(self, arg):
        print time.asctime(), 'yellow'

    def doStop(self, arg):
        reactor.stop()


import time
from twisted.internet import reactor
reactor.callWhenRunning(A, 'switch-on')
reactor.callLater(60, A, 'switch-off')
reactor.run()
The class automat.Automat is designed in a such way that every timer is started only when it is needed.
This is to decrease the amount of dellayed calls and to not consume extra resources.
For example, timer-10sec in the example above
is started when state machine riched state RED.
The timers is generated automatically, syntax is timer-{number}{sec|min|hour}. For seconds you can use values less than 1 and omit point. For example:
- timer-25sec,
- timer-5min,
- timer-3hour,
- timer-004sec,
- timer-0.2sec.
The automat.Automat is a thread-safe class,
so you can use it in a multi-threaded applications without any locks.
There is no blocking code in the class body, but writing conditions and actions is your deal.
You can use different methods to write threaded applications controlled with state machines,
for example use reactor.callInThread().
It must be noted that visio2python use colors to split expressions on the transition graph arcs and so right color values should be used to get correct result. In Microsoft Visio open dialog Tools->Color Palette and check color indexes. Here is a table of used colors, your palette should have same indexes and values to be compatible with visio2python.
| index | name | value | used for |
|---|---|---|---|
| 0 | black | 0,0,0 | all other characters |
| 2 | red | 128,0,0 | events |
| 9 | green | 0,128,0 | conditions |
| 10 | blue | 0,0,128 | actions |
| 11 | gold | 128,128,0 | automats |
Well, actually this is standard system colors, so just do not change anything and it should work. Just need to be sure you are using right colors for conditions, actions, events and automats. Mine palette looks like this:
After you did generated the Python code for your future program you will need to modify it to make it working,
write conditions, actions and other things.
After some time you may want to modify the logic of your program and so change something
in the Microsoft Visio document.
No problem - there is a Step 3 in the visio2python tool to update the existing code.
Set a destination to your working program generated from this MS Visio document and press the button Merge with existing Python code.
It should read and scan all Python files in that location and update code for subclasses of automat.Automat class.
I am using Microsoft Visio 2007 to draw transition graphs,
I hope visio2python is compatible with other versions.
You can even run Microsoft Visio on Ubuntu using WineHQ, I did it for my self.
This tool is written in Microsoft Visual Basic 6.0.
Here is an official git repository for developers: http://github.com/vesellov/visio2python.
Please, contact Veselin Penev if you have any questions, or want to participate and improve visio2python tool.


