Main Teaching Site that will use this information https://github.com/hpssjellis/high-school-robotics-tinyml-machine-learning-curriculum
The photon code is in the photon folderr in each section. For the moment use the Particle.io Photon until comfortable with robotics and then switch to the Nano33BleSense (has everything but Wifi) or Nano33IOT (Has Wifi), PortnetaH7 (Has everything, but really expensive, even the extra boards for the sensors are expensive and not yet ready.)
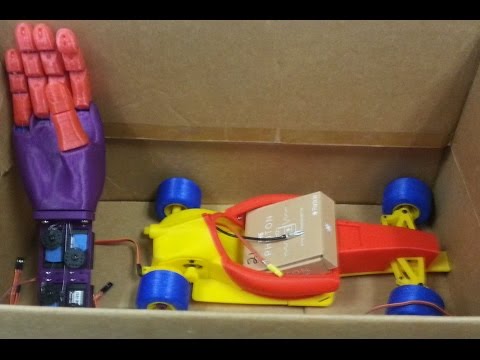
A High School Robotics course designed for my Feb 2021 Robotics class using several Arduino boards: the Nano33Iot, Nano33BleSense and the PortentaH7, and also 2 non-arduino boards the Seeeduino XIAO and Espressif ESP32 NodeMCU-32S. We will use the Arduino Regular IDE, (perhaps also the online cloud editor and the new Pro Editor when it is ready) using the C and C++ programming languages. We will also use the OpenMV IDE Micro-Python based PortentaH7 Vision Shield, and the Edge Impulse Machine Learning Platform along with my own Javascript TensorflowJS Web page based solutions and perhaps other shields that I get in the future.
Don't forget to see the price list for the basic Robotics course that I teach. Students tend to work in pairs but I have them plan three final projects two of which should be done individually.
Most of this information has been condensed from research repositories I have made or are in the process of making.
-
my-examples-for-the-arduino-portentaH7 The Dual Core $100 Pro Arduino The PortentaH7
-
https://github.com/hpssjellis/my-examples-of-edge-impulse Simplifying Machine Learning on both connected and un-connected micro-controllers.
-
OpenMV, Micro-Python, The OpenMV IDE and the PortentaH7 Vision Shield
-
ESP32 by Espressif the NodeMCU-32S
-
Seeduino XIAO The ultra cheap $4 USD board, needs USB C connector
.
.
.
.
.
.
.
Five year tested Robotics course Old information below: It will eventually be replaced with new information.
Github has a website at
https://hpssjellis.github.io/arduino-high-school-robotics-course/
Started Feb 7th, 2020.
I have already tested and converted to Arduino most of the folders up to a12-stepper-motor. I will be working on the other folders over the next little while. I will keep the old videos until I have had time to make some new videos.
..
To begin with, while teachers are preping their course, the most important item is to have at least 2 the Nano 33 IoT from the Arduino Store $20.00 USD .
.
.
.
#Old github Particle Photon information. This will probably all be changed!
Note: Started Feb 6th, 2020 forked from https://github.com/hpssjellis/particle.io-photon-high-school-robotics
The following is all the old stuff:
If in any of my code you see
https://api.spark.io/v1/devices/
It has been deprecated and this code should replace it
https://api.particle.io/v1/devices/
Most of the important files from my High School Robotics course using the particle.io photon, a wifi out of the box arduino.
For advanced students in my High School beginner robotics class to proceed quickly through the course so they can start making prototypes or for beginner students in my advanced Robotics Construction class to work at their own pace through some of the harder assignments.
For Machine Learning using Javascript and tensorflowjs in the web browser try my site at: https://www.rocksetta.com/tensorflowjs/
Hopefully this repository will stay reasonably static so that it matches the video series at
https://www.youtube.com/playlist?list=PL57Dnr1H_egsL0r4RXPA4PY2yZhOJk5Nr
.
.
Particle Community Great help when you are stuck
Photon Firmware Documentation Learn about the firmware (The software that runs the Photon).
Price List Don't forget to see the price list for the basic Robotics course that I teach. Students tend to work in pairs but I have them plan three final projects two of which should be done individually.
-
Video a00-intro An introduction to teaching robotics using the Particle.io Photon
-
Video a01-console: A simple console program to get things started. No webpage needed. Outputs a counter, a random number and the analog sensor A0 to the console, by using a GND (black), 3V3 (red) , SIG (yellow) sensor connected to A0 in this case a slide potentiometer (variable resistor).
-
Video a02-voltage-divider: Using a voltage divider to better control the output of a 2 prong sensor in this case a SNAP circuit photoresistor
-
Video a03-DAC-to-ADC: This program shows how to change a digital signal into an anlog signal and then what happens when that analog signal is read by the analog pin A0 and the digital pin D6
-
Video a04-SOS-programming A short look at programming the particle.io photon by having students control the D7 LED to flash SOS
-
Video a05-tinker A quick look at the tinker program that is part of the Particle android or IOs Apps
-
Video a06-web-app A web page replacement for the Tinker App. You can edit the web page to control any pins on the Photon. View the generic working web app at https://hpssjellis.github.io/particle.io-photon-high-school-robotics/ Needs your device ID and access token, which is stored locally on the webpage and watch how it can activate D7 to prove web page connectivity.
-
Video A07-mobile-App. Once you have a working web page you can then convert the web page into a free Android App (or IOS App but for $100 per year to Apple !) The App can then be installed on your android. All of this is done very easily using the online Adobe Phonegap Build
-
Video video A08-IFTTT Have your Photon control other devices on the web using https://ifttt.com. Today we just use a button to turn on D7 but using IFTTT we can try to control other students D7 buttons. Note: use a slider to reset your photon's ability to send to IFTTT and a button to actually send the message.
-
Video a09-servo Get a 6V servo working. Never run a 6V servo off the photon. It may work for a few seconds but my students have fried too many photons doing that. Servo's are very easy to use, make sure you change the code to prove you understand how it works. The servos we use tend to messup around 0 degrees and at 180 degrees, We find it works best to go from 10 degrees to 170 degrees. Challenge: How to get the servo working with the web-app?
-
Video a10-transistor. Using a PNP transistor to protect the Photon while controlling a more powerful circuit, such as a small 3V DC motor. A kind of cheap single direction DC motor driver using only a transistor.
-
Video a11-DC-motor-drivers For DC motors I would like you to use the web-app.ino and web-app.html to control both the dual motor driver which works for motors up to to 13.5 V max and 1.2 Amp Max and the big motor driver for DC motors up To 24V Max and 12 Amp Max .
-
Video a12-stepper-motor-driver Just proving that a Pololu stepper motor with Pololu stepper driver works. You should try to program it to do more fancy things. Another thing my students tried is using delayMicroseconds() instead of delay() to get the stepper moving faster. As always be careful with your motor.
-
Video a13-arduino. When Wifi is bad make your Photon switch between Photon normal wifi behaviour and Non-Wifi Arduino type behaviour. Solid green means the photon is working without Wifi, breathing cyan means normal Wifi mode. Note: Learn how to set the photon to safe mode !
-
Video a14-serial-I2C using the Groove OLED Showing how to make text print out on a very small display.
-
Video a15-serial-SPI using the Pixy Demonstrating how to use SPI serial connections with the very cool Pixy camera that converts colored objects into high speed data.
-
Video a16-serial-uART using a finger print scanner purchased from sparkfun.com
-
a17-particle-mesh working on it Jan 2019. Check it out as interesting things are added as they are understood.
Mesh networking is in the early stages of working with Google Nests, OpenThread. Tutroials at openthread.io and the openthread github.More to come late 2019
My draft Openthread installation page is here. Note: Openthread makes the firmware for devices, the Border Router connects the device to the internet and wpantund controls everything.
-
a18 GPS. I havn't made a video yet, but working code is here.
-
a19 Accelerometer. I havn't made a video yet, but working code is here.
-
a20. FSLP 5 Inch Touch Strip. I havn't made a video yet, but working code is here.
-
a21 RangeFinder. I havn't made a video yet, but working code is here.
Extra These are really good extras, everyone should have a look at all 3 of them.
-
Advanced Rasperry PI video at has it's own github site at https://github.com/hpssjellis/particle-photon-raspberry-pi-iot
-
Advanced websockets video at has it's own github site at https://github.com/hpssjellis/Particle-Spark-Core-Photon-Websocket-Hack
-
Video The IoT rant When I first started researching Robotics for the classroom I looked into what other teachers were doing with Lego Mindstorms, VEX robotics, First programs. I had already messed around with Stamp micro-controllers and new about Arduino's and the Raspberry Pi's. All of these were great but I didn't really like them for the High School classroom. Either they were more like clubs for school competitions or just really confusing to even turn on a few LED's. Arduinos also have several versions which causes some issues.
I found out about the Particle.io Photon predecessor the Spark Core and purchased it and started working with it but was really frustrated by all the weird issues surrounding learning robotics. However, as a multi-year computer programming teacher I was really impressed with the online IDE https://build.particle.io/ and the ability to flash code wirelessly, since installing software into school computers has always been a frustrating route. Website for the video here
Enjoy the rant.
.
.
.
My main github location https://github.com/hpssjellis?tab=repositories
The normal particle cloud communication repository https://github.com/hpssjellis/particle-photon-raspberry-pi-iot
The older version of the above https://github.com/hpssjellis/spark-core-web-page-html-control
Fast websocket node js communication https://github.com/hpssjellis/Particle-Spark-Core-Photon-Websocket-Hack
IDS (Independent Directed Studies) for Roboitcs and Machine Learning course at
https://github.com/hpssjellis/fraser-valley-IDS-robotics-machine-learning-javascript-high-school
By Jeremy Ellis
Canadian High School Robotics Teacher
Maker of http://www.rocksetta.com
Twitter https://twitter.com/rocksetta
Use at your own risk!