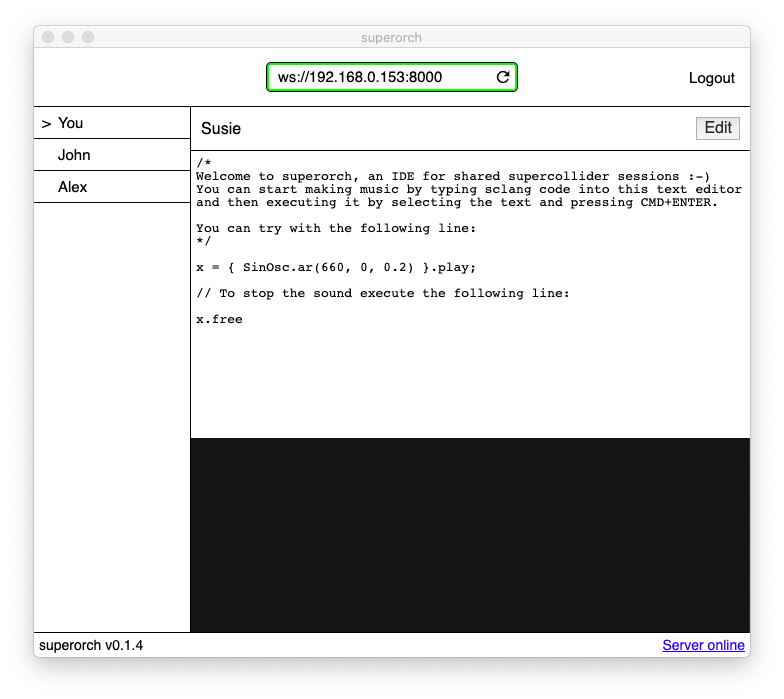
A supercollider IDE for laptop orchestras
This application provides a simple system to connect supercollider musicians over a network, allowing them to transmit sclang instruction to each other in real time. The app will work alongside supercollider to intercept instructions and having them translated into sound immediately.
In order to produce any sound the app requires a copy of supercollider to be installed on the user machine. If you don't have it already, go to the official download page and install a version of the software for your operating system.
Make sure to place the application folder in the default location for your operating system, otherwise superorch won't be able to find it automatically.
To install the app you can simply download an app bundle for your operating system in the releases section of this repository. If you feel like building the app from source you can follow the instructions in the development section.
Download the latest release of the app for your operating system and install it, then run the application bundle and wait for a window to pop up.
Once the app is running you will notice a url bar on the top, this is used to connect to any supeorch server available, including the one generated by the app itself.
By default the app will try to connect to its own server at startup. If a connection is established the url bar should turn green and should display the url for the superorch server, which should be follow this pattern ws://xxx.xxx.xxx.xxx:8000.
At this point you should press login and then tell your peers to open the app on their computers and connect to you by typing that url on their url bar, click the refresh icon and finally click login.
If the operation was successful now you should see a list of connected users on the sidebar on the left.
Now that a chat room has been created every user can start typing supercollider code into the text editor and evaluate commands by selecting the desired portion of text and hit CMD+ENTER. Each supercollider instruction will be executed on all the machines connected to the server.
Clone the repository:
git clone git@github.com:lorenzorivosecchi/superorch.gitMove inside the directory
cd superorchInstall the dependencies:
yarn installTo run the development build:
yarn devIf the install script notified you that it could not find sclang or scsynth
then create a file called .supercollider.yaml and paste the following text.
sclang: /your/path/of/choice/sclang
scsynth: /your/path/of/choice/scsynth
Make sure to replace /your/path/of/choice with an actual path for the indicated binaries.
To create a production build:
yarn build && yarn build:electron
yarn package
If build fails for windows or linux targets you have to run electron-builder on a virtual machine. In the section below i explain how to do it with docker.
If you want to distribute your app executable on github you have to first get you github account token end then expose it as an environment variable. You can find it by going to Settings > Personal access tokens and then copy and paste the token or generate one if you don't have any.
export GH_TOKEN=123456789
Then you just need to run this command to publish the app on github.
yarn deploy -c.snap.publish=githubFirstly you will need to install docker on your machine. When docker is installed you can open a terminal and paste this comand:
docker run --rm -ti \
 --env-file <(env | grep -iE 'DEBUG|NODE_|ELECTRON_|YARN_|NPM_|CI|CIRCLE|TRAVIS_TAG|TRAVIS|TRAVIS_REPO_|TRAVIS_BUILD_|TRAVIS_BRANCH|TRAVIS_PULL_REQUEST_|APPVEYOR_|CSC_|GH_|GITHUB_|BT_|AWS_|STRIP|BUILD_') \
 --env ELECTRON_CACHE="/root/.cache/electron" \
 --env ELECTRON_BUILDER_CACHE="/root/.cache/electron-builder" \
 -v ${PWD}:/project \
 -v ${PWD##*/}-node-modules:/project/node_modules \
 -v ~/.cache/electron:/root/.cache/electron \
 -v ~/.cache/electron-builder:/root/.cache/electron-builder \
 electronuserland/builder:wine
If the command was successful you terminal prompt should display a text like this root@b67354f23c46:/project#.
If that's the case you can go ahead and install the project dependencies.
yarn installIf there's an error saying that the node version isn't compatible with one of the required modules you should change node version through nvm. Follow their guidelines to install the software and then run this command with your desired node version in the arguments (for me it was v11.10.1).
nvm install <desired_node_version>At last you can run node -v to verify that the current version of node is in fact the one you tried to install,
if that's the case you can go ahead and run yarn install again.
Finally, to build and package the app you should run these commands:
yarn build && yarn build:electron
yarn package --win --linux- Increase test coverage
- Add optional password authentication
- Add direct messaging between users
- Prevent override of supercollider code across users
- Fork it (https://github.com/lorenzorivosecchi/superorch.git)
- Create your feature branch (
git checkout -b feature/fooBar) - Commit your changes (
git commit -am 'Add some fooBar') - Push to the branch (
git push origin feature/fooBar) - Create a new Pull Request
