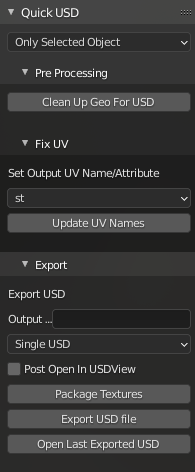
Use this Blender Addon to cleanly export meshes from Blender to separate .usda files with textures applied along with being neatly packaged in it's own folder.
These are HARD requirements, otherwise Quick USD won't be able to apply the textures, only save out and package up the USD.
YOU NEED TO HAVE USD INSTALLED FOR THE MAIN PYTHON ENVIRONMENT ON YOUR PC
-
Python 3.6.7 - REQUIRED FOR PYTHON USD! Set as Main Python for PC through environment variables.
- Install PySide2 and PyOpenGL to python, e.g.,
python -m pip install PySide2 PyOpenGL
- Install PySide2 and PyOpenGL to python, e.g.,
-
USD Binaries installed
-
Add %USDROOT%\bin and %USDROOT%\lib to the front of %PATH%
-
Add %USDROOT%\lib\python to the front of %PYTHONPATH%
Open a terminal and attempt these commands to make sure USD is properly setup.
usdcat.cmd %USDROOT%\share\usd\tutorials\convertingLayerFormats\Sphere.usdshould return :
#usda 1.0

def Sphere "sphere"
{
}
-
usdview.cmd %USDROOT%\share\usd\tutorials\traversingStage\HelloWorld.usdashould bring up usdview with a simple Sphere -
Check python setup with
import pxr. It should not error out or say pxr is missing.
- Single material slot export and application only
-
Select Mesh to export
-
Open Quick USD addon Tab
-
Set Selection Dropdown to
Only Selectedso only the selected mesh is exported. -
Paste in the Directory you want to save the newly packaged USD to.
- ex :
C:\Temp\Buildingwill createC:\Temp\Bulding\Doorwayetc.
- ex :
-
Click the Export to USD button to export the newly packaged USD file and dependencies.
Your newly packaged USDa should now be available.
-
Select Mesh to export
-
Open Quick USD addon Tab
-
Set Selection Dropdown to either
All Objects In SceneorActive Collectionso only the selected mesh is exported. -
Paste in the Directory you want to save the newly packaged USDs to.
- ex :
C:\Temp\Buildingwill createC:\Temp\Bulding\Doorwayetc.
- ex :
-
Click the Export to USD button to export the newly packaged USDs file and dependencies.
Your newly packaged USDa(s) should now be available.
