A python client 'companion' tool for sizing workloads for migration to VMware Cloud.
Welcome to the VMware Cloud Sizer Companion CLI! VMware Cloud Sizer Companion CLI is a Python tool developed for assisting customers, consultants, presales engineers, and anyone else for sizing workloads for VMware Cloud.
VMware Cloud Sizer Companion CLI was created by Tom Twyman and Chris White. This tool can be used to help you quickly and reliably retrieve sizings for VMware Cloud via the command line. It is intended primarily as a tool to take file data - either from RVTools or LiveOptics - and either immediately retrieve a sizing recommendation, or to allow the user to transform the data (using a set of predefined transformations) before retrieving a recommendation.
Current 'out of the box' capabilities include:
- Ingest either a LiveOptics or RVTools file
- Ingest multiple files at once (provided they are of the same type and version)
- Provide a quick review (“view_only”) option to summarize the environment
- Retrieve a sizing recommendation for the environment
- Sizing adjustments include:
- select specific / preferred node type
- specify single AZ / multi-AZ (stretched cluster)
- specify provisioned / allocated storage
- Data transformations include:
- Include all VM, or only those powered on / suspended
- Include specific workloads by VM Name, cluster, or Guest operating system
- Exclude specific workloads by VM Name, cluster, or Guest operating system
- Create workload profiles based on:
- Current vm:cluster distribution – all clusters
- Current vm:cluster distribution – some clusters
- Guest OS based on text string filter
- VM name based on text string filter
- Present results on-screen
- Optionally save to PDF as well
- Identify VM exceptions or host incompatibilities
This tool is dependent on Python3 (specifically 3.10), you can find installation instructions for your operating system in the Python documentation (https://wiki.python.org/moin/BeginnersGuide/Download).
If you know git, clone the repo with
git clone https://github.com/vmware-samples/vmware-cloud-sizer-companion-cli.git
When you navigate to the pyvmcsizer folder, you will find a requirements.txt file that lists all your Python packages. They can all be installed by running the following command on Linux/Mac:
pip3 install -r requirements.txt
On Windows, use
python -m pip install -r requirements.txt
No! You can simply use it interactively at the command line, or in a script.
This is super easy...
- run ./sizer-cli.py to see the current list of supported commands.
- use '-h' to see the supported arguments / parameters.
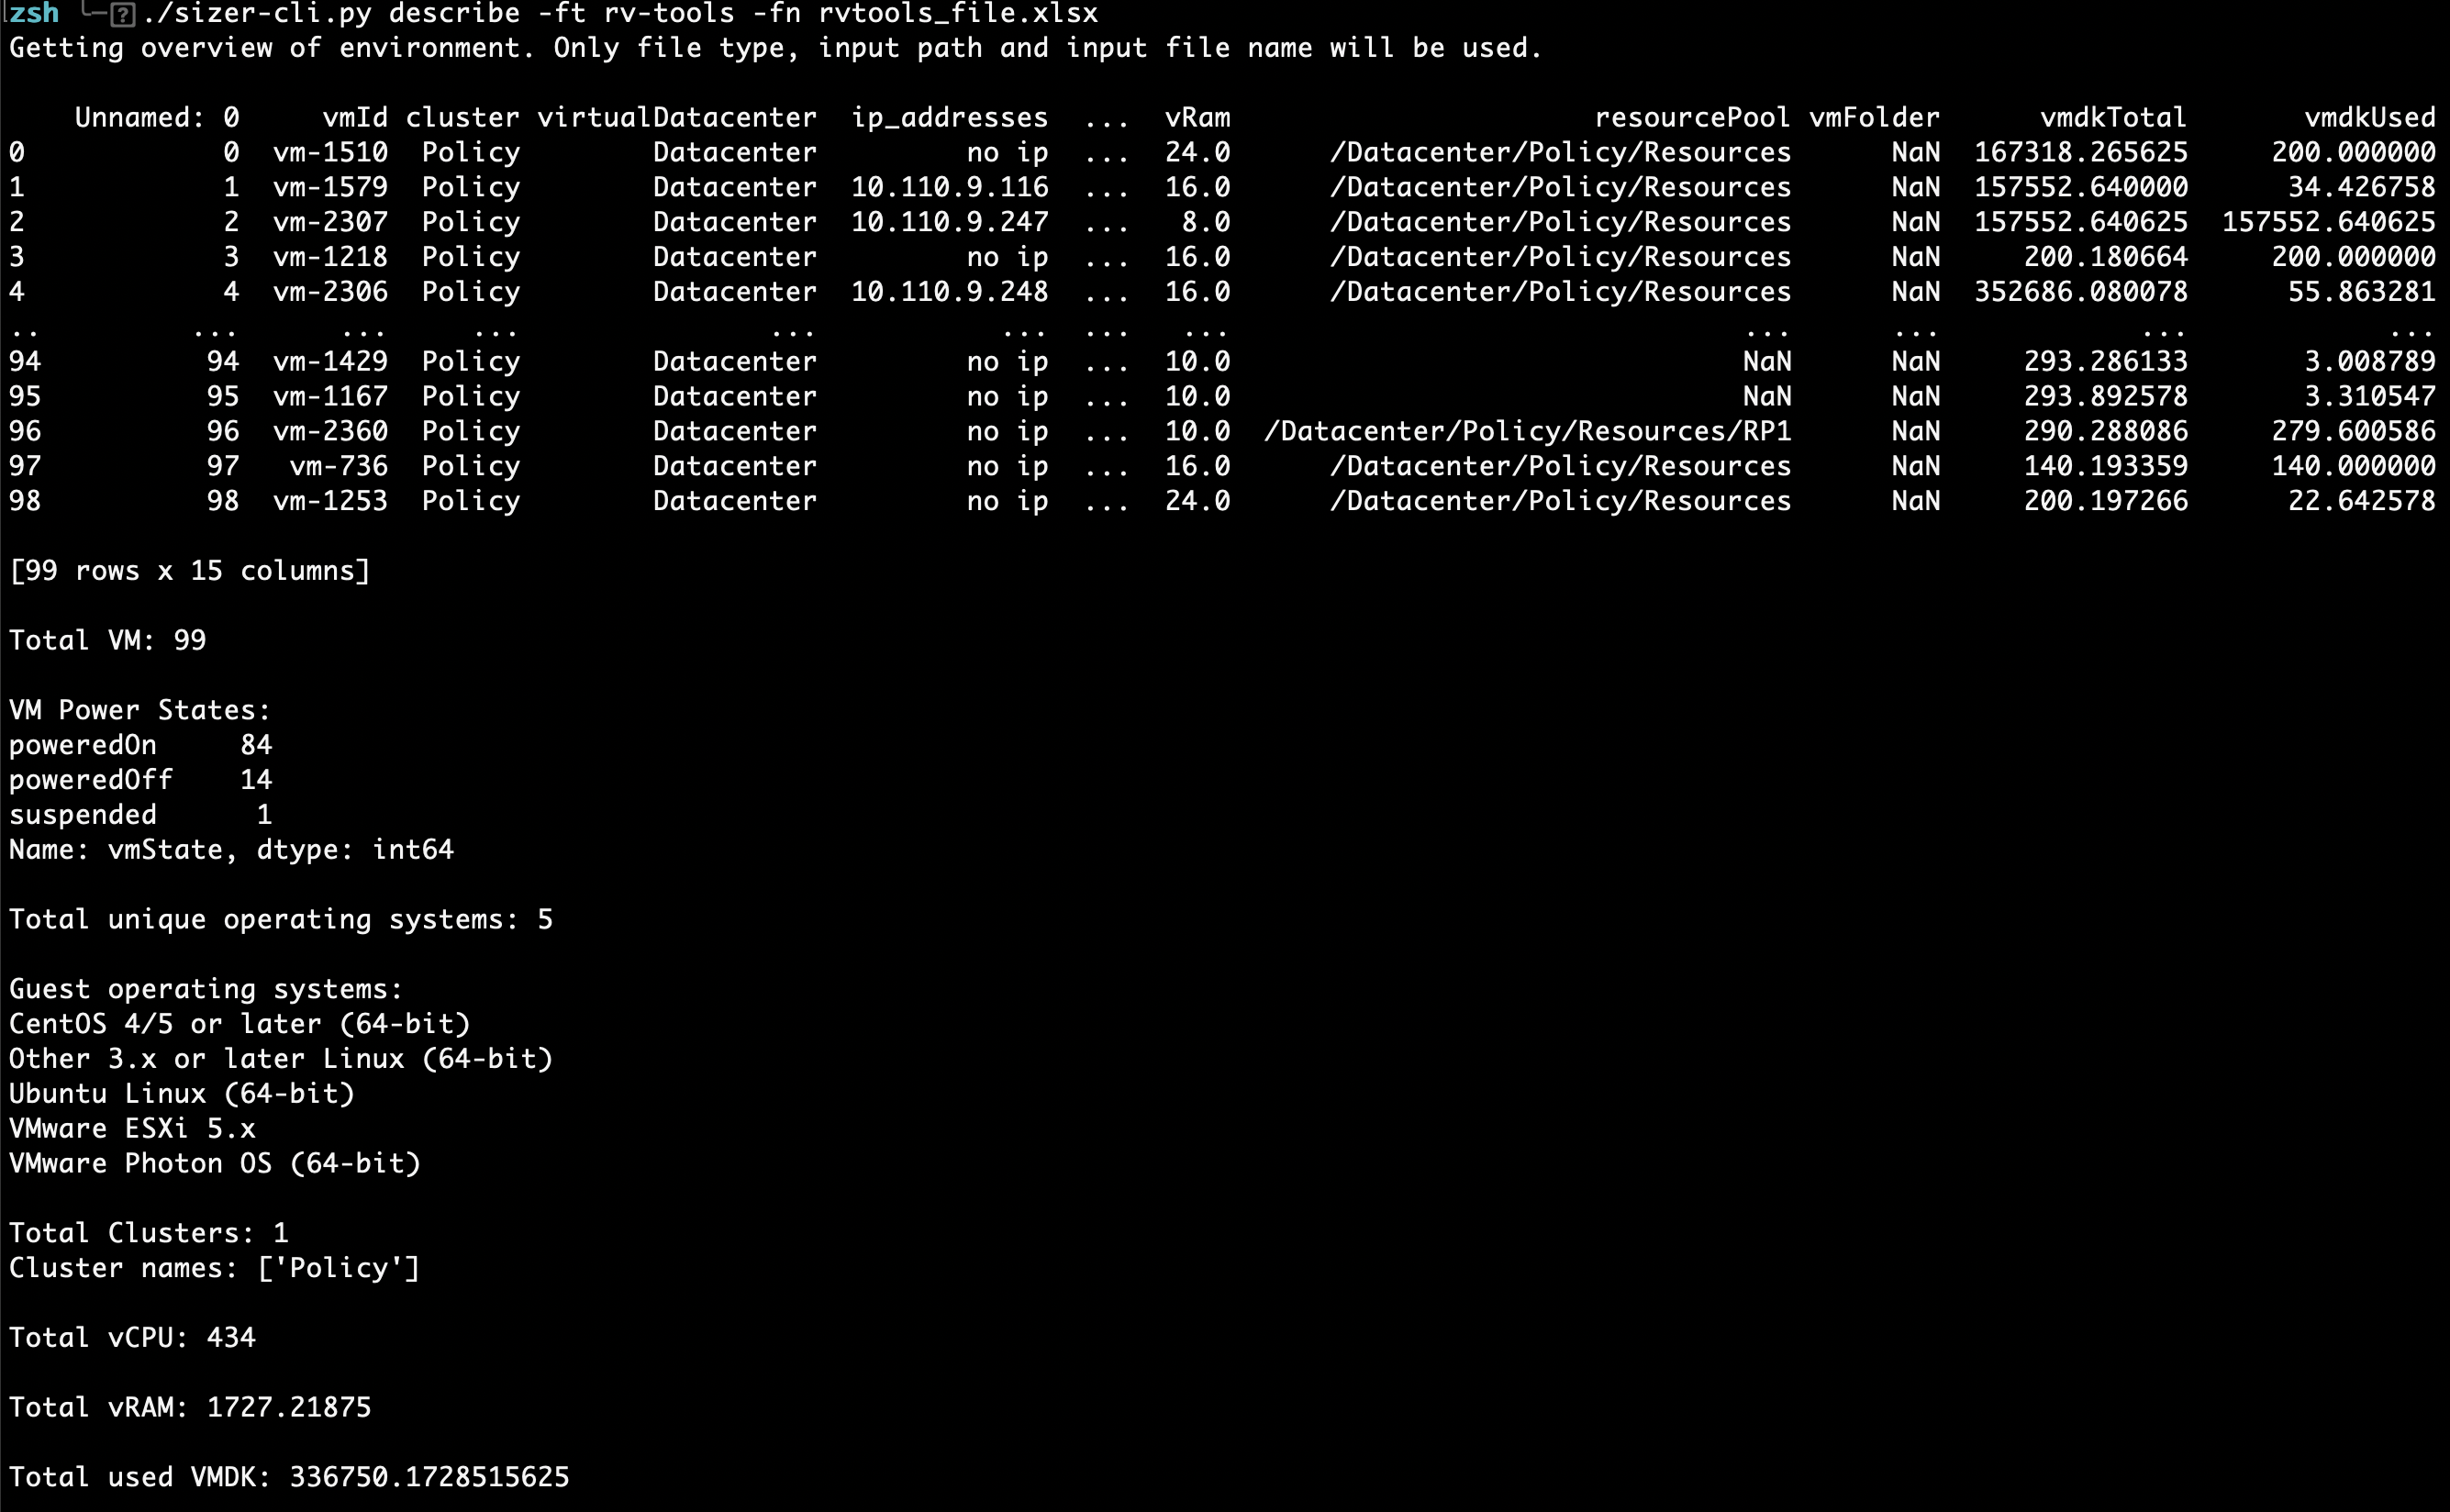
First, run get an overview of the environment:
./sizer-cli.py describe -ft rv-tools -fn rvtools_file.xlsx
This will give you a good review of what's in your file, as shown by the image below.

Next, you can add some options to your command to transform the data, or just get a recommendation.
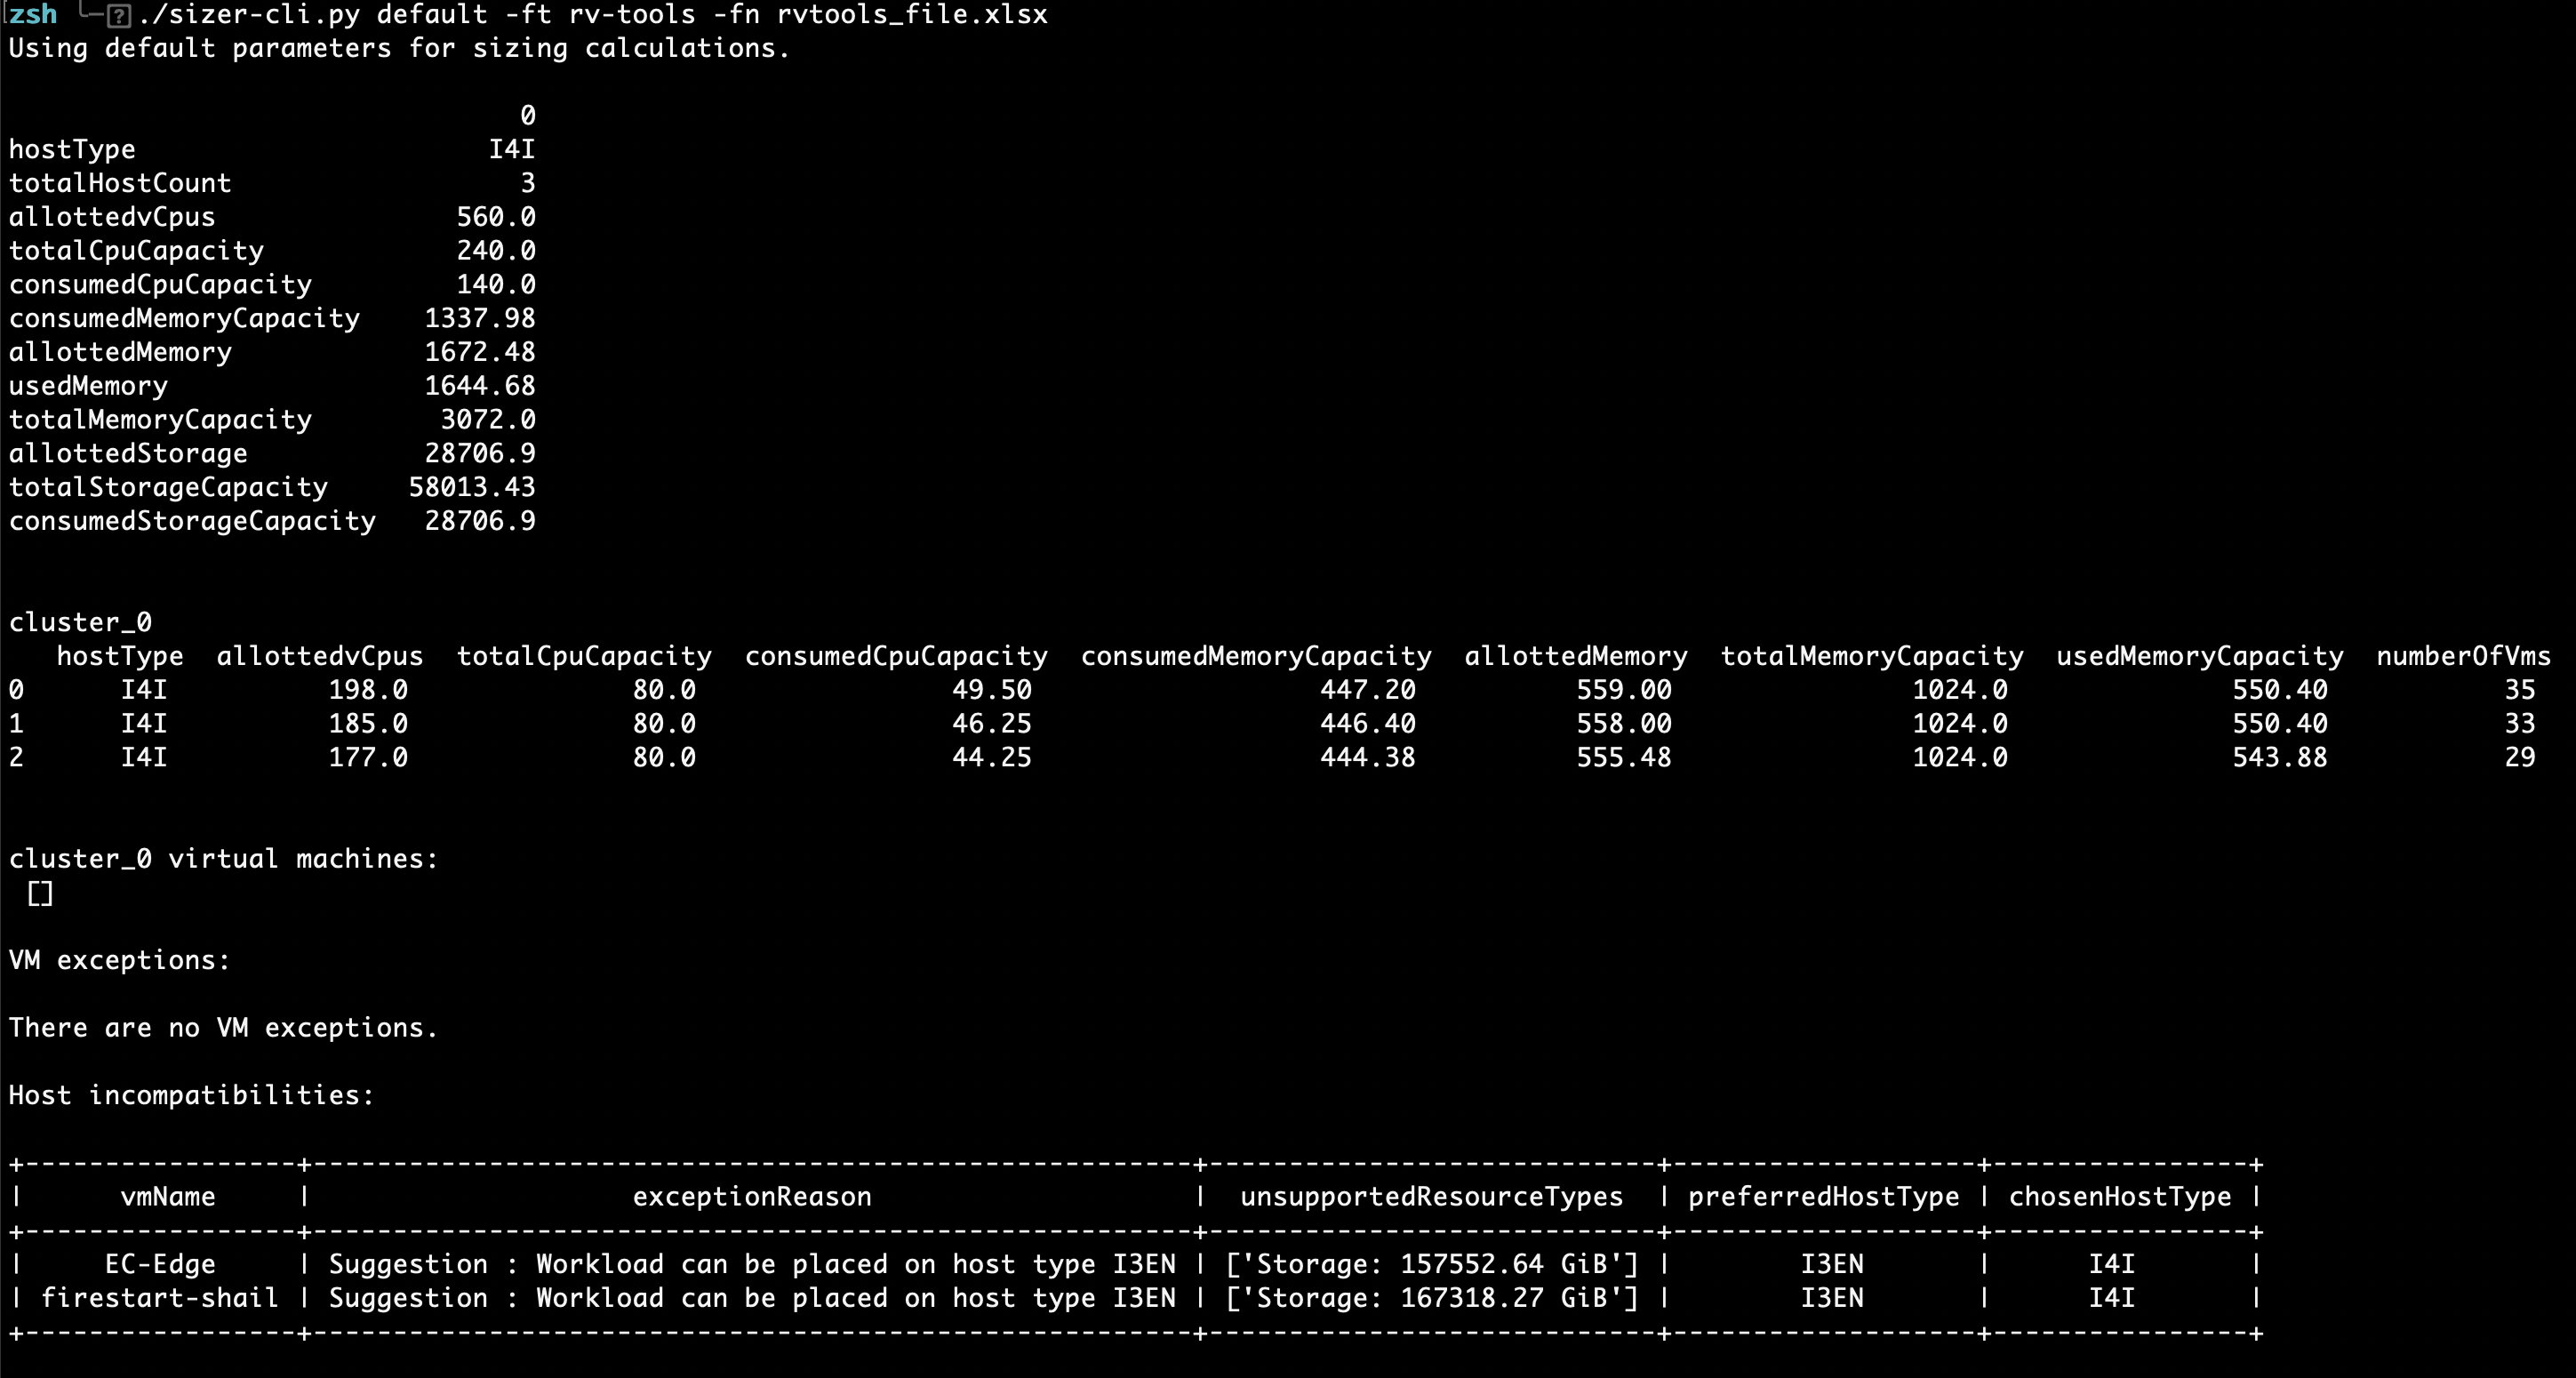
To simply submit the file to the Sizer and get a recommendation without any filtering / changes to the data at all, simply change "view_only" to "default":
./sizer-cli.py default -ft rv-tools -fn rvtools_file.xlsx
As you can see, not only does this simply return a result, it will also identify any workloads that either can't be placed, or that will fit better on certain host types.
Finally, if you wish to customize the data in any way before getting a recommendation, change "default" to "custom"... there are several transformations you can use:
- "-p" | "--power_state" - select workloads by power state using
- "-infil" | "--inlude_filter" - include only workloads matching a text string. Use this with "-iff" | "--include_filter_field" to indicate what field to filter by (Guest OS, VM name, or cluster name).
- "-exfil" | "--exlude_filter" - include only workloads matching a text string. Use this with "-eff" | "--exclude_filter_field" to indicate what field to filter by (Guest OS, VM name, or cluster name).
- "-wp" | "--workload_profiles" - group workloads into 'workload profiles', which can then be placed on their own clusters. Use this with "-pl" | "--profile_list" to indicate the desired groupings.
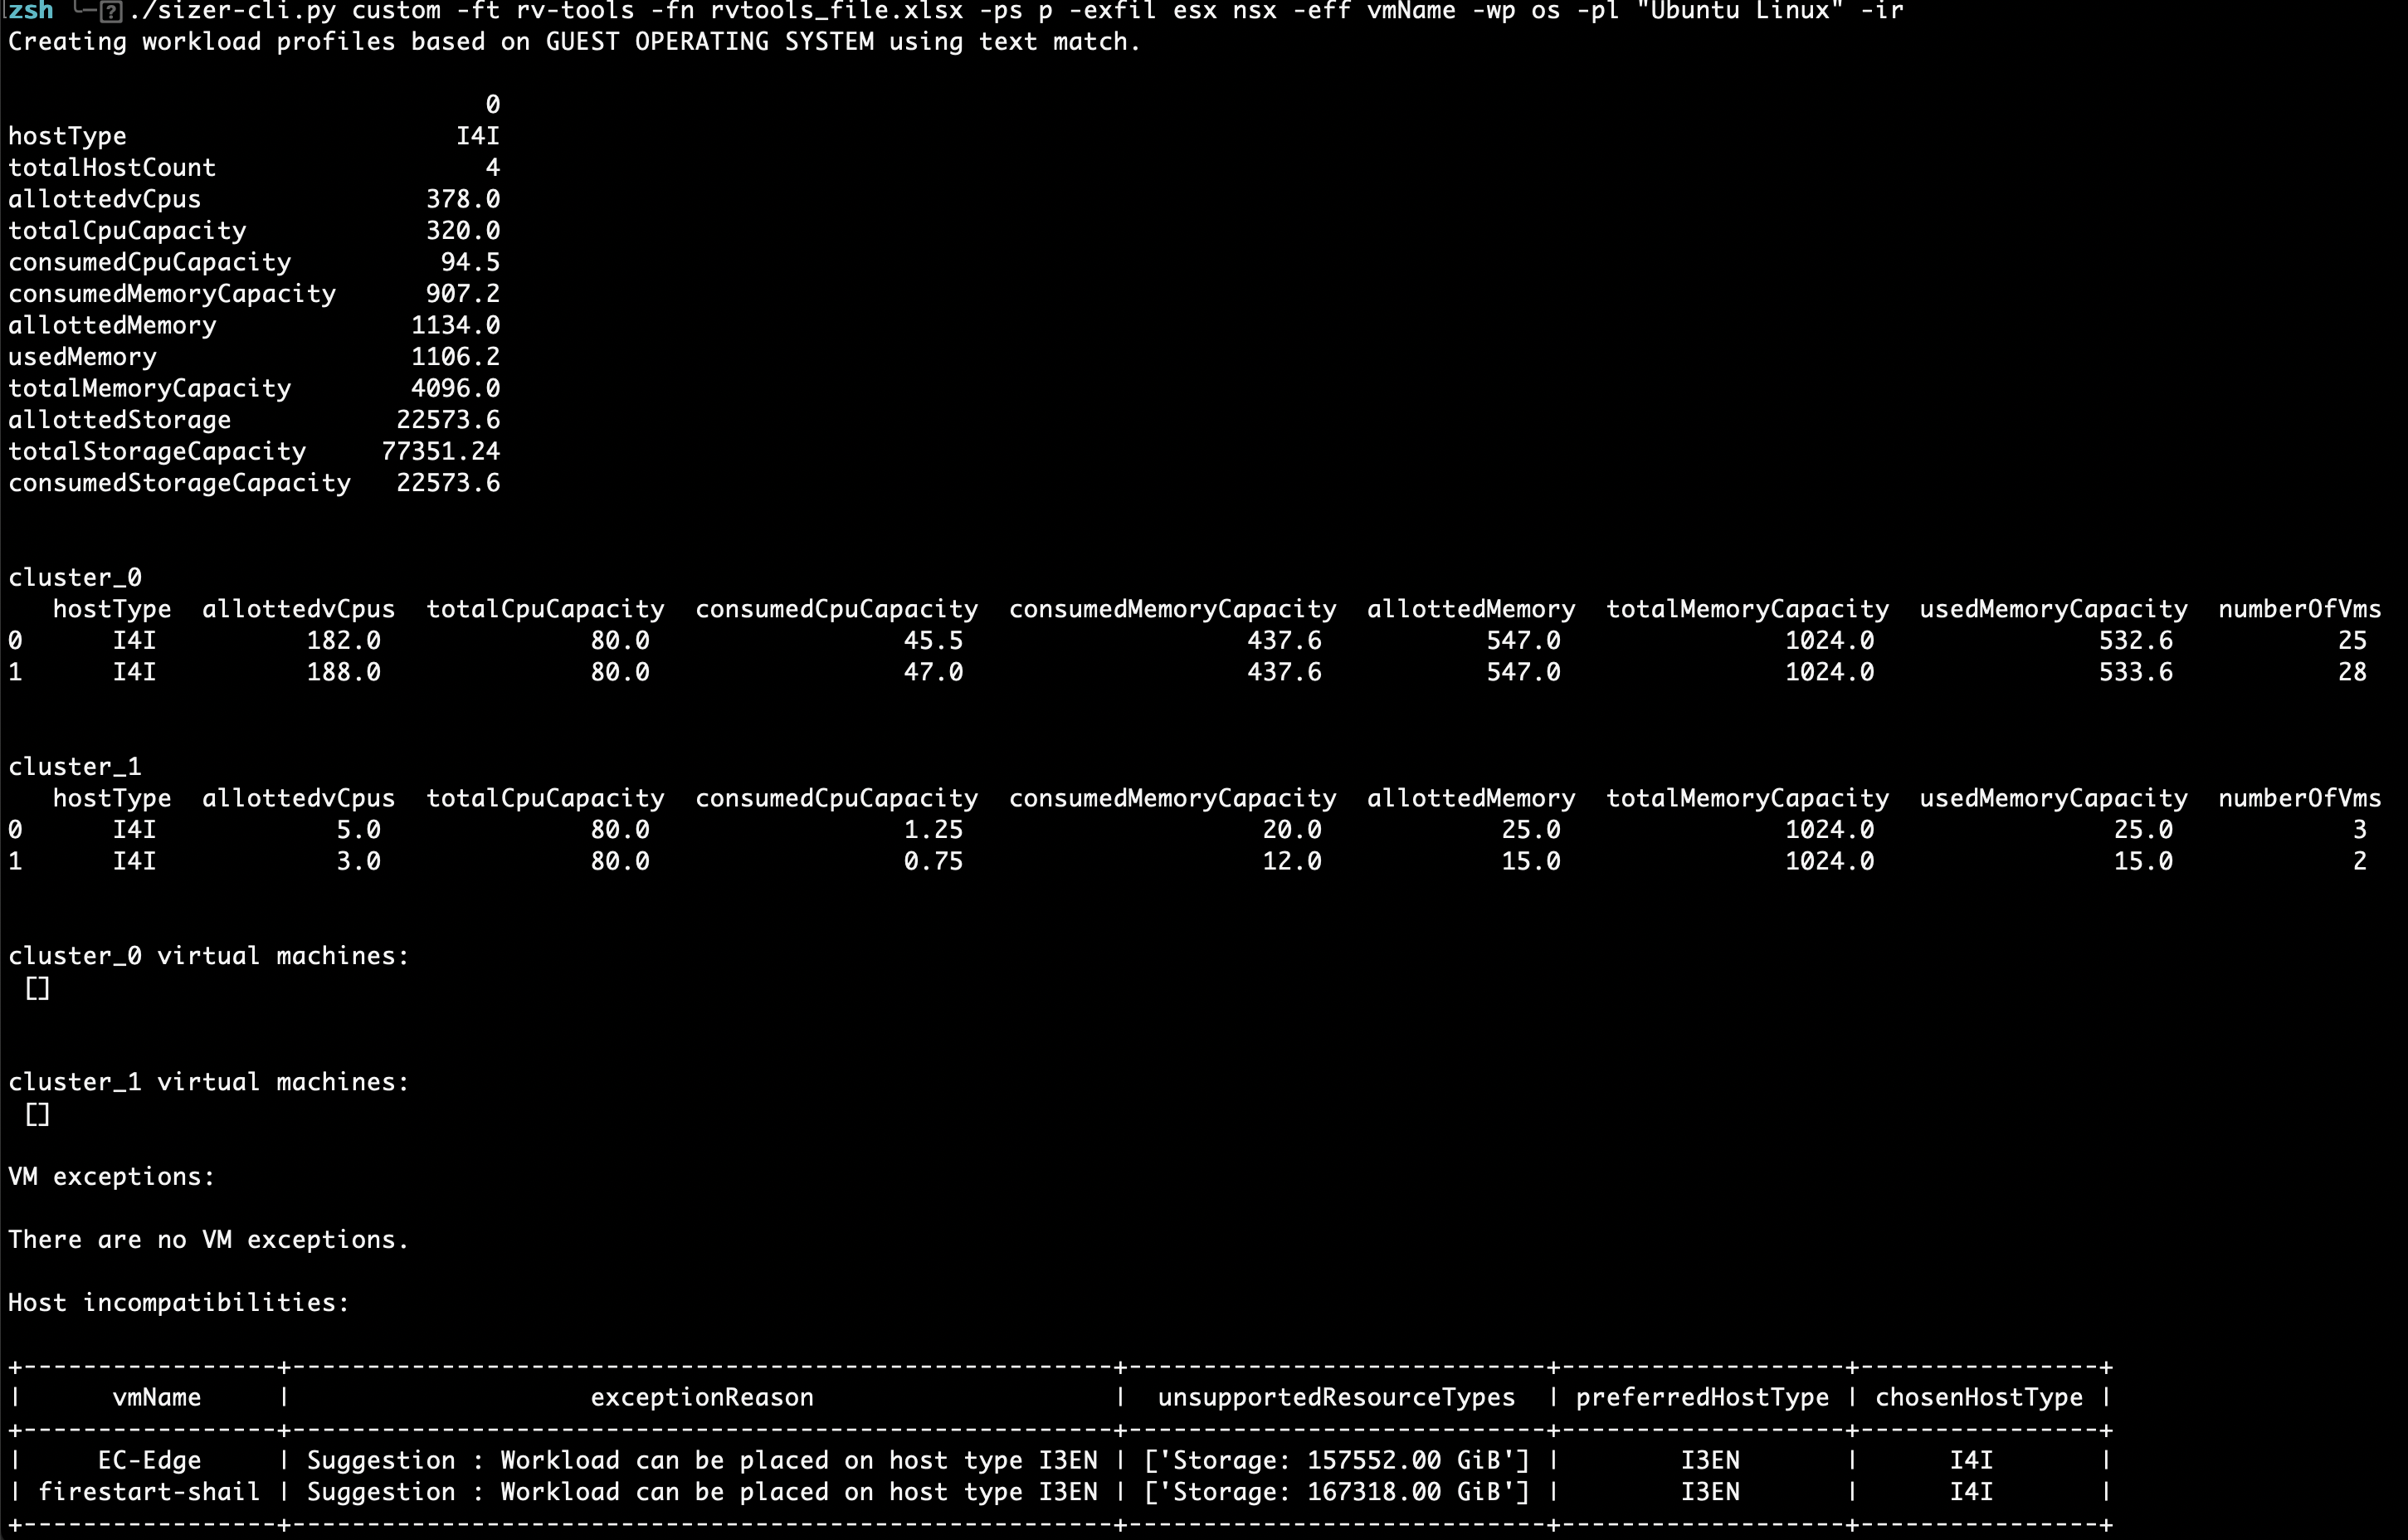
In the example below, the dataset has been modified as follows:
- filtered to only include powered-on workloads
- exclude any VMs with either "esx" or "nsx" in the name
- create a workload profile in its own cluster for any VMs identified as running "Ubuntu Linux" in one cluster
- create a workload profile for all remaining VMs in a separate cluster:
./sizer-cli.py custom -ft rv-tools -fn rvtools_file.xlsx -ps p -exfil esx nsx -eff vmName -wp os -pl "Ubuntu Linux" -ir
Take care when using filtering - if the correct arguments are provided, all of the above filters may be applied to your file. Note that the filters are applied in the order indicated below, regardless of the order the arguments are provided....
- Filtering based on power state is performed first.
- ... then filters are applied to only include workloads based on arguments
- ... then filters are applied to exclude workloads based on arguments
- ... then workload profiles are created based on arguments
Furthermore, note that the original file will never actually be altered - it is read into memory, and though filtering and grouping may be applied to the data, the original file will remain untouched. Each filter applied will result in a new subset of data that will be stored on the drive in the "output" folder - in this fashion you may track how the data set has changed as a result of each filter.
Avoid the use of special characters when using text strings for filtering (such as asterisks, parentheses, etc).
sizer-cli.py -h
A Command-line companion for the VMware Cloud Sizer.

positional arguments:
  {describe,default,custom}
          sub-command help
    describe
          Describe the contents of an imported file.
    default
          Import a file and receive a sizing recommendation without transforming data.
    custom
          Import a file and transform the data before receiving a sizing recommendation.

options:
  -h, --help
          show this help message and exit

                    Welcome to the VMC Sizer Companion CLI!!

                    This tool is used to help you send and receive sizing recommendations from the VMware Cloud Sizer quickly and reliably, with a number of available options.
                    The script acn be used to import data from from either RVTools or LiveOptics (DO NOT MODIFY the original files), or simply receive a 'quick sizing' from the sizer.
                    Use arguments at the command line to transform the data before you receive your sizing!
/sizer-cli.py describe -h
usage:  describe [-h] -fn [FILE_NAME ...] -ft {rv-tools,live-optics}

options:
  -h, --help
          show this help message and exit
  -fn [FILE_NAME ...], --file_name [FILE_NAME ...]
          The file containing the VM inventory to be imported. By default, this script looks for the file in the 'input' subdirectory.
  -ft {rv-tools,live-optics}, --file_type {rv-tools,live-optics}
          Specify either 'liveoptics' or 'rvtools'
sizer-cli.py default -h
usage:  default [-h] -fn [FILE_NAME ...] -ft {rv-tools,live-optics} [-cloud [{VMC_ON_AWS,GCVE}]] [-ht [{I3,I3EN,I4I}]] [-cluster [{SAZ,MAZ}]] [-vp] [-logs] [-o {csv,pdf,ppt,xls}]

options:
  -h, --help
          show this help message and exit
  -fn [FILE_NAME ...], --file_name [FILE_NAME ...]
          The file containing the VM inventory to be imported. By default, this script looks for the file in the 'input' subdirectory.
  -ft {rv-tools,live-optics}, --file_type {rv-tools,live-optics}
          Specify either 'liveoptics' or 'rvtools'
  -cloud [{VMC_ON_AWS,GCVE}], --cloud_type [{VMC_ON_AWS,GCVE}]
          Which cloud platform are you sizing for?
  -ht [{I3,I3EN,I4I}], --host_type [{I3,I3EN,I4I}]
          Use to specify the desired host type. (default is I4I)
  -cluster [{SAZ,MAZ}], --cluster_type [{SAZ,MAZ}]
          Use to specify single AZ (SAZ) or stretched cluster (MAZ). Default is SAZ
  -vp, --vm_placement
          Use to show vm placement. Use to include VM placement data.
  -logs, --calculation_logs
          Use to show calculation logs. Default is False - results will not, by default, show calculation logs.
  -o {csv,pdf,ppt,xls}, --output_format {csv,pdf,ppt,xls}
          Select output format Default is none.
sizer-cli.py custom -h
usage:  custom [-h] -fn [FILE_NAME ...] -ft {rv-tools,live-optics} [-cloud [{VMC_ON_AWS,GCVE}]] [-ht [{I3,I3EN,I4I}]] [-cluster [{SAZ,MAZ}]] [-vp] [-logs] [-o {csv,pdf,ppt,xls}]
               [-exfil EXCLUDE_FILTER [EXCLUDE_FILTER ...]] [-eff {cluster,os,vmName}] [-infil INCLUDE_FILTER [INCLUDE_FILTER ...]] [-iff {cluster,os,vmName}] [-ps]
               [-wp {all_clusters,some_clusters,os,vmName}] [-pl PROFILE_LIST [PROFILE_LIST ...]] [-ir] [-st [{PROVISIONED,UTILIZED}]]

options:
  -h, --help
          show this help message and exit
  -fn [FILE_NAME ...], --file_name [FILE_NAME ...]
          The file containing the VM inventory to be imported. By default, this script looks for the file in the 'input' subdirectory.
  -ft {rv-tools,live-optics}, --file_type {rv-tools,live-optics}
          Specify either 'liveoptics' or 'rvtools'
  -cloud [{VMC_ON_AWS,GCVE}], --cloud_type [{VMC_ON_AWS,GCVE}]
          Which cloud platform are you sizing for?
  -ht [{I3,I3EN,I4I}], --host_type [{I3,I3EN,I4I}]
          Use to specify the desired host type. (default is I4I)
  -cluster [{SAZ,MAZ}], --cluster_type [{SAZ,MAZ}]
          Use to specify single AZ (SAZ) or stretched cluster (MAZ). Default is SAZ
  -vp, --vm_placement
          Use to show vm placement. Use to include VM placement data.
  -logs, --calculation_logs
          Use to show calculation logs. Default is False - results will not, by default, show calculation logs.
  -o {csv,pdf,ppt,xls}, --output_format {csv,pdf,ppt,xls}
          Select output format Default is none.
  -exfil EXCLUDE_FILTER [EXCLUDE_FILTER ...], --exclude_filter EXCLUDE_FILTER [EXCLUDE_FILTER ...]
          A list of text strings used to identify workloads to exclude.
  -eff {cluster,os,vmName}, --exclude_filter_field {cluster,os,vmName}
          The column/field used for exclusion filtering.
  -infil INCLUDE_FILTER [INCLUDE_FILTER ...], --include_filter INCLUDE_FILTER [INCLUDE_FILTER ...]
          A list of text strings used to identify workloads to keep.
  -iff {cluster,os,vmName}, --include_filter_field {cluster,os,vmName}
          The column/field used for inclusion filtering.
  -ps , --power_state
          By default, all VM are included regardless of powere state. Use to specify whether to include only those (p)owered on, or powered on and suspended (ps). (choices: p, ps)
  -wp {all_clusters,some_clusters,os,vmName}, --workload_profiles {all_clusters,some_clusters,os,vmName}
          Use to create workload profiles based on the selected grouping.
  -pl PROFILE_LIST [PROFILE_LIST ...], --profile_list PROFILE_LIST [PROFILE_LIST ...]
          A list of text strings used to filter workloads for the creation of workload profiles.
  -ir, --include_remaining
          Use to indicate you wish to keep remaining workloads - default is to discard.
  -st [{PROVISIONED,UTILIZED}], --storage_type [{PROVISIONED,UTILIZED}]
          Use to specify whetther PROVISIONED or UTILIZED storage is used (default is UTILIZED).
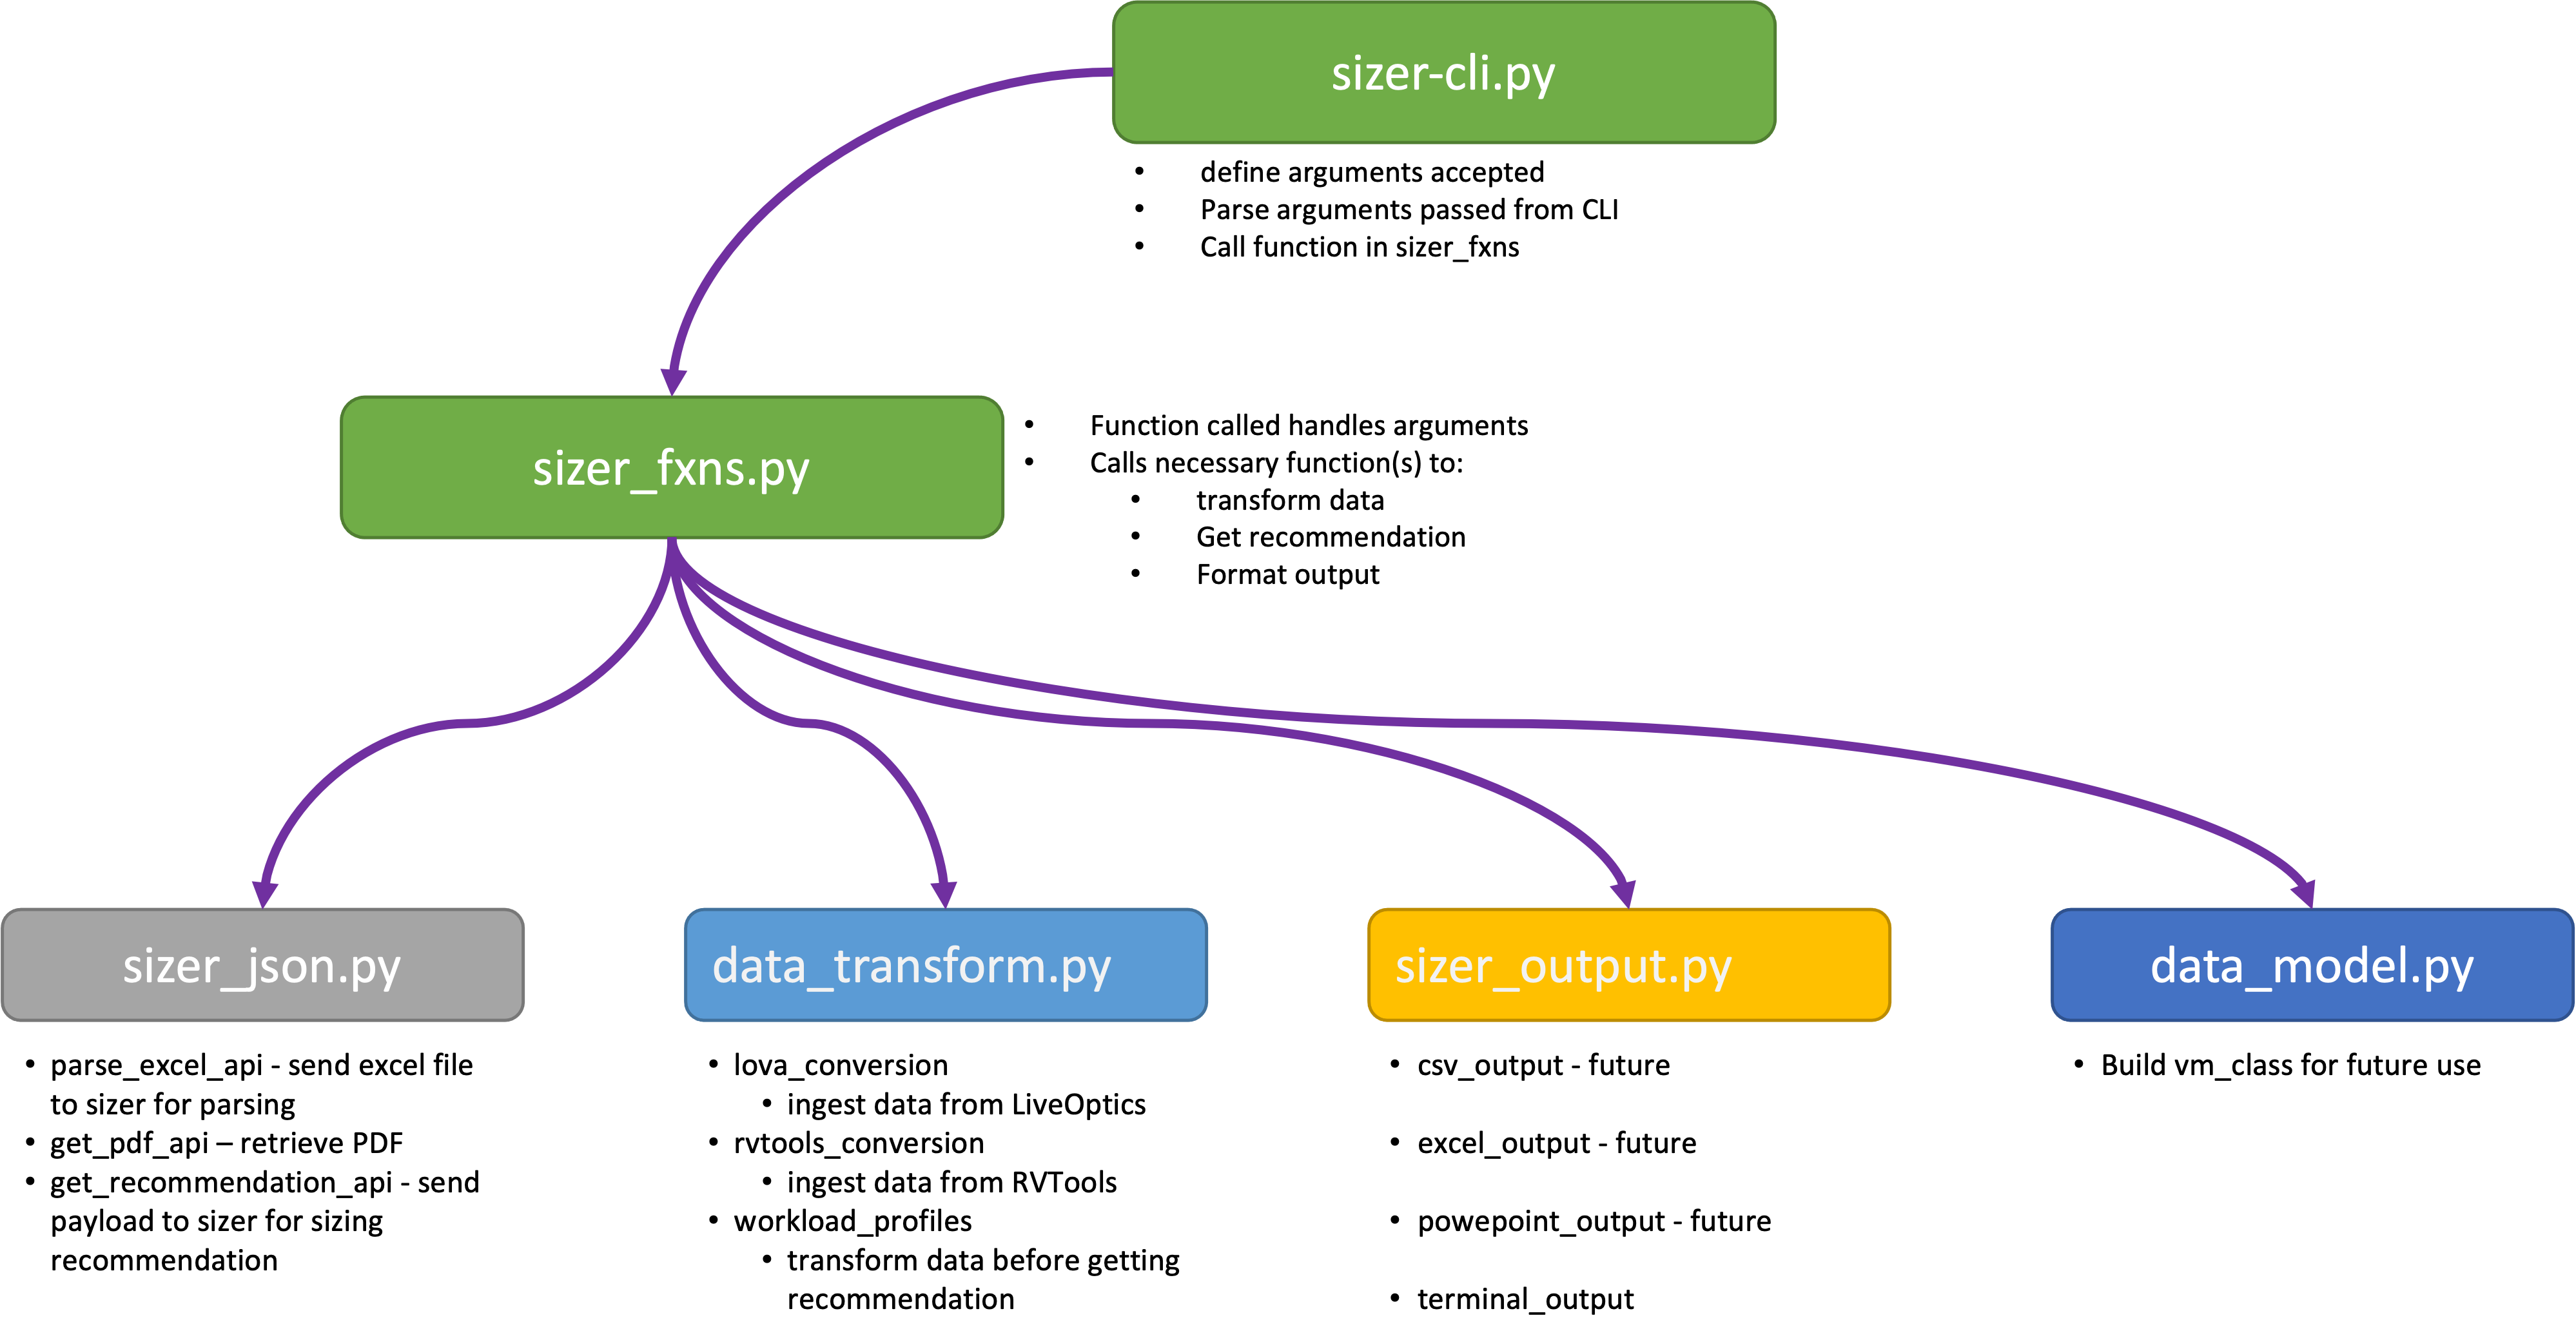
For those of you interested in getting 'under the covers,' this project is split up amongst several files.
- sizer-cli.py - contains the main function, which defines all the arguments accepted, help for the command, etc... calls function in sizer_fxns based on argument
- sizer_fxns.py - contains the primary functions called by the commands defined in argparse
- sizer_json.py - functions that call the VMware Cloud Sizer API - specifically for parsing an Excel file and obtaining a sizing recommendation.
- data_transform.py - functions that ingest data from an Excel file (LiveOptics or RVTools), and optionally transform the data before sending it to the sizer for a recommendation
- sizer_output.py - functions to handle the output of data
The vmware-cloud-sizer-companion-cli project team welcomes contributions from the community. Before you start working with vmware-cloud-sizer-companion-cli, please read our Developer Certificate of Origin. All contributions to this repository must be signed as described on that page. Your signature certifies that you wrote the patch or have the right to pass it on as an open-source patch. For more detailed information, refer to CONTRIBUTING.md.


