Carbon Black adapter for Harbor integrates your Harbor Registry with the Carbon Black Cloud. It leverages Harbor's official Pluggable Scanner API Spec. to enable Harbor to scan images present in its registry and provide vulnerability reports for those images - right in the Harbor UI.
All configuration values for the Harbor Adapter can be set using the following environment variables at startup:
| Name | Default | Description |
|---|---|---|
CB_API_ID |
|
Carbon Black API ID |
CB_ORG_KEY |
|
Carbon Black ORG KEY |
CB_URL |
|
Carbon Black URL |
CB_API_KEY |
|
Carbon Black API KEY |
LOG_LEVEL |
info |
Adapter service log level |
- Kubernetes >= 1.14
- Harbor >= 1.10
- Helm >= 3
- Carbon Black Credentials -
CB_API_ID,CB_ORG_KEY,CB_URL,CB_API_KEY
-
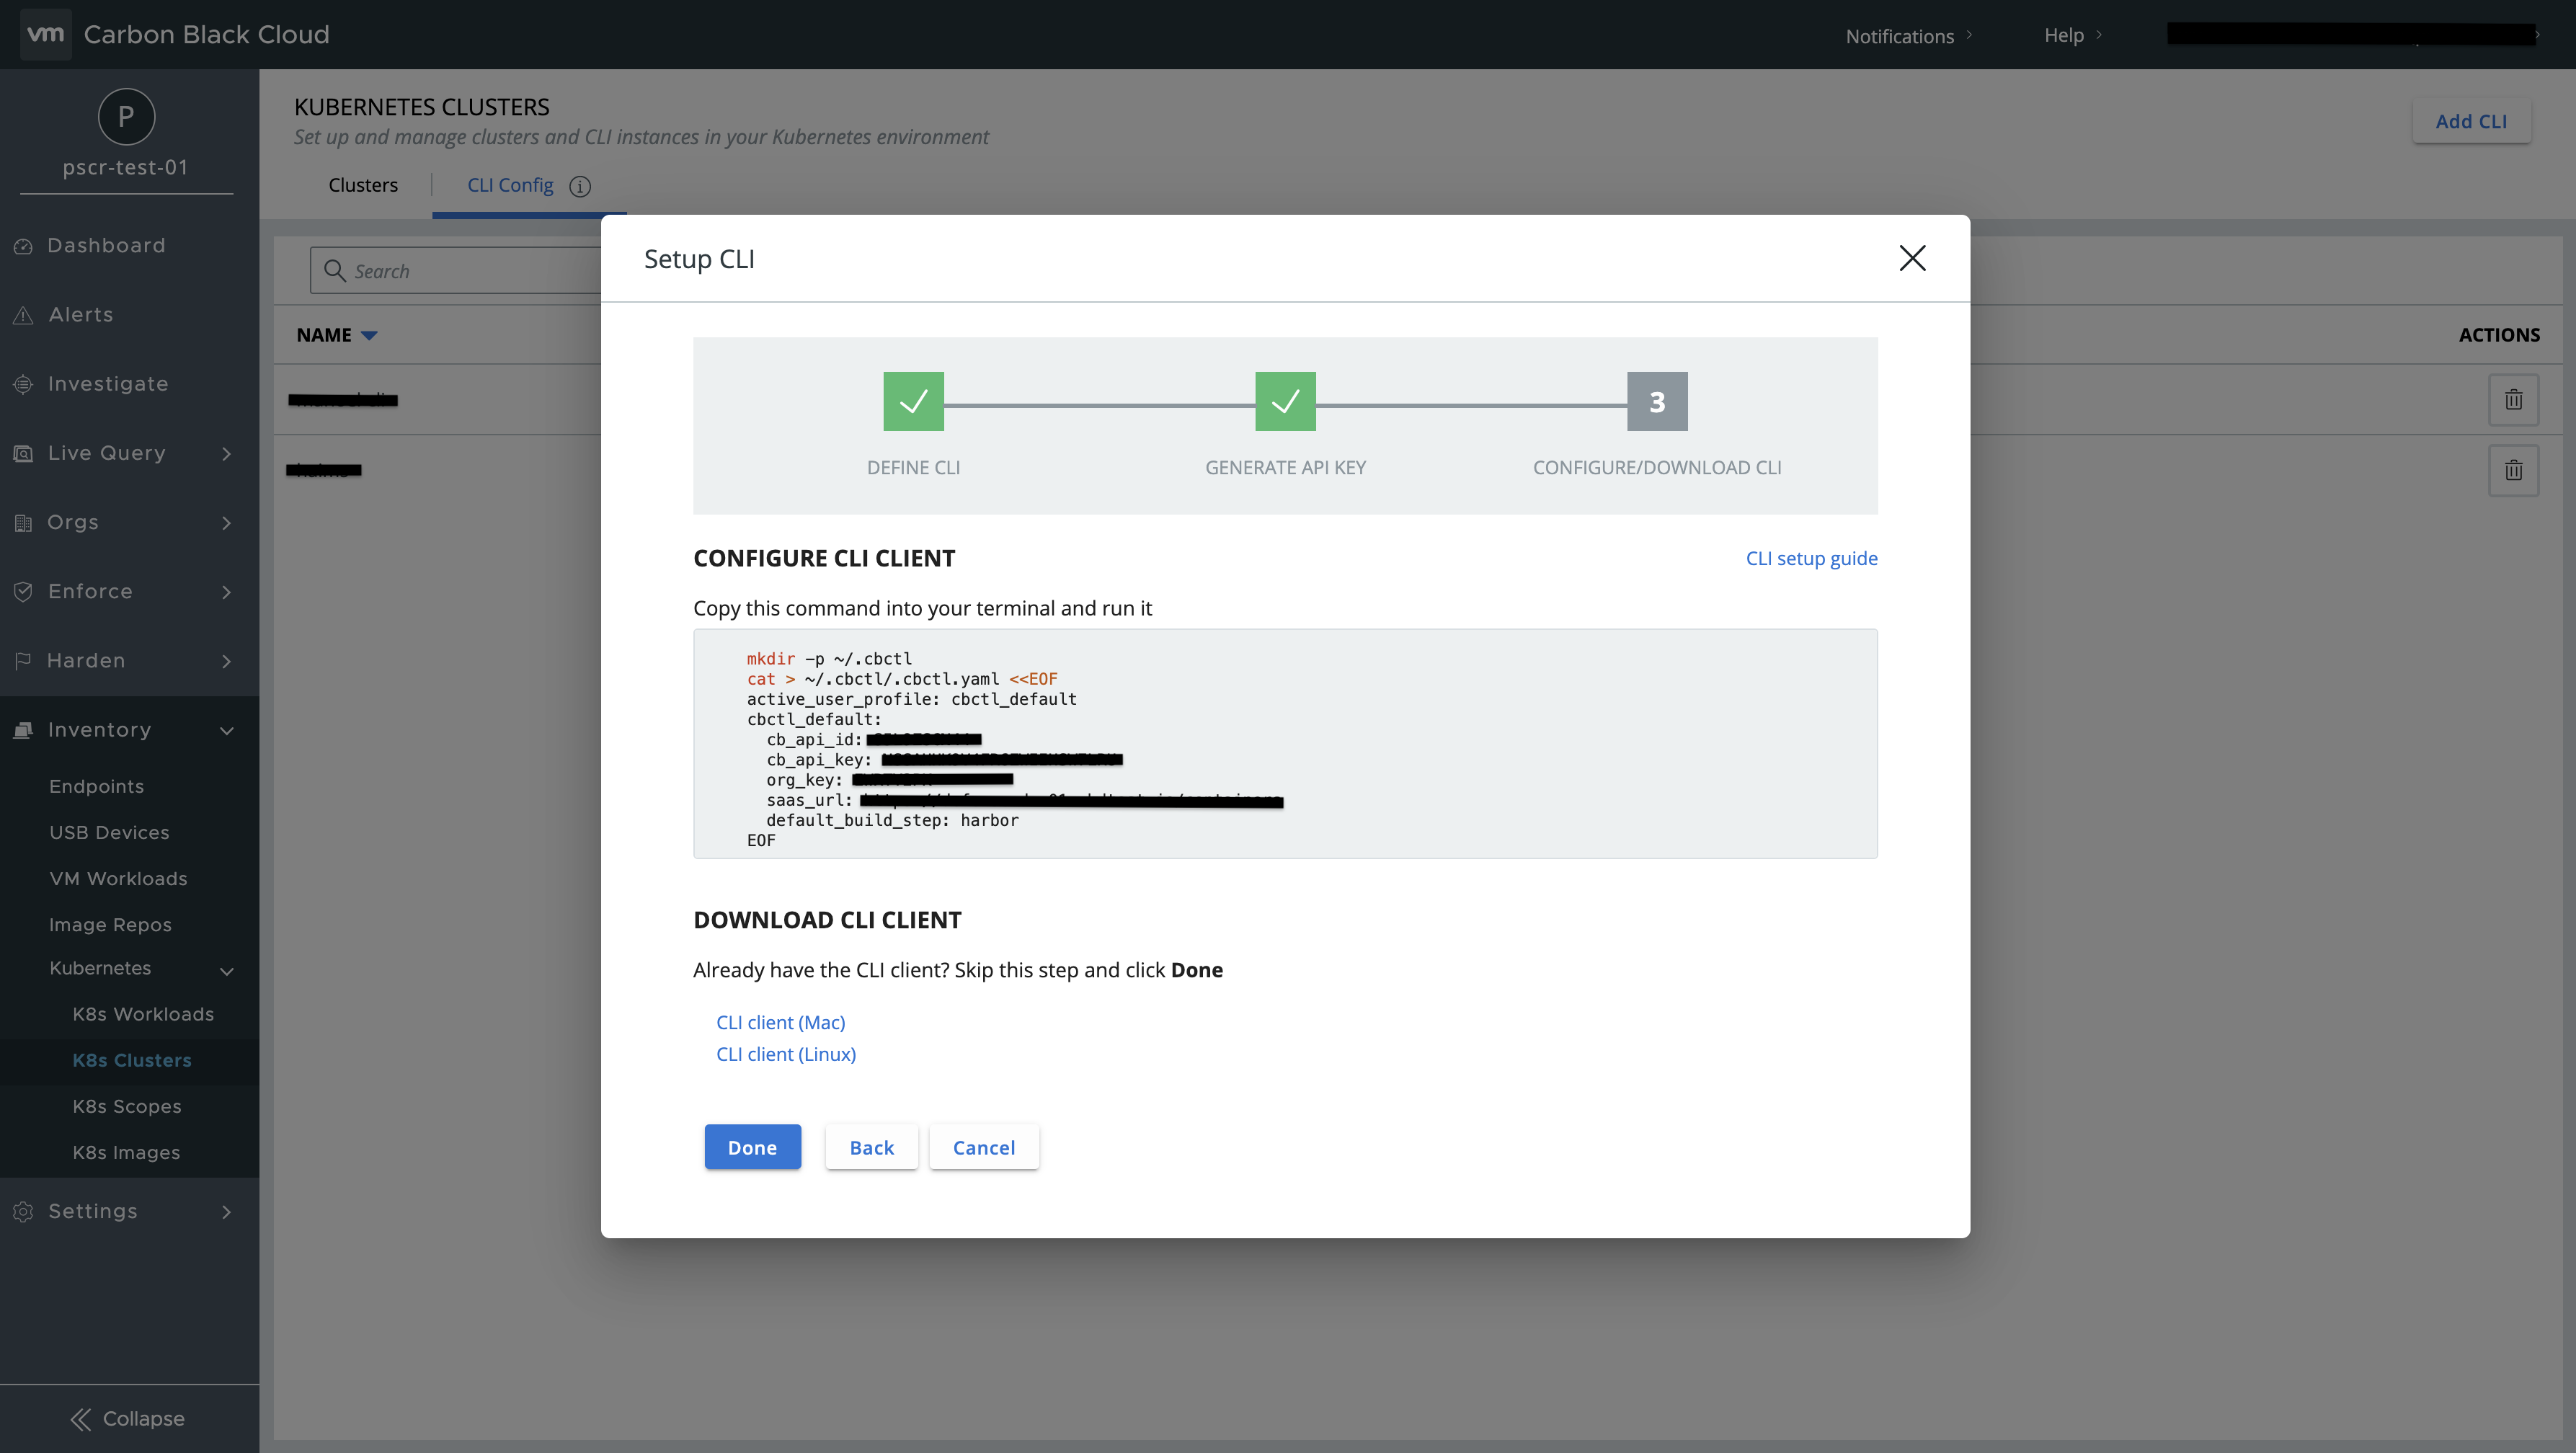
Log in to the Carbon Black cloud.
-
On the left side bar navigate to Inventory -> Kubernetes -> K8s Clusters
-
Switch to CLI config and click on Add cli on the right top.
-
Provide CLI name, Default build step, CLI description and generate credentials.
-
Now you can get the following environment values from the generated credentials.
CB_API_ID- cb_api_id,CB_ORG_KEY- org_key,CB_URL- saas_url,CB_API_KEY- cb_api_key
The easiest was to deploy Harbor Adapter is through the helm install command and make sure you provide all the necessary arguments as mentioned below:
$ helm install carbon-black --set cb_image_scanning.api_id=,<YOUR_API_ID_HERE>,cb_image_scanning.org_key=<YOUR_ORG_KEY_HERE>,cb_image_scanning.api_key=<YOUR_API_KEY_HERE>,cb_image_scanning.url=<YOUR_URL_HERE> oci://registry-1.docker.io/cbartifactory/cb-harbor-adapter
NAME: carbon-black
LAST DEPLOYED: Thu Apr 15 02:40:37 2021
NAMESPACE: default
STATUS: deployed
REVISION: 1
TEST SUITE: None
You can also provide the configuration through values file and make sure you provide configuration values for the following parameters in values.yaml file:
- cb_image_scanning.api_id
- cb_image_scanning.org_key
- cb_image_scanning.api_key
- cb_image_scanning.url
$ helm install carbon-black -f values.yaml oci://registry-1.docker.io/cbartifactory/cb-harbor-adapter
Here is the sample values.yaml file
NOTE: The old repository at projects.registry.vmware.com is now deprecated and will not be updated with new releases. Thus, you may need to run helm uninstall and then helm install to get the latest release, if you are using the old repository.
- Add the base 64 encoded values for api_id, org_key, org_key, org_key into ./k8s/cb-harbor-adapter.yaml file
- Run the following command:
kubectl apply -f ./k8s/cb-harbor-adapter.yaml
The adapter can also be run as a standalone Docker container, provided that Harbor can access its web endpoint.
First, build the container by running the command below (tagging is optional, the image hash can be used instead).
docker build . -t <my_repo>:<my-tagThen create an env file with the required values
echo 'CB_API_ID=<api_id>
CB_ORG_KEY=<org>
CB_URL=<url>
CB_API_KEY=<api_key>' > envfile
Then start the container with those values and expose the necessary 8080 port (example exposes it on the same port on the host as well).
docker run --name adapter --env-file=./envfile -d -p 8080:8080/tcp harbor-adapterQuerying the API should produce a result now. Note that Harbor must be able to access the host if it is external. For an option where Harbor runs locally as docker containers, see Local development
curl -s 127.0.0.1:8080/api/v1/metadata | jq
# Output
{
  "scanner": {
    "name": "Carbon-Black",
    "vendor": "VMware",
    "version": "1.0"
  },
  "capabilities": [
    {
      "consumes_mime_types": [
        "application/vnd.docker.distribution.manifest.v2+json",
        "application/vnd.oci.image.manifest.v1+json"
      ],
      "produces_mime_types": [
        "application/vnd.scanner.adapter.vuln.report.harbor+json; version=1.0",
        "application/vnd.security.vulnerability.report; version=1.1"
      ]
    }
  ],
  "properties": {
    "env.LOG_LEVEL": "info",
    "harbor.scanner-adapter/scanner-type": "os-package-vulnerability"
  }
}
This option is useful if one wants to run the adapter against a harbor instance that is not in Kubernetes or in development scenarios.
- Log in to your Harbor registry
- Navigate to Administration -> Interrogation Services on the left panel.
- Click on new scanner
- Provide the following -
- Name - Carbon-Black
- Description - eg - Scan images using Carbon Black image scanning service
- Endpoint - http://SERVICE-NAME:8080 eg - http://carbon-black-harbor-adapter:8080
$ kubectl get service
NAME                                   TYPE        CLUSTER-IP       EXTERNAL-IP   PORT(S)             AGE
carbon-black-harbor-adapter            ClusterIP   10.97.54.107     <none>        8080/TCP            8h
* check on `Use internal registry address`
- After adding set the scanner as default.
- Now the Adapter is ready for scanning.
Please follow CONTRIBUTING.md
This is a suggested setup to develop the adapter locally.
Prerequisites:
- Ubuntu VM with internet connectivity
- Docker in the Ubuntu VM
- The adapter's code in the VM
First, follow the instructions from harbor to install harbor itself via Docker compose.
In our experience, the script from here (also linked in the original gist discussion) works better. Also, using IP for the registry is recommended instead of FDQN as Docker DNS can get confused sometimes.
Note that in some Ubuntu installations, the default user does not have sudo rights so make sure to add the default user to the sudoers list as the script assumes it can run sudo.
The rest of the steps in the Harbor docs are unchanged.
Once harbor is running locally, follow the instructions from local docker image install to run the adapter as an additional container.
The last step needed for this setup is to add the adapter container to harbor's network. To do so, run:
docker network connect harbor_harbor adapterOnce this is done, the adapter should be accessible from harbor (and vice versa) - and the integration should be available healthy in Harbor.
This allows a local development loop of "make change -> docker build -> start new adapter container -> validate change".
These steps should be followed when publishing a new release of the adapter:
- Run
make publish release_version=Xwhere X is the new version to release (e.g. 3.0). This requires access to the project's Docker Hub account. - Bump the chart and/or app version in Chart.yaml
- Change the default image tag under Helm and K8S to match the new version.
- Open an MR
- Once the MR is merged, create a new release from the merge commit. The release should match the version in step 1.
